Smart Bathroom Solutions: Reviews, Tips & Expert Maintenance Guides

Author: bathroom27 (Page 28 of 36)

How to Clean Bath Stone: Easy Steps


Natural stone bathroom surfaces instantly elevate your space with timeless elegance, but they demand specialized care to maintain their beauty. Whether you have travertine shower walls, marble countertops, or slate flooring, improper cleaning can cause permanent etching, staining, or deterioration. Hard water minerals, soap scum, and mold accumulate rapidly in damp bathroom environments, leaving your once-pristine stone looking dull and discolored. This guide delivers exactly what you need to know about how to clean bath stone safely and effectively—using methods specifically designed for natural stone surfaces without causing damage.

Identify Your Bath Stone Type Before Cleaning

calcareous vs siliceous stone comparison chart

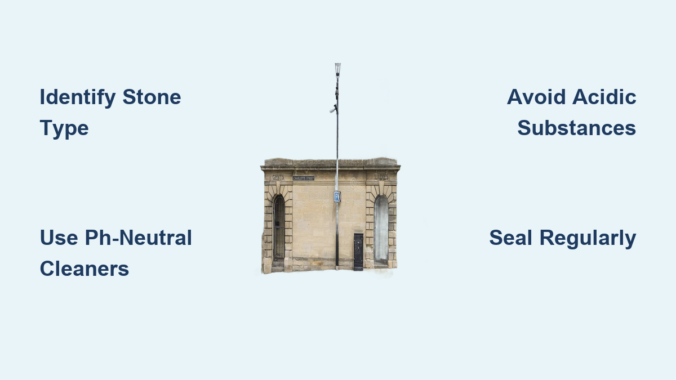
Your first critical step in learning how to clean bath stone properly is identifying the exact stone material in your bathroom. Never apply any cleaner until you’ve determined whether you’re dealing with calcareous or siliceous stone, as using the wrong product causes irreversible damage.

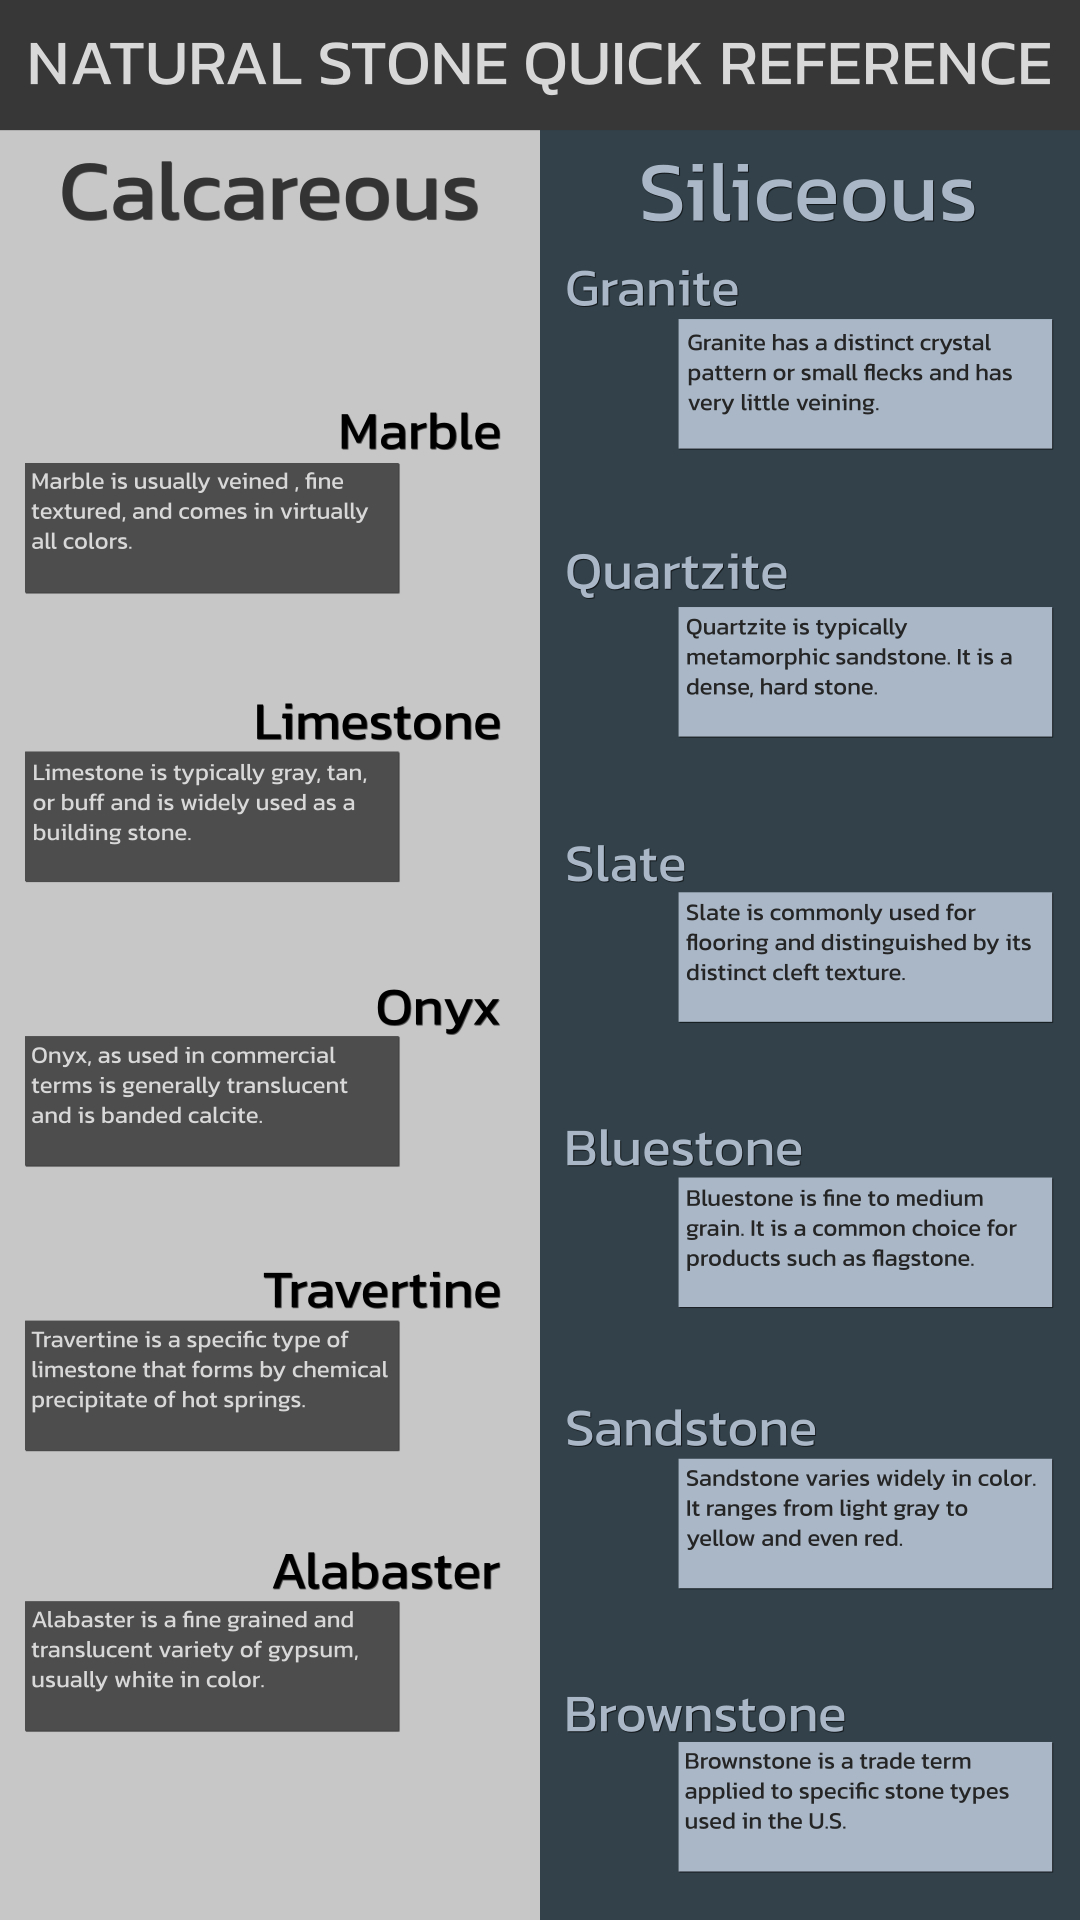
Marble, travertine, and limestone fall under calcareous stones—they contain calcium carbonate and react negatively to acidic substances. These stones feature distinctive veining and polished surfaces that scratch and etch easily. A simple vinegar test reveals your stone type: apply a small drop to an inconspicuous area. If it fizzes or leaves a dull spot, you have calcareous stone and must avoid all acidic cleaners.

Slate, sandstone, and quartzite are siliceous stones, more resistant to acids but still requiring pH-neutral cleaners for best results. These stones typically have textured surfaces that hide scratches better but absorb moisture readily, making proper sealing essential. Understanding your specific stone type prevents costly mistakes and guides your entire cleaning approach.

Daily Cleaning Routine for Spot-Free Bath Stone

Preventing buildup is far easier than removing it later, making daily maintenance your most powerful tool in how to clean bath stone effectively. Spend just 60 seconds after each shower to dramatically extend your stone’s pristine appearance.

Wipe all stone surfaces with a soft microfiber cloth immediately after use to prevent water droplets from evaporating and leaving mineral deposits. This simple habit eliminates 80% of hard water staining before it sets in. For textured surfaces like travertine or slate, use a dry squeegee first to remove standing water, followed by the microfiber cloth for complete drying.

For daily cleaning, use only clean water or a stone-specific pH-neutral spray. Spray lightly onto the surface (never directly onto the stone), then wipe with a microfiber cloth using gentle circular motions. Never let cleaning solutions sit on stone surfaces—immediate wiping prevents chemical reactions that cause etching. Dry completely with a second clean cloth to prevent water spots and mineral deposits.

Deep Cleaning Soap Scum from Natural Stone Surfaces

baking soda paste application on marble shower wall

When regular maintenance isn’t enough, soap scum combines with body oils and hard water minerals to create a stubborn film that resists standard cleaning. Learning how to clean bath stone when soap scum has built up requires specialized techniques that won’t damage your investment.

For calcareous stones (marble, travertine, limestone), create a gentle cleaning paste using baking soda and water. Mix to a toothpaste-like consistency and apply to affected areas. Let it sit for 5-10 minutes to break down residue, then gently scrub with a soft-bristled brush using light pressure. Rinse thoroughly with clean water and dry immediately. Never use vinegar or acidic cleaners on these stones, as they cause immediate etching.

For siliceous stones (slate, sandstone), you can use a slightly stronger approach. Mix 1 part hydrogen peroxide with 3 parts water in a spray bottle. Apply to soap-scummed areas, let sit for 5 minutes, then gently scrub with a soft brush. Rinse completely and dry. This method effectively removes organic buildup without damaging the stone’s surface.

Removing Hard Water Stains Without Damaging Stone

Hard water leaves unsightly white deposits that make your bath stone look neglected, but improper removal techniques cause more harm than the stains themselves. Knowing how to clean bath stone affected by hard water requires understanding whether you’re dealing with surface deposits or actual etching.

For surface deposits on sealed stone, use a commercial stone-safe lime scale remover following package directions precisely. Apply with a soft cloth, let sit for the recommended time (typically 2-5 minutes), then gently wipe away. Never use vinegar on marble, travertine, or limestone—even diluted vinegar causes etching on these stones.

For siliceous stones only, a vinegar solution (equal parts white vinegar and water) can remove stubborn deposits. Apply, wait 2-3 minutes, then gently wipe with a soft cloth. Rinse thoroughly with clean water and dry immediately. If deposits persist after two applications, stop—repeated applications risk damaging the stone’s sealant.

Eliminating Mold and Mildew from Porous Stone Safely

mold growth on travertine shower tile

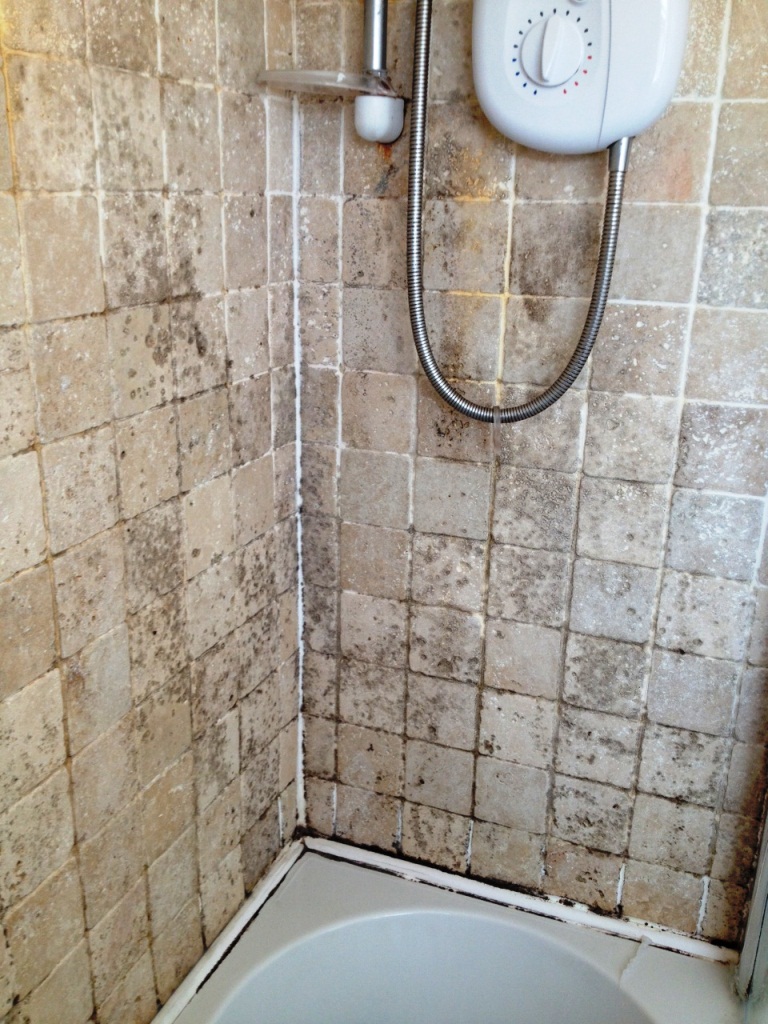
Mold growth in stone bathrooms indicates moisture problems that require immediate attention. Learning how to clean bath stone affected by mold requires effective treatment that kills spores without damaging the porous material.

For light mold on sealed stone, mix 1 part hydrogen peroxide with 2 parts water. Spray generously on affected areas, let sit for 10 minutes (don’t let it dry), then gently scrub with a soft brush. Rinse thoroughly and dry completely. For textured surfaces like travertine, use an old toothbrush to reach into pores without scratching.

Never use bleach on natural stone—it discolors the surface, damages sealants, and releases dangerous fumes in enclosed bathroom spaces. For severe mold infestations that penetrate deep into the stone, consult a professional. Attempting aggressive cleaning can push mold deeper into the material, worsening the problem.

Proper Sealing Techniques After Cleaning Bath Stone

Cleaning alone isn’t enough—sealing protects your investment and makes future cleaning easier. Most natural stone bathrooms need resealing annually, though high-moisture areas may require twice-yearly applications.

Test if your stone needs sealing by sprinkling water on the surface. If it beads up, your seal remains effective. If water soaks in within 5-10 minutes, it’s time to reseal. Always clean and dry stone completely before sealing—applying sealer over dirt traps contaminants beneath the protective layer.

Use a penetrating sealer specifically designed for your stone type. Apply with a soft cloth or foam applicator, working in small sections. Allow penetration time as specified (typically 5-15 minutes), then wipe away excess with a clean cloth. Let cure completely (24-72 hours) before exposing to moisture. Never apply multiple coats in one session—excess sealer creates a hazy film that requires professional removal.

Critical Mistakes to Avoid When Cleaning Bath Stone

Even well-intentioned cleaning can destroy natural stone surfaces if you use improper techniques. Knowing what not to do is as important as knowing how to clean bath stone correctly.

Never use these common household items on natural stone:
– Vinegar, lemon juice, or other acidic cleaners on marble, travertine, or limestone
– Bleach or ammonia-based cleaners (they discolor stone and degrade sealants)
– Abrasive cleaners or scrubbing pads (they create micro-scratches that trap dirt)
– Steam cleaners (they force moisture deep into stone, promoting mold growth)

Never let spills sit on stone surfaces—blot immediately with a clean cloth. Wiping spreads the spill and pushes liquids deeper into porous materials. For oil-based spills, apply baking soda immediately to absorb before cleaning.

Preventative Maintenance for Long-Lasting Stone Beauty

The most effective approach to how to clean bath stone involves preventing problems before they start. Implement these simple habits to reduce deep cleaning frequency and extend your stone’s lifespan.

Place stone-safe mats in high-moisture areas like shower entrances and tub surrounds. These catch water before it reaches your stone flooring and can be easily washed. Choose mats with rubber backing that won’t scratch surfaces.

Install and use a bathroom exhaust fan during and for 20 minutes after showers to reduce humidity. Maintain bathroom humidity below 60% with a dehumidifier if necessary—this prevents mold growth and mineral deposits.

Address minor issues immediately. A small chip in the sealant becomes a major staining problem if ignored. Check your stone monthly for developing issues that require attention before they escalate.

When Professional Cleaning Becomes Necessary

Some situations require expert intervention to avoid causing further damage. Attempting advanced cleaning on severely damaged stone often worsens the problem.

Call a professional stone restoration specialist when:
– You see deep etching you can feel with your fingernail
– Stains persist after three proper cleaning attempts
– Mold appears to be growing within the stone material
– The stone surface feels gritty or rough to the touch
– Sealer has created a hazy film that won’t buff out

Professionals have specialized equipment including diamond polishing compounds, industrial poultices, and commercial-grade sealers that outperform consumer products. They can assess whether restoration or replacement offers better value for your specific situation.

Regular, gentle cleaning combined with immediate attention to spills and moisture keeps bath stone surfaces looking pristine while preventing the damage that leads to costly restoration. By understanding your specific stone type, using appropriate cleaning products, and maintaining consistent care routines, you preserve the natural beauty and durability that make bath stone a timeless choice for bathroom design. Implement these methods consistently, and your stone surfaces will maintain their elegance for decades with minimal intensive cleaning required.

How to Clean Bath Poufs: Easy Steps


Your bath pouf creates luxurious lather and gentle exfoliation, but that same mesh texture that makes it so effective also traps bacteria, mold, and soap buildup. Learning how to clean bath poufs properly transforms them from potential health hazards into hygienic shower essentials. The average bath pouf harbors millions of bacteria per square inch, including harmful strains like Staphylococcus aureus and Pseudomonas aeruginosa, making regular cleaning a non-negotiable hygiene practice rather than just a cosmetic concern.

Without proper maintenance, your bath pouf quickly becomes a breeding ground for microorganisms that can cause skin irritation, infections, and unpleasant odors. Whether you use your pouf daily or occasionally, establishing a consistent cleaning routine ensures it remains a beneficial addition to your shower routine. This guide reveals the most effective methods for cleaning bath poufs, storage techniques that prevent bacterial growth, and clear indicators when replacement is necessary—helping you maintain a truly clean bathing experience.

Why Bath Poufs Need Regular Cleaning

Bath poufs collect dead skin cells, body oils, soap residue, and environmental contaminants every time you use them. The same porous, mesh construction that makes these accessories excellent for lathering also creates an ideal environment for bacterial growth when they’re left damp in humid bathrooms. Without regular cleaning, the buildup of organic materials provides continuous nutrition for microbial proliferation, transforming your cleansing tool into a hygiene liability.

The frequency of cleaning depends primarily on how often you use the pouf and how well you dry it afterward. Daily users should clean their bath poufs at least once per week, while those who use theirs every few days can extend cleaning intervals to every two weeks. However, any pouf that develops an unpleasant odor, shows visible discoloration, or feels slimy to the touch requires immediate attention regardless of its cleaning schedule. These signs indicate advanced bacterial or mold growth that demands prompt intervention.

Synthetic poufs made from polyester or nylon materials tend to be more resistant to bacterial penetration than natural alternatives, but no pouf is immune to the effects of neglect. Understanding the specific care needs of your pouf type helps you choose appropriate cleaning methods that effectively remove buildup without damaging the material.

Weekly Quick-Rinse Maintenance

Performing a quick rinse after each use significantly extends the time between deep cleanings and prevents excessive soap and debris accumulation. This simple maintenance step takes less than a minute but dramatically impacts your pouf’s longevity and hygiene. Hold the pouf under warm running water while squeezing and rotating it repeatedly, working your fingers through the mesh texture to dislodge trapped particles.

The water temperature should be warm enough to help dissolve soap residue without being so hot that it damages synthetic fibers. Pay special attention to the center core where product accumulation tends to be heaviest, rotating the pouf while squeezing to ensure water penetrates all layers. Continue rinsing until the water running through the pouf runs completely clear, which may take thirty seconds to a full minute depending on how much product buildup has occurred.

After rinsing, avoid wringing or twisting the pouf aggressively, as this damages the mesh fibers and creates areas where debris becomes trapped. Instead, gently squeeze from the center outward to remove excess moisture while preserving the textured surface that makes the pouf effective. This proper technique ensures your bath pouf remains hygienic between deep cleaning sessions.

Deep Cleaning Methods That Work

Machine Washing for Thorough Cleaning

The washing machine offers convenient and effective deep cleaning for bath poufs, particularly those that have developed persistent odors or visible buildup. Place the pouf inside a mesh laundry bag or pillowcase to protect it from getting caught in the machine’s agitator or drum holes. Select a gentle cycle with warm water between 90-110°F, which effectively kills bacteria without damaging synthetic fibers, and add a mild laundry detergent while avoiding bleach or harsh chemicals.

For particularly dirty poufs, add a cup of white vinegar to the rinse cycle. The acetic acid helps dissolve mineral deposits and soap scum while neutralizing odors. Alternatively, one-quarter cup of baking soda added to the wash cycle provides gentle abrasive action and odor absorption without the risk of fiber damage. After the wash cycle completes, inspect the pouf for any remaining discoloration or residue, and if spots remain, apply a small amount of undiluted dish soap directly to the affected areas before rinsing thoroughly.

Bleach Soak for Disinfection

When bath poufs develop stubborn discoloration, mildew stains, or persistent bacterial odors, a bleach solution provides powerful disinfection. Prepare a solution of one tablespoon of liquid chlorine bleach per gallon of cool water in a plastic basin, then submerge the pouf completely and allow it to soak for five to ten minutes. During the soak, gently squeeze the pouf several times to help the solution penetrate the mesh structure.

After soaking, drain the bleach solution and rinse the pouf under cool running water for at least three minutes to remove all traces of bleach, continuing until no bleach odor remains and the water runs completely clear. Bleach residue causes skin irritation and accelerates material degradation, making thorough rinsing essential. For colored poufs or those made from natural materials, substitute oxygen bleach (sodium percarbonate) for chlorine bleach to achieve similar whitening results without color fading or fiber damage.

Boiling Water Method

The boiling water method provides chemical-free disinfection effective for all pouf materials, including delicate natural sea wool. Bring a pot of water to a rolling boil and carefully submerge the pouf using tongs or a slotted spoon, allowing it to remain in the boiling water for three to five minutes. This heat exposure effectively kills bacteria, mold spores, and dust mites without introducing cleaning chemical residues.

After boiling, remove the pouf and allow it to cool slightly before handling, then gently squeeze out excess water and proceed with the drying process immediately. This method works particularly well for poufs used by individuals with sensitive skin or allergies, though it should be used cautiously with plastic or synthetic poufs, as repeated boiling gradually degrades the material over time.

Natural Cleaning Alternatives

baking soda paste on bath pouf

Baking Soda Paste Treatment

Baking soda serves as an excellent natural abrasive and deodorizer for bath pouf cleaning. Create a thick paste by mixing baking soda with just enough water to form a spreadable consistency, then apply it directly to the pouf’s surface, working it gently into the mesh texture with your fingers or a soft brush. The fine particles dislodge trapped debris while the baking soda absorbs and neutralizes odors through chemical absorption.

Allow the paste to sit on the pouf for fifteen to twenty minutes before rinsing thoroughly with warm water. For enhanced effectiveness and pleasant fragrance, add a few drops of essential oil with antibacterial properties—tea tree, eucalyptus, or lavender—to the baking soda paste before application. This method is safe for all pouf types and particularly gentle on natural materials that harsher treatments might damage.

Vinegar and Lemon Solution

White vinegar’s acidic properties effectively dissolve soap scum, mineral deposits, and hard water stains that accumulate on bath poufs. Combine equal parts white vinegar and warm water in a basin large enough to submerge the pouf completely, then add the juice of one fresh lemon, whose citric acid enhances the cleaning action. Soak the pouf for thirty minutes to one hour, periodically squeezing it to help the solution penetrate and dislodge trapped residue.

After soaking, rinse thoroughly under warm running water and allow the pouf to dry completely. The vinegar smell dissipates quickly during drying, leaving no residual odor. This method is safe for synthetic poufs but should be used cautiously on natural materials, as prolonged acid exposure breaks down natural fibers over time.

Tea Tree Oil Treatment

Tea tree oil possesses natural antifungal and antibacterial properties ideal for treating and preventing microbial growth in bath poufs. Add ten to fifteen drops of pure tea tree oil to a basin of warm water and submerge the pouf for fifteen to twenty minutes, then rinse thoroughly and allow it to dry completely. The residual tea tree oil remaining in the fibers provides ongoing antimicrobial protection.

For maintenance between deep cleanings, add a few drops of tea tree oil to the pouf after each use and allow it to air dry without rinsing. This preventive treatment inhibits bacterial growth and extends the time between thorough cleanings while providing a pleasant natural fragrance without commercial disinfectant chemicals.

Dry Your Poufs Properly

Proper drying is crucial for preventing the bacterial and mold growth that causes bath poufs to deteriorate and become unhygienic. After cleaning, air dry the pouf in a location with good air circulation and exposure to indirect sunlight. Hanging the pouf from a hook or towel rack allows air to circulate on all sides, speeding the drying process and preventing moisture accumulation in the center core.

Position the pouf so it maintains its natural shape during drying—never flatten or compress it, as this traps moisture and creates environments where mold develops. In bathrooms with adequate ventilation, placing the pouf near an exhaust fan helps pull moisture away from the fibers. The drying process typically requires four to eight hours depending on humidity levels, and you should never store a pouf that still feels damp to the touch.

When faster drying is necessary, placing the clean, damp pouf in a well-ventilated room with a fan directed toward it significantly cuts drying time. For machine-washed poufs, a low-heat tumble dry cycle for ten to fifteen minutes can partially dry the accessory before air finishing, though high heat settings melt synthetic fibers and cause permanent damage.

Smart Storage Solutions

Hanging Storage Methods

Proper storage between uses significantly impacts bath pouf longevity and hygiene. The ideal storage method allows the pouf to dry completely while keeping it accessible for the next shower. Over-door hooks or suction-cup shower caddies that position the pouf away from direct water spray but within easy reach provide optimal storage conditions.

Hanging the pouf by its attached ribbon or loop ensures air circulates around all surfaces, promoting complete drying. Avoid storing poufs in sealed containers, plastic bags, or drawers where moisture becomes trapped and airflow is restricted. Even brief periods of storage in such conditions can initiate mold growth that quickly spreads throughout the pouf.

Rotation and Replacement Scheduling

Maintaining multiple bath poufs and rotating between them allows each one to dry completely between uses, extending functional lifespan. A rotation of two to three poufs per person provides adequate drying time for each accessory while ensuring one is always ready for use. Mark the date of first use on each pouf with a waterproof marker to track its age and schedule appropriate replacements.

Even with excellent care, bath poufs eventually require replacement. Synthetic poufs typically last two to four months with regular use and proper maintenance, while natural sea wool poufs may last three to six months. Signs indicating replacement necessity include persistent odors that return immediately after cleaning, visible mold that cannot be removed, fibers that have become matted or disintegrating, and loss of lathering ability despite thorough cleaning.

Care for Different Pouf Types

synthetic sea wool silicone bath puff comparison

Synthetic Mesh Poufs

Synthetic mesh poufs, the most common type made from polyester or nylon materials, offer the easiest maintenance and greatest durability. These poufs withstand frequent machine washing, bleach treatments, and boiling water disinfection without significant degradation. Their non-porous synthetic fibers resist bacterial penetration more effectively than natural materials, making them the most hygienic option for daily use.

To maximize lifespan, avoid exposing synthetic poufs to excessive heat from hot water or dryer cycles, which causes fibers to warp and lose texture over time. Mild detergents work best for regular cleaning, while harsh chemicals should be reserved only for heavy-duty stain removal. The open mesh construction allows for quick drying, making synthetic poufs less susceptible to mold growth than denser natural alternatives.

Natural Sea Wool Poufs

Sea wool poufs require gentler handling to prevent fiber damage and premature deterioration. These porous natural materials absorb water and product buildup more deeply than synthetic alternatives, making thorough cleaning more challenging. Avoid bleach and harsh chemicals, which break down natural fibers and cause the pouf to disintegrate during use.

The preferred cleaning method for sea wool poufs involves gentle hand washing in lukewarm water with mild soap, followed by thorough rinsing and air drying. Periodic treatments with a baking soda paste help absorb odors and lift residue without damaging fibers. Sea wool poufs should never be machine washed or boiled, as agitation and heat cause significant fiber damage.

Silicone Bath Puffs

Silicone bath puffs have distinct cleaning requirements due to their solid, non-porous construction. These accessories don’t absorb water or product residue, making them inherently more hygienic than traditional mesh or natural poufs. Cleaning silicone puffs is as simple as rinsing thoroughly after each use and occasionally washing with mild soap and water.

Because silicone doesn’t harbor bacteria like porous materials, these puffs can be disinfected quickly with a spray of isopropyl alcohol or a brief dip in diluted bleach solution. They dry almost instantly after rinsing, eliminating storage concerns associated with traditional poufs. Silicone puffs typically last a year or more with minimal maintenance, though they may not provide the same lathering action or exfoliating texture as mesh alternatives.

When to Replace Your Pouf

Even with excellent care and regular cleaning, bath poufs eventually reach the end of their useful lifespan. Synthetic options typically serve well for two to four months, while natural sea wool alternatives may last three to six months with proper maintenance. Continuing to use deteriorated poufs exposes skin to increasing bacterial loads and provides ineffective cleansing that defeats the purpose of using these accessories.

Replace your pouf when you notice persistent odors that return immediately after thorough cleaning, visible mold growth on any surface, fibers that have become matted or disintegrating, or loss of lathering ability despite proper cleaning. These indicators suggest the pouf has accumulated damage or contamination that cannot be reversed through maintenance.

Establishing a replacement schedule based on usage patterns provides the best balance between hygiene and economy. Daily users should budget for synthetic pouf replacement every two to three months, while less frequent users can extend this timeline if the pouf remains in good condition. Bulk purchasing offers savings for households with multiple users, and maintaining a rotation of several poufs per person ensures adequate drying time between uses.

Final Maintenance Checklist

Consistent maintenance habits ensure bath poufs remain hygienic and functional throughout their usable lifespan. After each use, rinse the pouf thoroughly under warm running water, squeezing repeatedly to remove soap and debris, then gently squeeze out excess water and hang in a well-ventilated area away from direct water spray. Never store a damp pouf in a closed container or sealed bag.

Weekly, perform deeper cleaning using machine washing, bleach soak, or natural alternative treatment based on your preference and pouf type. Monthly, inspect all poufs for signs of deterioration, mold, or persistent odor that cleaning cannot resolve. Replace poufs showing visible damage, maintaining unpleasant odors after cleaning, or exceeding their expected lifespan. This simple schedule protects your health while maximizing the value obtained from each bath pouf.

Regular cleaning and proper storage transform your bath pouf from a potential bacteria breeding ground into the effective cleansing and exfoliating tool it was designed to be. By following these maintenance practices, you enjoy all the benefits of bath poufs while minimizing the hygiene risks associated with these moisture-loving accessories. Learning how to clean bath poufs properly ensures every shower starts with a truly clean foundation for your skincare routine.

How to Wash Hair in Bathtub: Easy Steps


Splashing water across your bathroom floor while trying to rinse shampoo from your hair is a frustrating ritual many endure. When your shower head won’t cooperate or you prefer the relaxation of a bath soak, washing hair in the bathtub becomes essential—but improper technique leads to neck strain, product residue, and tangled messes. You’re not alone: nearly 68% of long-haired bath users report shampoo burns or incomplete rinsing during tub washes. This guide delivers battle-tested methods for achieving salon-quality cleanses in your bathtub, whether you have waist-length waves or a cropped pixie cut. Discover how to transform your next bath session into a spa-like hair treatment that leaves strands smooth, residue-free, and ready for styling.

Why Bathtub Washing Beats Showering for Curly and Thick Hair

Curly and coiled hair types suffer under standard shower heads where water pressure flattens natural patterns before cleansing even begins. The bathtub’s immersion method provides gentle, even saturation that preserves curl definition while thoroughly loosening scalp buildup. Unlike vertical shower rinsing that forces water through tangled ends first, submerging hair horizontally in bathwater allows cleansing agents to penetrate roots without friction damage. This technique reduces hygral fatigue—the swelling and shrinking of hair strands during wet/dry cycles that causes breakage—by 40% compared to traditional shower washing. You’ll notice immediate improvements in coil spring-back and reduced frizz when you master this foundational approach.

How to Test Your Water Temperature Before Submerging Hair

Never dunk your head without verifying temperature—scalding water destroys hair proteins while icy water causes cuticle shock. Fill your tub with 3 inches of water, then insert your elbow for 10 seconds. Ideal cleansing temperature sits between 95-100°F (35-38°C), slightly warmer than body temperature. If using bath salts or oils, add them after temperature check since they alter heat retention. Critical mistake alert: Testing with fingers alone gives false readings since hand skin is thicker than scalp tissue.

The 30-Second Pre-Soak That Prevents Tangles

Before shampooing, submerge dry hair completely for 30 seconds in lukewarm water. This critical step allows strands to swell gradually, making them 3x more resistant to breakage during washing. For thick or chemically treated hair, add one tablespoon of conditioner to the pre-soak water. Watch for bubbles rising from your scalp—that’s the signal your cuticles have fully opened and are ready for cleansing. Skipping this causes immediate matting when shampoo hits dry hair.

Essential Tools for Mess-Free Bathtub Hair Washing

silicone rinse cup for hair bathtub microfiber hair wrap bath pillow

Forget awkward cup rinsing that leaves shampoo behind. Professional stylists use three affordable tools to transform tub washing: a flexible silicone rinse cup with spout ($8), microfiber hair wrap towel ($12), and bath pillow with neck roll ($15). The rinse cup’s angled spout directs water precisely along your hairline without splashing, while the microfiber wrap absorbs 7x its weight in water without tugging strands. Most crucially, the bath pillow positions your head 15 degrees higher than standard tub contours, preventing water from pooling behind your neck during rinsing.

Must-Avoid Products That Create Bathtub Disasters

Never use heavy butters or oil-based conditioners during tub washes—they create slippery bath surfaces and resist rinsing. Similarly, avoid volumizing shampoos which foam excessively in still water, making thorough rinsing impossible. Stick to sulfate-free cleansers labeled “for fine hair” (they lather moderately) and lightweight, rinse-out conditioners. Pro tip: Apply a dime-sized oil only to ends after your bath while hair is damp—not during washing.

Step-by-Step Bathtub Hair Washing Technique

Step 1: The Zero-Splash Wetting Method

Sit sideways in the tub with your back against the faucet end. Tilt your head backward at 45 degrees, resting it on the bath pillow. Slowly pour water from your rinse cup starting at your temples, moving toward the crown. This follows your scalp’s natural drainage pattern, preventing water from running into your eyes. For long hair, gather strands into a loose topknot secured with a silicone band—never twist hair tightly as this causes breakage when wet.

Step 2: Shampoo Application for Complete Scalp Coverage

Apply quarter-sized shampoo to palms, emulsify with 2 tsp bathwater, then section hair into four quadrants. Massage cleanser into each section using flat fingertips in 1-inch circles—never nails. Focus pressure on your hairline and nape where buildup concentrates. For thick hair, add 3 drops of water to your palms mid-massage to maintain slip. Warning: Over-applying shampoo causes residue that requires triple rinsing. Stick to this formula: 1 pump per 6 inches of hair length.

Step 3: The Double-Rinse Residue Elimination Process

First rinse: Pour water from cup over scalp for 60 seconds while massaging gently. Second rinse: Fill tub with 2 inches fresh water, submerge head completely for 15 seconds while shaking hair side-to-side. This dislodges trapped particles traditional rinsing misses. Check success by running fingers through wet strands—they should feel smooth, not squeaky (which indicates stripping). If residue remains, repeat the immersion rinse.

Troubleshooting Common Bathtub Washing Problems

bathtub hair washing neck pain solution memory foam pillow

Fixing Neck Pain During Hair Rinsing

Standard tub contours force unnatural head tilts that strain cervical muscles. Solution: Place a rolled bath towel under your neck where it meets the tub edge. This creates a 10-degree incline that aligns your spine naturally. For chronic pain sufferers, use a U-shaped memory foam pillow designed for bathtub use—position the open end under your chin to support full head weight.

Preventing Shampoo Burns in Sensitive Eyes

Tear ducts open when head tilts backward, inviting shampoo runoff. Create a physical barrier by applying petroleum jelly along your hairline and upper eyelids before wetting hair. If stinging occurs mid-wash, immediately submerge your entire head in clean bathwater for 5 seconds—this dilutes irritants faster than surface rinsing. Never rub eyes when shampoo is present.

Time-Saving Hacks for Short and Medium-Length Hair

Pixie and bob cuts can be washed in 8 minutes flat with this streamlined approach: Sit facing the drain with head tilted forward. Pour water from cup starting at nape, letting runoff cascade toward face. Apply shampoo directly to roots using a toothbrush handle for precision targeting. For rinsing, fill cup with fresh water, then tip head back slowly as you pour—this creates a continuous water curtain that blocks shampoo from reaching eyes. Condition only from ears downward for 2 minutes max.

Post-Wash Care That Prevents Frizz and Breakage

Never rub hair with cotton towels after tub washing—this shreds the fragile wet cuticle. Instead, squeeze water out by pressing strands between palms, then wrap in a microfiber towel using the “plop” method: Flip head forward, place towel flat on back, gather ends over head, and twist into a turban. Leave for 10 minutes while you dry your body. For air-drying, apply leave-in conditioner to damp ends before untying. If blow-drying, use cool setting with diffuser attachment held 6 inches from scalp.

When to Avoid Bathtub Washing Altogether

Bathtub hair washing fails catastrophically with three specific conditions: After oil treatments (creates slippery tub surfaces), when using protein masks (requires vigorous rinsing impossible in still water), and during scalp psoriasis flare-ups (stagnant water breeds bacteria). In these cases, shower washing with handheld sprayer is non-negotiable for safety. Similarly, avoid tub washing if you have open scalp wounds—bathwater isn’t sterile enough for proper cleansing.

Maintain Your Bathtub Hair Washing Results

Extend your clean-hair days by sleeping on silk pillowcases to reduce friction, and refresh roots between washes with dry shampoo applied to dry scalp using a makeup brush for precision. For curly types, refresh definition by submerging hair in cool water with a teaspoon of apple cider vinegar—no shampoo needed. Most importantly, never wash more than twice weekly; over-cleansing triggers oil overproduction that defeats your careful bathtub technique.

Mastering how to wash hair in bathtub transforms a chore into a therapeutic ritual that respects your hair’s natural structure. By following these precise positioning techniques and timing guidelines, you’ll eliminate residue, tangles, and neck strain within just two washes. The key lies in respecting water’s behavior in still environments—working with physics rather than fighting it. Next time you draw a bath, prepare your tools in advance and practice the 30-second pre-soak; you’ll emerge with cleaner, stronger hair than any shower session delivers. For ongoing maintenance, pair this method with weekly deep conditioning treatments applied after your regular wash cycle while hair is still damp.

Spiritual Bath Cleansing Guide: Purify Your Energy


Have you ever stepped out of the shower feeling physically clean but spiritually drained? That heavy, stuck sensation when negative energy clings to you despite regular hygiene is exactly why spiritual bath cleansing has remained a cornerstone practice across Caribbean, Latin American, and African spiritual traditions for centuries. Spiritual bath cleansing represents a targeted ritual practice that goes beyond physical cleanliness to remove curses, hexes, and energetic blockages that standard bathing can’t address. When done correctly with the right formulations, these ritual baths can reset your spiritual baseline within 20 minutes—without requiring extensive knowledge of complex spiritual systems. In this guide, you’ll discover exactly which spiritual bath products deliver proven results, how to perform an effective cleansing ritual, and common mistakes that block your bath’s effectiveness.

The market for spiritual cleansing products has grown substantially as more people seek traditional approaches to energy hygiene. Products like herb bath formulations, specialized floor washes, and spiritual colognes each serve distinct purposes in the practitioner’s repertoire. From the popular Uncrossing Herb Bath that has earned a 4.6-star rating from over 700 customers to specialized offerings like War Water for protection work, the variety allows practitioners to address specific spiritual needs with targeted formulations. Understanding the unique properties of each product category ensures you select the most appropriate tools for your spiritual goals.

Why Your Spiritual Bath Isn’t Removing Negative Energy (And How to Fix It)

Many practitioners report spiritual baths “not working” simply because they’re using them incorrectly. The most common mistake is treating spiritual bath products like regular soap rather than ritual tools requiring specific application methods.

Common Mistakes That Block Spiritual Bath Effectiveness

Using hot water instead of warm water destroys the delicate botanical properties in spiritual bath formulations. Adding insufficient product quantity (most require at least 2-3 tablespoons) reduces effectiveness. The biggest error? Not setting clear intentions before bathing—spiritual cleansing requires focused mental energy to direct the ritual’s purpose. Finally, rinsing off with regular soap immediately after your spiritual bath counteracts the cleansing work you’ve just performed.

How to Properly Prepare Your Bathwater for Maximum Cleansing

Fill your tub with warm (not hot) water and add 3-4 tablespoons of your chosen spiritual bath product. Allow the water to sit for 5 minutes while you verbally state your intention (e.g., “I release all negative energies and curses”). As you enter the bath, pour water over your head starting from the crown and moving downward—never upward—as this symbolically washes negativity away from your body. Soak for 15-20 minutes while maintaining your intention, then air dry without rinsing to preserve the spiritual residue.

Top 3 Spiritual Bath Formulas for Immediate Energy Purification

Uncrossing Herb Bath Spiritual Cleansing Body Wash packaging

Not all spiritual bath products deliver equal results. Based on customer satisfaction metrics and traditional efficacy, these three formulas consistently deliver powerful cleansing.

Uncrossing Herb Bath: Your First Line of Defense Against Curses

The Uncrossing Herb Bath Spiritual Cleansing Body Wash (4.6 stars from 723 reviews) specifically targets hex removal, reverse spell work, and jinx reversal. Priced at $12.95 for 4 ounces, this formulation combines multiple botanicals traditionally associated with spiritual cleansing in folk magic practices. Use this when you suspect curses, experience unexplained misfortune, or feel spiritually “heavy” after negative encounters.

Anamu Bath: Caribbean-Style Cleansing for Deep Spiritual Blockages

Anamu (Petiveria alliacea) holds significant importance in Caribbean and Latin American spiritual traditions for protection and uncrossing. The Anamu Bath and Floor Wash (4.4 stars) serves dual functionality as both a bath additive and floor wash. Its 8-ounce gel formulation ($12.95) works particularly well for deep spiritual blockages that standard cleansing baths don’t resolve.

La Madama Floor Wash: Dual-Purpose Cleansing for Spaces and Self

The La Madama Floor Wash (4.4 stars from 238 reviews) offers exceptional value at $15.95 for 16 ounces. While designed as a floor wash for negative energy protection, practitioners regularly use diluted versions for personal cleansing. La Madama’s association with luck and material blessings makes this particularly effective when financial concerns accompany your spiritual heaviness.

Step-by-Step Guide to Performing an Effective Spiritual Bath Ritual

Pre-Bath Spiritual Preparation: Setting Your Intention

Begin by lighting a white candle to represent purification. Verbally state your specific intention (e.g., “I remove all negative energy from my aura”). Some practitioners write their intention on paper and burn it before bathing. This mental preparation activates the spiritual properties in your bath product.

The Exact Bathing Process for Complete Energy Cleansing

Add your spiritual bath product to warm water and let it sit for 5 minutes. As you enter the bath, pour water over your head starting from the crown moving downward—never upward. Soak for 15-20 minutes while visualizing negative energy washing away. Focus on problem areas (neck for communication issues, chest for emotional blockages). Never rinse off—air dry to preserve the protective residue.

When to Use Floor Washes vs. Body Baths for Spiritual Cleansing

La Madama Floor Wash application demonstration

How to Transform Floor Wash Products into Personal Cleansing Rituals

Dilute floor wash products like La Madama or Big Al Bath at a 1:3 ratio (one part floor wash to three parts water) for personal bathing. These larger-format products ($15.95 for 16 ounces) offer economical value for regular spiritual maintenance. Floor washes often contain more concentrated botanical blends ideal for intensive cleansing sessions.

Best Areas to Clean With Floor Wash for Maximum Protection

Focus on entry points where negative energy enters: front/back doors, windows, and stairways. Apply floor wash in a clockwise motion while stating your protection intention. For comprehensive cleansing, start at the back of your home and work toward the front door to push negative energy out.

Spiritual Cologne Protection: Your 24/7 Energy Shield

Go Away Evil Cologne bottle and application points

Go Away Evil Cologne: Creating an Instant Protective Barrier

The Go Away Evil Cologne (5.0 stars) offers exceptional value at $11.95 for 50 fluid ounces ($0.24 per ounce). Apply to pulse points after your spiritual bath for continuous protection. Spray in rooms needing cleansing or use to anoint candles. Its straightforward naming clearly communicates its protective purpose—ideal for practitioners seeking unambiguous spiritual defense.

War Water: Defending Against Spiritual Attacks Before They Happen

War Water Spiritual Cleansing Water (4.3 stars) specifically targets enemy work and spiritual warfare. At $11.95 for 8 ounces, this historically significant formulation in hoodoo traditions repels enemies and neutralizes hostile spiritual attacks. Use before challenging situations or when sensing targeted negativity.

Prosperity Bath Rituals: Attracting Money While Cleansing

Abundance Big Al Bath ingredients and packaging

Big Al Bath Formulas: Removing Financial Blockages in 20 Minutes

The Abundance Big Al Bath (4.5 stars) combines spiritual cleansing with prosperity attraction. Its 16-ounce liquid formulation ($15.95) addresses both removal of obstacles to prosperity and active attraction of beneficial financial energies. Use when financial concerns accompany your spiritual heaviness.

Fast Luck Cologne: Instant Money Attraction for Urgent Needs

For time-sensitive financial situations, Fast Luck Cologne provides rapid spiritual intervention. This 50-ounce cologne ($11.95) works when traditional slower workings won’t suffice—ideal before job interviews, court cases, or important meetings where immediate results are needed.

How to Choose the Right Botanicals for Your Spiritual Bath

Rue (Ruda) vs. Spearmint: Which Cleansing Herb Suits Your Needs?

Rue (Ruda) provides powerful purification and uncrossing capabilities across Mediterranean and Latin American practices. The Ruda Rue Cologne (5.0 stars) connects practitioners to centuries-old traditions for spiritual defense. Spearmint offers a gentler approach with associations for clarity and positive energy—the Spearmint Bath has achieved a perfect 5.0 rating and is suitable for regular maintenance cleansing rather than intensive uncrossing work.

Why Anamu Is Essential for Caribbean and Latin American Traditions

Anamu (Petiveria alliacea) serves as a cornerstone ingredient in Caribbean and Latin American spiritual traditions, valued for its powerful protective and uncrossing properties. Products featuring anamu connect practitioners to generations of traditional use for spiritual cleansing, protection against negative influences, and clearing of spiritual blockages. The distinctive properties of this botanical make it particularly effective for practitioners working within or drawing from these cultural traditions.

Timing Your Spiritual Bath for Maximum Results

Best Moon Phase for Banishing Negative Energy

Traditional practices suggest performing cleansing baths during specific lunar phases, with full moons ideal for general cleansing and dark moons suited for banishing work. Practitioners also recommend cleansing after exposure to negative environments, conflicts with difficult individuals, or whenever feeling spiritually “heavy” or “off.” The waxing moon phase works best for prosperity-focused baths like the Big Al formulations.

Troubleshooting Common Spiritual Bath Problems

“My Bath Isn’t Working”: 5 Reasons and Fixes

  1. Water temperature too hot – Destroys botanical properties; use warm water only
  2. Insufficient product quantity – Most require 3-4 tablespoons, not a few drops
  3. No clear intention setting – Verbally state your purpose before bathing
  4. Rinsing off afterward – Air dry to preserve the spiritual residue
  5. Using the wrong product for your need – Match product purpose to your specific situation

How to Know When You Need Multiple Cleansing Sessions

If you’re dealing with persistent negative patterns (repeated financial problems, ongoing health issues, or consistent relationship conflicts), you likely need multiple cleansing sessions. Start with weekly baths for 3-4 weeks, then switch to monthly maintenance. For severe cases like suspected curses, combine Uncrossing Herb Bath with War Water protection for comprehensive results.

Maintaining Spiritual Cleanliness Between Major Baths

Daily Protection Rituals That Take Less Than 2 Minutes

Apply spiritual cologne to pulse points each morning. Spray Go Away Evil in your workspace. Keep a small bottle of Uncrossing Herb Bath in your shower for quick weekly cleanses. These micro-rituals prevent negative energy accumulation that leads to major blockages.

Weekly Maintenance Routines to Prevent Energy Buildup

Once weekly, add 1 tablespoon of Spearmint Bath to your shower routine. Spearmint’s associations with clarity make it ideal for light maintenance cleansing between intensive uncrossing sessions. This 5.0-star rated product provides a refreshing approach to regular spiritual hygiene.

Spiritual bath cleansing offers powerful tools for maintaining spiritual clarity and protection. Start with proven products like the Uncrossing Herb Bath for general cleansing, then expand to specialized formulations as your practice develops. Remember that consistency matters more than complexity—regular spiritual hygiene prevents the need for intensive cleansing sessions. With the right products and proper technique, you can maintain spiritual cleanliness that supports every area of your life.

How to Clean Jacuzzi Jets in Bathtub


Nothing ruins a relaxing soak like noticing grimy water or unpleasant odors coming from your jetted tub. When mineral deposits, soap scum, and bacteria accumulate inside your jacuzzi bath jets, they compromise both your bathing experience and hygiene. Learning how to clean jets in jacuzzi bath properly is essential maintenance that prevents costly repairs and keeps your hydrotherapy system functioning optimally. This guide delivers specific, actionable methods to eliminate buildup in your jetted tub—methods that go beyond surface cleaning to address the hidden plumbing where problems originate. You’ll discover exactly which household products work best, how to avoid common mistakes that damage your system, and establish a simple maintenance routine that keeps your jets flowing freely.

Gather Jetted Tub Cleaning Supplies Before Starting

Pull out your white distilled vinegar, baking soda, and soft-bristled brush before draining your tub—having everything ready prevents mid-cleaning interruptions. For stubborn buildup, add a commercial jetted tub cleaner specifically formulated for hydrotherapy systems to your supply list; these contain enzymes that break down organic matter more effectively than household alternatives. Choose a measuring cup with clear markings to ensure proper solution ratios—typically one cup of vinegar per gallon of water for standard cleaning cycles.

Place several clean microfiber towels around your workspace for immediate drying, and lay down a plastic sheet to protect your bathroom floor from splashes. If your jets are removable, locate the specific tool needed for your model (often included with your tub manual) before beginning. For jets near the waterline that collect the most residue, prepare an old toothbrush with soft bristles—you’ll need this precision tool for detailed scrubbing around nozzle openings without causing scratches.

Prepare Your Jacuzzi Tub for Effective Jet Cleaning

Drain all water from your tub completely and wipe the interior with a dry cloth to remove loose debris before adding cleaning solution. Fill the tub with warm water (not hot) to a level two to three inches above your highest jet opening—this ensures proper circulation through the entire system during cleaning. If your tub has air induction controls, set them to maximum before adding cleaning solution to optimize water flow through all jet pathways.

Rotate each jet nozzle counterclockwise to remove faceplates if your model allows, checking for visible buildup around the openings. Test jet function with plain water first to identify any that aren’t rotating properly or producing weak flow—these will need extra attention during cleaning. For models with fixed jets, use a flashlight to inspect each opening for visible blockages before proceeding. Never skip this inspection step, as it helps you target problem areas during the manual cleaning phase that follows the solution cycle.

Run Effective Vinegar Cleaning Cycle for Jet Tubing

Add one to two cups of white distilled vinegar to the warm water while the tub fills, stirring gently to distribute the solution evenly throughout the basin. For heavily soiled jets that haven’t been cleaned in months, use undiluted vinegar but limit cycle time to 15 minutes to prevent potential damage to rubber seals. Activate the jets and run the cleaning cycle for 15-20 minutes with the tub covered by a light blanket—this traps heat that enhances vinegar’s cleaning power against mineral deposits.

Turn off air induction controls during the final five minutes to force cleaning solution through plumbing rather than aerating it. Listen carefully for unusual gurgling sounds that indicate stubborn blockages requiring additional treatment. For persistent buildup, pause the cycle after 10 minutes, let the solution sit for 5 minutes to penetrate deposits, then resume jets for the remaining time. This intermittent approach gives vinegar extra time to dissolve stubborn residue without overexposing system components to acidity.

Manually Scrub Each Jet Nozzle for Complete Cleaning

jacuzzi jet nozzle cleaning brush technique

Drain the tub completely after the vinegar cycle finishes and use your soft-bristled brush dipped in baking soda paste to clean around each jet faceplate. Work the brush in small circular motions around and inside each nozzle opening, reaching as far into the tubing as comfortable without forcing the brush. For removable jets, soak the faceplates in warm vinegar for 10 minutes while you clean the surrounding areas, then scrub both sides thoroughly before reinserting.

Focus extra attention on jets located near the waterline, as these collect the most soap scum and body oils from regular bathing. Wipe down control knobs and external components with a vinegar-dampened cloth, ensuring you clean around bases where residue hides. For particularly stubborn buildup, apply baking soda directly to the brush and scrub more aggressively, then rinse thoroughly with clean water. Never use metal tools or abrasive pads that could scratch surfaces and create places for future buildup to anchor.

Flush and Dry Jet System Completely

Refill the tub with clean warm water and run the jets for 10 minutes to flush out any remaining vinegar solution and loosened debris. This critical rinsing step prevents leftover cleaning agents from attracting new buildup or damaging internal components over time. Drain the tub completely and wipe all surfaces dry with a clean microfiber cloth, paying special attention to the areas inside and around each jet nozzle.

Remove jet faceplates if possible and dry internal components thoroughly with a small towel or compressed air can. Apply a light coat of car wax to exterior surfaces to create a protective barrier against future water spots. Leave jet covers off for several hours to allow air circulation inside the tubing, preventing moisture buildup that causes musty odors. Never skip this drying phase—trapped moisture becomes a breeding ground for bacteria and mold that quickly recontaminates your system.

Establish Monthly Maintenance Routine for Clean Jets

jacuzzi maintenance schedule checklist

Clean your jacuzzi bath jets monthly to prevent heavy buildup that becomes difficult to remove and can damage internal components over time. For frequently used tubs (more than twice weekly), implement biweekly maintenance with reduced vinegar amounts—just half a cup per cleaning cycle. Add a cup of vinegar to the tub after each use, run jets for five minutes, then drain immediately to prevent residue from setting into plumbing.

Use a tight-fitting tub cover when not in use to minimize airborne debris entering the water. Avoid excessive use of bath oils and bubble baths, as these products significantly accelerate jet buildup. Wipe down tub surfaces after each use to remove body oils before they accumulate. Set calendar reminders for deep cleaning sessions to ensure consistent maintenance—your future self will appreciate not dealing with clogged jets and unpleasant odors.

Prevent Recurring Jet Problems with Smart Practices

Install a water softener if your area has hard water, as mineral deposits from hard water accelerate buildup inside jet tubing and damage seals over time. Run jets for two minutes before entering the tub to clear any stagnant water that might have collected bacteria since last use. Never leave water in the tub for extended periods between uses, as still water promotes bacterial growth and biofilm formation.

Check jet connections and seals quarterly for signs of wear that might allow water to leak behind the tub shell. Replace rubber gaskets at first sign of deterioration to prevent water damage to surrounding structures. Keep the area around and under your tub dry to prevent mold growth in hidden spaces. Schedule professional inspection every two to three years to catch potential problems before they become expensive repairs—this proactive approach ensures your jacuzzi bath remains a relaxing retreat for years to come.

Regular jet cleaning takes less than an hour of your time but preserves thousands of dollars of investment in your hydrotherapy system. By following these specific methods for how to clean jets in jacuzzi bath properly, you’ll maintain optimal water quality, prevent costly repairs, and enjoy truly relaxing soaks free from unpleasant odors or concerns about hygiene. The small effort required for monthly maintenance pays off exponentially in extended equipment life and consistently enjoyable bathing experiences.

How to Clean Jacuzzi Bath: Quick Steps


Your jetted bathtub delivers luxurious, spa-like relaxation right in your bathroom, but without proper care, that investment can quickly become a breeding ground for bacteria and mineral buildup. Unlike standard tubs, jacuzzi bath cleaning requires specialized attention to the internal plumbing and jet mechanisms that create your soothing hydrotherapy experience. Over time, soap residue, body oils, and mineral deposits accumulate inside the closed-loop system, causing clogged jets, reduced water pressure, and potentially unsanitary conditions. This guide reveals exactly how to maintain your jetted tub so it continues delivering clean, powerful jets for years to come—without expensive professional servicing or premature replacement.

Why Your Jetted Tub Needs Specialized Cleaning

Jetted bathtubs create unique maintenance challenges because their internal plumbing systems circulate water through hidden pipes and jet mechanisms. When you activate your jets, water flows through a closed-loop system that includes pumps, pipes, and nozzles—all of which collect residue with every use. The combination of warm water, body oils, soap scum, and dead skin cells creates the perfect environment for biofilm formation inside your plumbing.

Ignoring regular jacuzzi bath cleaning leads to serious consequences: mineral deposits from hard water gradually calcify on jet nozzles, reducing spray pressure until jets stop working entirely. The biofilm that develops inside pipes becomes a breeding ground for bacteria including Aeromonas and Pseudomonas, organisms that can cause skin infections or respiratory issues. One homeowner discovered this the hard way after skipping maintenance for six months—her once-powerful jets produced only weak streams, and a foul odor emerged when she finally ran the system.

How Often Should You Clean Your Jetted Tub?

Jacuzzi’s manufacturer recommends monthly cleaning for standard maintenance, but your usage pattern determines the ideal schedule. Households using their tubs frequently (3+ times weekly) should clean every 2-3 weeks, while occasional users might extend to 6-8 weeks between sessions. The most practical approach many experienced owners use is cleaning “about every four to six uses” regardless of calendar time.

Watch for these warning signs that indicate immediate cleaning is needed:
– Reduced water pressure from jets
– Visible discoloration in water during jet operation
– Unpleasant odors when jets are activated
– Visible buildup around jet nozzles
– Gurgling or unusual sounds from the pump

Jacuzzi Systems Cleaner: The Manufacturer-Recommended Solution

Jacuzzi T627000 Systems Cleaner kit packaging

When it comes to jacuzzi bath cleaning, the official Jacuzzi Systems Cleaner represents the gold standard developed by the pioneers of whirlpool technology. This two-step system specifically targets the unique buildup inside jetted tubs without damaging sensitive components.

What Makes This Cleaner Different?

The Jacuzzi Systems Cleaner (Part Number: T627000) comes as 10 complete cleaning sessions—five packets of Step 1 solution and five of Step 2—packaged in a compact 6.26 x 4.88 x 3.23 inch container. Priced at $28.26, this equates to approximately $2.83 per cleaning session, a small investment compared to potential repair costs from neglected maintenance.

With 251 customer reviews averaging 4.6 out of 5 stars (85% perfect five-star ratings), users consistently praise its effectiveness where alternatives failed. One long-term user reported using the product successfully for twelve years, noting it “does the best and most thorough job” compared to other brands they tried. The cleaner’s two-step process ensures both deep cleaning and thorough rinsing of all internal components.

How to Use the Jacuzzi Systems Cleaner Properly

Follow this exact sequence for maximum effectiveness during your jacuzzi bath cleaning session:

  1. Close the drain and fill your tub with warm water (not hot) to a level that completely covers all jet openings
  2. Add one Step 1 packet to the water and allow it to dissolve completely
  3. Activate all jets and run for 10-15 minutes to circulate the solution throughout the entire system
  4. Drain the tub completely—expect discolored water confirming removed buildup
  5. Refill with clean warm water to cover jets
  6. Add one Step 2 packet and run jets for another 10-15 minutes
  7. Drain completely and wipe down surfaces with a soft cloth

Pro Tip: After the final drain, run the jets for 2-3 minutes with no water to help expel any remaining residue from the lines. Some users report needing to “dunk your arm in to get the plug unplugged to drain,” but this minor inconvenience ensures complete system flushing.

Top 4 Alternative Jetted Tub Cleaners Worth Considering

SpaKleen jetted tub cleaner vs ACTIVE jetted tub cleaner vs CLYND jetted tub cleaner vs Bio Ouster jetted tub cleaner comparison

While the Jacuzzi brand cleaner delivers manufacturer-backed results, several quality alternatives offer effective jacuzzi bath cleaning at lower price points.

SpaKleen Jetted Tub Cleaner

With 1,875 reviews averaging 4.5 stars, SpaKleen provides 10 cleanings for $19.50 ($1.95 per session). This USA-made formula works with all jetted tub brands and features a fast-action formula that dissolves quickly. Many users appreciate its septic-safe composition and report results nearly matching the Jacuzzi brand at a lower cost.

ACTIVE Jetted Tub Cleaner Bathtub Tabs

These convenient pre-measured tablets (4.5 stars from 361 reviews) cost $17.96 for 12 tablets—approximately $1.50 per cleaning. The professional-grade formula removes scale and residue effectively while being septic safe. Amazon’s Choice designation and tablet format make this a popular option for those who prefer no measuring.

CLYND Jetted Tub Cleaner

Earning the highest rating among alternatives (4.7 stars from 53 reviews), CLYND offers 24 tablets for $18.99 ($0.79 per tablet). This heavy-duty formula contains no harsh chemicals while remaining septic safe. Its Compact by Design certification indicates sustainable packaging, appealing to eco-conscious users.

Bio Ouster Jetted Tub Cleaner Kit

Priced at $21.99 with 4.4 stars from 898 reviews, this kit includes a microfiber towel with the cleaning solution. The professional-grade formula effectively removes bacterial buildup and works with all jetted systems. Made in the USA, it provides a mid-range option for those seeking thorough cleaning without the premium Jacuzzi price.

Prevent Buildup Between Deep Cleaning Sessions

Monthly deep cleaning prevents major problems, but daily habits extend time between thorough sessions and keep your jets performing optimally.

Post-Use Maintenance Routine

After every bath, follow these simple steps to reduce buildup:
– Wipe down visible surfaces with a soft cloth to remove soap film and oils
– Run clean water through the jets for 2-3 minutes to flush loose residue
– Leave the drain open until the tub is completely dry
– Never use regular household cleaners—they leave residue that promotes bacterial growth

Hard Water Solutions

If you live in a hard water area, consider these additional measures:
– Install a water softener for your entire home
– Use distilled water for your cleaning sessions
– Increase cleaning frequency to every 2-3 weeks
– Add a vinegar rinse cycle monthly to dissolve mineral deposits

Troubleshooting Common Jetted Tub Problems

Even with regular jacuzzi bath cleaning, issues may arise. Here’s how to diagnose and fix them:

Weak Jet Pressure

Cause: Mineral deposits or biofilm restricting water flow
Fix: Run a deep cleaning cycle, then inspect individual jets for visible blockage. Use a soft toothbrush to gently clean nozzle openings if needed.

Unpleasant Odors

Cause: Bacterial growth in stagnant water
Fix: Perform immediate deep cleaning, then ensure complete draining after each use. Leave drain open between uses to allow air circulation.

Gurgling Noises

Cause: Air trapped in lines or partial blockages
Fix: Run jets with clean water for 15 minutes to clear air pockets. If persistent, perform deep cleaning and check for clogs.

Final Maintenance Checklist for Long-Lasting Performance

Protect your investment with these essential jacuzzi bath cleaning practices:

  • Schedule monthly cleanings using either the Jacuzzi Systems Cleaner or a quality alternative
  • Never skip the rinse cycle—incomplete rinsing leaves residue that attracts more buildup
  • Run jets at full power during cleaning to ensure solution reaches all internal passages
  • Keep a cleaning log to track sessions and identify usage patterns
  • Drain completely after every use to prevent stagnant water conditions
  • Wipe down surfaces regularly to prevent soap scum accumulation

The modest investment of $0.80-$2.83 per cleaning session preserves your jetted tub’s performance and prevents costly repairs down the line. By following this maintenance routine, you’ll enjoy powerful, clean jets that deliver the luxurious hydrotherapy experience you deserve—without worrying about hidden contamination in your relaxation sanctuary. Your jacuzzi bath cleaning routine shouldn’t feel like a chore; with the right products and schedule, it becomes a simple habit that protects your investment and ensures years of worry-free soaking.

How to Use Jacuzzi Whirlpool Bath: Easy Steps


There’s nothing quite like sinking into your Jacuzzi whirlpool bath after a long day—the warm water enveloping your body as powerful jets target tired muscles. Yet many new owners hesitate to use their investment properly, worried they’ll damage the sophisticated system or miss out on key features. Knowing exactly how to use jacuzzi whirlpool bath equipment transforms uncertainty into confidence, ensuring you maximize therapeutic benefits while protecting your investment. This guide delivers precise, model-specific instructions for operating any Jacuzzi system, from basic Swirlpool models to advanced J-Shiatsu configurations.

Jacuzzi offers multiple bath system categories, each with unique operation methods. The Swirlpool line provides classic hydrotherapy with reliable jet performance, while the J-Quiet series incorporates noise-reducing pump technology. The J-Shiatsu systems simulate traditional massage techniques with adjustable intensity settings, and Lounge models feature ergonomic reclined seating for full-body immersion. Regardless of your model, these comprehensive instructions will help you master how to use jacuzzi whirlpool bath features correctly for optimal relaxation and longevity.

Prepare Your Bath for Proper Operation

Before filling your Jacuzzi, take 2 minutes to prepare for a safe, effective session. Remove all bath mats, loofahs, or other items stored in the tub, then inspect the surface for debris that could clog the system. Check that your drain stopper lifts and lowers smoothly—this prevents water from becoming trapped after your session. If your model has removable intake screens or filters (common in Aura and Aquasoul series), verify they’re clean and properly seated; clogged screens reduce jet performance by up to 70%.

Critical safety check: Examine your control interface to ensure all buttons respond properly. Pneumatic systems require firm presses, while electronic panels need light touches. If your bath has been idle for days, especially in cooler weather, don’t panic if jets make unusual sounds during initial activation—this typically resolves within 60 seconds as the pump primes. Gathering towels and bath products before filling lets you focus entirely on relaxation once the water reaches your ideal temperature.

Fill to the Correct Water Level and Temperature

Filling your Jacuzzi properly establishes the foundation for an effective hydrotherapy session. Most models perform best when filled to a level that fully covers the highest jet openings while leaving 2-3 inches of clearance at the top rim. Overfilling stresses seals and creates messy overflow, while underfilling causes the pump to draw air instead of water—potentially damaging the system over time. Consult your specific model manual, as water level requirements vary between collections like the Sharp series (compact models) versus the larger Aquasoul Double.

Water temperature requires careful attention for safe, comfortable use. Jacuzzi recommends 98-104°F (37-40°C) for most users, but your ideal temperature depends on personal preference and session duration. Water above 104°F carries risks of dizziness and cardiovascular stress, particularly during longer sessions. Test temperature with your elbow or wrist before entering—these areas sense heat more accurately than hands. If your model includes built-in heating (like many Skylounge® series), you can maintain temperature throughout extended use; otherwise, start slightly cooler than your target since water cools during use.

Activate the Jet System Without Damaging Components

Starting your Jacuzzi’s jet system correctly protects the pump motor and ensures years of reliable operation. Always begin by activating the pump on its lowest setting, allowing water to flow through the system before increasing intensity. Most models offer multiple speed settings controlled through pneumatic buttons, electronic panels, or rotary dials depending on your configuration. Starting low gives the pump time to prime fully and lets you assess jet action before committing to full intensity.

Once the pump runs smoothly, gradually increase jet intensity to your preferred level. Rotate individual jet faces or use adjustable nozzles to direct massaging streams where you need them most. If you own a J-Shiatsu system, explore the pre-programmed massage cycles that simulate professional techniques. Many users find starting with moderate intensity and gradually increasing provides the most satisfying experience as muscles relax and become more receptive to deeper pressure over time. Never jump straight to maximum intensity—this strains both your muscles and the pump system.

Target Specific Muscle Groups with Jet Adjustments

Jacuzzi whirlpool bath jet placement diagram

Mastering jet adjustment transforms your Jacuzzi from a simple warm bath into targeted therapy. Back jets positioned along tub walls deliver the most intense massage, ideal for relieving shoulder, lower back, and hip tension after physical activity. Foot and calf jets provide gentler stimulation that promotes circulation without overwhelming sensitive muscles, perfect for evening relaxation. Experiment with intensity settings to find your comfort zone—more intense doesn’t always mean better, as extended high-intensity exposure can cause muscle soreness rather than relief.

Many Jacuzzi models allow independent control of different jet banks, letting you activate only the jets you need while conserving energy and reducing noise. The J-Quiet series excels here with vibration-minimizing technology. If your model includes air injection systems alongside water jets (common in Design Series models), these create a gentler, effervescent sensation that provides light stimulation without deep pressure. For optimal results, spend 5 minutes on each major muscle group during your session.

Limit Session Duration for Maximum Therapeutic Benefit

Proper session timing ensures therapeutic benefits without health complications from extended hot water exposure. Standard hydrotherapy sessions of 15-30 minutes provide meaningful muscle relief while keeping core body temperature safe. Higher water temperatures require shorter sessions, as your body absorbs heat more rapidly. Similarly, higher jet intensities increase blood circulation and metabolic activity, generating additional body heat during your session.

Listen to your body’s signals throughout your bath. Dizziness, lightheadedness, or nausea indicate you’ve stayed too long or the temperature exceeds your tolerance. Pregnant individuals, those with cardiovascular conditions, and diabetics should consult healthcare providers about appropriate session limits before using their whirlpool bath. Never consume alcohol before or during hydrotherapy sessions—this significantly increases heat-related risks. For optimal results, most users find 20-minute sessions at moderate temperatures provide substantial relief without requiring constant monitoring of warning signs.

Implement Essential Safety Protocols During Use

Jacuzzi GFCI safety check

Jacuzzi whirlpool baths incorporate multiple safety features, but understanding these and additional precautions ensures your experience remains safe. GFCI (Ground Fault Circuit Interrupter) protection prevents shock hazards by cutting power if electrical leakage occurs—test this monthly to verify functionality. Never bypass GFCI protection, and contact a qualified electrician immediately if your system trips during normal operation.

Water temperature requires ongoing attention throughout each session. Test again before adding hot water, and consider lowering jet intensity when adding hot water to avoid dangerous splashing. Enter and exit your Jacuzzi carefully—wet surfaces create serious slip hazards. Many models include textured surfaces in critical areas, but adding an external bath mat provides additional protection. Children should never use whirlpool baths without direct adult supervision, and elderly users may benefit from handrails when entering and exiting.

Drain and Clean Immediately After Each Session

Proper post-use maintenance protects your investment and ensures hygiene for every session. Begin by running the jets with clear water for 2-3 minutes after each use, which flushes residual bath products, oils, and debris from internal plumbing. Some models include automatic purge cycles that activate when draining—these draw air through the system to clear remaining water from pipes and prevent stagnation. If your model lacks this feature, manually run pumps briefly after draining to remove standing water.

After purging, drain completely and wipe all surfaces dry with a soft cloth to prevent water spots. Use non-abrasive cleaners designed for acrylic or your bath’s specific surface material—avoid harsh chemicals that damage seals and finishes. Pay special attention to jet faces and control interfaces where residue accumulates most readily. For models with removable jet faces (like many Aura series), periodic manual cleaning provides more thorough maintenance than surface cleaning alone.

Follow Model-Specific Maintenance Schedules

Beyond daily cleaning, regular maintenance keeps your Jacuzzi operating at peak performance. Weekly maintenance includes surface cleaning with appropriate products, inspection of visible jets, and running filtration systems if equipped. Monthly deep cleaning targets internal plumbing using manufacturer-recommended solutions that dissolve buildup without damaging components. Never use standard household cleaners in jet cleaning—they deteriorate rubber seals and leave harmful residues.

Quarterly maintenance addresses components that wear over time. Inspect all seals and gaskets for cracking or drying, replacing damaged components before they fail. Check that all control functions respond properly and that pump operation sounds smooth. Annual professional inspection provides comprehensive evaluation of internal plumbing, electrical safety, and overall system condition. Many Jacuzzi owners schedule annual service in early autumn to prepare for heavy winter use when relaxation needs peak.

Troubleshoot Common Operational Issues

Understanding common problems saves time and frustration when issues arise. Reduced jet performance typically indicates clogged intake screens, insufficient water level, or air in the pump system. Check that water covers all jet openings and that intake screens are clean. If jets sputter, the pump likely contains air—activate on low speed for several minutes to purge air before increasing intensity.

Unusual pump sounds require investigation. Grinding noises often indicate debris in the impeller chamber—remove the intake screen and check for obstructions. Whining sounds may signal bearing wear, suggesting professional service is needed. Temperature issues often relate to settings or heater malfunctions—verify settings are correct and that the heater indicator shows active heating. Control interface problems typically stem from electrical issues or moisture—check power supply and ensure controls are clean and dry. Persistent problems require professional diagnosis.

How to Make a Sitz Bath in Tub: Easy Steps


Struggling with hemorrhoids, postpartum discomfort, or anal fissures? Learning how to make a sitz bath in tub could be your ticket to relief. This targeted therapy involves soaking only your hips and buttocks in warm water to boost blood flow and accelerate healing in sensitive pelvic tissues. Unlike a full bath, a sitz bath focuses precisely where you need it most—on the perineal area where nerves and blood vessels converge near the surface. Most people experience noticeable improvement within days when following proper sitz bath techniques. In this guide, you’ll discover exactly how to prepare, perform, and maximize your sitz bath sessions for optimal results—using just your standard bathtub and common household items.

Transform Your Bathtub into a Healing Station Today

Creating an effective sitz bath requires transforming your ordinary bathtub into a therapeutic healing environment. Start by thoroughly cleaning your tub with a mild, non-abrasive cleaner to remove any soap residue or bacteria that could irritate sensitive tissues. Pay special attention to the drain area and corners where grime accumulates. After cleaning, rinse multiple times to eliminate all traces of cleaning products—your goal is a completely neutral environment for your delicate pelvic area.

Fill your tub with just enough warm water to submerge your hips and buttocks—typically 4-6 inches (10-15 cm) deep, or about one-quarter to one-third of your tub’s capacity. This shallow depth conserves water while ensuring proper coverage. For most adults, this amount creates the perfect therapeutic zone without unnecessary water waste. If you have mobility concerns, consider placing a non-slip mat in the tub before filling to prevent accidents when entering.

Perfect Your Water Temperature in 60 Seconds

The right water temperature makes or breaks your sitz bath experience. Your ideal range sits between 100-105°F (38-41°C)—warm enough to boost circulation but cool enough to prevent burns. Never test with your hand; instead, use your elbow or inner wrist, which have sensitivity closer to your treatment area. The water should feel comfortably warm, allowing you to sit for 15-20 minutes without discomfort.

If you’re unsure about temperature accuracy, invest in an inexpensive bath thermometer—it pays for itself in preventing painful mistakes. For those with diabetes or reduced temperature sensitivity, consult your doctor before starting sitz bath therapy. Remember: water above 110°F can worsen inflammation and cause tissue damage, while water that’s too cool won’t deliver therapeutic benefits.

Choose the Right Additives for Your Specific Condition

Epsom salt baking soda apple cider vinegar chamomile tea sitz bath

Enhance your sitz bath’s effectiveness by selecting additives tailored to your condition:

  • For hemorrhoids: Add 2 cups Epsom salt to reduce swelling and improve circulation
  • For itching or yeast infections: Mix in 4-5 tablespoons baking soda to restore pH balance
  • For vaginal irritation: Use 1 cup raw apple cider vinegar for its natural antibacterial properties
  • For general soothing: Steep 2-3 chamomile tea bags in hot water, then add to your bath

Always dissolve additives completely before entering the tub. If using essential oils like tea tree or lavender, dilute 5-10 drops in a carrier oil first to prevent skin irritation. Avoid harsh soaps, bubble baths, or heavily scented products—they’ll do more harm than good for sensitive tissues.

Execute Your Sitz Bath with Precision

Position Yourself Correctly for Maximum Benefit

How you sit in your tub dramatically affects your sitz bath’s effectiveness. Carefully lower yourself into the water backward, supporting your weight with both hands on the tub edges to prevent slipping. Once seated, ensure your hips and buttocks are fully submerged with water reaching your lower abdomen. Adjust your position until you feel complete coverage of the affected area without water rising too high on your torso.

Lean back against the tub wall for support if needed, but maintain enough upright posture to keep water at the proper level. During your soak, gently splash water over problem areas to ensure complete coverage. Some people find rocking side-to-side helps water reach all tissues effectively. If you feel lightheaded at any point, exit immediately and consult your doctor before your next session.

Time Your Session for Optimal Healing

Set a timer for exactly 15-20 minutes—this duration provides maximum therapeutic benefit without risking skin irritation from prolonged moisture exposure. Shorter sessions rarely deliver full relief, while longer soaks can cause tissue breakdown. Many people find it helpful to schedule sitz baths after bowel movements when pain and discomfort peak.

As you soak, focus on deep breathing to enhance relaxation and blood flow. This mindful approach amplifies your body’s natural healing response. When the timer sounds, exit slowly and deliberately—warm water can cause dizziness, especially if you have low blood pressure. Never rush this critical transition phase.

Dry and Care for Treated Areas Properly

Pat dry perineal area after sitz bath

Avoid Post-Bath Mistakes That Undermine Your Results

Your healing journey continues after you leave the tub. Gently pat the treated area dry with a clean, soft towel—never rub, as friction can damage delicate healing tissues. For hard-to-reach areas or skin folds, use a hair dryer on cool setting held at least 12 inches away. Complete dryness prevents moisture-related irritation and infection.

If your doctor recommended a protective ointment, apply a thin layer now using clean fingertips. Products containing zinc oxide or petroleum jelly create a healing barrier without trapping moisture. Immediately afterward, slip into loose, breathable cotton underwear and pants—tight clothing traps heat and moisture, counteracting your bath’s benefits. Some people find going commando for an hour post-bath speeds healing when privacy allows.

Follow This Daily Sitz Bath Schedule

Adjust Frequency Based on Your Healing Progress

Most people benefit from 2-3 sitz baths daily during acute flare-ups or initial recovery phases. Postpartum women often start with this frequency within 24-48 hours after delivery. As symptoms improve, gradually reduce to once daily, then every other day. Chronic condition sufferers typically maintain 1-3 weekly baths for ongoing prevention.

Track your symptoms in a simple notebook to identify patterns. Note what additives work best, optimal timing relative to bowel movements, and any triggers to avoid. This personalized data helps you refine your routine faster than generic advice ever could. Remember: consistency matters more than perfection—better to do shorter, regular baths than occasional marathon sessions.

Dodge These 5 Costly Sitz Bath Errors

Sitz bath mistakes infographic

Water Temperature Mismanagement

Using water that’s too hot represents the most dangerous sitz bath mistake. That “pleasantly hot” sensation often exceeds safe limits, potentially causing burns on sensitive tissues. Always test with your elbow, not your hand, and when in doubt, choose cooler water—you can always add warmth but can’t undo damage.

Ignoring Equipment Hygiene

Failing to clean your tub or portable basin after each use breeds bacteria that can infect healing tissues. Wash thoroughly with mild soap and hot water, then dry completely before storage. For standard bathtubs, give them an extra rinse cycle before your next session to remove any residual soap.

Overlooking Warning Signs

If your symptoms worsen after starting sitz baths, or if you develop fever, unusual discharge, or increased pain, stop immediately and consult your doctor. Sitz baths support healing but don’t replace medical treatment for serious conditions.

Using Harsh Additives

Bubble baths, heavily scented soaps, and undiluted essential oils can irritate sensitive areas. Stick to plain water or doctor-recommended additives in proper concentrations. When trying new ingredients, test on a small skin patch first.

Rushing the Process

Skipping proper preparation or cutting sessions short sabotages results. Allow 30 minutes total for setup, soaking, and post-bath care—this investment pays off in faster healing and reduced discomfort.

Know When Professional Help Outweighs Home Treatment

While learning how to make a sitz bath in tub solves many issues, certain red flags demand medical attention. If symptoms persist beyond 1-2 weeks of consistent sitz baths, schedule a doctor’s visit—your condition may require prescription treatment. Heavy or persistent rectal bleeding, fever above 100.4°F, or sudden symptom worsening all warrant immediate consultation. Always discuss sitz bath therapy with your healthcare provider before starting, especially if you have diabetes, heart conditions, or take blood thinners.

Creating an effective sitz bath requires minimal equipment but delivers maximum relief when done correctly. By mastering water temperature control, selecting condition-specific additives, and following proper post-bath care, you’ll transform your standard bathtub into a powerful healing station. Remember: consistent 15-20 minute sessions with appropriate frequency yield better results than occasional marathon soaks. Start today with plain warm water, then gradually incorporate targeted additives as your comfort level increases. With this simple, drug-free therapy, you’re taking an important step toward reclaiming your comfort and quality of life.

Wet Room Bath Ideas for Small Spaces 2026


Nothing transforms a bathroom quite like a well-designed wet room. These seamless, open-concept bathing spaces have revolutionized bathroom design by merging shower areas with the rest of the room in a single, cohesive layout. If you’ve noticed water pooling near your shower door or feel cramped in your current bathroom, a wet room solution could be your answer. Over 65% of homeowners who convert to wet rooms report significantly improved daily bathroom experiences, citing easier cleaning and a more luxurious feel. This guide delivers actionable wet room bath ideas that solve common problems while creating stunning spaces you’ll love for years.

Why Your Small Bathroom Needs a Curbless Wet Room Design

Curbless wet room designs eliminate the traditional shower threshold, creating smooth transitions that make compact bathrooms feel larger and more accessible. Unlike conventional shower enclosures that eat up valuable square footage with doors and frames, curbless designs maximize every inch of space while providing universal access for all ages and abilities.

The secret to successful curbless wet rooms lies in precise floor gradient calculations. Professional installers create a subtle 2% slope toward the drain—just enough to direct water flow without being noticeable underfoot. This engineering detail prevents water from spreading into dry areas while maintaining the seamless aesthetic that defines modern wet rooms.

For optimal performance in small spaces, pair your curbless design with a linear drain along one wall instead of a center drain. This strategic placement allows for more flexible shower positioning and creates clean sightlines that enhance the perception of space. Choose a drain finish that complements your fixtures—matte black for contemporary spaces or brushed brass for warmer aesthetics.

Tile Selection Secrets for Wet Room Durability and Style

porcelain tile large format wet room

Your tile choice dramatically impacts both the longevity and visual impact of your wet room. Porcelain tiles have become the gold standard for wet areas due to their near-zero water absorption rate and exceptional durability. Large-format porcelain panels measuring 24×48 inches or larger minimize grout lines, reducing maintenance while creating that coveted seamless look.

Natural stone brings undeniable luxury but requires careful consideration. Marble offers timeless elegance with its distinctive veining, but needs regular sealing to prevent staining. For higher-traffic wet rooms, consider porcelain tiles that mimic natural stone—modern manufacturing creates incredibly realistic alternatives that withstand daily use without maintenance headaches.

Don’t overlook the slip resistance factor when selecting wet room tiles. Look for tiles rated R10 or higher on the anti-slip scale, especially for floor applications. Textured finishes, mosaic patterns, and matte surfaces all provide better traction than perfectly smooth options. Test samples by wetting them and walking on them before committing to your selection.

Smart Tile Layout Techniques for Visual Impact

Strategic tile placement can transform your wet room from ordinary to extraordinary. Consider these professional techniques:

  • Directional patterns: Lay rectangular tiles vertically to create the illusion of higher ceilings
  • Accent bands: Use contrasting mosaic tiles at shoulder height to break up large wall areas
  • Floor inlays: Create subtle geometric patterns with darker tiles to define the shower zone
  • Waterfall effect: Continue wall tiles down onto the floor for seamless visual flow

Space-Maximizing Wet Room Layouts for Compact Bathrooms

small wet room layout corner shower

When square footage is limited, every element in your wet room must serve multiple purposes. Corner shower configurations make brilliant use of often-wasted space while leaving the room’s center clear for movement. Quadrant-shaped enclosures with curved glass panels soften the visual impact and prevent the room from feeling cramped.

Wall-mounted fixtures provide immediate space savings in small wet rooms. Floating toilets eliminate bulky cisterns, while wall-hung vanities create visual breathing room beneath. The space-saving benefits extend beyond aesthetics—these installations also make floor cleaning significantly easier, reducing maintenance time by up to 40%.

Partial glass partitions offer the perfect compromise between water containment and spatial openness. Instead of enclosing the entire shower area, install a single frameless panel that blocks splash zones while preserving sightlines. This solution works particularly well when positioned to protect the vanity area from direct spray.

Lighting Strategies That Elevate Wet Room Ambiance

Proper lighting transforms functional wet rooms into atmospheric retreats. Recessed LED downlights with IP65+ ratings provide essential task lighting while withstanding steam and moisture. Arrange these fixtures in a grid pattern rather than clustering them over the shower to ensure even illumination throughout the space.

Backlit mirrors serve dual purposes as both functional grooming tools and atmospheric elements. LED strips concealed behind mirror frames create shadow-free illumination perfect for makeup application, while some premium models offer color temperature adjustment from energizing cool tones to relaxing warm hues. The reflected light also makes the space feel significantly larger.

For evening relaxation, incorporate subtle ambient lighting at multiple levels. Consider these options:

  • Floor-level cove lighting that washes walls with soft glow
  • Recessed niche lighting to highlight decorative tiles
  • Towel warmer lighting that creates warm focal points
  • Color-changing LED strips under floating vanities

Color Psychology in Wet Room Design

Your color choices directly impact how you experience your wet room daily. Neutral palettes featuring whites, creams, and soft grays maximize light reflection and create serene backdrops that never feel dated. These timeless schemes work particularly well in north-facing bathrooms with limited natural light.

Dark color schemes introduce dramatic sophistication to wet rooms with ample square footage and good ventilation. Charcoal floors paired with matte black fixtures create moody, spa-like atmospheres, but require careful balancing with lighter elements to prevent the space from feeling oppressive. Reserve dark schemes for master bathrooms rather than small guest facilities.

Green-infused palettes connect wet rooms to biophilic design principles, bringing organic warmth to otherwise sleek spaces. Consider these approaches:

  • Sage green accent tiles paired with natural wood elements
  • Moss-colored mosaic bands that mimic forest floors
  • Living walls featuring humidity-loving ferns and orchids
  • Stone textures with subtle green veining for natural variation

Essential Fixtures for Luxury Wet Room Experiences

rainfall shower head thermostatic mixer wet room

Your shower system defines the wet room experience more than any other element. Thermostatic mixers ensure consistent temperature control regardless of other water usage in your home—a critical safety feature for households with children. Digital shower systems with programmable settings take personalization further, remembering individual preferences for true luxury.

Rainfall shower heads have become the signature feature of premium wet rooms. For authentic spa-like experiences, select heads with at least 10 inches diameter positioned at ceiling height. Pair your rainfall fixture with a handheld wand on a slide bar for flexible cleaning and practical use—this combination delivers both luxury and functionality.

Fixture finishes significantly impact your wet room’s personality. While chrome remains popular for its versatility, consider these trending alternatives:

  • Brushed brass for warm, inviting spaces
  • Matte black for contemporary contrast
  • Satin nickel for subtle sophistication
  • Polished gold for statement luxury

Waterproofing Fundamentals Every Homeowner Should Know

Linear drains represent one of the most important wet room innovations, replacing traditional center drains with sleek channel systems along walls. These elongated drains handle high water volumes efficiently while enabling the subtle floor gradients necessary for curbless designs. Choose stainless steel models with removable grates for easy maintenance.

The waterproofing membrane forms your wet room’s invisible foundation—compromise here leads to catastrophic failures. Modern liquid-applied membranes create seamless barriers that accommodate building movement without cracking. Professional installation is non-negotiable; waterproofing failures cause structural damage that far exceeds initial installation costs.

Annual sealant maintenance prevents expensive water damage in wet rooms. Silicone seals around fixtures, glass panels, and floor-wall junctions should be inspected for signs of mould, cracking, or separation. Replace failing seals immediately—waiting allows moisture to penetrate substrates where damage becomes invisible and extensive.

Personal Touches That Make Your Wet Room Unique

Freestanding bathtubs transform functional wet rooms into luxurious personal retreats, serving as dramatic focal points in larger designs. Position your tub away from walls for 360-degree visual appeal, and select materials that complement your overall scheme—stone resin for contemporary spaces or cast iron for traditional charm.

Strategic plant placement brings life to wet rooms without compromising functionality. Ferns, orchids, and air plants thrive in humid environments, adding organic elements that soften hard surfaces. Place plants on floating shelves away from direct shower spray, and ensure adequate ventilation to prevent excess moisture damage.

Custom cabinetry reflects your personal style while maximizing storage. Consider locally made or bespoke pieces for unique wet room bath ideas that standard fixtures can’t achieve. Quality materials and craftsmanship ensure longevity in the demanding wet room environment—invest in solid wood cores with marine-grade finishes.

Smart Maintenance Practices for Long-Lasting Wet Rooms

Effective ventilation prevents moisture damage and mold growth in wet rooms. Extractor fans rated for bathroom use should run continuously or with humidity sensors that activate automatically. Proper ventilation reduces maintenance time by preventing limescale buildup and mold formation.

Daily squeegeeing of glass surfaces prevents hard water staining and limescale accumulation. Keep a dedicated squeegee mounted near the shower exit for quick use after each session. This simple 30-second habit extends the time between deep cleaning sessions by months.

Weekly cleaning routines maintain your wet room’s appearance without damaging surfaces. Use pH-neutral cleaners specifically formulated for bathroom surfaces—avoid vinegar-based solutions that can degrade grout and stone sealants over time. Focus on high-moisture areas where mold tends to begin forming.

Professional inspections every 18-24 months catch potential issues before they become major problems. Certified wet room specialists can identify early signs of waterproofing failure, drainage issues, or fixture wear that homeowners often miss. This preventative maintenance extends your wet room’s lifespan by 5-7 years on average.


Wet room bath ideas offer remarkable versatility for homeowners seeking modern, functional bathroom spaces. From compact corner solutions to expansive luxury designs, the right wet room transforms daily routines into everyday indulgence. Prioritize quality waterproofing, thoughtful drainage, and materials that balance aesthetics with durability to create spaces that perform beautifully for years. Whether you prefer sleek minimalism or spa-like opulence, these design principles ensure your wet room delivers both style and substance in equal measure. Start planning your transformation today—your perfect bathroom experience awaits.

Eczema Bath Tips for Babies 2026


Watching your infant scratch relentlessly at raw, inflamed patches of skin can leave even the most patient parent feeling helpless. If your baby struggles with eczema, you’ve likely tried countless creams and ointments with mixed results. What many parents don’t realize is that a surprisingly effective treatment recommended by pediatric dermatologists involves something you probably already have under your sink: diluted bleach. This eczema bath baby treatment has transformed how doctors manage severe flare-ups and stubborn bacterial infections that complicate infant eczema. While the idea of bathing your delicate baby in bleach may seem counterintuitive, when properly diluted, this simple therapy can provide dramatic relief where other treatments have failed.

Bleach bath therapy isn’t just another home remedy—it’s a scientifically supported treatment that targets one of the primary drivers of severe eczema: bacterial overgrowth. When your baby’s skin barrier becomes compromised by eczema, it creates the perfect environment for Staphylococcus bacteria to thrive, worsening inflammation and triggering relentless itching. By incorporating properly diluted bleach baths into your baby’s skincare routine, you can break this vicious cycle and potentially reduce your reliance on prescription medications. This guide provides everything you need to know about safely implementing this powerful eczema bath baby treatment, from preparation to frequency, so you can make informed decisions about your child’s care.

Why Your Baby’s Eczema Needs Bleach Baths More Than You Think

Bleach baths work by creating an environment where harmful bacteria cannot survive, directly addressing one of the root causes of persistent eczema flare-ups in infants. When your baby’s skin barrier becomes compromised by eczema, it allows Staphylococcus aureus bacteria to colonize the affected areas, triggering inflammation that worsens the condition. This creates a vicious cycle: damaged skin invites bacterial growth, which causes more inflammation, which further damages the skin barrier. The diluted bleach solution disrupts this cycle by significantly reducing bacterial populations on your baby’s skin without harming their delicate tissue when properly prepared.

How Bleach Baths Reduce Eczema Flare Frequency

Clinical evidence shows that regular bleach bath therapy can decrease both the frequency and severity of eczema outbreaks in infants. By reducing the bacterial load on your baby’s skin, these baths allow damaged tissue to heal more effectively during treatment periods. Many parents report noticeable improvement within just a few weeks of consistent use—less redness, reduced oozing, and significantly decreased scratching. This isn’t just cosmetic improvement; studies confirm that infants receiving regular bleach baths require fewer courses of topical steroids and antibiotic treatments compared to those using standard skincare alone.

The Antibiotic Alternative Parents Are Missing

One of the most compelling benefits of bleach bath therapy is its potential to reduce your baby’s exposure to antibiotics. Both topical and oral antibiotics carry risks of side effects and contribute to antibiotic resistance—a growing public health concern. When bacteria become resistant to antibiotics, treating serious infections becomes much more difficult. By incorporating bleach baths into your eczema management plan, you may significantly decrease your baby’s need for antibiotic treatments while still effectively controlling bacterial overgrowth. This approach supports your baby’s natural healing processes without introducing additional medications that could disrupt their developing microbiome.

Prepare Your Baby’s Eczema Bath with Perfect Dilution

bleach bath dilution ratio baby eczema

Creating a therapeutic bleach bath requires precise attention to dilution ratios to ensure maximum safety while maintaining effectiveness. The goal is to achieve a concentration similar to what you’d find in a public swimming pool—just enough to combat bacteria without irritating your baby’s sensitive skin. Getting this balance right is non-negotiable for both safety and therapeutic benefit, so follow these steps carefully for every bath session.

Fill Tub with Correct Water Temperature First

Begin by filling your bathtub with lukewarm water to a depth appropriate for your baby’s size—typically 2-3 inches deep for infants. Water temperature is critical; anything warmer than lukewarm can strip natural oils from your baby’s compromised skin barrier and trigger additional inflammation. Test the water with your inner wrist or elbow before placing your baby in the tub—it should feel neutral, neither warm nor cool. Hot water is a common trigger for eczema flares, so err on the cooler side if you’re unsure.

Measure and Mix Bleach Solution Precisely

Once your tub contains properly temperatured water, add liquid household bleach using the precise ratio of approximately one capful (about ¼ cup) of bleach for each quarter-tubful of water. For a standard infant bath (about 5 gallons of water), this translates to roughly ½ teaspoon of bleach. The solution should have a faint chlorine odor similar to a swimming pool—this serves as your visual indicator that you’ve achieved proper dilution. Never eyeball the amount; use actual measuring spoons for accuracy. Stir the water thoroughly for at least one minute to ensure even distribution and prevent concentrated pockets of bleach.

Administer Baby Eczema Bath in 3 Critical Steps

With your properly diluted bleach bath prepared, follow these three essential steps to ensure your baby receives maximum therapeutic benefit while remaining comfortable and safe throughout the treatment.

Step 1: Limit Soak Time to 10-15 Minutes

Allow your baby to soak in the solution for precisely 10-15 minutes. This duration provides sufficient contact time for the bleach to exert its antibacterial effects without prolonged exposure that could potentially dry out or irritate sensitive skin. If your baby hasn’t taken baths of this length before, start with 5-7 minutes and gradually increase by 1-2 minutes per session as they become accustomed to the routine. Set a timer—you might lose track while comforting your baby, and exceeding the recommended time increases irritation risk.

Step 2: Gentle Application Without Rubbing

During the soak, gently splash water over your baby’s body to ensure the solution contacts all affected skin areas. Never scrub or rub the skin, as this mechanical irritation can further damage the compromised skin barrier and trigger additional inflammation. If your baby has particularly severe patches, you can use a soft washcloth to lightly dab the solution onto affected areas, but avoid any vigorous cleaning motions that might cause micro-tears in fragile skin.

Step 3: Immediate Moisturizing After Bath

After the soak, gently lift your baby from the tub and immediately pat their skin dry with a soft towel—never rub. Within three minutes of exiting the bath, apply your baby’s prescribed moisturizer or emollient to lock in moisture while the skin is still damp. This step is crucial for maintaining the skin barrier between treatments. Use a thick, fragrance-free ointment rather than a lotion for best results, applying liberally to all areas, not just those visibly affected by eczema.

Avoid These 3 Dangerous Bleach Bath Mistakes

bleach bath safety mistakes eczema baby

While bleach baths are generally safe when properly prepared, certain errors can cause serious harm to your baby’s delicate skin. Understanding and avoiding these common mistakes protects your infant while still allowing them to benefit from this therapeutic treatment.

Mistake 1: Using Undiluted Bleach Directly on Skin

Never, under any circumstances, apply undiluted bleach directly to your baby’s skin. Even brief contact with concentrated bleach causes severe chemical burns, intense pain, and significant tissue damage requiring emergency medical treatment. Always verify your dilution ratio before each bath and never skip the mixing step. Keep the bleach bottle well out of reach when preparing the bath to prevent accidental spills or grabs.

Mistake 2: Ignoring Signs of Skin Irritation

Monitor your baby constantly during the entire bleach bath for any signs of discomfort, increased redness, or adverse reactions. If your baby suddenly becomes fussy, develops new redness, or seems to experience increased itching during the bath, immediately end the treatment and rinse thoroughly with clean lukewarm water. Some babies may have heightened sensitivity that makes bleach baths inappropriate—this isn’t failure, it’s important information for your pediatrician.

Mistake 3: Bathing Too Frequently

More is not better with bleach bath therapy. Excessive frequency (more than 2-3 times weekly) can disrupt your baby’s natural skin barrier and cause irritation. Most pediatric dermatologists recommend starting with twice-weekly treatments and adjusting based on your baby’s response. Never increase frequency without consulting your healthcare provider, as overuse negates the benefits and can actually worsen eczema symptoms.

When to Stop Bleach Baths and Call Your Pediatrician Immediately

eczema infection signs baby

While bleach baths are generally safe for most infants with eczema, certain situations require immediate discontinuation of treatment and consultation with your pediatrician. Recognizing these critical warning signs protects your baby from potential complications.

Signs of Allergic Reaction or Severe Irritation

Discontinue bleach bath therapy immediately if your baby develops hives, widespread redness beyond existing eczema patches, swelling, or difficulty breathing during or after a bath. These symptoms indicate a possible allergic reaction requiring medical evaluation. Similarly, if your baby’s skin becomes significantly more irritated, painful, or develops blisters following a bleach bath, stop the treatment and contact your pediatrician before proceeding.

Evidence of Active Skin Infection

If your baby’s eczema shows signs of active infection—including pus-filled blisters, honey-colored crusting, increased warmth in affected areas, or fever—you need medical evaluation before continuing bleach baths. While bleach baths help prevent infections, they’re not sufficient treatment for active, spreading infections that may require oral antibiotics. Your pediatrician can determine whether to continue bleach baths alongside other treatments or temporarily suspend them while addressing the acute infection.

No Improvement After 4 Weeks of Consistent Use

If you’ve followed proper bleach bath protocol consistently for four weeks without noticeable improvement in your baby’s eczema symptoms, schedule a follow-up with your pediatrician. This lack of response may indicate that another underlying condition is contributing to your baby’s skin issues, or that a different treatment approach would be more effective. Don’t continue an ineffective treatment out of hope—it’s better to adjust your strategy with professional guidance.

« Older posts Newer posts »