Bathroom ventilation is critical for preventing mold and moisture damage, yet many homeowners struggle with properly wiring their bath fan and light combinations. If your bathroom fan won’t turn on while the light works, or both components fail to function after installation, you’re not alone—improper wiring causes most bathroom ventilation issues. This comprehensive guide shows you exactly how to wire bath fan and light units correctly the first time, whether you’re installing a new unit during a renovation or replacing an aging fixture. You’ll learn the essential electrical requirements, safety protocols, and step-by-step connection methods that ensure your bathroom stays dry and well-lit for years to come.
When tackling how to wire bath fan and light fixtures, understanding your specific configuration options is crucial before touching a single wire. Bathroom electrical work demands respect for both safety and code compliance, but with proper preparation, most homeowners can successfully complete this project without professional help. By the end of this guide, you’ll know precisely which wires connect where, how to choose between single or dual switch setups, and what common mistakes to avoid during installation.
Single vs. Dual Switch Wiring Configurations
Choosing between single-switch and dual-switch setups determines your entire wiring approach when you wire bath fan and light fixtures. A single-switch configuration uses one wall toggle to control both components simultaneously—turning on the light automatically activates the fan. This simpler setup requires only standard 14/2 NM-B cable (black, white, and ground wires) between your switch and fixture, making it ideal for beginners or when working with limited space in existing walls.
For independent control, dual-switch wiring gives you the flexibility to run the fan without turning on the light—a must-have feature during morning showers when bright lights are unnecessary. This configuration requires 14/3 NM-B cable (black, red, white, and ground) to create separate hot leads for each component. The red wire typically powers the fan while the black wire controls the light, allowing completely independent operation from two separate switches mounted side-by-side in your bathroom.
Critical wiring tip: When installing dual switches, mark all white wires used as hot conductors with black tape at both ends. The National Electrical Code requires this identification to prevent dangerous confusion during future maintenance. Many DIYers skip this step, creating serious safety hazards for themselves or future homeowners.
Essential Tools and Materials Checklist
:max_bytes(150000):strip_icc()/how-to-install-a-bathroom-exhaust-fan-4147975-08-53bbc79144ec4c30b0008a16b95551da.jpg)
Before attempting to wire bath fan and light fixtures, gather these non-negotiable items to ensure a smooth installation:
- Voltage tester or multimeter (test before and after working on circuits)
- Wire strippers with gauge markings for 14-12 AWG wires
- Needle-nose pliers for bending and securing wire connections
- Screwdriver set (both Phillips and flathead)
- Wire nuts matching your wire gauge (blue for 14 AWG, yellow for 12 AWG)
- Electrical tape (10+ feet)
- Fish tape (for retrofit installations through existing walls)
Your materials list must include:
– Fan-rated electrical box (standard boxes can’t support fan vibration)
– 14/2 or 14/3 NM-B cable (depending on your switch configuration)
– GFCI-protected switch or circuit breaker (required by code)
– Moisture-resistant switch plates
– Combination fan-light unit rated for damp locations
Warning: Never use standard light fixture boxes for fan installations—they’ll loosen over time from vibration, potentially causing the unit to fall. Proper fan-rated boxes have reinforced mounting brackets that secure directly to ceiling joists.
Safety Protocols and Code Requirements
Electrical safety in bathroom installations isn’t optional—it’s a matter of preventing fire or electrocution hazards. The National Electrical Code mandates GFCI protection for all bathroom receptacles and lighting circuits, which means your fan-light combination must either connect to a GFCI-protected circuit or use a special GFCI switch at the wall. This protection cuts power within milliseconds if current leakage is detected, potentially saving your life in a wet environment.
Most building departments require dedicated 20-amp circuits for bathroom outlets, but fan-light combinations can typically share a 15-amp circuit if no other bathroom outlets connect to it. Verify your local code requirements before starting—some jurisdictions mandate separate circuits for fans and lights in new construction. Remember that bathroom circuits cannot serve outlets outside the bathroom, so don’t try to extend this circuit to power hallway or bedroom fixtures.
Life-saving practice: Always test your voltage tester on a known live circuit before and after checking your work circuit. Faulty testers have caused numerous electrical accidents when DIYers mistakenly believed circuits were dead. Keep one hand in your pocket while testing to prevent current from traveling across your heart if accidental contact occurs.
Step-by-Step Wiring Process for Single Switch Setup
Follow these precise steps when you wire bath fan and light with a single switch:
- Turn off power at the breaker and verify with your voltage tester at both the switch box and fan location
- Connect the power source black (hot) wire to the switch’s common terminal
- Attach a black pigtail wire from the switch’s load terminal to both the fan and light black wires
- Splice all white (neutral) wires together with a wire nut
- Connect all ground wires to each other and to the switch’s green terminal
- Carefully tuck wires into the electrical box without pinching conductors
For the fan unit connections:
– Black wire → Black (hot) from switch
– White wire → White (neutral) bundle
– Green/bare wire → Ground bundle
– Blue wire (if present) → Connect to black hot wire (some units have separate light wiring)
Pro tip: Wrap all wire nut connections with electrical tape before tucking them into boxes. This extra step prevents connections from loosening over time—especially important in humid bathroom environments where thermal expansion and contraction occur daily.
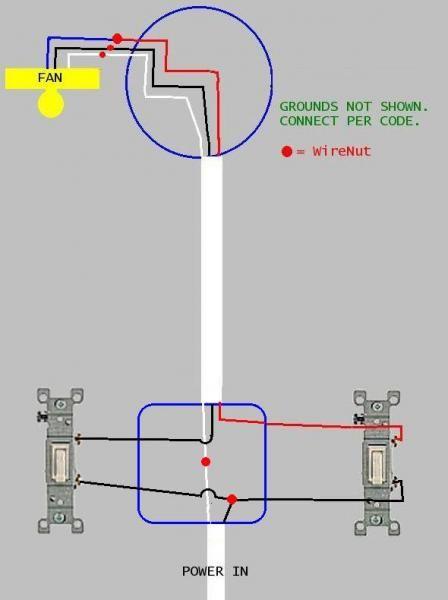
Dual Switch Wiring Configuration Made Simple
Dual-switch installations require careful organization but provide superior functionality. Here’s how to wire bath fan and light independently:
- Run 14/3 cable from the switch box to the fan unit (black, red, white, ground)
- At the fan: connect black wire to light, red wire to fan motor, white to neutral
- In the switch box: connect black (common hot) to both switches’ line terminals
- Attach black wire to first switch’s load terminal (for light)
- Connect red wire to second switch’s load terminal (for fan)
- Splice all white wires together and mark with black tape where used as hots
Common mistake alert: Many DIYers connect the fan’s blue wire to the red wire but forget to connect the fan motor’s black wire to the same red circuit. This error causes the light to work while the fan remains dead—double-check both connections before closing up the unit.
Testing and Troubleshooting Your Installation
After completing your how to wire bath fan and light project, systematic testing prevents future headaches:
- Turn on both components simultaneously and listen for unusual noises
- Check for consistent light output without flickering
- Verify the fan pulls air effectively (hold tissue near grille)
- Test GFCI protection by pressing the test button
Troubleshoot these common issues:
– Fan works but light doesn’t: Check blue wire connection at fan and switch
– Light works but fan doesn’t: Verify both black and blue wires connect to proper circuits
– Both components intermittent: Inspect all wire nut connections for looseness
– GFCI trips immediately: Look for ground wires touching hot terminals
Critical warning: If your circuit breaker trips repeatedly, turn off power immediately and check for short circuits—exposed copper touching where it shouldn’t causes dangerous conditions.
Maintenance for Long-Term Reliability
Properly wired bath fan and light units should last 10+ years with minimal maintenance. Extend their lifespan by:
- Cleaning fan blades and housing every 6 months to prevent dust buildup
- Checking wire connections annually for signs of corrosion
- Replacing worn motor bearings before complete failure occurs
- Ensuring the ventilation duct remains unobstructed
Run your fan for at least 20 minutes after showers to eliminate moisture completely. Consider installing a timer switch that automatically runs the fan for 30 minutes, preventing mold growth even when you forget to turn it on manually.
When Professional Help Becomes Necessary
While many homeowners successfully complete how to wire bath fan and light projects, call a licensed electrician if:
- You need to install a new circuit from your electrical panel
- Your home has aluminum wiring (common in 1965-1973 construction)
- You encounter knob-and-tube wiring during installation
- Local codes require permits you’re uncomfortable obtaining
- You’re unsure about any step in the process
Electrical mistakes can cause house fires or electrocution—never risk your safety to save installation costs. A professional electrician typically charges $150-$300 for this work, a small price compared to potential repair costs from improper wiring.
Mastering how to wire bath fan and light fixtures gives you control over your bathroom’s ventilation and lighting while saving money on installation costs. By following these precise steps, respecting electrical safety protocols, and understanding code requirements, you’ll create a reliable system that prevents moisture damage and keeps your bathroom comfortable. Remember that proper wiring today means fewer problems tomorrow—take your time with each connection, test thoroughly before final assembly, and enjoy the satisfaction of a job well done. Your newly installed fan-light combination will serve your household efficiently for years to come, protecting your home from the damaging effects of excess moisture.
Leave a Reply