Water damage from failing bathroom sealant costs homeowners thousands annually in repairs. When the silicone caulk around your bathtub begins peeling, cracking, or showing mold growth, prompt replacement prevents expensive structural damage. This guide shows you exactly how to replace sealant around bath fixtures correctly the first time—saving money while protecting your home from moisture intrusion. You’ll learn professional techniques for complete old sealant removal, surface preparation, and application that deliver results lasting 3-5 years with proper maintenance.
Why Your Bath Sealant Fails and When to Replace It
Bathroom sealant typically lasts 3-5 years before showing signs of deterioration. Constant exposure to water, temperature fluctuations, and cleaning chemicals breaks down the silicone’s molecular structure. Watch for visible cracks along the bead, especially in corners where movement occurs. Peeling edges that lift away from the tub or tile surface indicate failed adhesion and immediate replacement needs.
Perform the fingernail test: gently scrape along the sealant bead. If your nail catches on rough, brittle sections or pulls material away, renewal is necessary. Discoloration—particularly black, green, or pink spots—reveals mold growth beneath the surface that standard cleaning won’t eliminate. Water stains on adjacent walls or soft spots in cabinetry confirm moisture penetration requiring urgent attention.
Delaying replacement allows water to seep behind fixtures, damaging drywall, subflooring, and framing. This hidden damage often costs 10-20 times more to repair than timely sealant replacement. Address failing caulk at the first signs of deterioration to avoid major renovation expenses.
Essential Tools and Materials for Perfect Sealant Replacement
Selecting the right products makes the difference between temporary fixes and long-lasting results. Purchase 100% silicone bathroom sealant specifically labeled for tub and tile applications—never use general-purpose caulk. Look for “mold-resistant” and “flexible” on the label; these formulations withstand constant moisture exposure. Standard acrylic caulk dries hard, cracks within months, and promotes mold growth.
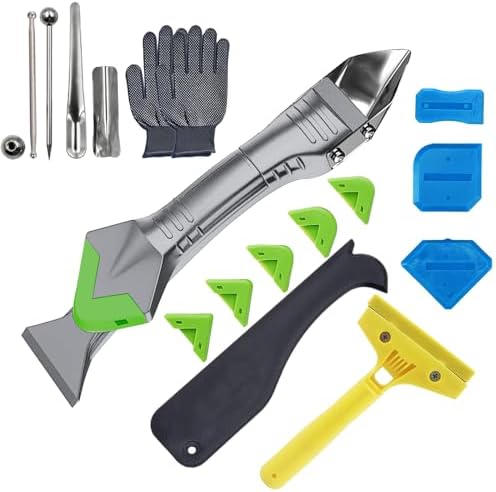
You’ll need these tools for professional results:
– Quality caulk gun with smooth trigger action
– Utility knife with fresh blades
– Plastic putty knives (metal scratches acrylic tubs)
– Needle-nose pliers for stubborn sections
– Painter’s tape (3/4-inch blue tape works best)
– Isopropyl alcohol (90%+ concentration)
– Spray bottle filled with soapy water solution
– Old toothbrush for surface cleaning
Skip cheap tools that compromise your work. A $15 professional caulk gun provides consistent pressure control compared to $2 disposable models that jam and leak. Proper tools save time during application and prevent frustrating mistakes that require rework.
Complete Old Sealant Removal Without Damaging Surfaces
Thorough removal of old material determines new sealant adhesion. Start by scoring along both edges of the existing bead with a sharp utility knife held at a 45-degree angle. Cut through the full depth where sealant meets tub and wall surfaces—this prevents tearing during extraction.
Grab the loosened edge with needle-nose pliers and pull slowly at a 30-degree angle away from the surface. Work in 6-inch sections, applying steady pressure rather than yanking. For stubborn areas, slide a plastic putty knife beneath the bead to lift it free. Never force removal—patience prevents surface scratches that compromise new adhesion.
Check for hidden residue in corners where walls meet the tub. Use an old credit card wrapped in a damp cloth to dislodge trapped particles. Run your fingernail along the joint line—you should feel only smooth, clean surfaces. Any remaining old sealant creates weak points that cause premature failure.
Surface Preparation That Ensures Maximum Adhesion
Clean surfaces bond properly; dirty surfaces guarantee failure. Wash the entire area with warm water and dish soap using a non-abrasive sponge. Focus on corners and joints where soap scum accumulates. Rinse thoroughly with clean water and dry completely with lint-free towels.
For stubborn residue, make a paste of baking soda and water. Apply with an old toothbrush using circular motions, then rinse completely. Never use bleach-based cleaners—they leave residues that repel new sealant. Allow surfaces to air dry for 20 minutes to ensure no hidden moisture remains.
Finish with isopropyl alcohol applied via spray bottle. Wipe the entire bonding surface with a clean microfiber cloth, working in one direction. The alcohol removes invisible oils from skin contact and previous cleaning. Properly prepared surfaces feel slightly tacky—not slick—when ready for new sealant application.
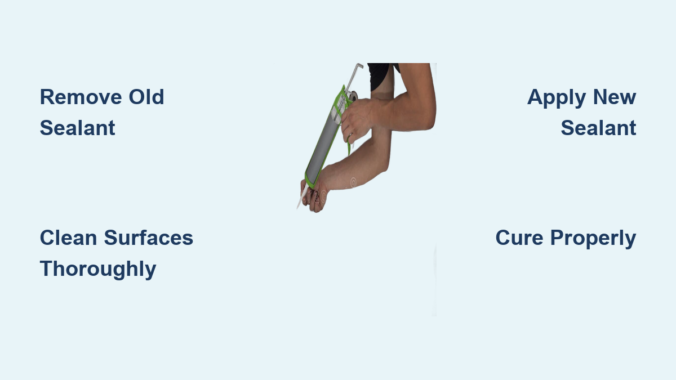
Professional Sealant Application Techniques for Flawless Results
Master these application steps for clean, durable beads every time. Cut the sealant tube nozzle at a 45-degree angle, creating a 1/8-inch opening for standard joints. Larger openings cause messy application; smaller ones create weak, thin beads. Load the tube into your caulk gun and press the plunger until sealant appears at the tip.
Apply painter’s tape 1/16-inch away from the intended bead line on both sides. This creates perfect boundaries and eliminates cleanup work. Hold the caulk gun at a consistent 45-degree angle to the surface, applying steady pressure while moving at a smooth, continuous pace.
Start in a corner and work toward an exit point to avoid trapping yourself. Apply sealant in 3-foot sections to prevent premature skinning. Maintain constant speed—too fast creates thin, weak beads; too slow causes bulges that crack during curing. Keep the nozzle tip touching the back of the joint for maximum adhesion.
Perfecting the Sealant Bead Shape Through Tooling
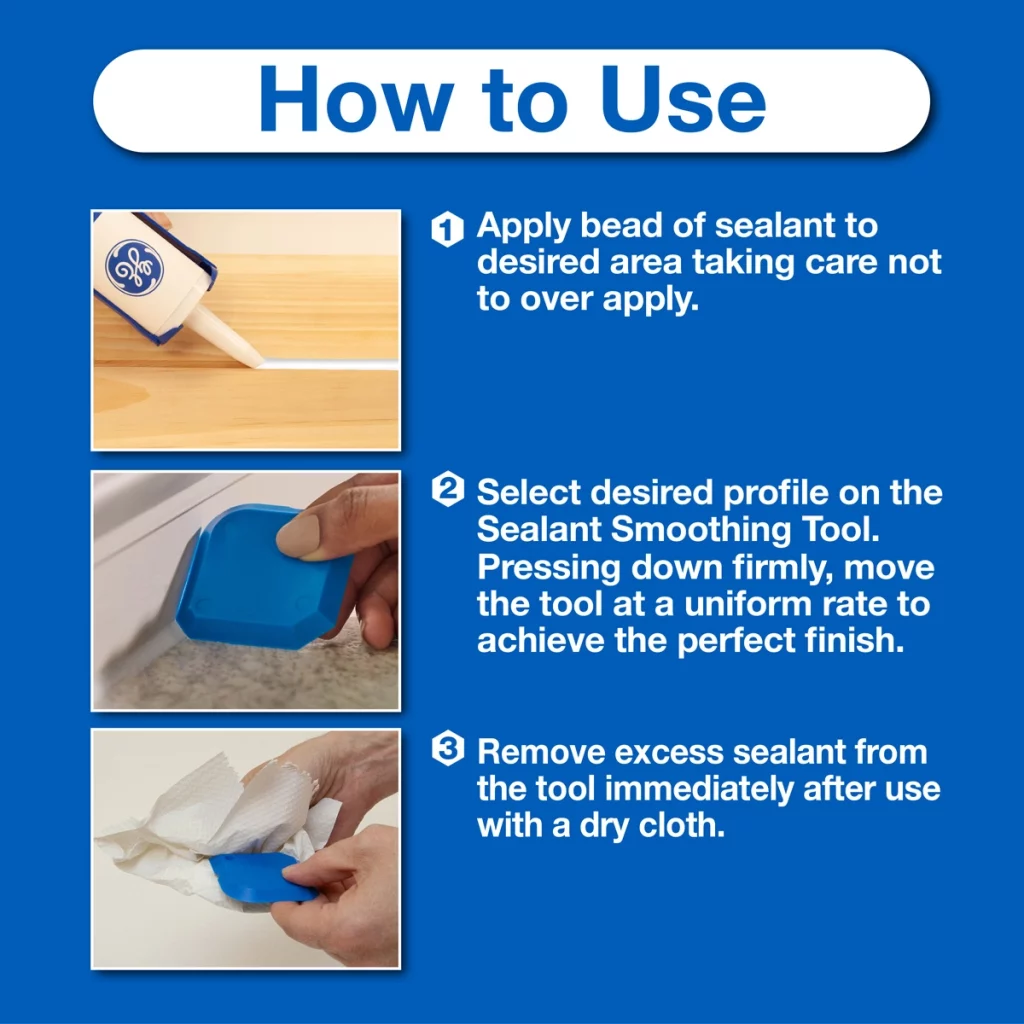
Tooling creates the essential concave shape that sheds water and prevents pooling. Work immediately after application—within 2 minutes before skinning occurs. Dip your finger in the soapy water solution and run it along the fresh bead with firm, even pressure.
Keep your finger perpendicular to the bead and move in a single continuous motion. Wipe your finger frequently on a damp cloth to prevent buildup. For inside corners, use the rounded end of a spoon handle dipped in soapy water. Outside corners require careful feathering to maintain consistent width.
Remove painter’s tape while the sealant remains wet, pulling at a 45-degree angle away from the bead. Check for thin spots or gaps as you work and immediately touch up problem areas. Proper tooling creates a smooth, uniform bead that cures with professional appearance and maximum water resistance.
Critical Curing Time and Conditions for Longevity
Rushing curing causes 90% of sealant failures. Most bathroom silicones skin over in 30-60 minutes but require 24-72 hours for full cure depending on humidity. High humidity (above 60%) extends curing time significantly—avoid showering for 48 hours in steamy bathrooms.
Maintain optimal curing conditions by running exhaust fans continuously or opening windows. Ideal temperatures range from 60-80°F (15-27°C); curing slows below 50°F (10°C). Never apply sealant in cold bathrooms expecting faster results—low temperatures prevent proper chemical bonding.
Test cure completion by gently pressing the bead with your thumb. Fully cured sealant feels firm yet slightly flexible. Check edges for lifting—if any section pulls away, reapply immediately before moisture exposure. Patience during curing delivers years of reliable performance.
Sealant Maintenance That Extends Replacement Cycles
Proper maintenance doubles your sealant’s lifespan. Clean weekly with mild, non-abrasive cleaners—never use bleach or vinegar-based products that degrade silicone. Dry the bead thoroughly after each bath to minimize moisture exposure. Monthly inspections catch minor issues before they require full replacement.
Reseal problem areas annually with a thin topcoat of fresh sealant. This preventative maintenance refreshes the surface without complete removal. When discoloration appears but adhesion remains strong, clean with a paste of baking soda and hydrogen peroxide before resealing.
Replace sealant every 3-5 years regardless of appearance. Silicone degrades internally before visible signs appear. Proactive replacement prevents water damage and saves significant repair costs down the line. Track installation dates with a label hidden behind the overflow cover for future reference.
Costly Mistakes That Cause Premature Sealant Failure
Skipping surface preparation causes most DIY failures. Applying new sealant over mold, soap scum, or old residue creates weak adhesion points. Never attempt “spot repairs”—replace the entire bead for uniform performance. Rushing curing by using the shower too soon creates permanent weak spots.
Using inappropriate products guarantees quick failure. Standard latex caulk lacks flexibility for bathroom movement. Tub and tile “adhesives” aren’t designed for expansion joints. Check labels for “100% silicone” and “mold-resistant” specifications—these withstand constant moisture exposure.
Poor application technique creates weak spots. Inconsistent pressure produces thin sections that crack during curing. Applying too much sealant causes messy beads that trap water. Working in sections larger than 3 feet leads to uneven tooling. Practice on cardboard before starting your actual project.
Replacing bath sealant properly protects your home from costly water damage while maintaining bathroom aesthetics. Following these precise steps ensures professional results that last 3-5 years with minimal maintenance. Focus on thorough surface preparation, proper product selection, and adequate curing time—these elements determine long-term success more than application speed. When in doubt, remove all old material completely and start fresh rather than attempting quick fixes. With practice, you’ll develop the skills to maintain perfect sealant joints throughout your bathroom, preventing expensive repairs and preserving your home’s structural integrity.
Leave a Reply