
Tired of staring at dingy, discolored grout lines that make your once-beautiful bathroom look worn and neglected? Regrouting bath tile is one of the most cost-effective bathroom upgrades you can tackle yourself, transforming your space for a fraction of the cost of a full remodel. Over time, bathroom grout deteriorates from constant exposure to moisture, cleaning chemicals, and daily wear, leading to unsightly cracks, stubborn stains, and even mold growth that regular cleaning can’t fix. The good news is that with the right approach, regrouting your bathroom tiles is a manageable DIY project that most homeowners can complete in a weekend without professional help.
This guide provides the exact steps needed to successfully regrout your bath tiles, saving you hundreds compared to hiring a contractor. You’ll learn how to properly assess your grout condition, select the right materials, and execute each phase of the process for professional-looking results. Whether your grout has turned yellow from hard water, developed hairline cracks, or harbors persistent mildew that won’t wash away, this comprehensive walkthrough gives you everything needed to restore your bathroom’s appearance and prevent further water damage behind your tiles.
Assess Your Grout Condition Before Starting
Taking time to properly evaluate your existing grout prevents wasted effort and materials by ensuring regrouting will actually solve your problem.
Identify Which Areas Need Regrouting
Run your fingers along all grout lines to feel for cracks, crumbling sections, or areas where grout has pulled away from tiles. Pay special attention to grout around the tub edge, shower floor, and corners where water collects. Discolored grout that resists regular cleaning typically needs replacement, as stains have penetrated deep into the porous material. If you see powdery residue when touching grout lines, this indicates efflorescence from moisture behind the tile that requires addressing before regrouting. For minor issues affecting less than 20% of your grout lines, spot repair might suffice, but widespread deterioration calls for complete regrouting.
Spot Warning Signs of Underlying Problems
Before investing time in regrouting, check for problems that would undermine your efforts. Press firmly on tiles in affected areas—if any feel loose or wobbly, you likely have substrate damage requiring professional attention. Soft spots on walls or floors near tile areas indicate water damage that must be repaired first. Visible mold growth extending beyond grout lines into wall cavities means you need remediation before proceeding. If grout fails repeatedly in the same spot, this often signals an unresolved moisture issue behind the tile that will compromise your new grout. Addressing these underlying problems first saves you from redoing your work prematurely.
Gather Essential Tools and Materials for Success
Having the right equipment ready prevents project delays and ensures professional results when regrouting bath tile.
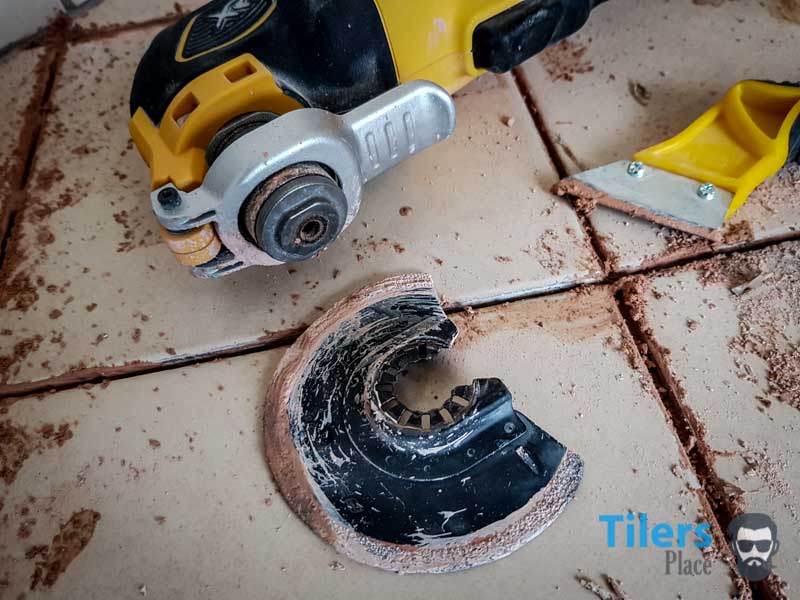
Specialized Grout Removal Equipment
An oscillating multi-tool with a carbide-tipped grout removal blade makes quick work of old grout while minimizing tile damage—this single tool dramatically reduces project time compared to manual methods. For smaller jobs or tight corners, a manual grout saw with a diamond-encrusted blade provides precision control. Keep multiple utility knife blades on hand for cleaning out stubborn residue from corners and edges. A narrow grout scoop or flathead screwdriver helps remove loosened debris from between tiles without scratching surfaces. Don’t forget a shop vacuum with a HEPA filter to capture fine dust particles during removal.
Application and Finishing Supplies
A high-quality rubber grout float with a firm base ensures even pressure when spreading new grout. You’ll need at least two large buckets—one for mixing grout and another for clean water during cleanup. High-density cellulose sponges work better than regular sponges for grout cleanup without leaving lint behind. A grout haze remover specifically designed for bathroom use saves hours of scrubbing after the main project. Have several microfiber towels ready for the final polishing stage when grout has partially set. A margin trowel makes mixing small batches of grout to perfect consistency much easier.
Select the Right Grout Type for Bathroom Conditions
:max_bytes(150000):strip_icc()/Sanded-vs-unsanded-tile-grout-1822584_color-ac2bb41141024ead823b7047fee86375.jpg)
Choosing appropriate grout ensures your regrouting project withstands bathroom moisture and maintains its appearance long-term.
Sanded vs. Unsanded: Making the Right Choice
For most bathroom applications, sanded grout provides superior durability in joints wider than 1/8 inch, which includes standard wall tile installations and all floor tiles. The fine sand particles add structural integrity that prevents shrinkage cracks in wider joints. Reserve unsanded grout for joints 1/8 inch or narrower, particularly on polished stone, glass tile, or other delicate surfaces where sand particles could cause scratching. In high-moisture areas like shower floors, epoxy grout offers the best long-term performance despite higher cost and more challenging application, as it resists staining and won’t degrade from constant water exposure.
Strategic Color Selection for Practical Results
While pure white grout creates a clean, spa-like appearance, it shows dirt and discoloration quickly in bathroom environments. Medium gray or beige tones provide excellent camouflage for everyday wear while maintaining a bright appearance. Dark charcoal or brown grout hides soap scum and hard water stains effectively but can make small bathrooms feel visually smaller. For dramatic visual impact, consider complementary colors that match other bathroom elements—navy blue grout pairs beautifully with white subway tile when accented by navy towels or accessories. Always purchase grout samples and test them against your tile in actual bathroom lighting before committing to a full purchase.
Execute Proper Grout Removal Techniques
The quality of your grout removal directly impacts how well new grout bonds and the professional appearance of your finished project.
Power Tool Removal Best Practices
Set your oscillating tool to medium speed to avoid excessive vibration that could damage tile edges. Maintain a consistent 30-degree angle between the blade and grout surface for optimal cutting without gouging tiles. Work methodically along each grout line, removing material to a uniform depth of about 1/8 inch—deeper removal risks damaging the tile substrate. Pause every few minutes to vacuum debris from joints, as accumulated dust reduces cutting efficiency. For corners and tight spaces, switch to a smaller blade attachment rather than forcing the main blade into awkward positions that could chip tiles.
Thorough Post-Removal Cleaning
After removing the bulk of old grout, use a stiff-bristled nylon brush to dislodge remaining particles from joint corners. Vacuum all surfaces thoroughly, including directing the nozzle along each grout line to extract fine dust. Wipe the entire area with a damp cloth to remove surface residue, then allow at least 24 hours for complete drying before applying new grout. Proper cleaning prevents dust contamination that would weaken the bond of your new grout and create visible imperfections once cured.
Apply New Grout for Professional Results
Mastering grout application technique transforms your DIY project from amateur to professional quality with minimal additional effort.
Perfect Mixing Consistency Every Time
Measure water precisely according to package instructions before adding grout powder. Mix small batches (enough for 2-3 square feet) to prevent premature setting. Achieve a thick, peanut butter-like consistency that holds its shape without sagging—too much water weakens grout strength, while too little makes application difficult. Allow mixed grout to slake (rest) for 5-10 minutes, then remix briefly before application. Discard any grout that begins to stiffen in the bucket rather than adding more water, as this compromises strength.
Effective Application Methodology
Hold your grout float at a 45-degree angle and press firmly to force grout deep into joints using diagonal sweeping motions across tile surfaces. Work in manageable 3×3 foot sections to maintain control before grout begins setting. After initial application, tilt the float nearly vertical to remove excess grout while maintaining joint fill. For vertical surfaces like shower walls, work from bottom to top in overlapping sections to prevent sagging. Allow grout to firm slightly (15-30 minutes) before tooling joints to create the characteristic concave profile that sheds water effectively.
Seal and Maintain Your Regrouted Bathroom
Proper sealing and maintenance protect your investment and dramatically extend the lifespan of your newly regrouted bathroom.
Critical Sealing Protocol
Wait the full curing time specified by your grout manufacturer (typically 72 hours for cement-based grouts) before applying sealer. Apply grout sealer using a small brush or applicator bottle, focusing only on grout lines while avoiding tile surfaces. Allow sealer to penetrate for 10-15 minutes, then wipe away excess with a clean microfiber cloth. Apply a second coat for maximum protection in shower areas. Annual resealing maintains protection against moisture penetration and staining—test by sprinkling water on grout lines; if it beads up, sealer remains effective.
Daily Maintenance for Longevity
Squeegee shower walls after each use to minimize water exposure on grout lines. Clean grout weekly with a pH-neutral cleaner specifically formulated for tile and grout—avoid vinegar-based cleaners on cement grout as they gradually degrade the material. Address any mold or mildew spots immediately with appropriate cleaners before they penetrate deep into grout. Check grout lines quarterly for cracks or deterioration, addressing small problems before they become major repairs. Proper maintenance ensures your regrouted bathroom maintains its fresh appearance for 5-10 years before requiring another refresh.
Regrouting bath tile delivers dramatic visual improvements while protecting your bathroom structure from moisture damage. By following these precise techniques for assessment, preparation, application, and maintenance, you’ll achieve professional results that transform your bathroom’s appearance without the expense of a full remodel. The key to success lies in proper preparation, selecting appropriate materials for bathroom conditions, and taking time with each step rather than rushing the process. With your newly regrouted tiles, you’ll enjoy a cleaner, brighter bathroom that feels like new for years to come—all accomplished through a manageable weekend project that puts thousands back in your pocket compared to professional retiling.
Leave a Reply