Struggling with hemorrhoids, postpartum discomfort, or anal fissures? Learning how to make a sitz bath in tub could be your ticket to relief. This targeted therapy involves soaking only your hips and buttocks in warm water to boost blood flow and accelerate healing in sensitive pelvic tissues. Unlike a full bath, a sitz bath focuses precisely where you need it most—on the perineal area where nerves and blood vessels converge near the surface. Most people experience noticeable improvement within days when following proper sitz bath techniques. In this guide, you’ll discover exactly how to prepare, perform, and maximize your sitz bath sessions for optimal results—using just your standard bathtub and common household items.
Transform Your Bathtub into a Healing Station Today
Creating an effective sitz bath requires transforming your ordinary bathtub into a therapeutic healing environment. Start by thoroughly cleaning your tub with a mild, non-abrasive cleaner to remove any soap residue or bacteria that could irritate sensitive tissues. Pay special attention to the drain area and corners where grime accumulates. After cleaning, rinse multiple times to eliminate all traces of cleaning products—your goal is a completely neutral environment for your delicate pelvic area.
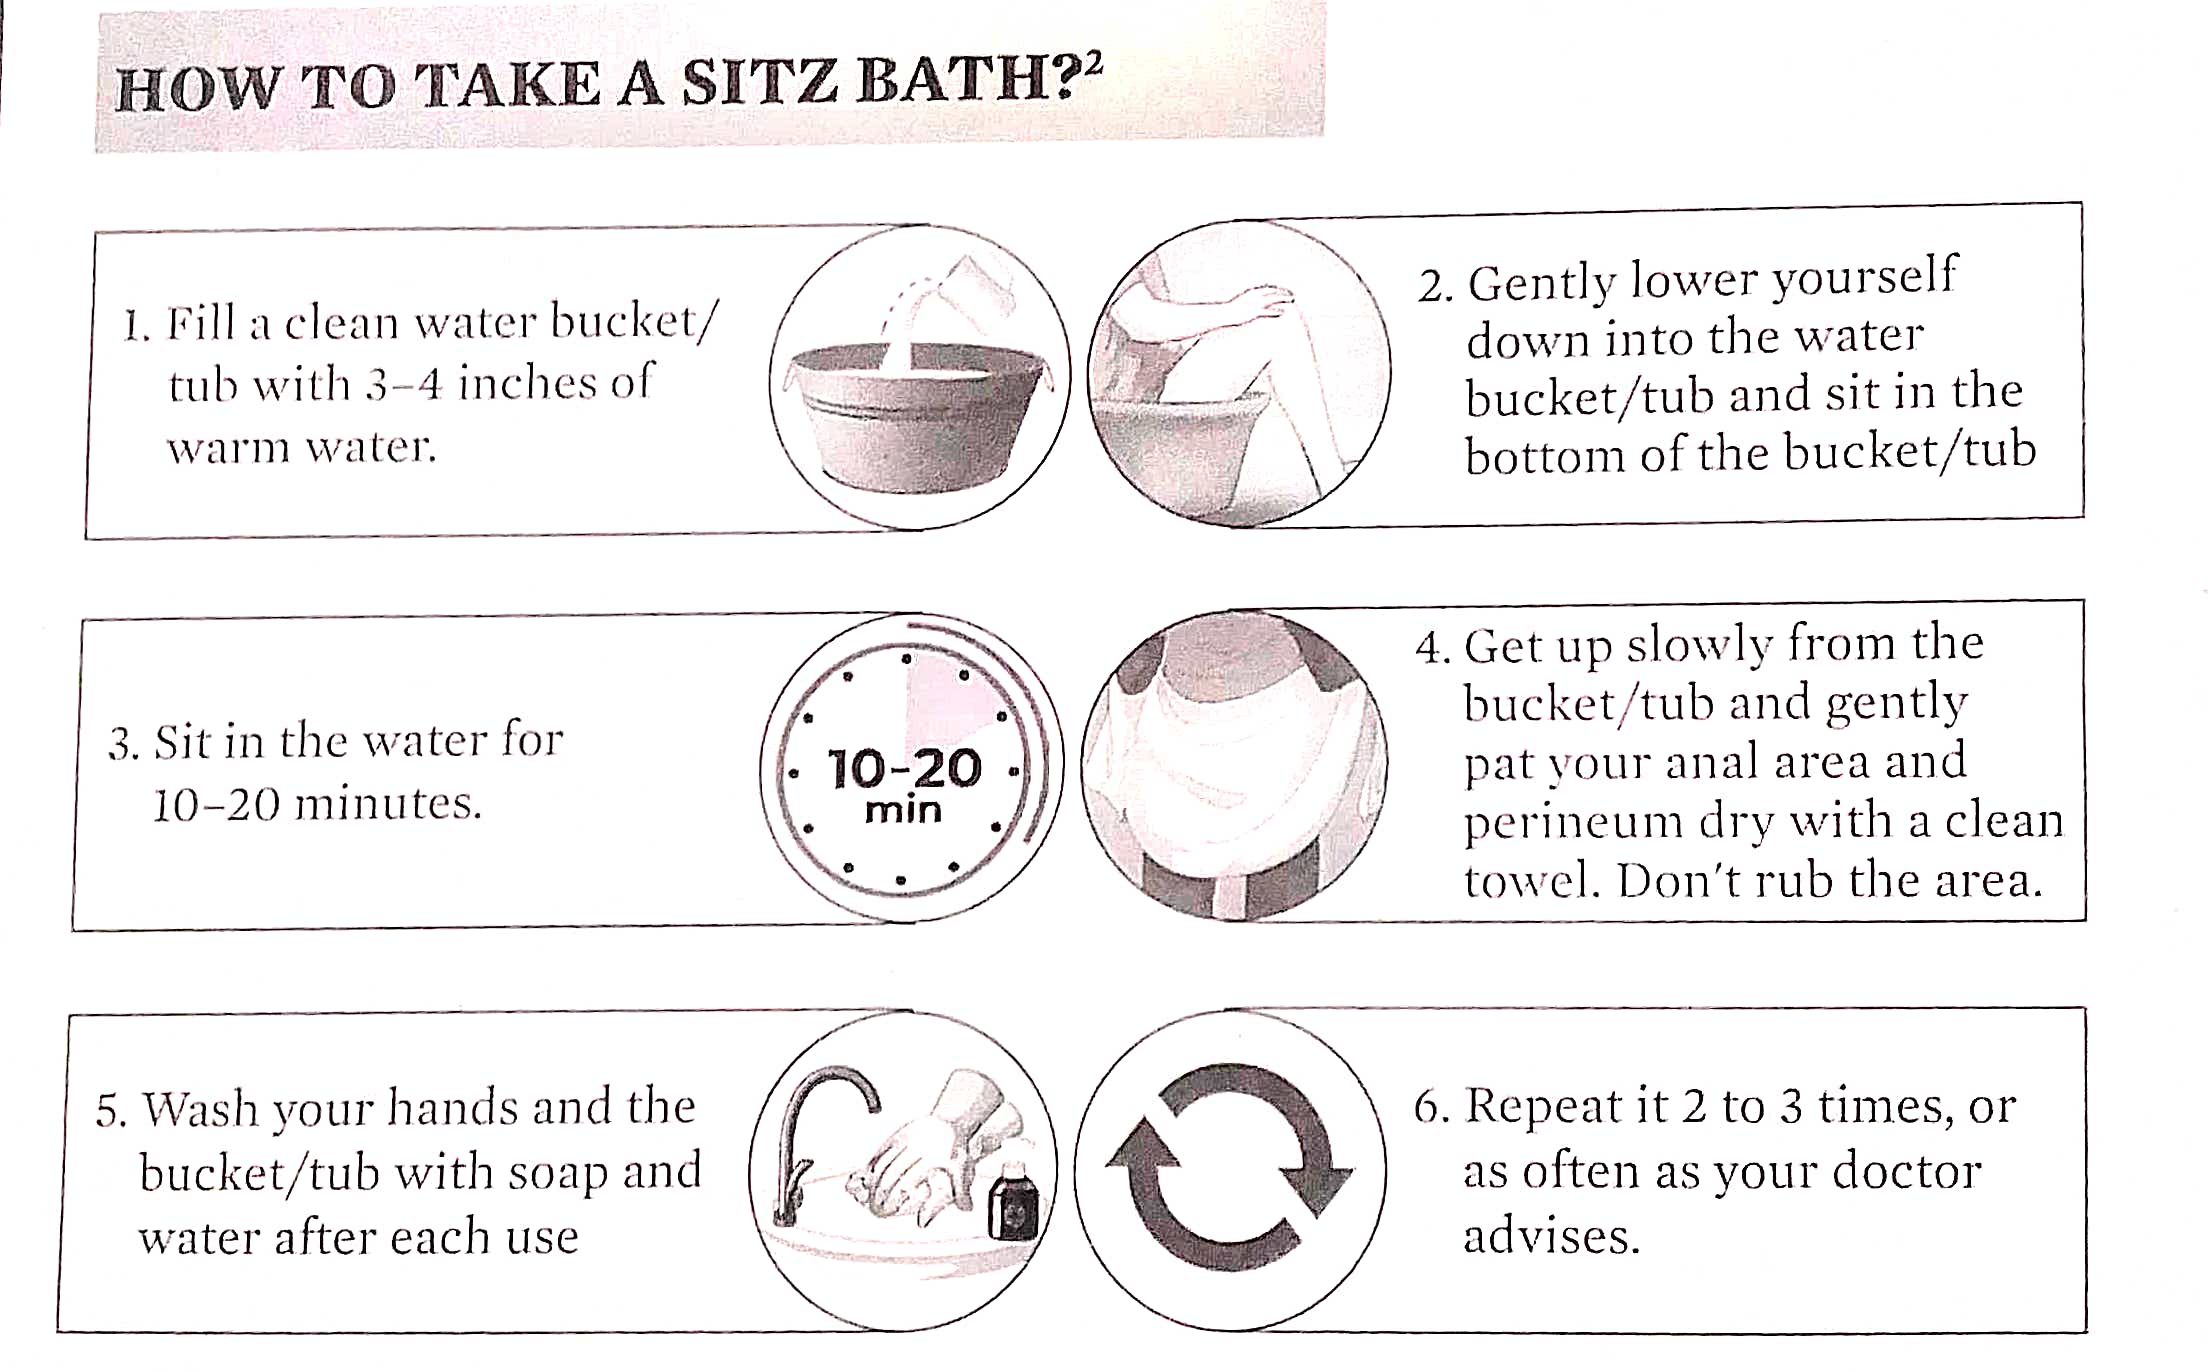
Fill your tub with just enough warm water to submerge your hips and buttocks—typically 4-6 inches (10-15 cm) deep, or about one-quarter to one-third of your tub’s capacity. This shallow depth conserves water while ensuring proper coverage. For most adults, this amount creates the perfect therapeutic zone without unnecessary water waste. If you have mobility concerns, consider placing a non-slip mat in the tub before filling to prevent accidents when entering.
Perfect Your Water Temperature in 60 Seconds
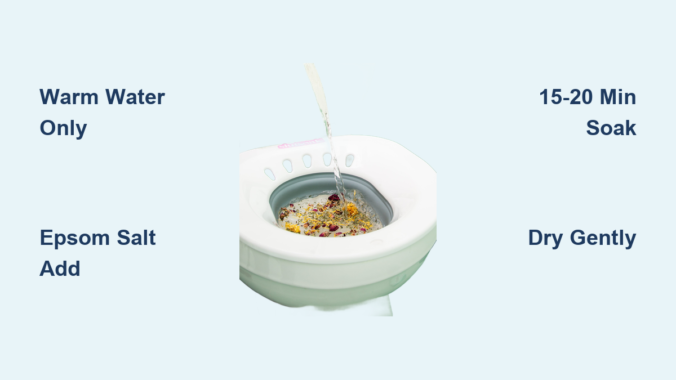
The right water temperature makes or breaks your sitz bath experience. Your ideal range sits between 100-105°F (38-41°C)—warm enough to boost circulation but cool enough to prevent burns. Never test with your hand; instead, use your elbow or inner wrist, which have sensitivity closer to your treatment area. The water should feel comfortably warm, allowing you to sit for 15-20 minutes without discomfort.
If you’re unsure about temperature accuracy, invest in an inexpensive bath thermometer—it pays for itself in preventing painful mistakes. For those with diabetes or reduced temperature sensitivity, consult your doctor before starting sitz bath therapy. Remember: water above 110°F can worsen inflammation and cause tissue damage, while water that’s too cool won’t deliver therapeutic benefits.
Choose the Right Additives for Your Specific Condition

Enhance your sitz bath’s effectiveness by selecting additives tailored to your condition:
- For hemorrhoids: Add 2 cups Epsom salt to reduce swelling and improve circulation
- For itching or yeast infections: Mix in 4-5 tablespoons baking soda to restore pH balance
- For vaginal irritation: Use 1 cup raw apple cider vinegar for its natural antibacterial properties
- For general soothing: Steep 2-3 chamomile tea bags in hot water, then add to your bath
Always dissolve additives completely before entering the tub. If using essential oils like tea tree or lavender, dilute 5-10 drops in a carrier oil first to prevent skin irritation. Avoid harsh soaps, bubble baths, or heavily scented products—they’ll do more harm than good for sensitive tissues.
Execute Your Sitz Bath with Precision
Position Yourself Correctly for Maximum Benefit
How you sit in your tub dramatically affects your sitz bath’s effectiveness. Carefully lower yourself into the water backward, supporting your weight with both hands on the tub edges to prevent slipping. Once seated, ensure your hips and buttocks are fully submerged with water reaching your lower abdomen. Adjust your position until you feel complete coverage of the affected area without water rising too high on your torso.
Lean back against the tub wall for support if needed, but maintain enough upright posture to keep water at the proper level. During your soak, gently splash water over problem areas to ensure complete coverage. Some people find rocking side-to-side helps water reach all tissues effectively. If you feel lightheaded at any point, exit immediately and consult your doctor before your next session.
Time Your Session for Optimal Healing
Set a timer for exactly 15-20 minutes—this duration provides maximum therapeutic benefit without risking skin irritation from prolonged moisture exposure. Shorter sessions rarely deliver full relief, while longer soaks can cause tissue breakdown. Many people find it helpful to schedule sitz baths after bowel movements when pain and discomfort peak.
As you soak, focus on deep breathing to enhance relaxation and blood flow. This mindful approach amplifies your body’s natural healing response. When the timer sounds, exit slowly and deliberately—warm water can cause dizziness, especially if you have low blood pressure. Never rush this critical transition phase.
Dry and Care for Treated Areas Properly
Avoid Post-Bath Mistakes That Undermine Your Results
Your healing journey continues after you leave the tub. Gently pat the treated area dry with a clean, soft towel—never rub, as friction can damage delicate healing tissues. For hard-to-reach areas or skin folds, use a hair dryer on cool setting held at least 12 inches away. Complete dryness prevents moisture-related irritation and infection.
If your doctor recommended a protective ointment, apply a thin layer now using clean fingertips. Products containing zinc oxide or petroleum jelly create a healing barrier without trapping moisture. Immediately afterward, slip into loose, breathable cotton underwear and pants—tight clothing traps heat and moisture, counteracting your bath’s benefits. Some people find going commando for an hour post-bath speeds healing when privacy allows.
Follow This Daily Sitz Bath Schedule
Adjust Frequency Based on Your Healing Progress
Most people benefit from 2-3 sitz baths daily during acute flare-ups or initial recovery phases. Postpartum women often start with this frequency within 24-48 hours after delivery. As symptoms improve, gradually reduce to once daily, then every other day. Chronic condition sufferers typically maintain 1-3 weekly baths for ongoing prevention.
Track your symptoms in a simple notebook to identify patterns. Note what additives work best, optimal timing relative to bowel movements, and any triggers to avoid. This personalized data helps you refine your routine faster than generic advice ever could. Remember: consistency matters more than perfection—better to do shorter, regular baths than occasional marathon sessions.
Dodge These 5 Costly Sitz Bath Errors
:max_bytes(150000):strip_icc()/Lines-Health-Sitz-Bath-green-horiz-bd02bbc3d3ca46928937d1db7bdf92bc.jpg)
Water Temperature Mismanagement
Using water that’s too hot represents the most dangerous sitz bath mistake. That “pleasantly hot” sensation often exceeds safe limits, potentially causing burns on sensitive tissues. Always test with your elbow, not your hand, and when in doubt, choose cooler water—you can always add warmth but can’t undo damage.
Ignoring Equipment Hygiene
Failing to clean your tub or portable basin after each use breeds bacteria that can infect healing tissues. Wash thoroughly with mild soap and hot water, then dry completely before storage. For standard bathtubs, give them an extra rinse cycle before your next session to remove any residual soap.
Overlooking Warning Signs
If your symptoms worsen after starting sitz baths, or if you develop fever, unusual discharge, or increased pain, stop immediately and consult your doctor. Sitz baths support healing but don’t replace medical treatment for serious conditions.
Using Harsh Additives
Bubble baths, heavily scented soaps, and undiluted essential oils can irritate sensitive areas. Stick to plain water or doctor-recommended additives in proper concentrations. When trying new ingredients, test on a small skin patch first.
Rushing the Process
Skipping proper preparation or cutting sessions short sabotages results. Allow 30 minutes total for setup, soaking, and post-bath care—this investment pays off in faster healing and reduced discomfort.
Know When Professional Help Outweighs Home Treatment
While learning how to make a sitz bath in tub solves many issues, certain red flags demand medical attention. If symptoms persist beyond 1-2 weeks of consistent sitz baths, schedule a doctor’s visit—your condition may require prescription treatment. Heavy or persistent rectal bleeding, fever above 100.4°F, or sudden symptom worsening all warrant immediate consultation. Always discuss sitz bath therapy with your healthcare provider before starting, especially if you have diabetes, heart conditions, or take blood thinners.
Creating an effective sitz bath requires minimal equipment but delivers maximum relief when done correctly. By mastering water temperature control, selecting condition-specific additives, and following proper post-bath care, you’ll transform your standard bathtub into a powerful healing station. Remember: consistent 15-20 minute sessions with appropriate frequency yield better results than occasional marathon soaks. Start today with plain warm water, then gradually incorporate targeted additives as your comfort level increases. With this simple, drug-free therapy, you’re taking an important step toward reclaiming your comfort and quality of life.
Leave a Reply