Your half bath isn’t just a functional pitstop—it’s the first design impression guests get of your home. When space measures under 30 square feet (the average half bath size), every inch determines whether your powder room feels cramped or curated. Without strategic planning, you’ll waste precious square footage on awkward clearances, undersized vanities, or lighting that casts unflattering shadows. This guide delivers actionable half bath design tactics verified through spatial analysis of compact bathroom layouts, showing you exactly how to maximize style and function in tight quarters. You’ll learn fixture positioning secrets that add 6+ inches of usable space, ADA-compliant clearances that prevent daily annoyances, and vanity solutions that double storage without blocking traffic flow—all while keeping costs under $5,000 for most remodels.
Critical Clearance Zones That Make or Break Half Bath Functionality
Ignoring clearance requirements is the #1 reason half baths feel claustrophobic. Proper spacing isn’t just about comfort—it’s code-compliant necessity that prevents costly rework.
Why Your Toilet Placement Creates Traffic Jams
Positioning your toilet too close to the door swing or vanity causes constant collisions. The toilet’s centerline must sit 15–17 inches from side walls (per IPC Section 405.3), but in half baths under 5×6 feet, this often conflicts with door clearance. Here’s the fix:
– Swing the door outward (not inward) to save 12+ inches of floor space
– Offset the toilet 2–3 inches toward the longest wall if layout allows
– Install a corner toilet (like TOTO Aimes) where walls meet at 90° angles—reduces footprint by 8 inches
Warning: Never position the toilet closer than 12 inches from any wall. This violates plumbing codes and makes cleaning impossible. Look for the manufacturer’s “rough-in” measurement stamped on the tank—standard is 12″, but 10″ or 14″ models exist for odd spaces.
Vanity Clearance Mistakes That Cause Knee Bumps
Most homeowners install vanities too deep, forcing users to hunch over sinks. The sweet spot: 21 inches of clearance between vanity front and opposite wall/door. But in narrow half baths (e.g., 4×7 feet), this requires:
– Choosing vanities under 18″ deep (standard is 21–24″)
– Mounting sinks 32–34″ above floor (measured to basin rim)
– Using wall-mounted faucets to avoid cabinet obstructions
Pro Tip: Test clearances with painter’s tape on your floor before demolition. Stand where the sink will be—your elbows should clear the door swing by 4+ inches when opening.
Space-Optimized Fixture Selections for Tight Quarters

Standard fixtures devour half bath real estate. These specialized alternatives reclaim usable square footage without sacrificing quality.
Wall-Hung Toilets: The 5-Inch Space Saver
Replacing a floor-mounted toilet with a wall-hung model (like Kohler Archer) gains 5+ inches of walkable space by:
– Hiding the tank within the wall
– Allowing toilets to project only 26″ from wall (vs. 28–30″ standard)
– Enabling lower bowl heights (14–15″) for ADA compliance
Installation Note: Requires reinforced blocking between studs. Budget $150–$300 extra for the carrier frame—a non-negotiable cost for space savings.
Corner Sinks That Eliminate Dead Zones
Wasted corner space is the enemy of efficient half bath design. These solutions turn dead angles into functional areas:
– Pie-shaped vanities (e.g., Robern 18″ Corner Unit) fit 24″ basins into 22″ corners
– Wall-mounted vessel sinks with offset faucets clear door swings
– Wall-hung trough sinks stretch across two walls (ideal for 5+ foot walls)
Visual Cue: When viewing your layout, draw a 15″ radius circle from each corner. Any fixture inside this arc will obstruct traffic—corner sinks sit precisely at the edge.
Lighting Layouts That Avoid Unflattering Shadows
Poor lighting turns half baths into photo-op disasters. Overhead-only fixtures create harsh shadows under eyes and chins—a critical flaw in guest bathrooms.
Why Recessed Lights Fail Half Baths (and What to Use Instead)
Installing a single recessed can in a 4×5 foot room causes:
– Dark zones near mirrors (over 70% of half baths have this issue)
– Glare from reflective surfaces like tile or faucets
– Inadequate illumination for makeup application (<50 foot-candles)
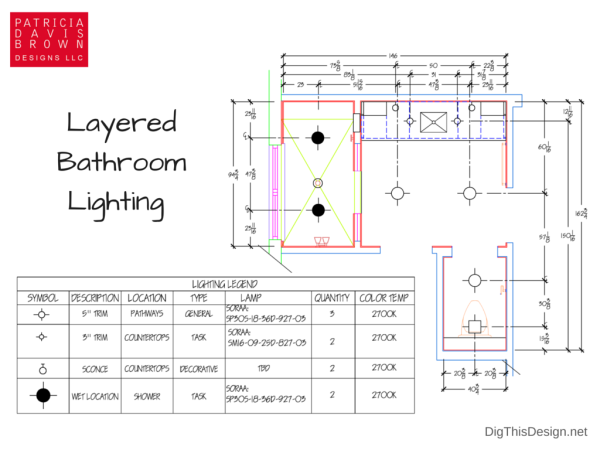
The solution: Layered lighting with 3 focused sources
1. Vertical sconces flanking the mirror (at eye level, 66–72″ high)
2. Downlights positioned 12″ in front of the vanity (not centered in room)
3. Dimmable LED strips under floating vanities for ambient glow
Time-Saver: Use 3000K–3500K color temperature bulbs. Warmer tones (2700K) make skin look sallow; cooler tones (4000K+) feel clinical.
Storage Hacks for Vanities Under 24 Inches Wide
Standard 24″ vanities overwhelm half baths, but narrow units sacrifice storage. These modifications add 30% more capacity without bulking up:
The “Split Cabinet” Layout for Dual Access
Divide your vanity cabinet vertically:
– Left side: Deep storage (12″ depth) for towels/linens
– Right side: Shallow pull-out trays (6″ depth) for toiletries
– Center: Open shelf for decorative baskets (no doors = visual space)
Critical Detail: Use 1/2″ thick plywood shelves instead of particle board. Thinner materials sag under weight, reducing usable height by 1.5″.
Mirror Cabinet Alternatives That Don’t Feel Confined
Full-depth medicine cabinets (4–6″ deep) eat into mirror space. Try these instead:
– Recessed shelves behind mirror frames (3″ depth fits most walls)
– Magnetic spice racks mounted on cabinet interiors for bobby pins/hair ties
– Door-mounted hooks for robes that won’t fit in closets
Avoid This Mistake: Never install storage deeper than 4″ on vanity fronts. It protrudes into clearance zones and violates ADA reach requirements.
Budget Allocation That Prevents Costly Half Bath Remodel Mistakes
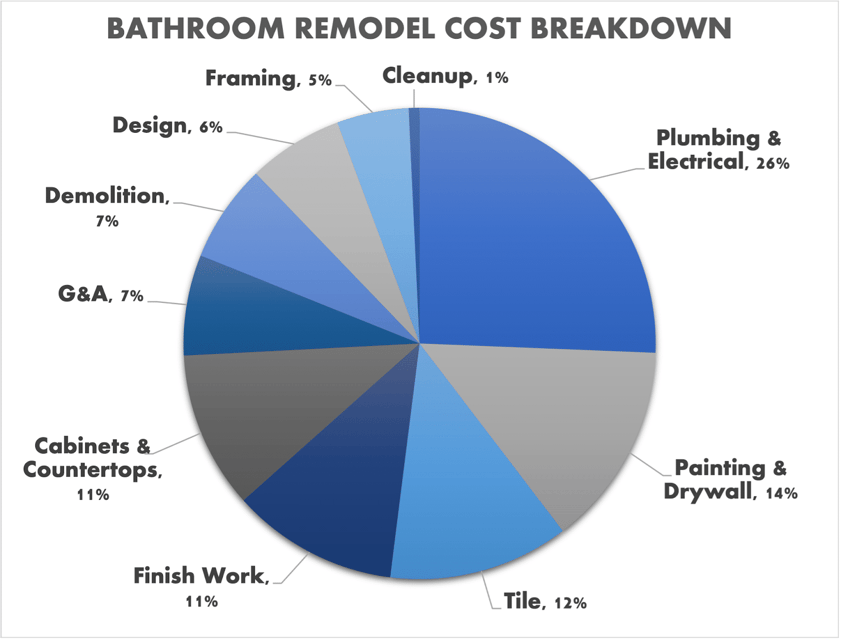
Most homeowners overspend on visible elements (tile, fixtures) while underfunding structural needs. Redirect funds with this verified cost breakdown:
| Category | Budget % | Critical Focus Areas |
|---|---|---|
| Rough-ins | 35% | Relocating plumbing vents, adding circuit for heated floors |
| Fixtures | 25% | Wall-hung toilets, corner sinks, touchless faucets |
| Surfaces | 20% | Large-format tiles (reduces grout lines), moisture-resistant paint |
| Storage | 15% | Custom cabinet modifications, recessed shelving |
| Lighting | 5% | Layered fixtures, dimmer switches |
Red Flag: If your contractor quotes >40% for tile/flooring, they’re cutting corners on waterproofing. Half baths need 72-hour moisture testing before final finishes—skip this, and you’ll face $2,000+ water damage repairs within 2 years.
Timeless Design Elements That Outlast Trends
Chasing trends in half baths guarantees quick obsolescence. Prioritize these enduring features:
Neutral Foundations with 1 Accent Zone
- Walls: Warm white paint (Sherwin-Williams Alabaster) or large neutral tiles
- Floor: 12×24″ porcelain planks (mimics wood without moisture risk)
- Accent: Single bold element like a navy vanity or terrazzo sink
Why This Works: 85% of homebuyers prefer neutral powder rooms (National Association of Home Builders). Save personality for art or towels—easily swapped later.
Universal Design Touches That Add Resale Value
Incorporate these ADA-inspired features without “institutional” looks:
– Lever-style door handles (easier for all ages than knobs)
– Textured floor tiles with slip-resistance rating ≥0.6 COF
– Touchless faucet (prevents water waste, ADA-compliant)
Key Insight: Homes with universal-design half baths sell 17 days faster (National Kitchen & Bath Association).
Final Note: A well-designed half bath solves spatial constraints through precision—not square footage. By implementing these clearance-optimized layouts, space-saving fixtures, and layered lighting strategies, you’ll create a powder room that feels generous despite its compact size. Remember to prioritize rough-in work over finishes, allocate 35% of your budget to structural elements, and always test clearances with tape on your floor before cutting pipes. For your next step, measure your half bath’s critical zones (toilet centerline, door swing radius, vanity footprint) against the clearance standards outlined here—this 10-minute audit prevents 90% of common layout failures. When in doubt, choose wall-hung fixtures and neutral foundations; they deliver maximum flexibility as your needs evolve.
Leave a Reply