That persistent drip from your bath tap isn’t just an irritating nighttime soundtrack—it’s literally draining your finances with wasted water and potentially causing hidden damage to your bathroom. A single dripping tap can waste over 15 liters of water daily, significantly increasing your utility bills while risking water damage to surrounding surfaces. The good news is most bath tap leaks can be repaired in under an hour with basic tools you likely already own. This guide provides the exact steps to diagnose your specific leak type, identify your tap mechanism, and complete the repair yourself—potentially saving hundreds of dollars in plumber fees while giving you the satisfaction of solving the problem at its source.
Ignoring a leaking bath tap allows minor issues to escalate into major problems. What begins as a simple washer failure can progress to corroded valve seats or damaged cartridges, eventually requiring complete fixture replacement. Most leaks originate from predictable component failures: rubber washers degrade from constant water exposure, valve seats develop pits from mineral deposits, O-rings lose elasticity from repeated use, and cartridges develop internal seal failures. By understanding where and why your tap leaks, you can apply the precise solution without unnecessary disassembly or wasted effort. Whether your tap drips from the spout when off, leaks around the handle during use, or shows moisture at its base, this guide delivers the targeted repair approach you need.
Pinpoint Exactly Where Your Bath Tap Leaks
Before gathering tools, you must identify the leak’s origin point and pattern—this diagnostic step determines your repair approach and prevents wasted effort on the wrong components.
Spout Drips During Water Flow: When water trickles from the spout even while the tap is fully open, this indicates internal seal failure. Compression taps develop this symptom when rubber washers can’t create a complete seal against the valve seat, while cartridge and ceramic disc taps show the same behavior when their internal seals deteriorate. This leak pattern typically worsens gradually as the sealing surface continues to degrade with each use.
Persistent Dripping When Tap Is Off: Water continuing to drip from the spout after you’ve turned the tap completely off signals incomplete closure of the internal mechanism. In compression taps, this almost always means the rubber washer has worn thin or hardened, while cartridge taps exhibit the same issue when their internal seals develop cracks or deformations. The drip rate often increases as the problem progresses, moving from occasional drips to a steady stream.
Handle Area Leaks: Water pooling around the handle base or running down the spout when operating the tap points to O-ring failure or loose handle connections. This type of leak typically appears as moisture near the handle mounting point and increases with each use as the connection gradually loosens. You’ll often notice water beading around the handle stem when turning the tap on or off.
Base Leaks at Mounting Point: Moisture appearing where the tap body meets the bathtub surface or mounting deck indicates failed supply line connections, degraded mounting seals, or improper installation. Base leaks sometimes create visible water stains on the tub surface beneath the tap and can lead to more serious water damage if left unaddressed. These leaks often worsen when water pressure increases elsewhere in the home.
Intermittent Dripping Patterns: Drips that start and stop unpredictably often relate to household water pressure fluctuations rather than mechanical failure. If your tap begins dripping precisely when other fixtures run (like the washing machine or toilet refill), pressure variations—not tap damage—may be the primary cause. This pattern requires different solutions than component replacement.
Determine Your Bath Tap Mechanism Type
Different tap designs require completely different repair approaches—using the wrong parts or techniques can damage your fixture. Most residential bath taps fall into four distinct categories, each with unique internal mechanisms that dictate your repair strategy.
Compression Taps: The oldest and most straightforward design features separate hot and cold handles that compress rubber washers against metal valve seats to stop water flow. These are most common in homes built before the 1990s and are the easiest to repair. You can identify them by the visible washer seat when you remove the handle and by the need to apply noticeable pressure when turning them on or off.
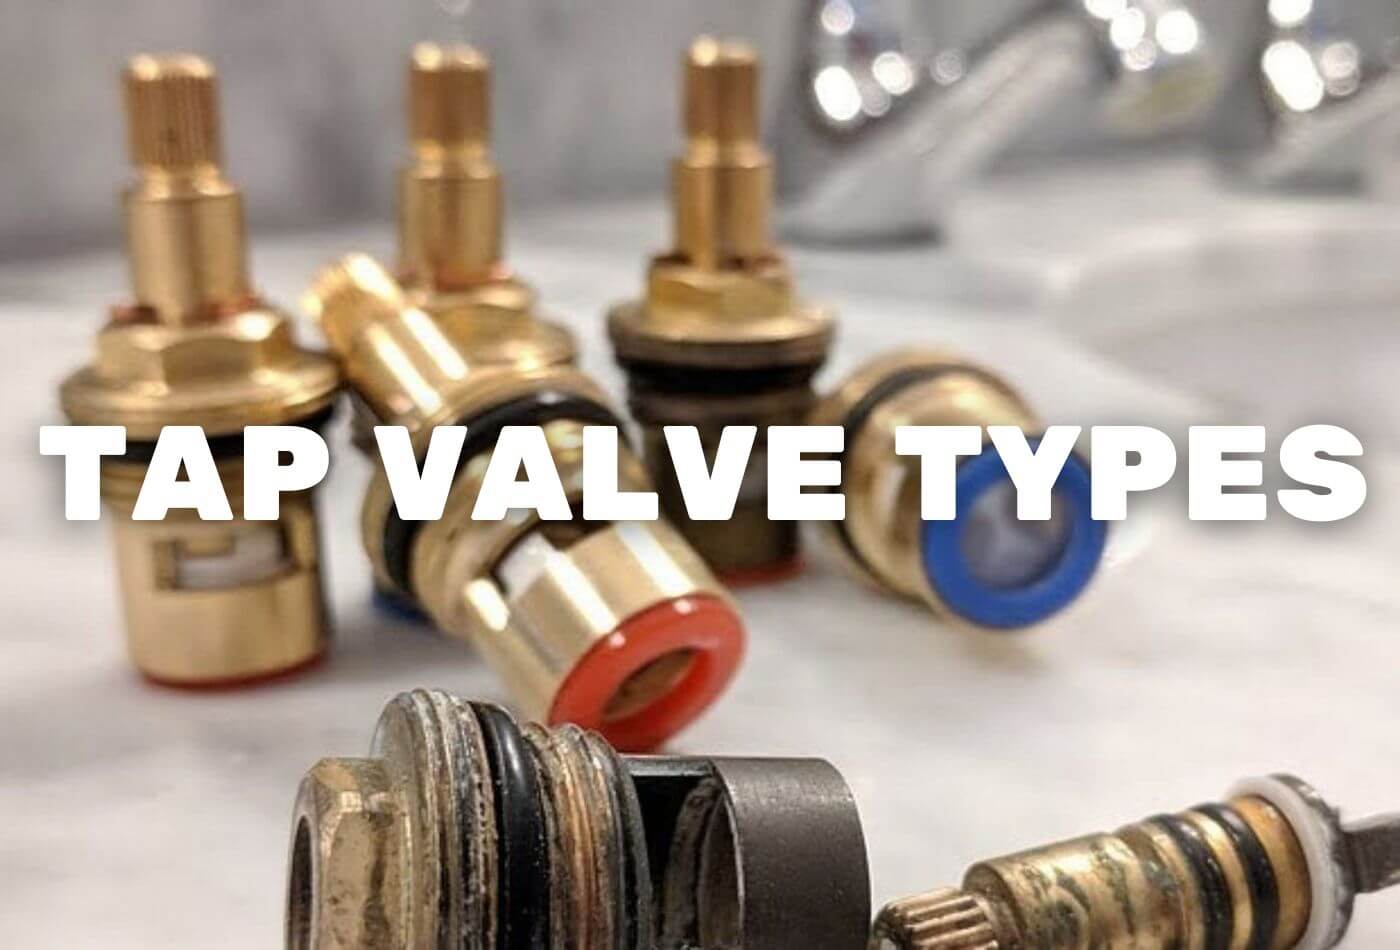
Cartridge Taps: Modern single-handle designs use a cylindrical cartridge containing multiple ports that control both water flow and temperature mixing. Cartridge taps operate with smooth quarter-turn motion and require minimal force. The identifying feature is a plastic or brass cartridge visible after handle removal—these often require specific replacement cartridges matched exactly to your tap model.
Ceramic Disc Taps: High-end fixtures use stacked ceramic discs that slide against each other to control water flow. These extremely durable designs rarely leak unless debris damages the precision-machined surfaces. They feature a wide cylindrical body and typically have a single disc assembly inside that requires careful alignment during reassembly.
Ball Taps: Single-handle designs using a spherical ball with slots to control water flow and temperature. Common in budget fixtures from the 1970s-1990s, these can be identified by the plastic or metal ball visible inside the handle mechanism. They require specific replacement springs, cams, and seats for proper repair.
Gather Essential Repair Tools and Materials
Proper preparation prevents frustrating mid-repair trips to the hardware store. Collect these tools before starting and ensure you have the correct replacement parts for your specific tap mechanism.
Critical Tools Checklist: An adjustable wrench handles most fastener sizes without scratching chrome finishes. A set of screwdrivers—both flathead and Phillips—removes handle caps and internal screws. Needle-nose pliers grip small retaining clips without damage. Keep a rag nearby to protect surfaces from tool marks and catch small parts. A flashlight illuminates internal components during disassembly.
Required Materials: Plumber’s grease lubricates O-rings and seals for smooth operation. Plumber’s tape (Teflon tape) creates watertight seals on threaded connections. Replacement washers in assorted sizes fit compression taps. Exact-match replacement cartridges are essential for cartridge taps. Cleaning cloths remove mineral deposits without scratching surfaces.
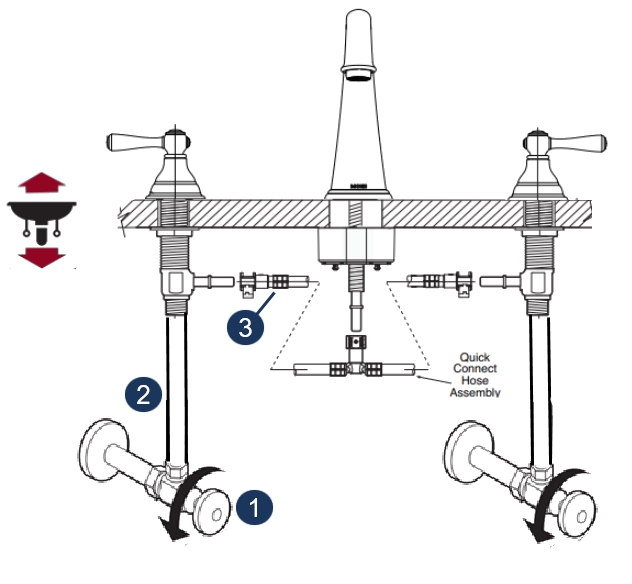
Preparation Protocol: Turn off water supplies at the shutoff valves beneath your bath—test by briefly opening the tap to confirm water stops flowing. Place a rag in the drain opening to catch dropped components. Photograph each disassembly step with your phone—this visual reference proves invaluable during reassembly. Organize removed parts in the order of removal to simplify reassembly.
Repair Compression Tap Spout Leaks
Compression taps develop leaks primarily through washer failure—this straightforward repair suits most DIY beginners and costs mere pennies in replacement parts.
Disassembly Sequence: Remove the decorative handle cap using a flathead screwdriver, exposing the handle screw beneath. Unscrew and carefully pull off the handle assembly. Use an adjustable wrench to grip the brass valve stem hex and rotate counterclockwise to remove it. At the stem’s bottom, you’ll find the rubber washer secured by a small brass screw.
Washer Replacement Process: Examine the old washer for wear patterns, cracking, or deformation. Note its exact diameter and thickness—standard flat washers work for most applications, but some taps require conical washers. Replace using the retaining screw, ensuring the new washer seats flush against its mating surface. If the valve seat shows pitting or corrosion, use a reseating tool to smooth the surface—this step often eliminates persistent drips.
Reassembly Verification: Thread the valve stem back into the body, tightening firmly but avoiding overtightening. Replace the handle assembly and test operation. Turn water supplies on gradually while watching for leaks as pressure builds. A slight weep initially may clear as the new washer seats itself during the first few uses—persistent dripping indicates improper seating or an incomplete seal.
Replace Cartridge in Single-Handle Taps
Cartridge replacement eliminates leaks in modern single-handle mixers. Cartridges wear uniformly, so replacement restores like-new function without adjustment.
Cartridge Extraction: After shutting off water and removing the handle, locate the retaining clip or nut securing the cartridge. Some manufacturers use a brass retaining clip that pulls out with needle-nose pliers, while others use a threaded retaining nut. With the retainer removed, grasp the cartridge body and pull straight outward—some force may be necessary if mineral deposits have locked it in place.
Precision Installation: Take the old cartridge to your hardware store for exact matching—cartridge designs vary significantly between manufacturers. Clean the valve body interior with a cloth to remove debris or mineral buildup. Apply plumber’s grease to new O-rings to ensure smooth operation and extended service life.
Final Testing: Insert the new cartridge, ensuring alignment tabs or notches match their receptacles. Push firmly until it seats completely. Replace the retaining clip or nut, tighten appropriately, and reattach the handle. Test hot and cold operation through the full range of motion, checking for leaks at all positions and flow rates.
Address Handle and Base Leaks
Leaks around the handle or at the tap base require different solutions than spout drips. These locations typically indicate seal failures at connection points rather than internal mechanism issues.
Handle Leak Resolution: Remove the handle to access the O-ring or packing seal surrounding the stem. Worn or compressed O-rings allow water to escape along the shaft. Replace with an identical size, applying plumber’s grease to ease installation. If your tap uses a packing nut with braided packing, replace the packing material or upgrade to modern O-ring seals for longer service life.
Base Leak Correction: Base leaks suggest failed inlet seals or mounting hardware issues. For deck-mounted taps, remove the faucet body to access mounting nuts and seals. Replace degraded rubber gaskets with new ones of identical thickness. For wall-mounted taps, base leaks may indicate supply line problems requiring plumbing access—tightening mounting nuts often resolves minor seeps, but corroded mounting surfaces require complete resealing.
Prevent Future Leaks Through Proactive Maintenance
Regular maintenance extends tap life and prevents unexpected leaks. Implementing simple habits saves money and inconvenience over your fixture’s lifespan.
Monthly Inspection Routine: Check for drips around handles and at the spout base. Operate handles through full range of motion, listening for grinding or stiffness. Tighten loose handle screws before they cause complete failure—most handle leaks begin with minor looseness that worsens over time.
Quarterly Cleaning Sessions: Remove mineral deposits around faucet aerators and handle bases using white vinegar soaks that dissolve buildup without damaging finishes. Clean valve seats in compression taps annually to prevent pitting and corrosion that accelerates washer wear.
Proper Operation Techniques: Avoid overtightening handles—this accelerates washer and seal wear more than any other factor. Turn taps fully off but don’t force them past their stop point. Teach household members proper operation techniques to extend your fixture’s service life.
A leaking bath tap won’t fix itself—and waiting only compounds water waste and potential damage. With basic tools, minimal parts investment, and the systematic approach outlined above, most homeowners successfully complete this repair in under two hours. The satisfaction of restoring function while saving plumber fees makes this a rewarding DIY project with immediate practical benefits and long-term cost savings.
Leave a Reply