Smart Bathroom Solutions: Reviews, Tips & Expert Maintenance Guides

Category: Tips (Page 6 of 17)

Is It Safe to Bathe During a Thunderstorm?


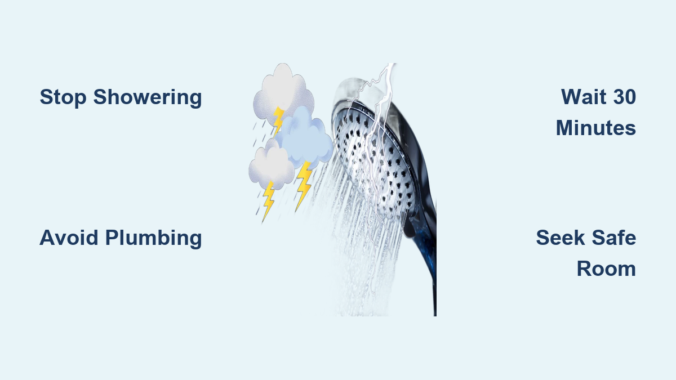
Imagine this: you’re enjoying a relaxing shower when you hear the first rumble of thunder in the distance. Should you quickly finish or immediately step out? The truth is, bathing during a thunderstorm creates a potentially fatal electrical hazard that most people dangerously underestimate. Lightning can travel through your home’s plumbing system, electrifying the water you’re standing in and turning your shower into a death trap within milliseconds. This isn’t just theoretical—people are injured and killed each year by lightning that traveled through plumbing while they were bathing or washing dishes. In this guide, you’ll discover exactly how lightning exploits your home’s plumbing, why plastic pipes don’t make you safe, and the specific steps you must take to protect your family during storm season.

Many homeowners mistakenly believe that as long as it isn’t raining outside their window, they’re safe from lightning dangers. This dangerous misconception leads directly to risky behavior like bathing during a thunderstorm. The reality is that lightning can strike up to 10 miles away from any visible rainfall, meaning a storm you can’t even see could send a lethal electrical surge through your plumbing. The National Weather Service’s critical rule is simple: if you can hear thunder, you’re within striking distance. By continuing to read, you’ll learn the science behind this danger, specific timeframes for safety, and practical steps to implement immediately when storms approach—potentially saving your life or that of someone you love.

Why Metal and Plastic Pipes Both Conduct Dangerous Lightning Currents

lightning strike plumbing diagram electrical conductivity

How Lightning Uses Your Plumbing as an Electrical Highway

Lightning seeks the path of least resistance to ground, and your home’s plumbing system—whether metal or plastic—provides an ideal conductive pathway. When lightning strikes your home directly or hits the electrical grid serving your neighborhood, that massive electrical surge travels through pipes with terrifying speed. Water inside these pipes, combined with the pipe material itself, creates a continuous electrical connection from your roof down through your walls. The moment you step into a shower or bath during this surge, you become part of the circuit, with current potentially passing through your heart and causing cardiac arrest.

Plastic Pipes Don’t Eliminate Your Bathing Risk During Storms

Many homeowners mistakenly believe that modern plastic plumbing eliminates lightning risks, but this dangerous assumption could cost you your life. While PVC pipes conduct electricity slightly less than metal pipes, this difference doesn’t make bathing during a thunderstorm safe—it merely might reduce the severity of the shock. Water itself is an excellent conductor, and the moisture content in concrete foundations and soil allows electrical surges to travel significant distances. The only guaranteed safety measure is avoiding all contact with plumbing and running water during any lightning activity, regardless of your pipe material. No convenience is worth risking cardiac arrest for a few minutes in the shower.

Water Activities to Avoid Beyond Just Bathing and Showering

Your lightning safety precautions must extend to all water-related activities in your home. During thunderstorms, you should also immediately stop:
– Washing dishes at the sink
– Hand washing before meals
– Filling pots for cooking
– Doing laundry
– Brushing your teeth

Every year, people suffer injuries from lightning that traveled through plumbing while performing these seemingly harmless tasks. The electrical current doesn’t discriminate between activities—it only needs a conductive pathway through water to reach you. Establishing a household rule of “no water use during storms” creates a simple, life-saving protocol that everyone can follow without confusion.

Immediate Actions to Take When Thunder Strikes Within 10 Miles

Creating Your Lightning-Safe Room Indoors

When you hear thunder, immediately move to an interior room away from windows and plumbing fixtures. The ideal lightning-safe room has no attached bathroom and minimal plumbing running through its walls—typically a living room or bedroom without an en suite bathroom. Gather all family members in this space and keep them there until 30 minutes after the last thunderclap. This room should contain a battery-powered phone or fully charged cell phone (not connected to a charger) so you can call for emergency help if needed. Avoid contact with concrete walls or floors, as lightning can travel through the metal rebar inside them.

Electrical Equipment to Avoid During Storm Activity

Lightning can enter your home through electrical wiring just as easily as through plumbing, making certain devices dangerous during storms. Immediately stop using:
– Corded telephones (cell phones and cordless phones are safe if unplugged)
– Desktop computers connected to power outlets
– Game consoles plugged into TVs
– Kitchen appliances like toasters or blenders
– Any device with a direct electrical connection to your home’s wiring

The surge from a nearby lightning strike can travel through these connections and cause severe injury even if you’re not touching plumbing. Unplug sensitive electronics before storms arrive to protect them from damage, but never attempt this once thunder is audible—that’s already too late for safety.

10-Mile Danger Zone: Why No Rain Doesn’t Mean Safe Showers

lightning strike range map distance from thunderstorm

Lightning’s Hidden Threat Beyond Visible Storms

The most dangerous lightning misconception is believing you’re safe if it’s not raining at your location. Lightning frequently strikes outside areas of heavy rain and can hit up to 10 miles from any visible rainfall. This explains why many lightning deaths occur before storms arrive or after they seem to have passed—people resume water activities too soon. If you can hear thunder, you’re within the danger zone where lightning could electrify your plumbing. The sound of thunder means lightning is close enough to pose an immediate threat to your safety, regardless of whether rain is falling where you are.

The Critical 30-Minute Waiting Period After Last Thunder

Many people make the mistake of resuming water activities too soon after a storm appears to pass. The National Weather Service recommends waiting at least 30 minutes after the last clap of thunder before considering the danger over. This waiting period accounts for lightning’s ability to strike from the trailing edge of a storm system. For families with evening bath routines, this means checking weather forecasts in advance and scheduling bathing times before typical afternoon and evening storm windows. Developing this habit prevents dangerous last-minute decisions when thunder suddenly rolls in.

28 Annual Deaths: Real Lightning Fatality Statistics You Must Know

US lightning strike fatality map annual statistics

Regional and Seasonal Risk Patterns for Homeowners

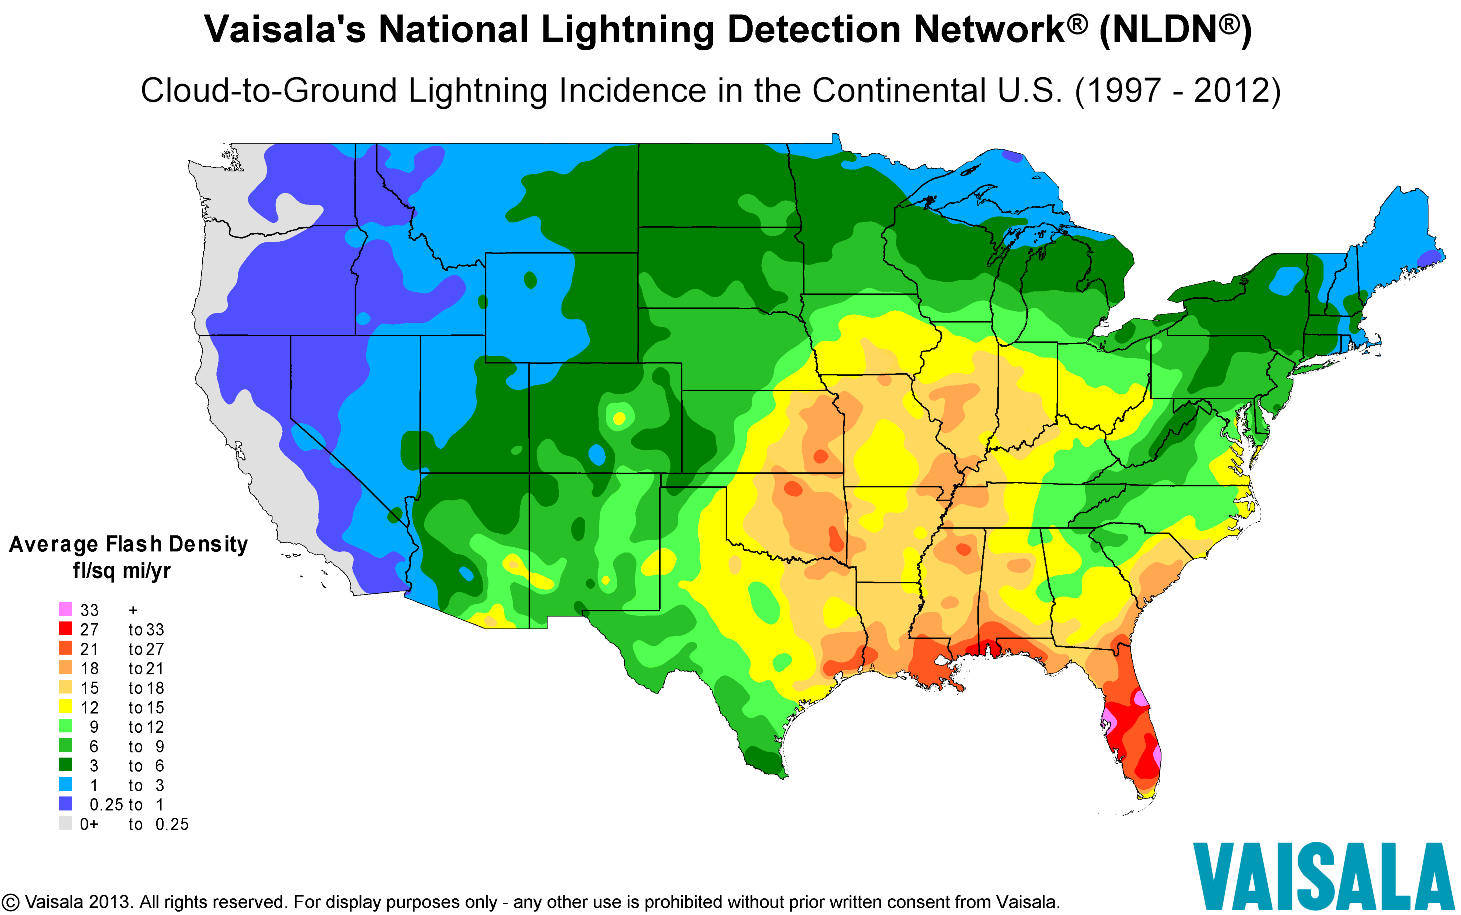
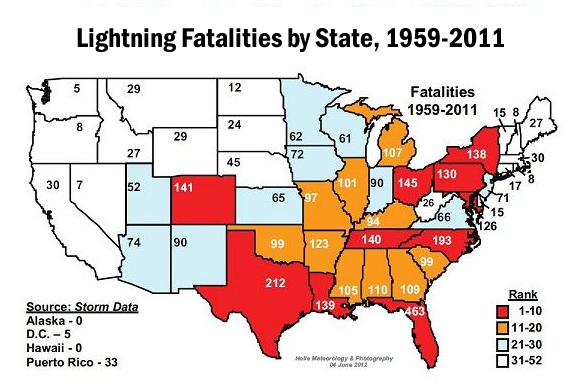
Lightning strike risks vary dramatically by location and time of year, directly impacting your bathing safety decisions. Southeastern states face the highest danger, with Florida and Texas reporting the most lightning-related deaths annually. Most strikes occur during summer months, particularly July, between afternoon and evening hours—exactly when many families schedule evening baths and showers. If you live in high-risk areas or during peak seasons, your vigilance about avoiding bathing during thunderstorms must increase accordingly. Checking your local lightning frequency maps helps you understand your specific household risk level.

Who Lightning Targets Most Frequently

Understanding lightning victim profiles reveals who’s most at risk in household settings. While 80% of lightning fatalities occur outdoors, indoor incidents happen when people ignore plumbing risks during storms. Men are four times more likely than women to be struck by lightning, partly due to riskier behavior during storms. Most indoor incidents involve people who continued water activities despite hearing thunder, believing their plastic pipes or lack of rain made them safe. Recognizing these patterns helps you avoid becoming a statistic—no matter your gender or location, bathing during a thunderstorm puts you at unnecessary risk.

First Aid Steps When Lightning Strikes a Family Member Indoors

Immediate Response Protocol for Lightning Victims

If someone in your home is struck by lightning while using water during a storm, act immediately but safely. First, ensure the lightning threat has passed before approaching—they do NOT retain an electrical charge, contrary to popular myth. Call 911 right away, then check for breathing and pulse. If the person isn’t breathing, begin CPR immediately—about 10% of lightning strike victims die from cardiac arrest, making prompt intervention critical. Continue CPR until emergency help arrives, as lightning victims often recover fully with timely assistance. Keep the victim warm and monitor for changing conditions while waiting for medical professionals.

Recognizing Less Obvious Lightning Injuries

Lightning injuries extend beyond obvious burns and cardiac issues. Victims may experience:
– Temporary neurological symptoms like confusion or memory loss
– “Lightning-induced cataracts” affecting vision
– Muscle pain and weakness from electrical current
– Ring-shaped skin lesions at entry and exit points
– Temporary hearing loss from the thunderclap

Even if someone appears fine after a lightning incident, they need professional medical evaluation. Internal injuries from electrical current may not be immediately apparent but can become serious without treatment. Documenting the exact circumstances helps medical professionals provide appropriate care for lightning-specific injuries.

Your Complete Thunderstorm Safety Checklist for Home Protection

Pre-Storm Preparation Protocol

Before storm season begins, implement these life-saving measures:
– Identify your lightning-safe room (interior space without plumbing)
– Install weather alert apps on all household cell phones
– Purchase battery-powered weather radios for emergency updates
– Discuss the “no water during storms” rule with all family members
– Create a storm safety plan that includes where to gather

Checking weather forecasts before evening activities prevents dangerous last-minute decisions about bathing during thunderstorms. For households with children, practice storm drills so everyone knows exactly where to go and what to avoid when thunder approaches.

Post-Storm Re-Entry Guidelines for Water Activities

Develop a clear household protocol for resuming normal activities after storms:
– Wait 30 minutes after the last thunderclap before using water
– Designate one person to monitor weather conditions
– Use visual timers to track the waiting period
– Have alternative hygiene options ready (pre-moistened wipes)
– Post reminders near showers and sinks about lightning risks

This structured approach prevents family members from accidentally using water too soon after storms pass. The few minutes spent waiting could prevent a lifetime of consequences from a single lightning strike through your plumbing.

Protecting yourself from lightning dangers indoors requires understanding that thunder means immediate risk—not just for outdoor activities, but for everyday household routines. By recognizing that bathing during a thunderstorm creates an unacceptable electrical hazard regardless of pipe material, and by implementing specific waiting periods before resuming water activities, you significantly reduce your risk of becoming one of the 28 annual lightning fatalities in the United States. Remember the golden rule: when thunder roars, go indoors—and stay away from all plumbing until 30 minutes after the last thunderclap. This simple practice transforms your home from a potential lightning conduit into a true safe haven during storm season.

How to Do Contrast Bath Therapy


Your legs feel like lead after yesterday’s intense workout. You know contrast bath therapy could help—alternating hot and cold water to boost circulation and reduce soreness—but you’re stuck wondering: What’s the exact temperature range? How many cycles do I really need? And is it safe for my chronic knee pain? You’re not alone. Millions search “how to do contrast bath” each month seeking proven recovery techniques, yet most guides skip critical safety steps or oversimplify the process. This guide delivers the precise protocol backed by sports medicine principles, including exact timing sequences, temperature thresholds that actually trigger physiological benefits, and red flags that mean you should stop immediately. You’ll learn how to transform your bathroom into a professional-grade recovery station using household items—no expensive tubs required—and avoid the three most dangerous mistakes 90% of beginners make.

Why Contrast Bath Therapy Works When Ice Baths Fail

Contrast bath therapy leverages thermodynamics to accelerate healing in ways single-temperature immersion can’t match. When you alternate hot and cold water, you create a “pumping” effect in your circulatory system. Cold water constricts blood vessels (vasoconstriction), forcing blood toward your core. Then hot water dilates vessels (vasodilation), flooding tissues with oxygen-rich blood upon rewarming. This cycle flushes metabolic waste like lactic acid while delivering nutrients for repair—critical for athletes training daily. Unlike prolonged ice baths that numb inflammation (sometimes delaying healing), contrast therapy manages inflammation through controlled vascular shifts. Studies show it reduces DOMS (delayed onset muscle soreness) by up to 40% compared to passive recovery when performed correctly. But get the sequence wrong, and you risk worsening swelling or triggering nerve damage.

Optimal Temperature Ranges for Real Results

Forget guessing with your hands—precision matters. Your cold water must be 50-60°F (10-15°C) to trigger vasoconstriction without risking tissue damage. Use a pool thermometer: below 50°F risks frostnip; above 60°F won’t constrict vessels effectively. For hot water, target 100-110°F (38-43°C). Water hotter than 110°F can cause burns or excessive blood pressure spikes. Never exceed 12 minutes total immersion time. Here’s the exact progression:

  1. Start cold for 30 seconds (counterintuitive but critical—prevents initial heat-induced swelling)
  2. Hot immersion: 60-90 seconds
  3. Cold immersion: 30-45 seconds
  4. Repeat hot/cold cycles 3-6 times
  5. ALWAYS end on cold to reduce residual inflammation

⚠️ Critical Safety Note: If you have diabetes, neuropathy, or vascular disease, skip contrast baths. Impaired sensation means you won’t feel tissue damage until it’s too late. Consult your doctor first.

Common Temperature Mistakes That Backfire

Most home attempts fail because of these errors:
Using ice directly in water: Creates dangerously cold pockets (below 40°F). Instead, chill water in the fridge overnight.
Guessing “warm” vs “hot”: 95°F feels hot when you’re sore but won’t dilate vessels. Test with a thermometer.
Extending cold phases: Longer than 45 seconds per cold cycle increases stiffness. Set a timer.

Step-by-Step Setup Using Household Items

contrast bath setup with buckets and thermometer

You don’t need a $2,000 contrast therapy system. Transform your bathroom in 10 minutes with items you own:

Required Equipment Checklist

  • Two large containers (5-gallon buckets work for feet; bathtubs for full legs)
  • Accurate digital thermometer ($8 at hardware stores)
  • Timer (phone app is fine)
  • Epsom salt (optional for hot phase—1 cup per 5 gallons)
  • Towels (2 minimum)

Setup Sequence for Maximum Efficiency

  1. Prepare cold water first: Fill one container with cold tap water + refrigerated water. Add ice only if needed to hit 55°F. Never add ice mid-session—temperatures must stay stable.
  2. Prepare hot water: Fill second container with tap water + kettle-boiled water. Stir thoroughly before testing temperature.
  3. Position containers: Place side-by-side with 18 inches between them. You should step directly from hot to cold without walking.
  4. Test temperatures: Recheck both 2 minutes after setup—water cools/warms rapidly.

💡 Pro Tip: Place a non-slip mat between containers. Wet feet + rushing between tubs = falls. This causes more injuries than the therapy itself.

Full-Leg vs Foot-Only Protocols

contrast bath full leg vs foot immersion diagram
Feet/ankles only: Sit on edge of tub. Submerge to mid-calf. Ideal for plantar fasciitis or trail runners.
Full legs: Requires two bathtubs or a large tub + kiddie pool. Submerge to hips. Critical for cyclists or soccer players.
Never submerge torso: Risks cardiac strain. Keep chest above water.

Critical Timing Rules Most Guides Ignore

Timing isn’t arbitrary—it’s physiology. Your vascular system needs exact windows to respond:

The 30-60-30 Cycle Breakdown

contrast bath cycle timing diagram
| Phase | Duration | Physiological Trigger |
|——-|———-|———————-|
| Cold | 30 seconds | Vasoconstriction begins |
| Hot | 60 seconds | Full vasodilation achieved |
| Cold | 30 seconds | “Pump reset” for next cycle |

Exceeding 60 seconds in hot water causes excessive dilation that backfires by trapping inflammatory fluids. Shorter than 30 seconds in cold won’t constrict vessels enough. Set phone timers for each phase—distraction leads to dangerous overexposure.

When to Stop Mid-Session

Abort immediately if you notice:
– Skin turning white or waxy (frostnip warning)
– Numbness spreading beyond immersion area
– Heart rate spiking above 100 BPM
– Dizziness or nausea

⚠️ Myth Busting: “More cycles = better results” is dangerous. Beyond 6 cycles, you flood tissues with inflammatory cells. 3-4 cycles suffice for most athletes.

Post-Session Protocol for Lasting Benefits

What you do after contrast bathing determines 70% of results. Skip this, and inflammation rebounds:

The 20-Minute Critical Window

  1. Dry immediately with warm towel—no air-drying
  2. Elevate limbs above heart level for 10 minutes
  3. Hydrate with 16oz electrolyte water (sodium/potassium)
  4. Gentle movement: 5 minutes of ankle circles or leg swings

This sequence maintains the “pumping” effect. Sitting still post-therapy allows fluids to pool, negating all benefits. Elite trainers call this the “golden period”—miss it, and recovery slows by 30%.

What NOT to Do After Contrast Baths

  • Don’t stretch aggressively: Tissues are hyper-responsive; you’ll strain them.
  • Avoid saunas/steam rooms: Overloads cardiovascular system.
  • Skip alcohol: Dehydration worsens inflammation rebound.

Special Cases: When Contrast Therapy Backfires

This isn’t a universal fix. Contraindications include:

Absolute No-Gos (Stop Immediately)

  • Open wounds or infections: Waterborne bacteria enter constricted vessels
  • Peripheral artery disease: Cold can trigger dangerous spasms
  • Recent surgery (under 6 weeks): Disrupts fragile healing

Modified Protocols for Common Issues

  • Arthritis: Reduce cold to 40 seconds; keep hot at 95°F (milder vasodilation)
  • Swollen joints: Add 1 tbsp apple cider vinegar to cold water (reduces edema)
  • Post-marathon recovery: Limit to 3 cycles—exhausted bodies can’t handle more

💡 Pro Tip: Test tolerance with 10-second cold dips first. If your skin turns bright red within 30 seconds of rewarming, your circulation responds well. No color change? Skip contrast baths.

Maintenance Schedule for Long-Term Gains

Overusing contrast baths causes vascular fatigue. Optimal frequency depends on your training phase:

Training Phase Weekly Sessions Max Consecutive Days
Pre-Competition 2 2
Heavy Lifting 3 3
Injury Rehab 1 1
Off-Season 1 1

Never do contrast baths on rest days—your body needs natural inflammation for adaptation. Morning sessions impair nerve signaling for training; always do them 3+ hours post-workout.

When to Switch to Single-Temperature Therapy

  • First 48 hours post-injury: Stick to cold-only immersion (20 mins max)
  • Chronic tendonitis: Use heat-only (15 mins at 105°F)
  • General soreness: Contrast baths lose effectiveness after 72 hours—switch to foam rolling

Final Checklist Before Your First Session

Run through this before starting:
– [ ] Thermometer verified in both tubs
– [ ] Timers set for exact durations
– [ ] Emergency towel within arm’s reach
– [ ] Phone nearby for emergency calls
– [ ] No jewelry on immersed limbs (causes cold burns)

Contrast bath therapy, done right, cuts recovery time by half. But precision is non-negotiable—this isn’t “just soaking in hot and cold water.” Follow this protocol strictly for 2 weeks, and you’ll notice reduced stiffness, faster return to training, and fewer nagging aches. If you experience persistent pain or swelling, stop immediately and consult a sports medicine specialist. Your body’s recovery capacity is remarkable—but only when you work with its physiology, not against it. Ready to try it tonight? Start with a single foot session to test tolerance before committing to full legs.

Vent Bath Fan Through Soffit: Best Practices and Tips


When bathroom humidity lingers after showers, creating foggy mirrors and musty odors, you know your ventilation system isn’t working correctly. Many homeowners seek simpler alternatives to roof venting and consider routing their bath fan exhaust through the soffit instead. This approach can work effectively when done right, but improper installation risks trapping moisture in your attic where it causes mold growth, wood rot, and compromised insulation. Understanding the critical steps for venting a bath fan through a soffit will protect your home while maintaining healthy indoor air quality. We’ll show you exactly how to implement this solution correctly, avoid common code violations, and prevent costly moisture damage that could require thousands in repairs.

Verify Your Local Building Code Requirements First

Before purchasing a single tool or material, contact your local building department to confirm whether soffit venting is permitted in your area. While the International Residential Code allows bathroom exhaust to terminate through soffits under specific conditions, many municipalities have stricter regulations that explicitly prohibit this method. Some jurisdictions require bathroom fans to vent directly through the roof with proper flashing, while others permit soffit termination only when the exhaust point maintains a minimum distance—typically three feet—from any attic intake vents or roof edges.

Failing to obtain proper permits and inspections creates significant risks for homeowners. Unpermitted work can void insurance coverage for moisture-related damage and create complications during home sales when inspectors discover non-compliant installations. Document the specific requirements for duct diameter (usually 4 inches), maximum run length, and insulation standards before proceeding. This preliminary research prevents wasted effort and ensures your ventilation system meets legal standards while effectively removing bathroom moisture.

Weigh the Real Advantages and Risks of Soffit Venting

Choosing to vent your bath fan through a soffit offers tangible benefits that appeal to many homeowners. The installation process typically requires less time on ladders than roof venting, reducing fall risks during installation. You avoid complex roof work that could compromise shingle integrity or create potential leak points that require professional repair. Shorter duct runs mean better airflow efficiency and lower material costs since you’ll need fewer components and less specialized equipment.

However, these advantages come with serious considerations. The primary danger involves moist bathroom air being drawn back into attic ventilation systems, especially when temperature differentials create suction effects. This recirculation traps humidity in your attic where it condenses on cold surfaces, promoting mold growth and structural damage over time. Soffit vents also sit closer to ground level than roof vents, making them more vulnerable to snow accumulation in winter climates and pest intrusion year-round. Carefully evaluate whether your specific home configuration and climate make soffit venting a viable option before committing to this approach.

Gather Code-Compliant Materials and Essential Tools

bathroom fan venting materials galvanized steel ductwork backdraft damper foil duct tape

Selecting the right components makes the difference between a long-lasting installation and one that fails prematurely. Begin with rigid metal ductwork—galvanized steel or aluminum—rather than flexible plastic or foil alternatives. Rigid duct maintains its shape, provides superior airflow, and satisfies code requirements in most jurisdictions. Ensure the duct diameter matches your fan’s output (typically 4 inches) to prevent airflow restrictions that reduce performance.

For exterior termination, invest in a dedicated bath fan vent hood featuring a backdraft damper that closes automatically when the fan turns off. This component prevents cold air infiltration and pest entry while allowing moist air to exit efficiently. Standard dryer vents won’t provide adequate protection against reverse airflow.

You’ll need specialized sealing materials including foil-faced duct tape (not regular tape) or UL-listed duct mastic to create airtight connections at every joint. For duct runs passing through unconditioned spaces, gather insulated duct wrap with an appropriate R-value for your climate zone. Essential tools include a hole saw matching your duct diameter, jigsaw with metal-cutting blade, drill, measuring tape, level, and safety equipment like work gloves and eye protection.

Plan Your Duct Route for Maximum Efficiency

bathroom fan duct routing diagram soffit venting slope ductwork airflow

The path your duct takes significantly impacts performance and longevity. Design a route that minimizes both total length and directional changes, as each foot of duct and every bend reduces airflow efficiency. The International Residential Code recommends keeping bathroom exhaust runs under 35 feet equivalent length, with each 90-degree bend counting as approximately 5 feet of additional length.

When horizontal sections are unavoidable, slope the duct slightly downward toward the exterior termination point—about a quarter-inch per foot—to prevent condensation from flowing back toward the fan. Never compress or kink ductwork to fit tight spaces, as this creates significant airflow restrictions that strain the fan motor and reduce moisture removal effectiveness. Support horizontal duct runs every 3-4 feet with proper hangers to prevent sagging, which creates low spots where condensation pools and eventually leaks.

Install the Interior Duct Connections Correctly

Begin by preparing the bathroom fan’s exhaust port, typically a knockout plug you remove to access the opening. Slide the rigid duct over the port with at least one inch of overlap, securing it with three to four evenly spaced screws. Apply foil tape or duct mastic over the entire joint, extending at least two inches onto both surfaces for a complete seal.

As you route the duct toward the soffit, use factory-made elbow fittings at bend points rather than attempting to bend the rigid duct. Each connection requires the same careful sealing process—screws followed by tape or mastic—to prevent air leaks. Before cutting through the soffit, verify the termination point sits at least three feet from any attic intake vents to minimize the risk of moist air recirculation. Position the hole near the outer edge of the soffit, centered between exterior and interior surfaces for optimal clearance.

Secure the Exterior Vent Hood with Weatherproof Sealing

The vent hood installation determines whether your system withstands seasonal weather challenges. Apply a continuous bead of exterior-grade silicone caulk around the hood’s mounting flange before positioning it against the soffit. This creates a watertight barrier that prevents moisture intrusion around the duct penetration.

Push the hood firmly into place and secure it with corrosion-resistant screws provided by the manufacturer, being careful not to over-tighten and crack the flange. Connect the interior duct to the hood’s inlet stub with at least one inch of overlap, securing with screws and sealing completely with foil tape or duct mastic. The finished connection should feel solid with no movement, and you should detect no air leakage when the fan operates.

Insulate Critical Duct Sections and Verify Sealing

bathroom fan duct insulation attic duct wrap foil tape sealing

For duct runs passing through unconditioned attic spaces, apply insulated duct wrap with the foil facing outward to create an effective radiant barrier. Seal all seams with foil tape, overlapping joints by at least six inches to prevent gaps where condensation could form. In colder climates, consider using pre-insulated rigid duct sections for maximum protection against freezing condensation.

Conduct a thorough inspection of your entire duct system, paying special attention to connection points at the fan housing and vent hood. Even minor air leaks allow warm, moist bathroom air to escape into wall or attic cavities, creating perfect conditions for mold growth. Run your hand along each joint while the fan operates to detect any escaping air, and reseal problem areas immediately.

Test Performance and Implement Preventative Maintenance

After installation, verify proper operation by feeling strong, consistent airflow at the exterior vent hood with no escaping air from interior connections. Monitor bathroom humidity levels during showers to ensure moisture clears within 20-30 minutes. Check the exterior hood periodically for debris accumulation, pest nests, or snow blockage that could restrict airflow.

Establish a maintenance routine that includes cleaning the fan grille and interior components annually, inspecting the exterior hood twice yearly, and testing fan performance whenever you notice lingering bathroom humidity. Replace worn components according to manufacturer recommendations, and consider upgrading to a modern, energy-efficient fan if your unit exceeds ten years of age.

Avoid These Critical Installation Mistakes

Many soffit venting failures stem from preventable errors. Using flexible plastic duct instead of rigid metal creates airflow restrictions and frequent failure points that violate building codes in most areas. Skipping required permits risks insurance complications and costly rework if inspectors discover non-compliant installations during home sales.

Inadequate sealing at connection points remains the most common failure cause, allowing moist air to infiltrate wall cavities and attics. Poor termination placement near attic intake vents or snow-prone roof edges creates immediate recirculation problems. Most importantly, neglecting climate-specific considerations—like insufficient duct insulation in cold regions—leads to frozen condensation that blocks airflow and damages fan motors.


Properly venting a bath fan through a soffit delivers effective moisture control when executed with careful attention to building codes, material selection, and installation precision. Focus on creating an airtight system with appropriate duct sizing, strategic termination placement, and climate-appropriate insulation to prevent the moisture damage that plagues improper installations. By following these guidelines, you’ll protect your home’s structural integrity while maintaining the healthy indoor environment your family deserves—without the complexity and expense of roof venting. Remember that when in doubt about code compliance or installation challenges, consulting a licensed HVAC professional ensures your ventilation system performs reliably for decades.

How to Wire Bath Fan and Light: Step-by-Step Guide


Bathroom ventilation is critical for preventing mold and moisture damage, yet many homeowners struggle with properly wiring their bath fan and light combinations. If your bathroom fan won’t turn on while the light works, or both components fail to function after installation, you’re not alone—improper wiring causes most bathroom ventilation issues. This comprehensive guide shows you exactly how to wire bath fan and light units correctly the first time, whether you’re installing a new unit during a renovation or replacing an aging fixture. You’ll learn the essential electrical requirements, safety protocols, and step-by-step connection methods that ensure your bathroom stays dry and well-lit for years to come.

When tackling how to wire bath fan and light fixtures, understanding your specific configuration options is crucial before touching a single wire. Bathroom electrical work demands respect for both safety and code compliance, but with proper preparation, most homeowners can successfully complete this project without professional help. By the end of this guide, you’ll know precisely which wires connect where, how to choose between single or dual switch setups, and what common mistakes to avoid during installation.

Single vs. Dual Switch Wiring Configurations

bathroom fan switch wiring diagram single dual

Choosing between single-switch and dual-switch setups determines your entire wiring approach when you wire bath fan and light fixtures. A single-switch configuration uses one wall toggle to control both components simultaneously—turning on the light automatically activates the fan. This simpler setup requires only standard 14/2 NM-B cable (black, white, and ground wires) between your switch and fixture, making it ideal for beginners or when working with limited space in existing walls.

For independent control, dual-switch wiring gives you the flexibility to run the fan without turning on the light—a must-have feature during morning showers when bright lights are unnecessary. This configuration requires 14/3 NM-B cable (black, red, white, and ground) to create separate hot leads for each component. The red wire typically powers the fan while the black wire controls the light, allowing completely independent operation from two separate switches mounted side-by-side in your bathroom.

Critical wiring tip: When installing dual switches, mark all white wires used as hot conductors with black tape at both ends. The National Electrical Code requires this identification to prevent dangerous confusion during future maintenance. Many DIYers skip this step, creating serious safety hazards for themselves or future homeowners.

Essential Tools and Materials Checklist

electrical tools for bathroom fan installation

Before attempting to wire bath fan and light fixtures, gather these non-negotiable items to ensure a smooth installation:

  • Voltage tester or multimeter (test before and after working on circuits)
  • Wire strippers with gauge markings for 14-12 AWG wires
  • Needle-nose pliers for bending and securing wire connections
  • Screwdriver set (both Phillips and flathead)
  • Wire nuts matching your wire gauge (blue for 14 AWG, yellow for 12 AWG)
  • Electrical tape (10+ feet)
  • Fish tape (for retrofit installations through existing walls)

Your materials list must include:
– Fan-rated electrical box (standard boxes can’t support fan vibration)
– 14/2 or 14/3 NM-B cable (depending on your switch configuration)
– GFCI-protected switch or circuit breaker (required by code)
– Moisture-resistant switch plates
– Combination fan-light unit rated for damp locations

Warning: Never use standard light fixture boxes for fan installations—they’ll loosen over time from vibration, potentially causing the unit to fall. Proper fan-rated boxes have reinforced mounting brackets that secure directly to ceiling joists.

Safety Protocols and Code Requirements

Electrical safety in bathroom installations isn’t optional—it’s a matter of preventing fire or electrocution hazards. The National Electrical Code mandates GFCI protection for all bathroom receptacles and lighting circuits, which means your fan-light combination must either connect to a GFCI-protected circuit or use a special GFCI switch at the wall. This protection cuts power within milliseconds if current leakage is detected, potentially saving your life in a wet environment.

Most building departments require dedicated 20-amp circuits for bathroom outlets, but fan-light combinations can typically share a 15-amp circuit if no other bathroom outlets connect to it. Verify your local code requirements before starting—some jurisdictions mandate separate circuits for fans and lights in new construction. Remember that bathroom circuits cannot serve outlets outside the bathroom, so don’t try to extend this circuit to power hallway or bedroom fixtures.

Life-saving practice: Always test your voltage tester on a known live circuit before and after checking your work circuit. Faulty testers have caused numerous electrical accidents when DIYers mistakenly believed circuits were dead. Keep one hand in your pocket while testing to prevent current from traveling across your heart if accidental contact occurs.

Step-by-Step Wiring Process for Single Switch Setup

Follow these precise steps when you wire bath fan and light with a single switch:

  1. Turn off power at the breaker and verify with your voltage tester at both the switch box and fan location
  2. Connect the power source black (hot) wire to the switch’s common terminal
  3. Attach a black pigtail wire from the switch’s load terminal to both the fan and light black wires
  4. Splice all white (neutral) wires together with a wire nut
  5. Connect all ground wires to each other and to the switch’s green terminal
  6. Carefully tuck wires into the electrical box without pinching conductors

For the fan unit connections:
– Black wire → Black (hot) from switch
– White wire → White (neutral) bundle
– Green/bare wire → Ground bundle
– Blue wire (if present) → Connect to black hot wire (some units have separate light wiring)

Pro tip: Wrap all wire nut connections with electrical tape before tucking them into boxes. This extra step prevents connections from loosening over time—especially important in humid bathroom environments where thermal expansion and contraction occur daily.

Dual Switch Wiring Configuration Made Simple

Dual-switch installations require careful organization but provide superior functionality. Here’s how to wire bath fan and light independently:

  1. Run 14/3 cable from the switch box to the fan unit (black, red, white, ground)
  2. At the fan: connect black wire to light, red wire to fan motor, white to neutral
  3. In the switch box: connect black (common hot) to both switches’ line terminals
  4. Attach black wire to first switch’s load terminal (for light)
  5. Connect red wire to second switch’s load terminal (for fan)
  6. Splice all white wires together and mark with black tape where used as hots

Common mistake alert: Many DIYers connect the fan’s blue wire to the red wire but forget to connect the fan motor’s black wire to the same red circuit. This error causes the light to work while the fan remains dead—double-check both connections before closing up the unit.

Testing and Troubleshooting Your Installation

After completing your how to wire bath fan and light project, systematic testing prevents future headaches:

  • Turn on both components simultaneously and listen for unusual noises
  • Check for consistent light output without flickering
  • Verify the fan pulls air effectively (hold tissue near grille)
  • Test GFCI protection by pressing the test button

Troubleshoot these common issues:
Fan works but light doesn’t: Check blue wire connection at fan and switch
Light works but fan doesn’t: Verify both black and blue wires connect to proper circuits
Both components intermittent: Inspect all wire nut connections for looseness
GFCI trips immediately: Look for ground wires touching hot terminals

Critical warning: If your circuit breaker trips repeatedly, turn off power immediately and check for short circuits—exposed copper touching where it shouldn’t causes dangerous conditions.

Maintenance for Long-Term Reliability

Properly wired bath fan and light units should last 10+ years with minimal maintenance. Extend their lifespan by:

  • Cleaning fan blades and housing every 6 months to prevent dust buildup
  • Checking wire connections annually for signs of corrosion
  • Replacing worn motor bearings before complete failure occurs
  • Ensuring the ventilation duct remains unobstructed

Run your fan for at least 20 minutes after showers to eliminate moisture completely. Consider installing a timer switch that automatically runs the fan for 30 minutes, preventing mold growth even when you forget to turn it on manually.

When Professional Help Becomes Necessary

While many homeowners successfully complete how to wire bath fan and light projects, call a licensed electrician if:

  • You need to install a new circuit from your electrical panel
  • Your home has aluminum wiring (common in 1965-1973 construction)
  • You encounter knob-and-tube wiring during installation
  • Local codes require permits you’re uncomfortable obtaining
  • You’re unsure about any step in the process

Electrical mistakes can cause house fires or electrocution—never risk your safety to save installation costs. A professional electrician typically charges $150-$300 for this work, a small price compared to potential repair costs from improper wiring.

Mastering how to wire bath fan and light fixtures gives you control over your bathroom’s ventilation and lighting while saving money on installation costs. By following these precise steps, respecting electrical safety protocols, and understanding code requirements, you’ll create a reliable system that prevents moisture damage and keeps your bathroom comfortable. Remember that proper wiring today means fewer problems tomorrow—take your time with each connection, test thoroughly before final assembly, and enjoy the satisfaction of a job well done. Your newly installed fan-light combination will serve your household efficiently for years to come, protecting your home from the damaging effects of excess moisture.

How to Replace Bath Fan: Quick Steps


That persistent musty odor after your shower? It’s your first warning sign that your bathroom exhaust fan has failed—and ignoring it risks mold growth, structural damage, and costly repairs. Replacing a bath fan isn’t a simple light-bulb swap; it involves live electrical wiring, ceiling access, and ventilation requirements most homeowners overlook. Without the exact model specifications (which vary widely by manufacturer), you’re gambling with safety and compliance. This guide cuts through the confusion with universal replacement steps that prioritize code compliance and injury prevention—whether you’re installing a Broan, Panasonic, or generic unit. You’ll learn how to safely disconnect old units, avoid deadly electrical mistakes, and verify airflow performance without specialized tools.

Why Bathroom Fan Replacement Demands Professional-Level Precision

Most DIYers underestimate how bathroom exhaust fans integrate with your home’s electrical and ventilation systems. A single misstep can trigger electrical fires, void insurance policies, or fail building inspections. Unlike light fixtures, exhaust fans require:
Dedicated 15-amp circuits (shared circuits often overload when fans run with heaters)
Minimum 50 CFM airflow (per International Residential Code for bathrooms under 100 sq ft)
Exterior venting (venting into attics causes catastrophic moisture damage)
Ignoring these standards traps humid air in your ceiling cavity, rotting wood framing within 18 months. Home inspectors routinely flag improperly replaced fans as “major defects” during resale—delaying closings by weeks.

How to Confirm Your Fan Needs Replacement (Not Just Cleaning)

Before disassembling anything, verify failure isn’t caused by simple clogs:
1. Test airflow: Hold tissue paper 2 inches from the grill—if it doesn’t stick firmly when the fan runs, airflow is insufficient
2. Check for humming: A loud buzzing with no rotation indicates seized bearings (requires motor replacement)
3. Inspect wiring: Visible fraying or melted insulation at the junction box means immediate replacement
Pro Tip: If the fan runs but humidity lingers after 20 minutes, your unit is undersized—not broken. Calculate needed CFM: (Bathroom length × width) × 1.1 = Minimum airflow.

Critical Safety Steps Before Removing the Old Fan

bathroom exhaust fan electrical safety steps

Never skip these steps—even if the fan seems “dead.” Bathroom circuits often share power with outlets, creating hidden electrocution risks.

How to Safely Isolate Power (The 3-Point Verification Method)

Assuming standard wiring (no GFCI protection in older homes):
1. Turn off the breaker labeled “Bathroom” or “Ventilation” at your main panel
2. Verify power loss at the fan switch using a non-contact voltage tester (tester must show zero voltage)
3. Double-check wires inside the fan housing—test both black (hot) and white (neutral) wires before touching
Warning: If your tester lights up at any point, STOP. You’ve turned off the wrong breaker. Consult an electrician.

Essential Tools for Safe Disassembly

Gather these before climbing your ladder:
– Non-contact voltage tester ($8, hardware stores)
– Insulated screwdrivers (magnetic tip prevents dropped screws)
– Flashlight with magnet base (sticks to metal housing)
– Heavy-duty garbage bag (to catch insulation debris)
Critical Mistake to Avoid: Using metal ladders near electrical work. Always use fiberglass ladders rated for electrical work.

Removing Your Old Bathroom Exhaust Fan Unit

Ceiling drywall damage is the #1 DIY replacement mistake. Follow this sequence to preserve your ceiling:

How to Disconnect Wiring Without Creating a Fire Hazard

  1. Remove the grill and light cover (usually clips or screws)
  2. Unscrew the mounting bracket—support the unit’s weight with your free hand
  3. Before disconnecting wires: Take a photo of the existing wiring configuration
  4. Loosen wire nuts counterclockwise (black to black, white to white, green/bare to ground screw)
  5. Slide the old unit out slowly while feeding wires through the ceiling hole
    Visual Cue: If wires show copper beyond the wire nut, the connection was loose—this causes arcing and heat damage.

Handling Common Obstruction Scenarios

  • Stuck housing in insulated ceilings: Cut insulation away with a utility knife (never pull the unit forcefully)
  • Rusted mounting screws: Spray with penetrating oil, wait 10 minutes, then tap gently with hammer before turning
  • No attic access: Work through the ceiling hole using a flexible drill bit extension (36-inch minimum)

Selecting a Code-Compliant Replacement Fan Unit

bathroom exhaust fan CFM sone rating comparison chart

Choosing the wrong model guarantees rework. Match these non-negotiable specs:

Critical Replacement Criteria Checklist

  • Housing diameter: Measure your existing ceiling cutout (common sizes: 7.5″ or 10.5″)
  • Duct diameter: Most require 4″ rigid ducting (flex duct reduces airflow by 30%)
  • Static pressure rating: Must exceed 0.1″ for vent runs over 25 feet (check manufacturer charts)
  • IC-rated housing: Required if insulation contacts the unit (prevents overheating)
    Expert Note: Avoid “multi-room” fans unless professionally ducted. Single-bath units cost 40% less and last longer.

Why Sone Ratings Matter More Than CFM Claims

Manufacturers advertise high CFM numbers, but noise (sone rating) determines real-world use:
| Sone Rating | Noise Level | Recommended For |
|————-|————-|—————-|
| 1.0 sone | Whisper-quiet | Master bathrooms |
| 2.5 sones | Normal conversation | Secondary bathrooms |
| 3.5+ sones | Annoying hum | Utility rooms only |
Choose 1.0 sone models even if slightly lower CFM—people won’t run noisy fans long enough to dry the room.

Installing Your New Bathroom Exhaust Fan

This is where 90% of DIY failures occur. Precision here prevents callbacks and code violations.

Step-by-Step Mounting for Zero Ceiling Damage

  1. Slide new unit into ceiling hole—do not force it (if tight, enlarge hole 1/8″ at a time)
  2. Align mounting tabs with joists (use a stud finder through the hole)
  3. Secure with #8 x 1″ screws only (longer screws puncture roof decking)
  4. Connect wires: Black to black, white to white, ground to green screw (wrap connections with electrical tape)
  5. Tuck wires neatly into housing—no pinching against mounting flanges
    Pro Tip: Apply silicone caulk around the housing rim before final tightening. Prevents air leaks that reduce airflow by 15%.

Ductwork Installation Mistakes That Cause Mold

  • Never use flexible ducting in ceiling cavities (collapses over time, trapping moisture)
  • Slope duct downward 1/4″ per foot toward exterior vent (prevents condensation pooling)
  • Seal joints with mastic (not duct tape—it fails at 180°F temperatures)
    Visual Cue: Properly installed ducts have zero kinks and maintain full diameter throughout the run.

Testing and Final Verification

Your replacement isn’t complete until these tests pass:

The 4-Point Performance Checklist

  1. Airflow test: Hold tissue against the grill—must hold firmly at full speed
  2. Timer function: Verify fan runs 20+ minutes after switch-off (prevents premature shutoff)
  3. Condensation check: Run a hot shower for 15 minutes—no moisture should collect on the grill
  4. Exterior vent inspection: Confirm air is blowing out (not sucking in) at the roof/wall cap
    Critical Warning: If the fan vibrates excessively, shut off immediately. Unbalanced motors overheat within hours.

When to Call a Professional Immediately

Some situations demand licensed help—no exceptions:
Aluminum wiring in your home (requires COPALUM crimps for safe connection)
No attic access (risks improper duct routing through living spaces)
Venting through soffit (creates negative pressure that pulls air back into attic)
GFCI tripping during testing (indicates ground fault needing circuit diagnosis)
Cost Reality: Electricians charge $150–$250 for fan replacement. This is cheaper than $5,000 in mold remediation from a failed DIY job.

Preventing Future Failures With Smart Maintenance

Extend your new fan’s lifespan with these 2-minute monthly habits:
– Vacuum the grill with a brush attachment (prevents dust buildup that strains motors)
– Wipe blades with a damp cloth during shower cleanings (oil from skin reduces airflow)
– Check exterior vent cap quarterly for bird nests or ice blockages
Pro Tip: Install a humidity-sensing switch ($35). It auto-runs the fan until moisture drops below 50%—eliminating guesswork.

Replacing a bath fan safely hinges on respecting electrical hazards and ventilation physics—not just swapping parts. By prioritizing code compliance over speed, you avoid the top pitfalls that turn simple upgrades into emergency repairs. Remember: When in doubt, turn off the breaker and call a pro. That $200 service call preserves your home’s structural integrity far better than a rushed DIY fix. For model-specific wiring diagrams, always consult the manufacturer’s PDF manual—never rely solely on generic guides. Your next shower should leave only steam, not regrets.

How to Size a Bath Exhaust Fan


Moisture damage sneaks up on homeowners when bathroom ventilation falls short. An undersized exhaust fan leaves steam clinging to mirrors and walls long after your shower ends, creating perfect conditions for mold growth that can compromise both your health and your home’s structure. Yet oversizing brings its own problems—excessive noise, energy waste, and even dangerous negative pressure that pulls conditioned air from other rooms. Getting the right size exhaust fan means understanding exactly how to size a bath exhaust fan for your specific space. This guide cuts through the confusion with clear, actionable steps to determine the precise CFM (Cubic Feet per Minute) capacity your bathroom needs. You’ll learn to calculate your requirements based on actual measurements, not guesswork, and avoid costly mistakes that lead to recurring moisture problems.

Measure Your Bathroom Dimensions Accurately

Grab your tape measure and start with the basics: your bathroom’s true square footage. Measure wall-to-wall length and width in feet, then multiply these numbers to get your total floor area. An 8-foot by 10-foot bathroom equals 80 square feet—this simple calculation forms the foundation of proper fan sizing. Don’t overlook irregular layouts; for L-shaped bathrooms or spaces with alcoves, break the room into sections, measure each separately, then add the totals together. This precision prevents the most common sizing error—underestimating your actual space.

Take extra care with measurements if you’re working with older homes where walls may not be perfectly square. Record dimensions to the nearest inch, especially in bathrooms with angled ceilings or unconventional shapes. A bathroom that appears 5×8 feet might actually measure 5’2″x8’3″, creating nearly 7 extra square feet that affects your fan requirements. Double-check your math before moving to the next step—this number determines your entire ventilation strategy.

Apply the CFM Sizing Formula to Your Measurements

bathroom exhaust fan CFM calculation chart

Your square footage directly translates to minimum CFM requirements using industry-standard guidelines. For bathrooms 45 square feet or smaller (like half-baths and powder rooms), you need at least 50 CFM to prevent moisture buildup from brief usage. Standard family bathrooms between 46-75 square feet require 70-80 CFM—choose the higher end if multiple people share the space or if you take frequent showers. Large master bathrooms ranging from 76-105 square feet need a robust 110 CFM fan to handle the increased air volume, especially if you have a soaking tub that releases significant moisture.

When your bathroom exceeds 105 square feet (common in luxury master suites with dual vanities and multiple showerheads), step up to 150 CFM. This higher capacity ensures even distant corners receive adequate air exchange. Remember these are minimum requirements—special circumstances may demand more power. For example, a 70-square-foot bathroom with a steam shower needs the 80 CFM rating at minimum, even though it falls in the lower size range.

Adjust for Ceiling Height Above Standard

bathroom exhaust fan CFM calculation vaulted ceiling

Standard sizing guidelines assume 8-foot ceilings, but vaulted ceilings or loft spaces dramatically increase the air volume your fan must move. A bathroom with 10-foot ceilings contains 25% more air than the same floor plan with standard 8-foot ceilings, requiring proportional CFM increases. For ceilings between 8-10 feet, add 20% to your base CFM requirement. With ceilings over 10 feet, increase by 50% or more depending on the actual height.

Consider this real-world example: a 90-square-foot bathroom with standard 8-foot ceilings needs 110 CFM. But with 12-foot ceilings, that same floor area requires at least 165 CFM (110 × 1.5) to achieve equivalent ventilation performance. Don’t skip this critical adjustment—homes with cathedral ceilings routinely suffer from persistent moisture problems because homeowners size fans based on floor area alone. When in doubt, choose the next higher CFM rating to compensate for increased ceiling height.

Factor in Your Specific Fixture Usage Patterns

Square footage provides the baseline, but your actual fixture usage determines whether you need to step up to a higher CFM rating. A bathroom with only a shower used occasionally might meet minimum requirements, but multiple daily showers, jetted tubs, or steam features significantly increase humidity output. Each additional showerhead adds substantial moisture load—dual showerheads can double the steam output of a standard shower.

If your bathroom includes any of these high-moisture features, increase your CFM selection by one tier:
– Jetted or air tubs filled regularly
– Multiple showerheads or rainfall fixtures
– Steam shower capabilities
– Frequent bathing by multiple household members

A bathroom with a standard shower used twice daily by two people needs the minimum CFM for its size. But add a jetted tub used nightly, and you should upgrade to the next CFM category regardless of square footage. This real-world adjustment prevents the common frustration of “my fan meets code but still leaves moisture on the walls.”

Select the Right Fan Type for Your Needs

bathroom exhaust fan types comparison chart with features

Beyond capacity, choosing the appropriate exhaust fan type ensures your ventilation system meets both functional and aesthetic requirements. Standard fan-only units provide basic ventilation at various CFM ratings, while fan-light combinations integrate illumination with exhaust functionality—ideal for bathrooms where ceiling space is limited. For maximum convenience, humidity-sensing fans automatically activate when moisture levels rise and shut off when the air clears, eliminating forgotten fans that run all day.

Consider these specialized options based on your bathroom’s specific needs:
Motion-sensing fans: Ideal for children’s bathrooms where remembering to turn on the fan is challenging
Heated fans: Perfect for cold climates, providing instant warmth while improving drying performance
Bluetooth-enabled units: Combine ventilation with audio entertainment for shower time
Decorative recessed models: Maintain aesthetics while providing necessary ventilation

Match Fan Dimensions to Your Existing Opening

Measure your current ceiling opening before purchasing a replacement fan—this prevents installation headaches and unnecessary ceiling repairs. Remove the grille cover and measure the length and width of the exposed housing. Most residential fans fit standard 11×4 inch or 7.7×7.7 inch openings, but older homes may have different dimensions.

A mismatched size creates significant problems:
Smaller fan: Leaves visible gaps requiring additional trim work
Larger fan: Requires ceiling modification to enlarge the opening
Different shape: Creates complex installation challenges

When replacing an older fan, you may discover your existing opening differs from modern standards. In this case, either select a fan with an adapter kit for your specific opening size or plan for minor ceiling modifications during installation. This upfront measurement saves hours of frustration later.

Avoid These Critical Sizing Mistakes

Homeowners commonly undersize fans by focusing only on current usage patterns without considering future needs. A bathroom adequate for one person becomes insufficient when a family grows. Similarly, selecting based solely on noise ratings leads to quiet but ineffective ventilation—modern fans offer both high CFM and low noise levels when properly sized.

Most dangerous mistake: Ignoring local building codes that specify minimum CFM requirements. While codes represent the legal minimum, your actual needs may exceed these standards based on your specific bathroom configuration and usage. Always verify both code requirements and practical needs before finalizing your selection.

Maintain Your Fan for Long-Term Performance

Even perfectly sized fans lose effectiveness when clogged with dust and debris. Clean your exhaust fan grille and blades every 3-6 months to maintain optimal airflow. Remove the cover (typically held by spring clips), wash with mild soap and water, and gently clean fan blades with a soft brush. Neglecting this simple maintenance can reduce your fan’s effective CFM by 30% or more over time.

Simultaneously inspect your ductwork for obstructions—crushed or disconnected ducts severely limit performance regardless of fan capacity. Attic-accessible ducts should be checked annually for damage, while inaccessible runs may require professional inspection every few years. Proper maintenance ensures your carefully sized fan continues delivering the ventilation performance you calculated.

Quick Reference CFM Sizing Chart

Use this chart as your final verification step after completing all measurements and adjustments:

Bathroom Size Standard Ceiling Height With High Ceilings
45 sq ft or less 50 CFM 60+ CFM
46-75 sq ft 70-80 CFM 90-100 CFM
76-105 sq ft 110 CFM 140+ CFM
Over 105 sq ft 150 CFM 200+ CFM

When you know how to size a bath exhaust fan correctly, you create a bathroom environment that stays fresh, dry, and mold-free. Your investment in proper sizing pays off through avoided moisture damage, lower energy costs, and a healthier living space. Take the time to measure accurately, account for all variables, and select the right fan type—you’ll enjoy the results every time you step out of the shower into a comfortably dry bathroom.

Epsom Salt Bath Side Effects to Know


Epsom salt baths have become a popular home remedy for muscle relaxation, stress relief, and minor aches and pains. Millions of people add these crystallized minerals to their bathwater believing in their therapeutic properties. However, despite their widespread use and generally favorable reputation, Epsom salt baths are not without potential side effects that could turn your relaxing soak into an uncomfortable experience. Understanding these possible adverse reactions is essential before you incorporate this seemingly harmless wellness practice into your routine, especially if you have underlying health conditions or plan to use them frequently.

While Epsom salt baths are generally considered safe for most healthy adults when used appropriately, the therapeutic claims surrounding them often overshadow important safety considerations. The magnesium and sulfate ions that make up Epsom salts can be absorbed through your skin during a bath, and this absorption can affect your body chemistry in ways you might not expect. Before you draw your next warm bath and reach for that box of Epsom salts, you need to understand the potential side effects, who should exercise particular caution, and how to use these baths safely to maximize benefits while minimizing risks.

Skin Irritation from Improper Epsom Salt Concentration

One of the most commonly reported problems with Epsom salt baths involves skin irritation, which can manifest as redness, itching, burning, or a rash after your soak. This reaction occurs because the high concentration of minerals creates an osmotic environment that draws moisture out of your skin cells, leading to dehydration of your epidermal layer. If you have sensitive skin or conditions like eczema or psoriasis, Epsom salt baths may actually worsen your symptoms rather than providing relief.

Allergic reactions to Epsom salts themselves are relatively rare but not impossible. Some people develop contact dermatitis characterized by inflamed, itchy skin that may blister in severe cases. If you notice hives, swelling beyond the exposed area, or difficulty breathing after an Epsom salt bath, seek medical attention immediately. Even mild skin irritation should be taken seriously—discontinue use if you experience persistent discomfort and consider consulting a dermatologist before trying again.

The concentration of Epsom salts in your bath water significantly influences your risk of skin problems. While product labels often recommend two to four cups per standard bathtub, these recommendations aren’t standardized and may not account for individual sensitivity. Start with just one cup of Epsom salts and limit your soak to fifteen to twenty minutes to gauge your skin’s tolerance before gradually increasing the amount or duration.

Magnesium Toxicity Risks from Frequent Soaking

Magnesium toxicity symptoms diagram

The primary appeal of Epsom salt baths lies in the belief that magnesium can be absorbed through your skin to supplement dietary intake. While healthy kidneys efficiently eliminate excess magnesium, this filtration capacity has limits. When magnesium levels in your blood rise above normal ranges—which can happen with excessive Epsom salt bath use—you may experience nausea, vomiting, flushing, low blood pressure, and a feeling of weakness.

How Epsom Salt Bath Frequency Affects Magnesium Levels

Using Epsom salt baths more than once daily significantly increases your risk of magnesium accumulation, especially when combined with very long soak times (exceeding thirty minutes), very hot water (which opens pores), and concurrent use of other magnesium supplements. People with any degree of kidney impairment should be particularly cautious and consult their healthcare provider before using Epsom salt baths regularly.

Warning Signs of Magnesium Overload

Watch for these symptoms that may indicate magnesium toxicity:
– Persistent nausea or vomiting
– Unusual drowsiness or lethargy
– Diminished reflexes
– Muscle weakness
– Irregular heartbeat

If you experience multiple symptoms, especially if you have kidney problems, stop using Epsom salt baths immediately and consult your healthcare provider.

Dehydration and Electrolyte Imbalance from Extended Soaks

Osmosis diagram skin cell dehydration

Epsom salt baths create a hypertonic environment on your skin’s surface, causing your skin cells to lose water to the surrounding bathwater rather than absorbing it. This osmotic effect can lead to temporary dehydration of your skin’s outer layers. When combined with the sweating promoted by warm bathwater, extended exposure to concentrated Epsom salt solutions can leave you feeling genuinely dehydrated.

You might experience these dehydration symptoms after an Epsom salt bath:
– Intense thirst
– Dry mouth
– Headache
– Dizziness
– Dark-colored urine

Always drink water before and after Epsom salt baths, especially if you soak longer than twenty minutes or use high salt concentrations. Replenishing fluids helps counteract both the osmotic fluid shifts and the sweating that occurs during your soak.

Blood Pressure Drops After Epsom Salt Soaks

The magnesium absorbed during Epsom salt baths affects cardiovascular function by promoting relaxation of smooth muscle cells in blood vessel walls, leading to vasodilation. For most people, this effect creates a pleasant sense of relaxation. However, if you already have low blood pressure, take antihypertensive medications, or are prone to dizziness upon standing, this blood pressure-lowering effect can become problematic.

Standing up quickly after an Epsom salt bath may cause lightheadedness or even fainting due to the combined effect of vasodilation and residual warmth in your leg vessels. If you experience frequent dizziness after Epsom salt baths, consider these safety measures:

  • Sit on the edge of the tub for several minutes before standing
  • Have someone assist you when exiting the bath
  • Keep a towel nearby in case you feel faint
  • Consider reducing your bath duration or salt concentration

Kidney Function Concerns with Regular Use

Your kidneys serve as your body’s primary filtering system for magnesium, and their function is the most important factor determining whether Epsom salt bath use is safe for you. In healthy kidneys, excess magnesium is efficiently excreted in urine. However, if you have reduced kidney function—whether from chronic kidney disease, acute injury, or certain medications—this protective mechanism is compromised.

Many people with early-stage kidney disease don’t realize they have the condition, as it often produces no obvious symptoms. Even mild to moderate reduction in kidney function can significantly impair your ability to handle the magnesium load from regular Epsom salt baths. If you have any kidney concerns, obtain clear guidance from your nephrologist or primary care physician before incorporating Epsom salt baths into your routine.

Medication Interactions You Should Know

Drug interaction chart magnesium blood pressure medication

The systemic absorption of magnesium means it enters your bloodstream and can potentially interact with medications you’re taking. These interactions can enhance certain drug effects, reduce absorption of others, or cause additive side effects.

Blood pressure medications require particular attention, as magnesium’s vasodilatory effects can compound with prescription antihypertensives like ACE inhibitors, angiotensin receptor blockers, calcium channel blockers, and beta-blockers. The combination could cause your blood pressure to drop too low, leading to dizziness or fainting.

Muscle relaxants also interact significantly with magnesium, as both affect neuromuscular function. The combination could lead to excessive muscle weakness, drowsiness, or impaired coordination. Always discuss Epsom salt bath use with your prescribing physician if you take any medications regularly.

Special Populations That Need Extra Caution

Certain groups face elevated risks from Epsom salt baths and should exercise heightened caution or avoid them entirely without medical guidance. Pregnant women, particularly during the first trimester, should discuss Epsom salt bath use with their obstetrician. The concern centers on the potential for absorbed magnesium to cross the placental barrier and affect fetal development, as well as the risk of elevated core body temperature during prolonged warm baths.

Individuals with diabetes face multiple concerns with Epsom salt baths. Diabetes is a leading cause of kidney disease, and many diabetics have some degree of renal impairment that may not be apparent. Additionally, diabetes often causes peripheral neuropathy—reduced sensation in the feet and hands—which can mask early signs of skin irritation. If you have diabetes, have a thorough discussion with your endocrinologist before using Epsom salt baths.

Recognizing When to Seek Medical Help

While most side effects of Epsom salt baths are mild, certain symptoms warrant immediate medical evaluation. Seek emergency care if you experience difficulty breathing, swelling of the face or throat, or widespread hives after an Epsom salt bath.

Symptoms suggesting significant magnesium toxicity require urgent medical evaluation, particularly if they occur in someone with known kidney disease or after an unusually long or concentrated bath. These include severe muscle weakness, profound drowsiness, slowed or irregular heartbeat, dramatically low blood pressure causing fainting, and respiratory difficulty. If you observe these symptoms following Epsom salt bath use, seek emergency medical treatment immediately.

Safe Epsom Salt Bath Practices for Risk Reduction

Using Epsom salt baths safely requires attention to concentration, temperature, duration, frequency, and your individual health status. Most healthy adults can enjoy the potential benefits while minimizing risks by following these guidelines:

Start with one to two cups of Epsom salts per standard bathtub rather than the higher amounts often recommended on product labels. Keep bathwater warm rather than hot—below 100 degrees Fahrenheit—to reduce both magnesium absorption rates and sweating. Limit initial baths to fifteen to twenty minutes, gradually extending to thirty minutes only if you tolerate shorter soaks well.

Restrict Epsom salt baths to two to three times per week rather than daily use, which increases cumulative magnesium absorption. Stay well-hydrated by drinking water before and after your bath to counteract fluid losses. Most importantly, pay attention to how your body responds and adjust your practices accordingly—if a particular concentration, temperature, or duration consistently causes symptoms, reduce it or discontinue use.

By understanding the potential side effects of Epsom salt baths and following these safety guidelines, you can make informed decisions about whether this popular home remedy is right for you and how to use it safely to support your wellness routine.

Epsom Salt Bath Benefits When Sick: Soothe Aches & Boost Recovery


When you’re feeling under the weather with body aches, congestion, and fatigue, turning to natural remedies that complement your recovery becomes essential. An Epsom salt bath offers a gentle yet powerful way to alleviate multiple symptoms simultaneously without relying solely on medication. Whether you’re fighting a seasonal cold, flu, or recovering from physical exhaustion, understanding how this simple remedy works can significantly improve your comfort during illness. This guide reveals exactly how Epsom salt baths provide relief when you’re sick, with practical instructions for maximum benefit and important safety considerations to ensure you use this therapy effectively.

Why Your Sick-Day Epsom Salt Bath Relieves Muscle Aches Faster

Epsom salt bath muscle relaxation diagram

The deep muscle soreness that often accompanies illness stems from your body’s inflammatory response to infection. As your immune system works overtime, inflammatory compounds flood your system, causing widespread tenderness. During your Epsom salt bath, magnesium sulfate breaks down into magnesium and sulfate ions that penetrate your skin, directly targeting these inflamed muscle tissues.

Magnesium functions as nature’s muscle relaxant by blocking calcium channels that cause muscles to contract. When illness depletes your magnesium stores through stress and reduced appetite, your muscles remain in a constant state of tension. The transdermal absorption from your bath bypasses digestive issues common during sickness, delivering magnesium straight to where it’s needed most. Within minutes of soaking, you’ll notice muscles that felt knotted and rigid beginning to soften and relax.

For optimal muscle relief, maintain water temperature between 100-104°F and soak for 15-20 minutes. This warm environment increases blood flow to sore areas, helping flush out lactic acid while the magnesium reduces inflammation at a cellular level. Many users report significant reduction in that “achy all over” feeling within 30 minutes of their bath, with benefits lasting several hours—providing much-needed rest during critical recovery periods.

Clear Nasal Passages and Eases Chest Congestion in 20 Minutes

Respiratory symptoms often prove the most disruptive when you’re sick, making rest nearly impossible. The steam generated during your Epsom salt bath creates an instant mini-sauna effect that works wonders for congestion relief. As you breathe in the warm, moist air, it immediately begins thinning thick mucus in your nasal passages and lungs, transforming stubborn congestion into easily expelled secretions.

The mineral-rich steam also soothes irritated throat and sinus tissues that become raw from constant coughing and mouth breathing. Unlike dry air that exacerbates irritation, the humidity from your bath coats these sensitive membranes with moisture, reducing inflammation and creating immediate breathing relief. For enhanced decongestion, add 2-3 drops of eucalyptus oil to your bath—its menthol compounds work synergistically with the steam to open airways.

Timing your bath before bedtime proves particularly effective for overnight congestion relief. The combination of steam therapy and muscle relaxation helps you fall asleep faster while keeping airways clearer throughout the night. Many users find they wake with significantly reduced congestion after implementing pre-bedtime Epsom salt baths during illness, eliminating those disruptive middle-of-the-night congestion episodes.

Manage Fever Discomfort Without Suppressing Your Body’s Defense

While fevers serve an important purpose in fighting infection, the accompanying discomfort can make recovery miserable. Properly executed Epsom salt baths help regulate your body temperature while supporting your immune response rather than interfering with it. The key lies in precise water temperature control—use lukewarm water between 98-100°F rather than hot water when managing fever.

This carefully calibrated temperature helps your body release excess heat through your skin while the magnesium supports immune cell function. Unlike fever-reducing medications that suppress your body’s natural defense mechanism, your bath creates optimal conditions for your immune system to work efficiently. The mineral absorption continues to support cellular function even after you exit the tub, providing extended benefits.

Limit fever-management baths to 10-15 minutes to prevent overheating, then cool down gradually by patting dry instead of vigorous rubbing. Wear lightweight clothing and rest in a comfortably cool room. This approach provides symptomatic relief while honoring your body’s natural healing processes—a crucial distinction when supporting rather than suppressing your immune response during illness.

Boost Immune Function When Your Body Needs It Most

Magnesium absorption through skin immune system illustration

Your immune system operates at peak efficiency only when properly nourished with essential minerals like magnesium. During illness, stress and reduced food intake often create magnesium deficiency just when your body needs it most for immune cell production and inflammatory regulation. Epsom salt baths deliver this critical mineral directly through your skin, bypassing digestive issues that commonly accompany sickness.

The magnesium absorbed during your soak performs multiple immune-supporting functions: it regulates cytokine production to prevent excessive inflammation, supports T-cell development for targeted pathogen fighting, and enhances vitamin D activation—crucial for immune response. Unlike oral supplements that may cause digestive upset when you’re ill, transdermal absorption provides immediate mineral support without taxing your compromised system.

Additionally, the profound relaxation induced by your bath lowers stress hormones like cortisol that directly suppress immune function. By creating optimal conditions for rest and recovery, your Epsom salt bath becomes a comprehensive immune-support therapy rather than just symptomatic relief—helping you bounce back faster from illness.

Perfect Your Epsom Salt Bath Ratio for Maximum Absorption

Epsom salt bath ratio guide bathtub fill level

Getting the salt-to-water ratio correct makes the difference between minimal relief and significant symptom improvement. For standard bathtubs (approximately 40 gallons when filled to typical soaking level), use exactly two cups of pure Epsom salt—no more, no less. This concentration creates optimal osmotic pressure for maximum magnesium and sulfate absorption through your skin.

Water temperature dramatically affects absorption rates. For general illness recovery, maintain 100-104°F water temperature—hot enough to open pores but not so hot that it causes excessive sweating (which reduces mineral absorption). If managing fever, lower to 98-100°F. Test water temperature with a bath thermometer rather than relying on hand sensation, which becomes unreliable when you’re sick.

Soak duration directly impacts effectiveness. The sweet spot for maximum benefit is 15-20 minutes—enough time for significant mineral absorption without causing skin dryness or overheating. Longer soaks beyond 25 minutes yield diminishing returns as your skin reaches mineral saturation point. For acute illness symptoms, one bath daily provides substantial relief; for persistent symptoms, two baths 8 hours apart can accelerate recovery.

Critical Safety Steps Before Your Sick-Day Soak

Epsom salt baths become unsafe for certain medical conditions without proper precautions. If you have heart conditions, high blood pressure, or diabetes, consult your physician before bathing—heat and mineral absorption can affect cardiovascular function and blood sugar regulation. Those with open wounds or skin infections should avoid baths entirely until healing occurs, as warm water can spread bacteria.

Pregnant women require special consideration. While lukewarm baths below 100°F generally remain safe throughout pregnancy, avoid hot baths during the first trimester when elevated core temperatures potentially affect fetal development. Always check with your obstetrician before bathing while pregnant and ill.

Hydration becomes non-negotiable when bathing while sick. Drink 8-16 ounces of water before entering the tub and another glass immediately after. The warm water and mineral absorption create mild diuretic effects that compound existing dehydration from illness. Exit immediately if you experience dizziness, nausea, or lightheadedness—these signal your body needs to cool down and rehydrate.

Enhance Healing with These Proven Bath Additions

Strategic additions transform your Epsom salt bath from symptom relief to comprehensive recovery therapy. Adding 5-10 drops of lavender essential oil creates a powerful one-two punch: the magnesium relaxes muscles while lavender’s linalool compounds reduce inflammation and promote deeper sleep—critical for immune function. For respiratory relief, 2-3 drops of eucalyptus oil amplifies the steam’s decongestant effects through its menthol compounds.

Timing your bath strategically multiplies benefits. Morning baths help loosen overnight congestion and prepare your body for the day’s healing work, while evening baths leverage the relaxation effect for superior nighttime recovery. Never bathe within one hour of eating—digestion competes with the increased circulation your bath creates, potentially causing nausea.

Post-bath ritual determines how long benefits last. Wrap yourself in warm towels immediately after exiting, then rest under light blankets for 20-30 minutes. This “cool-down period” extends the muscle-relaxing and immune-supporting effects by allowing your body to continue the therapeutic response initiated in the tub. Sip ginger or chamomile tea during this period to maintain internal warmth and further soothe digestive or respiratory symptoms.

When Epsom Salt Baths Aren’t Enough: Recognizing Medical Needs

While Epsom salt baths provide significant symptomatic relief, they cannot replace medical treatment for serious conditions. Seek immediate medical attention if you experience persistent fever above 103°F, difficulty breathing, severe headache with neck stiffness, or symptoms worsening after 3-4 days of home care. Never delay professional evaluation for symptoms like chest pain, confusion, or dehydration signs including dark urine and dizziness when standing.

Use Epsom salt baths as complementary therapy within a comprehensive recovery plan that includes adequate rest, proper hydration, and appropriate medical care when needed. For most viral illnesses, regular baths can shorten recovery time by supporting your body’s natural healing processes—reducing muscle aches, clearing congestion, and promoting restorative sleep. By understanding both the benefits and limitations of this therapy, you harness a traditional remedy that remains powerfully relevant in modern illness management.

How to Make an Epsom Salt Foot Bath


Your feet carry you through life, yet they rarely get the care they deserve. When aching arches or tired toes demand relief, a properly prepared Epsom salt foot bath delivers instant comfort without expensive spa visits. This simple ritual—using just two core ingredients—soothes sore muscles, softens rough skin, and melts away stress in under 20 minutes. Forget complicated recipes or unproven health claims; this guide gives you exactly what works based on universal preparation standards. You’ll learn precise measurements, water temperature sweet spots, and customization tricks that transform basic soaks into personalized recovery sessions. Most importantly, you’ll avoid dangerous mistakes like scalding water or improper salt ratios that could harm sensitive skin.

Why Epsom Salt Foot Baths Work When Nothing Else Does

osmosis diagram foot soaking epsom salt

Epsom salt (magnesium sulfate) dissolves completely in warm water, creating a solution that softens calluses and eases tension through osmosis—not magical absorption. The real magic happens when heat opens pores while magnesium draws out impurities, leaving skin supple and muscles relaxed. Unlike bubble baths or essential oils alone, this combination targets foot-specific pain from standing all day or tight footwear. Crucially, the salt’s coarse texture provides gentle exfoliation as you swirl your feet, lifting dead skin without harsh scrubbing. For best results, prepare your bath when you won’t be interrupted—this isn’t just cleaning; it’s active recovery time.

The Exact Water Temperature That Prevents Burns

Never guess with water temperature. Fill your basin with warm tap water first, then test with a thermometer:
– ✅ Ideal range: 100–104°F (38–40°C)
– ❌ Danger zone: Above 106°F risks burns, especially for diabetics or neuropathy sufferers
– 🌡️ Pro tip: If you lack a thermometer, dip your elbow in first—it’s more heat-sensitive than hands

Water too cool won’t dissolve salt properly; too hot degrades magnesium benefits. Adjust with small splashes of cold/hot water after adding salt, as Epsom salt slightly cools the mixture.

Measuring Epsom Salt for Maximum Effect

Forget vague “handful” instructions. Precision prevents wasted salt or stinging skin:
Standard tub (6–8 inches deep): Use ½ cup Epsom salt
Small basin (covers ankles): Use ¼ cup
Double-strength soak (severe soreness): Max 1 cup

Pour salt directly into running warm water while stirring 60 seconds until fully dissolved. Undissolved crystals cause micro-abrasions on cracked heels. For extra-sensitive skin, reduce to 3 tablespoons—never skip this step to “save salt.”

Customizing Your Soak Without Risking Irritation

essential oil dilution guide aromatherapy skin safety

Generic guides push essential oils, but improper use causes rashes. Stick to these safe upgrades:

Essential Oil Additions That Actually Work

Only use oils after salt dissolves:
3 drops lavender oil → Calms stressed nerves (proven in clinical aromatherapy studies)
2 drops peppermint oil → Cools overheated feet (avoid if you have neuropathy)
Never exceed 5 total drops—more risks chemical burns

⚠️ Critical rule: Always mix oils with 1 tsp carrier oil (coconut, almond) before adding to water. Dumping pure oils directly creates skin-searing droplets.

Natural Exfoliants for Cracked Heels

Add after soaking 10 minutes:
1 tbsp ground oats → Soothes irritation (grind plain oats in blender)
2 tbsp lemon slices → Brightens yellowed skin (rinse feet after 5 minutes)
Avoid coffee grounds or sugar—their sharp edges worsen cracks

Step-by-Step: Building Your Foot Bath in 7 Minutes

Follow this military-precise sequence for guaranteed results:

  1. Sanitize your basin (soap + hot water rinse) to prevent bacteria entering foot cracks
  2. Fill with 3 inches warm water (100–104°F)
  3. Add Epsom salt while stirring continuously for 60 seconds
  4. Test water with thermometer/elbow—adjust temperature now
  5. Mix carrier + essential oils (if using) in separate cup
  6. Pour oil blend into water, swirl gently
  7. Lower feet slowly—never plunge to avoid shocking circulation

How Long to Soak for Real Results

  • Basic tiredness: 12–15 minutes (set phone timer!)
  • Swollen feet: 10 minutes max—longer worsens inflammation
  • Never exceed 20 minutes—skin prunes, pulling salt out of your body
  • Exit immediately if feet turn bright pink—sign of overheating

Critical Safety Steps Before You Begin

foot wound infection signs diabetic foot care

Skipping these risks infections or chemical burns:

Who Should Avoid Epsom Salt Soaks

Do NOT soak if you have:
– Open wounds, blisters, or diabetic foot ulcers (salt = stinging + delayed healing)
– Recent surgery on legs/feet (moisture invites infection)
– Varicose veins with skin discoloration (heat worsens circulation issues)
When in doubt, consult your doctor first—no online guide replaces medical advice

Basin Selection Mistakes That Cause Injury

  • Never use metal tubs—salt corrodes metal, leaching toxins into water
  • Use food-grade plastic, ceramic, or inflatable basins
  • 🚫 Avoid “spa” tubs with jets—stagnant water breeds bacteria between uses

Post-Soak Routine for Lasting Softness

Most people ruin the benefits here. Do this instead:

  1. Blot feet dry—never rub (wet skin tears easily)
  2. Apply thick moisturizer while damp (shea butter > lotions)
  3. Wear cotton socks overnight to lock in hydration
  4. Scrub dead skin ONLY next morning with pumice stone

⚠️ Never file calluses post-soak—water-softened skin shreds under pressure. Wait 8+ hours.

When to Ditch the Foot Bath for Medical Help

Epsom salt soaks aren’t magic. Seek immediate care if you notice:
Red streaks spreading from foot wounds (sign of infection)
Persistent swelling after 24 hours (could indicate blood clot)
Numbness lasting >1 hour post-soak (nerve compression risk)

This ritual complements professional care—it doesn’t replace it.

Maintenance: Keeping Your Foot Bath Supplies Effective

Epsom salt degrades in humidity. Extend its life:
Store in airtight glass jar (not the original bag)
Discard if clumpy or discolored—wet salt grows mold
Buy USP-grade salt (check packaging)—non-therapeutic grades contain fillers

Monthly Deep Clean for Your Basin

Mineral deposits from salt harbor bacteria:
1. Scrub with 1:1 vinegar/water solution
2. Rinse thoroughly—vinegar smell lingers on skin
3. Air-dry upside down for 24 hours

Final Routine for Maximum Daily Benefit

  • Morning soaks: 10 minutes with peppermint oil (energizes)
  • Evening soaks: 15 minutes with lavender (promotes sleep)
  • Weekly: Add lemon slices for brightening (skip if diabetic)
  • Never do consecutive days—skin needs 48-hour recovery

A perfectly executed Epsom salt foot bath costs less than $0.50 and takes under 20 minutes. By following these precise measurements, temperature controls, and safety cutoffs, you transform a basic soak into targeted foot therapy. Remember: the salt’s power lies in correct dissolution and timing—not exaggerated health claims. Keep your basin ready by the sink, and in one week, you’ll notice smoother heels and lighter steps. For ongoing foot health, pair this with daily moisturizing and properly fitted shoes—your foundation for moving through life pain-free.

Important Note: This guide reflects standard preparation practices. Always prioritize your healthcare provider’s advice over general wellness tips, especially with diabetes, circulatory issues, or open wounds.

How Long to Soak in an Epsom Salt Bath


Epsom salt baths have become a popular at-home wellness ritual, but many users struggle with the fundamental question: how long in an Epsom salt bath should you actually soak? The answer isn’t one-size-fits-all, as optimal duration depends on your specific goals, health conditions, and personal tolerance. Most wellness practitioners recommend soaking for 15 to 30 minutes, but understanding why this timeframe matters can transform your experience from merely relaxing to genuinely therapeutic. When you step into a properly prepared Epsom salt bath, your body begins absorbing magnesium and sulfates through the skin—a process that requires sufficient time but can become counterproductive if extended too long.

Many people make the critical mistake of soaking for either too short a time (rendering the bath ineffective) or too long (causing potential adverse effects). The ideal duration balances absorption efficiency with your body’s natural limits. For general relaxation, 20 minutes typically provides noticeable stress relief without risking dehydration or skin irritation. If you’re targeting muscle recovery after intense exercise, 25 minutes often delivers optimal results by allowing enough time for magnesium absorption to ease tension without overheating inflamed tissues. Understanding these nuances prevents wasted effort and ensures you’re getting the most from your self-care routine.

Epsom Salt Bath Duration Guidelines by Purpose

Epsom salt bath infographic muscle recovery relaxation detox

Relaxation and Stress Relief Soaking Times

For pure relaxation and stress reduction, aim for 15-20 minutes in your Epsom salt bath. This duration allows your nervous system to shift from fight-or-flight mode to rest-and-digest mode without causing fatigue. Set your water temperature between 92-100°F (33-38°C)—too hot will stimulate rather than relax. As you soak, focus on deep breathing to enhance the calming effects. You’ll know you’ve reached optimal duration when your muscles feel noticeably looser but you haven’t started feeling lightheaded or overly tired. Many users report that exceeding 25 minutes for relaxation purposes can actually trigger a mild stress response as the body works to regulate temperature.

Muscle Recovery and Soreness Reduction Timing

Athletes and active individuals should target 20-25 minutes for optimal muscle recovery. This specific window allows magnesium sulfate to penetrate deep enough to reduce inflammation while avoiding the counterproductive effect of prolonged heat exposure on healing tissues. For best results, time your soak 2-4 hours post-exercise when inflammation has begun but hasn’t peaked. The water temperature should be slightly cooler than a standard bath—around 90-95°F (32-35°C)—to avoid increasing blood flow too much in already inflamed areas. Stop immediately if you notice increased redness or discomfort in specific muscle groups, as this indicates you’ve exceeded your personal optimal duration.

Detoxification and Circulation Improvement Sessions

For circulation and potential detox support, 25-30 minutes represents the maximum recommended duration. Longer soaks don’t necessarily enhance these benefits and may cause dizziness as blood vessels dilate extensively. Monitor your skin during the soak—if it becomes excessively wrinkled or pale, exit immediately as these are signs you’ve exceeded your body’s tolerance. The optimal temperature range for circulation benefits is 95-100°F (35-38°C), warm enough to promote blood flow but not so hot that it strains your cardiovascular system. Many practitioners recommend ending with a quick cool rinse to further stimulate circulation after your 30-minute maximum soak.

Critical Factors That Determine Your Personal Soak Time

Epsom salt bath temperature chart health conditions

Water Temperature’s Impact on Safe Soaking Duration

Hotter water significantly reduces your safe soaking time. For every 5°F above 95°F, decrease your maximum duration by 5 minutes. At 105°F (40°C)—a common but overly hot bath temperature—your maximum safe soak drops to just 10-15 minutes. The reason? Higher temperatures accelerate both magnesium absorption and dehydration. Use a floating thermometer to monitor water temperature throughout your soak, as evaporation and body heat can increase it by 3-5°F during a 20-minute session. If you’re new to Epsom salt baths, start at the lower end of temperature and duration recommendations to assess your personal tolerance.

Individual Health Conditions That Shorten Safe Duration

Certain health conditions require significantly shorter soak times regardless of your goals:

  • Heart conditions: Limit to 10-15 minutes maximum at lukewarm temperatures
  • Diabetes: Reduce to 15 minutes to avoid blood sugar fluctuations
  • Low blood pressure: Cap at 12-18 minutes to prevent dizziness
  • Pregnancy: Consult your healthcare provider, but typically 15-20 minutes max

If you experience any of these warning signs during your soak, exit immediately regardless of your planned duration:
Dizziness or lightheadedness
Excessive heart rate increase
Numbness or tingling in extremities
Skin turning bright red or pale

Step-by-Step Timing Protocol for First-Time Users

Epsom salt bath first time user guide sequence timer

Preparing Your Body for Optimal Absorption

Before entering your Epsom salt bath, spend 5 minutes dry brushing toward your heart to stimulate circulation—this extends your effective absorption window by 3-5 minutes. Hydrate with 8-16 ounces of water 30 minutes prior to prevent dehydration during your soak. Test your water temperature with your elbow (more sensitive than hands) to ensure it’s in the 92-98°F range. This preparation phase ensures your body is primed to maximize the limited time you’ll spend in the bath.

The Perfect 20-Minute Soak Sequence

Follow this timed sequence for your first Epsom salt bath experience:

  1. Minutes 0-5: Enter slowly, focusing on deep breathing to acclimate
  2. Minutes 5-12: Gently massage tense areas as magnesium begins absorbing
  3. Minutes 12-18: Practice mindfulness or light stretching while submerged
  4. Minutes 18-20: Begin cooling down mentally for exit

Set a waterproof timer for 18 minutes as your exit warning—this prevents over-soaking from relaxation. Keep a cool washcloth nearby to place on your forehead if you feel overheated before your timer sounds.

Common Timing Mistakes That Reduce Effectiveness

The 45+ Minute Myth and Its Consequences

Many wellness blogs incorrectly recommend soaking for 45 minutes or longer, but this practice often backfires. Beyond 30 minutes, your body starts reabsorbing toxins you’ve released, potentially causing headaches or fatigue. The magnesium absorption curve flattens significantly after 25 minutes, making additional time inefficient. Extended soaks also dehydrate your skin’s protective barrier, leaving you feeling drier than before your bath. If you’re tempted to soak longer for stubborn issues, consider taking a 10-minute break and re-entering for a second shorter session instead.

Rushing the Process: Why 10 Minutes Isn’t Enough

Conversely, many beginners exit too early, believing they’ve received the benefits in just 10 minutes. This timeframe allows only superficial magnesium absorption—insufficient for meaningful muscle relaxation or stress reduction. The therapeutic effects require at least 15 minutes for magnesium ions to penetrate beyond the epidermis. If you’re short on time, increase your Epsom salt concentration slightly (within safety limits) rather than shortening your soak, as duration matters more than concentration for absorption efficiency.

Post-Soak Protocol to Extend Benefits

Immediate Actions After Your Optimal Soak Time

When your timer sounds, exit slowly to avoid orthostatic hypotension. Pat yourself dry gently—don’t rub—and apply magnesium oil or lotion within 3 minutes while your pores remain open for continued absorption. Drink another glass of water to replenish fluids lost during your soak. For muscle recovery, follow with light stretching while your tissues remain warm and pliable. Avoid jumping straight into a cold shower as this shocks your system and counteracts the bath’s benefits.

Scheduling Multiple Weekly Soaks for Cumulative Effects

For sustained benefits, time your Epsom salt baths strategically throughout the week:
Active recovery days: 20-25 minutes post-workout
Stressful workdays: 15 minutes before bed
Rest days: 25 minutes in the morning to kickstart circulation

Never exceed three Epsom salt baths per week, as this can disrupt your body’s natural magnesium balance. Space them at least 48 hours apart to allow your system to process the absorbed minerals fully.


Final Note: Your ideal Epsom salt bath duration sits within a narrow window that balances therapeutic benefits with physiological limits. While 20 minutes serves as a reliable starting point for most healthy adults, your personal optimum depends on purpose, health status, and water temperature. Always prioritize how your body responds over rigid timing rules—exit immediately if you feel uncomfortable regardless of the clock. For ongoing benefits, consistency matters more than individual session length; regular 20-minute soaks twice weekly will deliver better results than occasional marathon sessions. Keep a simple log of your soak times, temperatures, and how you feel afterward to refine your personal optimal duration over time.

« Older posts Newer posts »