Smart Bathroom Solutions: Reviews, Tips & Expert Maintenance Guides

Category: Tips (Page 11 of 17)

How to Clean Sutera Bath Mat: Easy Steps


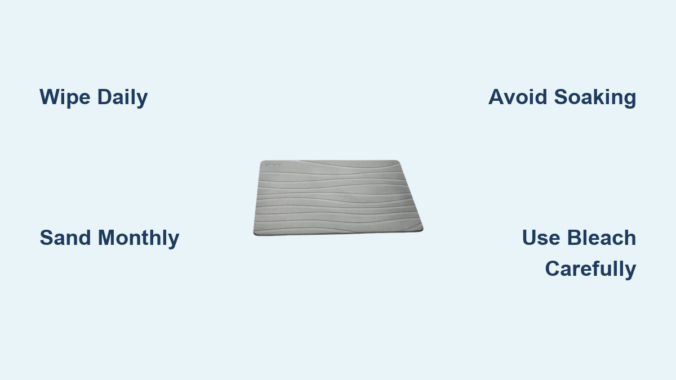
Your Sutera Stone Bath Mat offers a luxurious, natural alternative to traditional fabric bath mats, but keeping it in top condition requires knowing exactly how diatomaceous earth responds to different cleaning approaches. Unlike cotton mats you can simply toss in the washing machine, your Sutera bath mat demands specific care techniques that preserve its remarkable absorbency while preventing damage to the delicate porous structure. This comprehensive guide walks you through every cleaning scenario, from quick daily wipe-downs to stubborn stain removal and the essential sanding maintenance that keeps your mat performing like new for years to come.

The good news is that cleaning a Sutera bath mat is remarkably straightforward once you understand the material’s unique properties. Diatomaceous earth naturally resists mold and bacteria, dries quickly, and actually improves your bathroom safety by keeping floors slip-free. By following the procedures outlined below, you’ll maintain all these benefits while ensuring your mat stays clean, fresh, and functional. Let’s dive into the specific techniques that will keep your Sutera bath mat in pristine condition.

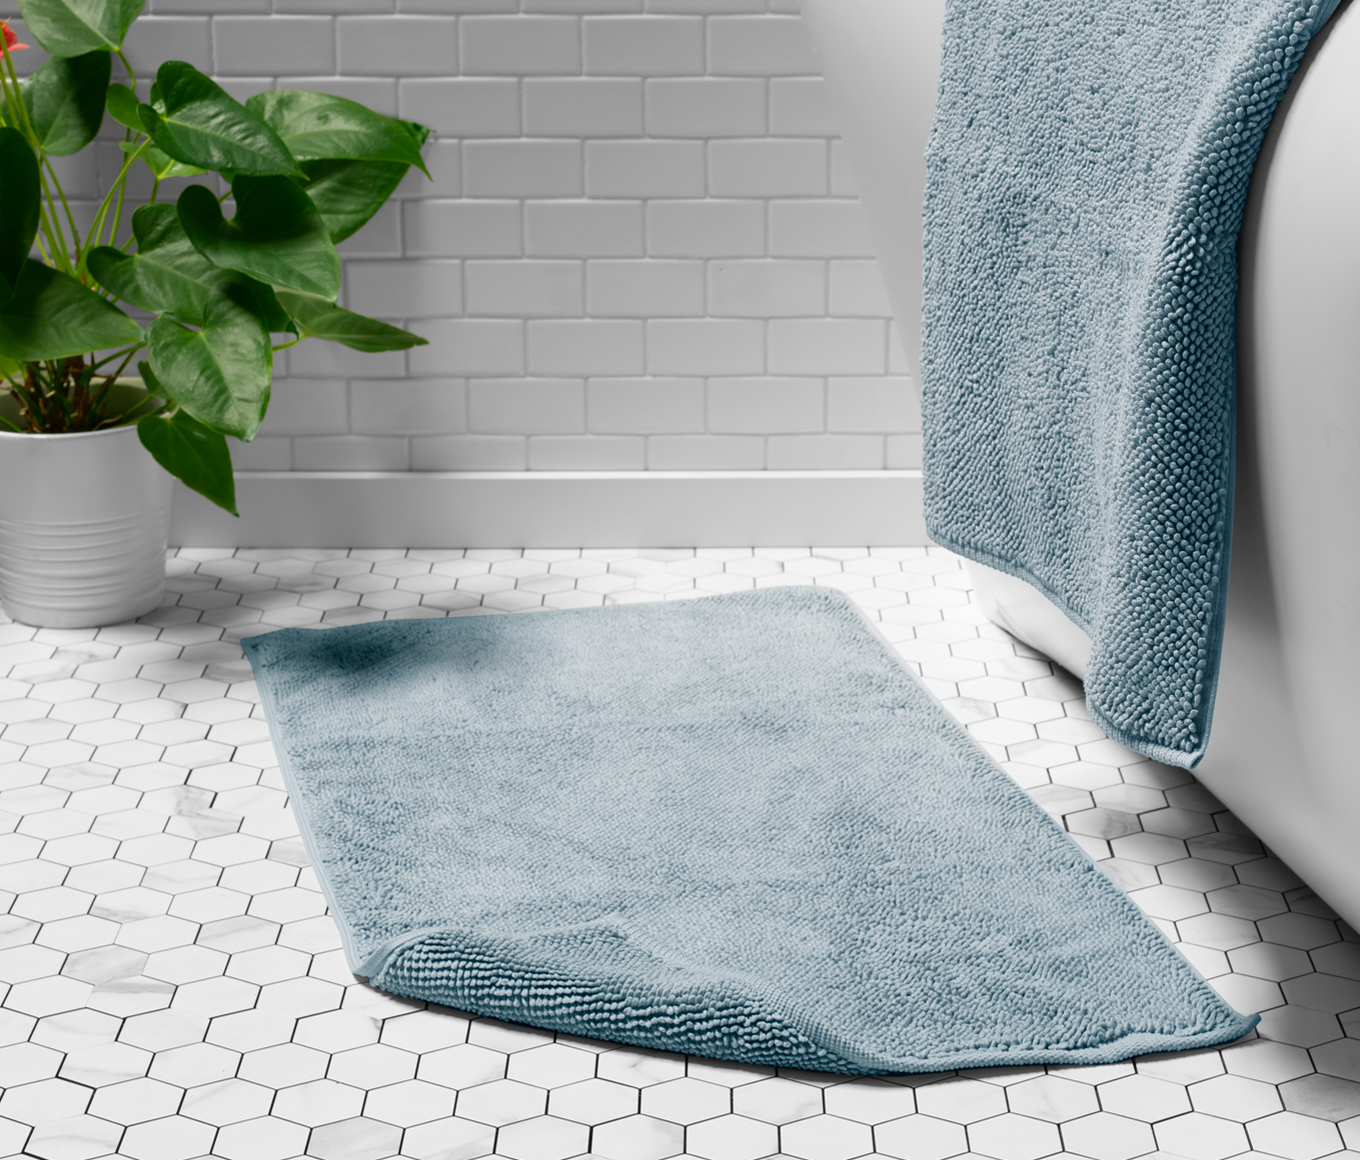
Position Your Sutera Mat for Optimal Cleaning Results

Proper initial setup creates the foundation for years of reliable use and makes cleaning significantly easier throughout your mat’s lifespan. Before you even begin using your Sutera bath mat, take a few minutes to ensure everything is positioned for optimal performance and safety.

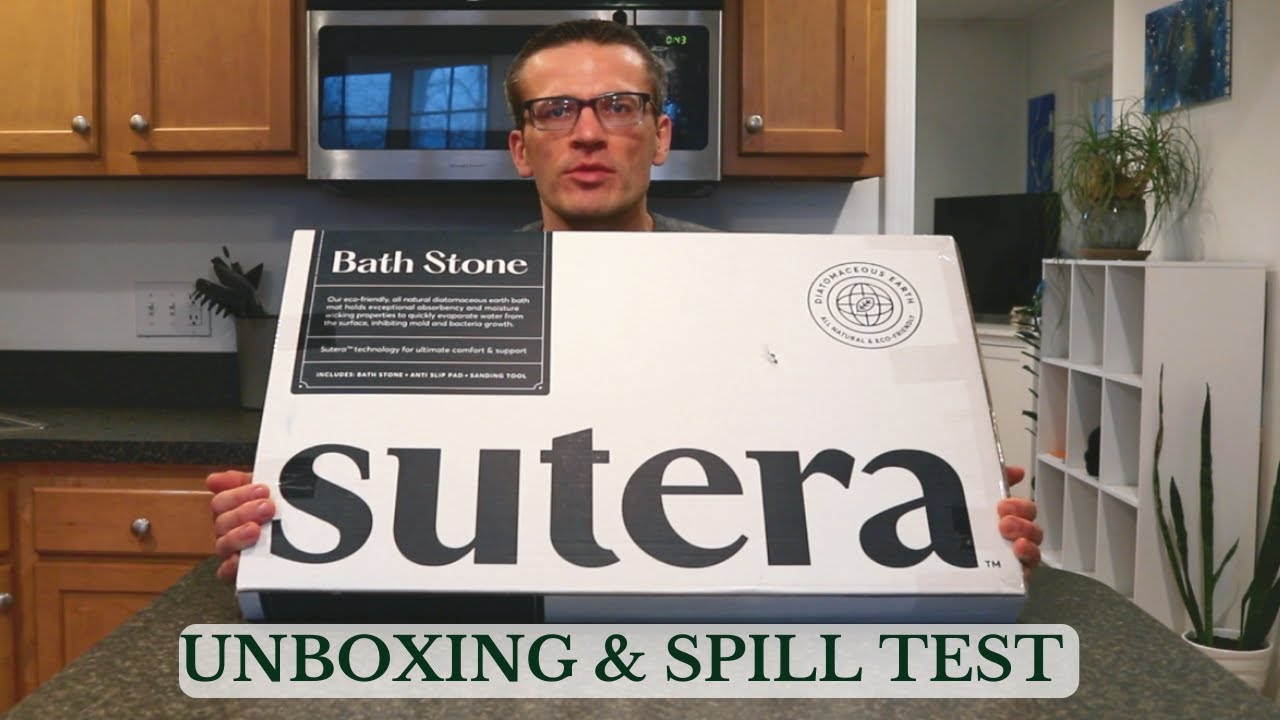
Begin by carefully unwrapping the Stone Bath Mat from its protective bubble wrap, handling the edges and surface gently to prevent chips or cracks during this initial unpacking process. Select a flat, clean area in your bathroom where the mat will live permanently, making certain the surface is completely free from debris, grit, or small particles that could scratch or damage the diatomaceous earth surface during use.

Position the included non-slip mat first, aligning it to cover the complete standing area where your feet will land when exiting the shower or bath. This backing layer serves an essential safety function—it prevents the Stone Bath Mat from sliding across wet tile or stone floors, which could create dangerous slip hazards. Once the non-slip layer is securely positioned with full contact against your bathroom floor, place the Stone Bath Mat directly on top, ensuring perfect alignment with complete contact between both layers. This simple two-layer setup is now ready for immediate use, combining the absorbent stone surface with grip-enhancing stability.

Clean Your Sutera Bath Mat Daily in Under Two Minutes

Establishing a daily cleaning routine takes just moments but dramatically extends the life of your Sutera bath mat while keeping it hygienic and fresh. The diatomaceous earth material responds beautifully to consistent, gentle care, and incorporating these quick maintenance steps into your bathroom routine requires minimal effort.

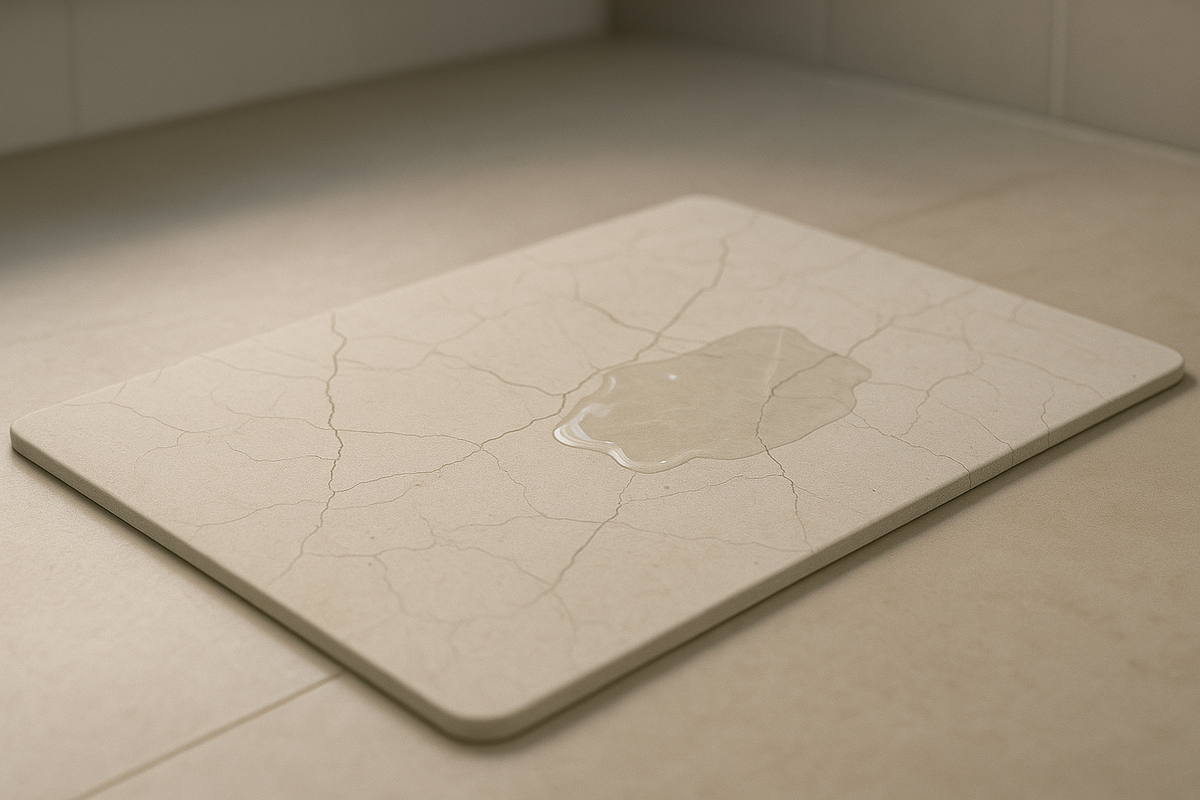
For everyday cleaning and routine maintenance, simply wipe the surface of the Stone Bath Mat with a warm, damp cloth. Apply gentle pressure as you move across the entire surface, removing water residue, soap scum, light dirt, and any body oils that have accumulated during use. This wipe-down works effectively after each shower or bath, though aiming for at least once daily cleaning in heavily used bathrooms ensures optimal cleanliness and performance.

After wiping the surface thoroughly, allow the mat to air dry completely before the next use. The porous structure of diatomaceous earth draws moisture inward and facilitates rapid evaporation, meaning your mat typically dries within minutes under normal bathroom conditions. This quick-drying capability distinguishes the Sutera mat from fabric alternatives that remain damp for extended periods and develop mildew. Never place the mat back into service while any moisture remains on the surface, as trapped dampness compromises the material’s natural properties and could promote issues over time.

Eliminate Tough Stains from Your Sutera Bath Mat Without Damage

diatomaceous earth stain removal before and after

When your Sutera bath mat develops stains that resist simple wiping, you’ll need to escalate your cleaning approach to address the discoloration without damaging the diatomaceous earth surface. Different stain types require different techniques, so identifying the nature of the stain helps you choose the most effective treatment method.

For light stains and everyday marks that accumulate through regular use, your routine damp cloth cleaning usually proves sufficient. The warm water helps lift surface staining while the cloth physically removes residue without requiring any chemical cleaners. This gentle approach maintains the integrity of the diatomaceous earth surface while keeping the mat looking clean and presentable. Work in small circular motions over stained areas, applying moderate pressure until the discoloration lifts.

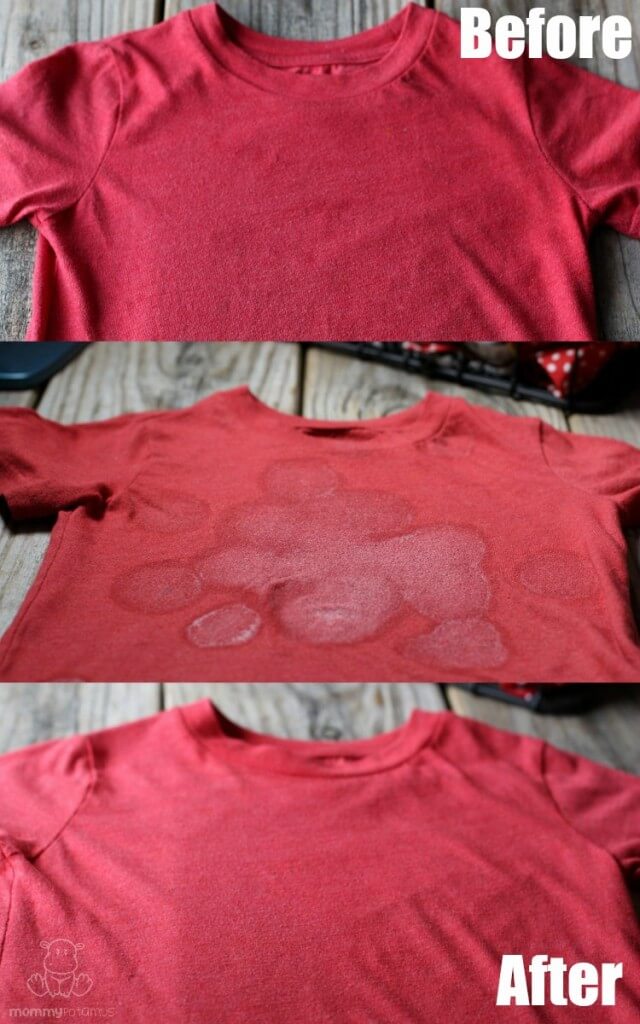
For heavier, more stubborn stains that resist simple wiping, a more intensive approach becomes necessary. Apply a very small amount of bleach-based cleaner directly to the stained area, using only the minimum quantity needed to address the discoloration. Work the cleaner into the stain gently with your cloth, allowing the bleaching action to break down the stubborn mark over a minute or two. After the stains have lifted, rinse the area thoroughly with clean water to remove any residual cleaning product, which is essential for preventing chemical buildup that could damage the material. Finally, allow the mat to air dry completely before returning it to service. This bleach-based method effectively removes tough stains while simultaneously disinfecting the surface.

Restore Absorbency with Sutera Bath Mat Sanding Procedure

The specialized sanding tool included with your Sutera bath mat serves a critical maintenance function that many owners overlook, yet this simple process makes the difference between a mat that performs excellently for years versus one that gradually loses its effectiveness. Understanding when and how to sand ensures your mat maintains peak absorptive power throughout its lifespan.

Plan to sand your Stone Bath Mat every couple of months under normal household usage. However, bathrooms that see heavy daily use—perhaps a family of four or more sharing a single bathroom—may benefit from monthly sanding to maintain optimal performance. The sanding process addresses two essential maintenance needs that develop naturally over time.

First, sanding reactivates the full absorptive power of your Stone Bath Mat. The natural porous structure of diatomaceous earth gradually becomes compacted through regular foot traffic and repeated wetting and drying cycles. This compression reduces the material’s ability to draw moisture away from the surface, making the mat feel less effective even when clean. Light sanding removes this compressed outer layer, reopening the pores and restoring exceptional absorbency. Second, the sanding process smooths out divots and uneven areas that develop from consistent use, preventing these worn spots from collecting water and reducing the mat’s overall effectiveness.

To use the sanding tool effectively, follow the included instructions carefully, working in gentle, even strokes across the entire surface of the mat. Your goal is surface refreshment rather than aggressive material removal—think of it as exfoliating the mat rather than sanding it down to nothing. After completing the sanding process, wipe away all resulting dust with a clean, dry cloth before using the mat again. You’ll notice immediately improved absorbency as the newly exposed porous structure immediately begins drawing moisture effectively.

Avoid These Critical Mistakes When Cleaning Sutera Bath Mat

diatomaceous earth bath mat damage examples

Understanding exactly what to do—and what to avoid—prevents accidental damage that could shorten your mat’s lifespan or compromise its performance. These essential guidelines capture the most important practices for protecting your investment while maintaining optimal functionality.

Essential Care Practices:

  • Consistently use the sanding tool every few months as part of your regular maintenance schedule
  • Wipe the mat with a damp cloth for routine cleaning, establishing a regular schedule that prevents buildup
  • Always allow the mat to air dry completely after cleaning or use
  • Periodically check the non-slip mat backing to ensure adequate grip

Critical Mistakes to Avoid:

  • Never submerge the Stone Bath Mat in water—complete immersion damages the diatomaceous earth structure
  • Avoid abrasive cleaners, scrub brushes, or rough cleaning pads that can scratch or gouge the surface
  • Never use the mat without the non-slip backing on wet surfaces—it creates serious safety hazards
  • Keep the mat away from sharp objects that could chip or crack the diatomaceous earth surface

Fix Common Sutera Bath Mat Performance Issues Immediately

Sutera bath mat water absorption test

Even with proper care, you may occasionally encounter issues that require specific attention. Knowing how to diagnose and address these common problems keeps your mat performing reliably and prevents small concerns from becoming major headaches.

If you notice reduced absorbency despite regular cleaning, your mat likely needs sanding to restore its porous texture. The natural compaction that occurs over time gradually decreases the material’s ability to draw moisture inward, but this process is easily reversed with the included sanding tool. After sanding, you’ll notice water absorbing immediately rather than pooling on the surface, confirming that full functionality has been restored.

When stains persist after using the bleach-based cleaner method, consider repeating the treatment or allowing the cleaner to sit on the stain for a slightly longer period before wiping. For particularly stubborn discoloration that resists standard treatment, professional cleaning products designed for natural stone surfaces may prove effective. Always test any new cleaning product on a small, inconspicuous area first to ensure compatibility with the diatomaceous earth material before applying it to visible surfaces.

Any musty odors emanating from the mat indicate trapped moisture or beginning mold growth, both of which signal that the mat needs more thorough cleaning and extended drying time. Increase air circulation around the mat by opening windows or running bathroom fans, ensure complete drying between uses, and apply the full stain removal process if any visible mold or mildew has developed. Persistent odor issues despite these interventions may indicate that the mat has absorbed moisture beyond its normal capacity and requires several days of thorough drying before use.

Follow This Simple Sutera Bath Mat Maintenance Schedule for Years of Service

Establishing and following a consistent maintenance schedule ensures your Sutera bath mat performs optimally throughout its entire lifespan, potentially providing years of reliable service that far exceeds conventional bath mat replacements. Breaking maintenance into daily, weekly, monthly, and quarterly tasks makes the responsibility manageable and prevents neglect that leads to performance issues.

Daily maintenance should include wiping the surface with a warm, damp cloth to remove accumulated moisture and residues, followed by verifying complete air drying before the next use. This two-minute habit prevents the buildup that makes deeper cleaning necessary and maintains the mat’s natural resistance to mold and bacteria. During your daily wipe-down, take a moment to inspect the surface for any new chips, cracks, or areas of concern that may need attention.

Weekly maintenance involves a slightly more thorough inspection, allowing you to assess the overall condition of the mat and note any areas that may need more intensive cleaning or that show early signs of wear. Check the non-slip backing for proper adhesion and grip, ensuring your safety setup remains secure. Monthly maintenance focuses on evaluating whether sanding is needed based on the mat’s appearance and performance—if water no longer absorbs quickly or visible wear patterns have developed, break out the sanding tool to restore the surface.

Your Sutera bath mat rewards consistent care with exceptional performance, natural beauty, and reliable service that enhances every bathroom experience. By following these precise cleaning methods and maintenance routines, you’ll keep your mat functioning at peak capacity for years to come. Remember that proper care of your Sutera bath mat isn’t complicated—it’s simply a matter of understanding the unique properties of diatomaceous earth and applying the right techniques at the right time. With this knowledge in hand, you can confidently maintain your investment and enjoy all the benefits that make your Sutera bath mat a superior alternative to traditional options.

How to Clean Bath Rugs: Easy Steps


Your bath rug absorbs daily moisture, traps dirt, and can harbor bacteria if neglected—but most homeowners don’t know how to clean bath rugs properly. These soft floor coverings face constant exposure to water, soap scum, and foot traffic, making them breeding grounds for mold and odors when improperly maintained. Whether you have a plush cotton mat or memory foam comfort rug, understanding how to clean bath rugs correctly extends their lifespan while keeping your bathroom hygienic. This guide delivers specific, actionable methods for every rug type, ensuring your bath rugs stay fresh, absorbent, and odor-free without damaging delicate fibers or rubber backing.

Check Your Rug’s Care Label Before Washing

Skip this critical step and you risk shrinking, fading, or ruining your bath rug permanently. Always locate and follow the manufacturer’s care instructions printed on the rug’s label—this single action prevents 90% of bath rug cleaning disasters. Cotton rugs typically tolerate machine washing, while memory foam and chenille varieties often require hand washing only. For rugs with rubber backing, verify whether the backing can withstand water exposure or needs special protection during cleaning. If your rug lacks a care label, assume it requires gentle handling and test any cleaning method on a small, inconspicuous area first. Sort your bath rugs by material type before washing—mixing cotton with microfiber creates lint transfer and uneven cleaning results. Never assume all bath rugs clean the same way; treating a bamboo rug like cotton causes irreversible fiber separation and shrinkage.

Identify Your Bath Rug Material Type

Knowing exactly what you’re working with determines your entire cleaning approach. Press your fingers into the rug—if it quickly regains shape, you likely have memory foam requiring hand washing only. Shine a light across the surface; microfiber rugs create a distinctive sheen and feel almost silky to the touch. Cotton rugs feel thick and plush with visible looped fibers, while chenille features twisted yarns creating a ribbed texture. Bamboo rugs have a slightly rougher, more natural feel with visible grain patterns in the fibers. For rubber-backed rugs, flip the rug over to confirm backing material—if it’s smooth and black, use cold water only to prevent melting. Natural fiber rugs like seagrass or jute feel stiff and coarse with visible plant fibers—these should never be fully submerged in water.

Machine Wash Bath Rugs Without Damage

washing machine with bath rug inside pillowcase

Most cotton and synthetic bath rugs clean safely in your washing machine when you follow these precise steps. Use cold water on the gentle cycle—hot water shrinks cotton and melts microfiber coatings within minutes. Add just one tablespoon of mild detergent; excess soap leaves residue that attracts dirt and creates stiffness. For rubber-backed rugs, place them inside a pillowcase or mesh laundry bag to protect both the backing and your machine drum. Never wash bath rugs with towels or heavy fabrics—they create friction that damages rug fibers and causes pilling. Balance the load by adding one or two small towels if washing a single bath rug to prevent machine imbalance. Stop the cycle halfway through to manually redistribute the rug, ensuring even cleaning and preventing bunching that creates dry spots.

When to Avoid Machine Washing

Certain bath rugs absolutely cannot withstand machine agitation. Memory foam bath rugs lose cushioning permanently when tumbled—their structure collapses within one wash cycle. Chenille rugs develop severe matting when machine washed, destroying their signature texture. Bamboo rugs experience fiber separation when subjected to machine motion, causing premature wear. Natural fiber rugs like jute or seagrass swell and lose shape when fully submerged in water. If your rug shows any backing deterioration—cracking, peeling, or bubbling—machine washing will accelerate damage and potentially stain your floors. Antique or high-value bath rugs with intricate designs require professional cleaning to preserve their condition. When in doubt, hand washing always provides a safer alternative that maintains rug integrity longer.

Hand Wash Delicate Bath Rugs Properly

Fill your bathtub with lukewarm water and add one teaspoon of mild detergent to create a gentle cleaning solution for delicate rugs. Submerge your bath rug completely and gently press it down with your palms to saturate all fibers—avoid vigorous scrubbing that damages delicate materials. For stubborn dirt, use a soft-bristled toothbrush to gently work cleaning solution into high-traffic areas near the sink or toilet. Work from the center outward to prevent stretching the rug’s shape during cleaning. Rinse thoroughly by draining the tub and refilling with clean water, repeating until water runs clear—this removes all detergent residue that attracts dirt. Never wring or twist delicate rugs; instead, press water out between clean towels to remove excess moisture without damaging fibers.

Dry Bath Rugs to Prevent Mold Growth

bath rug drying flat on towel

Air drying flat on a clean towel provides the safest method for nearly all bath rug types. Lay your cleaned rug on a dry towel in a well-ventilated area, flipping it every two hours until completely dry—this prevents mildew that develops within 24 hours of improper drying. For cotton rugs that tolerate machine drying, use the lowest heat setting with dryer balls to maintain fluffiness without damaging fibers. Never hang heavy, wet bath rugs over shower rods—the weight stretches fibers and creates permanent deformation. Keep rugs away from direct sunlight during drying; UV rays fade colors and weaken fibers within hours. Check rubber-backed rugs thoroughly for moisture between the backing and fabric layer—this hidden dampness causes mold that ruins rugs from within. Memory foam rugs require 48 hours of flat drying time to ensure complete moisture evaporation from the foam core.

Remove Bathroom Stains Without Ruining Fibers

Treat soap scum immediately with equal parts white vinegar and water applied with a soft cloth—let sit for 10 minutes before rinsing to prevent hard water buildup. For mold spots, mix one part hydrogen peroxide with eight parts water and dab gently on affected areas, avoiding colored rugs that may fade. Rust stains disappear when you apply lemon juice and salt directly to the spot, letting it sit for 30 minutes before rinsing. Makeup stains lift with micellar water applied to a cotton pad and blotted gently—never rub, which pushes makeup deeper into fibers. Always test stain treatments on a hidden corner first; what works on cotton may damage microfiber. Never use bleach on colored rugs—it strips color and weakens fibers, creating thin spots that wear through quickly.

Eliminate Persistent Bath Rug Odors

Pre-soak smelly bath rugs in a solution of one cup baking soda dissolved in cold water for 30 minutes before washing to neutralize odors at the source. For severe mildew smells, add one cup of white vinegar to the rinse cycle—this breaks down odor-causing bacteria without harsh chemicals. Sun-dry odor-affected rugs for two hours maximum; UV rays kill bacteria but prolonged exposure fades colors. Sprinkle baking soda directly on damp rugs before washing for extra odor absorption during the cleaning process. Never ignore persistent odors—they indicate trapped moisture that will cause permanent mold damage within days. Rotate between two bath rugs to ensure each gets 48 hours of complete drying time between uses, preventing odor development at the source.

Create a Bath Rug Cleaning Schedule That Works

Wash daily-use bath rugs every 7-10 days—waiting longer allows bacteria to multiply to unhealthy levels. Guest bathroom rugs need cleaning only every 3-4 weeks with light use. Vacuum all bath rugs weekly with a brush attachment to remove embedded dirt before it works deeper into fibers. Shake out rugs outdoors daily to remove surface moisture and prevent musty smells. Spot clean spills immediately with a damp cloth to prevent stains from setting. Keep two identical bath rugs and swap them weekly, ensuring each gets proper drying time. In humid climates, increase cleaning frequency by 50%—high moisture environments accelerate mold growth in bath rugs.

Special Care for Memory Foam and Rubber-Backed Rugs

memory foam bath rug with rubber backing closeup

Hand wash memory foam bath rugs only—machine washing collapses the foam structure permanently. Clean rubber-backed rugs in cold water only; warm water melts the backing within minutes. Never fold memory foam rugs during drying—this creates permanent creases that collect moisture and cause mold. Check rubber backing weekly for cracks or peeling; replace rugs immediately when backing deteriorates to prevent floor stains. Wash memory foam covers separately from the foam insert according to care labels. Never use fabric softener on rubber-backed rugs—it creates slippery residue that becomes a safety hazard.

Troubleshoot Common Bath Rug Problems

Restore shrunken cotton rugs by soaking in lukewarm water with one tablespoon hair conditioner, then gently stretching while damp. Fix matted fibers by brushing with a pet slicker brush while the rug is slightly damp, then air dry flat. Remove stiffness from detergent buildup by rewashing with one cup white vinegar in the rinse cycle. Repair minor backing cracks with rubber cement specifically designed for bath mats. Replace rugs immediately when you see black spots that won’t clean—this indicates deep mold penetration that cannot be fully removed.

Final Note: Following these specific how to clean bath rugs methods keeps your bathroom hygienic while extending rug life by years. Proper drying prevents 95% of bath rug problems, so never skip this critical step. Rotate between two rugs to ensure adequate drying time, and always treat stains immediately before they set. With consistent care using these techniques, your bath rugs will stay fresh, absorbent, and looking like new through daily bathroom use.

How to Use Sitz Bath for Hemorrhoids: Quick Relief Tips


That sharp pain when sitting down, the persistent itching that makes concentration impossible, the burning sensation after using the bathroom—hemorrhoid discomfort can turn ordinary life into constant misery. If you’re among the 1 in 20 Americans currently dealing with hemorrhoids, you need relief that works without invasive procedures or harsh medications. How to use sitz bath for hemorrhoids properly offers precisely this solution: a simple, evidence-based home treatment that delivers real results. This guide walks you through every detail of effective sitz bath therapy so you can finally find comfort and accelerate healing.

Sitz baths work by harnessing warm water’s natural healing properties to relax anal muscles, improve blood flow, and reduce inflammation in swollen hemorrhoidal veins. Within minutes of your first session, you’ll notice decreased pain and itching as the warm water soothes irritated tissues. Consistent use delivers even greater benefits—reduced swelling, faster healing, and restored comfort. Whether you’re experiencing your first hemorrhoid flare-up or managing a recurring condition, mastering how to use sitz bath for hemorrhoids correctly can transform your daily experience.

Why Your Hemorrhoids Need Warm Water Therapy Immediately

Hemorrhoids develop when veins in your rectum and anus become swollen due to pressure from straining, pregnancy, or prolonged sitting. This swelling causes pain, itching, and sometimes bleeding during bowel movements. The critical factor many sufferers miss is that anal sphincter muscle spasms significantly worsen hemorrhoid pain by trapping blood in the swollen veins.

Warm water therapy directly addresses this problem. When you immerse the affected area in water at exactly 104°F (40°C), the heat signals your anal muscles to relax. This relaxation breaks the pain-spasm cycle, allowing blood to flow freely through the hemorrhoidal veins again. Within 5-7 minutes of soaking, you’ll feel the relief as trapped blood circulates away and oxygen-rich blood delivers healing nutrients to damaged tissues. The result? Noticeable reduction in pain and swelling after just one session.

How Long Until Hemorrhoid Relief Starts Working

Many patients report feeling immediate pain reduction within the first 5 minutes of their sitz bath. The persistent burning sensation begins fading as warm water soothes irritated nerve endings in your perineal tissues. By the 10-minute mark, muscle spasms typically subside significantly as blood circulation improves. At the full 15-20 minute session completion, most people experience at least 50% reduction in discomfort that lasts for several hours post-treatment.

Bathtub vs. Sitz Bath Kit: Which Setup Gives Faster Hemorrhoid Relief

sitz bath kit vs bathtub comparison hemorrhoids

Your choice between bathtub and sitz bath kit directly impacts how consistently you’ll use this therapy—critical since frequency determines effectiveness. Understanding the practical differences helps you select the method that fits your lifestyle and delivers maximum hemorrhoid relief.

Bathtub Method for Maximum Comfort During Healing

When using your existing bathtub, fill only 3-4 inches of water—enough to cover your perineal area when seated. This approach costs nothing extra if you already have a bathtub, making it ideal for occasional use or those on a budget. The larger space allows you to stretch your legs comfortably during the 15-20 minute session, which many find more relaxing than confined kits.

Critical mistake to avoid: Never use bubble bath or soap in your sitz bath water. These products disrupt your skin’s natural pH balance and can worsen hemorrhoid irritation. Stick to plain warm water for therapeutic benefits without added risk.

Toilet-Mounted Sitz Bath Kits for Busy Schedules

Sitz bath kits designed to fit over your toilet bowl provide the most practical solution for multiple daily treatments. These kits typically include a shallow basin plus a plastic bag with tubing attachment that lets you maintain perfect water temperature throughout your session. The real advantage? You can take three to four treatments per day without the hassle of filling and draining your bathtub repeatedly.

Look for kits with these features for optimal hemorrhoid relief:
Contoured seating edges that prevent pressure points on thighs
Non-slip base that won’t wobble during use
Temperature monitoring system or easy-fill tubing
Easy-clean materials that resist bacterial buildup

Exact Water Temperature Protocol for Maximum Hemorrhoid Healing

hemorrhoid sitz bath temperature guide thermometer

Getting the water temperature wrong is the most common reason sitz baths fail to deliver expected relief. 104°F (40°C) represents the precise therapeutic temperature that provides maximum muscle relaxation without risking burns to sensitive perineal tissues.

How to Test Temperature Without a Thermometer

If you don’t have a bath thermometer (most people don’t), use this reliable method: submerge your elbow in the water for 10 seconds. The water should feel comfortably warm but not hot. If your elbow feels any burning sensation, the water is too hot for your more delicate hemorrhoid area. Let it cool 2-3 minutes before retesting.

Warning: Water hotter than 106°F can worsen inflammation and potentially burn hemorrhoid tissue, creating additional healing complications. Err on the side of slightly cooler rather than hotter when in doubt.

Step-by-Step Sitz Bath Routine That Reduces Hemorrhoid Pain in 15 Minutes

Following this exact sequence ensures you maximize therapeutic benefits from every sitz bath session. Deviating from these steps reduces effectiveness and can even worsen symptoms.

Pre-Soak Preparation Checklist

  1. Clean your basin thoroughly with soap and warm water before each use—bacteria introduced during cleaning can worsen hemorrhoid irritation
  2. Position yourself correctly: For bathtub use, sit with knees bent; for kits, ensure toilet seat is closed over basin for stable seating
  3. Fill to precise depth: 3-4 inches covers the perineal area without unnecessary submersion

The Critical 15-Minute Treatment Window

  1. Enter water slowly to avoid splashing and introducing air that cools the water
  2. Set a timer for exactly 15 minutes—less time provides incomplete relief; longer offers no additional benefit
  3. During soaking: Breathe deeply to enhance muscle relaxation; avoid reading material that causes straining
  4. Add warm water at 8 minutes if using a kit with tubing to maintain consistent therapeutic temperature

Post-Soak Protocol for Lasting Relief

Gentle drying technique makes or breaks your results: Use a clean cotton towel and pat—not rub—the area dry. Aggressive drying re-irritates tissues just soothed by the bath. For stubborn moisture, use a hairdryer on cool setting held 12 inches away.

Immediately after drying: Apply hemorrhoid cream if prescribed, wear loose cotton underwear, and avoid sitting for 30 minutes to let healing continue uninterrupted.

Timing Your Sitz Baths for Maximum Hemorrhoid Symptom Control

hemorrhoid sitz bath schedule daily routine

The strategic timing of sitz baths matters more than frequency alone for managing hemorrhoid discomfort. Understanding when to soak creates dramatic differences in daily comfort levels.

Post-Bowel Movement Protocol

Take your sitz bath within 5 minutes after every bowel movement. This timing prevents the burning, itching sensation that typically follows by immediately soothing irritated tissues before inflammation sets in. Many patients report this single adjustment reduces their daily discomfort by 70%—even before completing additional daily sessions.

Daily Treatment Schedule for Different Severity Levels

  • Mild flare-ups: 2 sessions daily (morning and after last bowel movement)
  • Moderate pain with bleeding: 3 sessions (morning, after lunch bowel movement, evening)
  • Severe pain/swelling: 4 sessions (upon waking, after each bowel movement, before bed)

When NOT to Take a Sitz Bath With Hemorrhoids

While generally safe, certain conditions make sitz baths potentially harmful. Recognizing these situations prevents complications and directs you to appropriate care.

Infection Warning Signs That Require Medical Attention

Stop sitz bath treatments immediately and contact your doctor if you notice:
Increasing pain despite consistent treatments
Spreading redness beyond the immediate hemorrhoid area
Fever above 100.4°F or chills
Pus discharge or foul odor from the area

These symptoms indicate possible infection that requires prescription treatment rather than continued home therapy.

Three Complementary Treatments That Double Sitz Bath Effectiveness

Sitz baths work best as part of a comprehensive hemorrhoid management strategy. Combining these approaches with your sitz bath routine accelerates healing and prevents recurrence.

Fiber Timing Protocol for Soft Stools

Consume 25-30 grams of fiber daily with this specific timing:
– 10g at breakfast (oatmeal + berries)
– 10g at lunch (salad with beans)
– 10g at dinner (whole grains + vegetables)
Crucially: Drink 8 ounces of water with each fiber dose to prevent constipation

Posture Correction for Pressure Relief

Avoid sitting directly on hemorrhoids by using a specially designed donut cushion that redistributes pressure away from the anal area. When sitting for extended periods, shift weight every 15 minutes and take 2-minute standing breaks hourly to prevent blood pooling in hemorrhoidal veins.

Gentle Cleansing Technique After Bowel Movements

Replace toilet paper with moistened cotton pads using plain water or unscented wipes. Pat gently rather than wiping, and always cleanse from front to back to prevent bacterial transfer. Follow with a quick cool water rinse from a spray bottle to further reduce irritation.


Mastering how to use sitz bath for hemorrhoids properly transforms hemorrhoid management from constant discomfort to controlled healing. The key lies in precise temperature control, strategic timing around bowel movements, and consistent daily sessions. By following this exact protocol—104°F water, 15-minute duration, immediate post-bowel movement timing—you’ll experience noticeable relief within your first treatment session. Combine this with proper fiber intake, posture correction, and gentle cleansing for maximum results. Remember that while sitz baths effectively manage most hemorrhoid symptoms, persistent bleeding, worsening pain after 48 hours of consistent treatment, or fever require immediate medical evaluation. Start your first properly executed sitz bath today and take the first step toward lasting hemorrhoid relief.

How to Give a Kitten a Dawn Bath Safely


Many new kitten owners face a messy situation when their playful furball gets covered in sticky substances or grease that regular pet shampoo won’t remove. While Dawn dish soap has gained popularity as a solution for oily kitten emergencies, improper bathing techniques can cause more harm than good. This comprehensive guide provides the exact steps you need to safely bathe your kitten using Dawn dish soap—without causing stress, skin irritation, or hypothermia. You’ll learn the critical preparation steps most owners skip, the precise water temperature that prevents shock, and how to avoid the most common bathing mistakes that send panicked kittens running for cover.

Essential Safety Precautions Before Bathing Your Kitten

Before you even consider using Dawn on your kitten, you must verify this method is appropriate for your specific situation. Dawn dish soap should only be used for removing petroleum-based products, cooking oils, or other greasy substances that standard pet shampoos cannot handle. Never use Dawn as a regular shampoo—it strips natural oils and can cause skin irritation if used routinely. The soap must be the original blue formula, not antibacterial or scented varieties which contain harmful additives.

When Dawn Bathing Becomes Necessary

Dawn bathing is appropriate only in specific emergency situations such as:
– Your kitten walked through motor oil or grease
– They got cooking oil or butter in their fur
– They encountered tar or similar sticky substances
– They came into contact with toxic substances requiring immediate removal

Critical Age and Health Considerations

Never bathe kittens younger than 4 weeks old— their bodies cannot regulate temperature properly. Kittens between 4-8 weeks should only be spot-cleaned unless absolutely necessary. Always check for these health red flags before proceeding:
Respiratory issues: Sneezing or wheezing indicates bathing could worsen condition
Low body temperature: Cold-to-the-touch ears or paws means immediate warming is needed first
Open wounds: Dawn can sting and irritate broken skin
Extreme stress: Panting, dilated pupils, or trembling means delay bathing until calm

Proper Preparation: Setting Up for a Stress-Free Bath

kitten bathing setup supplies checklist

The difference between a traumatic experience and a manageable bath lies entirely in your preparation. Gather all supplies before bringing your kitten to the bathing area, as leaving your kitten unattended during the process creates dangerous escape opportunities.

Required Supplies Checklist

  • Original blue Dawn dish soap (not antibacterial)
  • Two soft towels dedicated only to kitten bathing
  • Small container for mixing soapy water
  • Sink or plastic tub with non-slip surface
  • Thermometer (or your elbow for temperature check)
  • High-velocity blow dryer (never use heat setting)
  • Treats for positive reinforcement
  • Non-slip mat for the bathing area

Creating a Calm Environment

Begin preparing the room 30 minutes before bathing. Choose the smallest room possible with minimal hiding spots—many owners find bathrooms work best due to their contained space. Place a non-slip mat in the tub and ensure all escape routes are blocked. Run warm water through the faucet for several minutes to eliminate any cold water shock. Most importantly, warm your towels in the dryer—they make the biggest difference in preventing hypothermia after the bath.

Step-by-Step Bathing Procedure: Minimizing Stress and Maximizing Safety

Water Temperature and Depth Essentials

Fill your sink or tub with just 2-3 inches of water at precisely 100-102°F (38-39°C)—slightly warmer than your skin temperature. Test with a thermometer or your inner wrist; it should feel pleasantly warm but not hot. Never fill the container while your kitten is present, as the sound of running water increases anxiety. The shallow depth prevents drowning risk while allowing you to control the kitten without submerging them.

Proper Soap Application Technique

Dilute Dawn in a separate container using a 5:1 water-to-soap ratio before applying. Never pour soap directly onto your kitten. Using a washcloth or your hands, gently work the diluted solution into the affected areas, avoiding the face, ears, and eyes completely. Focus on one small section at a time, using minimal pressure—kitten skin is extremely delicate. For heavily soiled areas, allow the soap to sit for no more than 2 minutes before rinsing.

Effective Rinsing Method to Prevent Residue

Rinsing thoroughly is more critical than washing, as Dawn residue causes the most skin irritation. Use a cup or handheld sprayer to rinse with clean, warm water, working in the direction of hair growth. Check rinse water color—if it remains soapy, continue rinsing. The most common mistake owners make is insufficient rinsing, leading to persistent skin irritation that requires veterinary attention.

Emergency Troubleshooting During Kitten Bathing

panicked kitten during bath handling techniques

Handling Extreme Kitten Panic

If your kitten begins thrashing uncontrollably, immediately stop the bath. Wrap them gently but firmly in a towel and take a 15-minute break. Try speaking in a calm, high-pitched voice and offer a treat. Never force a bath to completion if your kitten is in distress—partial cleaning followed by professional help may be safer. For severely panicked kittens, consider using the “burrito method” where you wrap them in a towel with only the affected area exposed.

Addressing Accidental Soap Exposure to Sensitive Areas

If soap gets near eyes or mouth:
1. Immediately flush with clean, warm water using a cup (never spray directly)
2. Wipe gently with a damp cloth moving outward from the eye
3. Monitor for excessive blinking or pawing at face
4. Contact your veterinarian if irritation persists beyond 30 minutes

Post-Bath Care: Preventing Hypothermia and Stress Recovery

drying a kitten after bath towel wrap

Proper Drying Protocol

Gently squeeze excess water from fur without rubbing, then wrap your kitten in a warm towel. Replace towels as they become wet—using multiple pre-warmed towels works best. Never use a hair dryer on heat, but a cool setting on low velocity held at least 18 inches away can help. Most importantly, hold your kitten against your body to share your warmth during the drying process, which significantly reduces stress.

Monitoring for Post-Bath Complications

Watch for these warning signs in the 24 hours following the bath:
– Persistent shivering beyond 30 minutes
– Refusal to eat or drink for more than 4 hours
– Excessive scratching indicating skin irritation
– Labored breathing or nasal discharge
– Lethargy beyond normal post-stress recovery period

When to Seek Professional Help Instead of Bathing

Certain situations absolutely require veterinary intervention rather than at-home bathing:
– If your kitten came into contact with antifreeze (Dawn won’t remove it safely)
– When the substance is unknown or potentially toxic
– If your kitten shows signs of poisoning before bathing
– When more than 50% of the body is affected
– If previous bathing attempts have failed

Safe Alternatives to Dawn for Routine Kitten Cleaning

For non-emergency situations, these gentler options work better:
– Pet-safe dry shampoos formulated for kittens
– Unscented baby wipes for spot cleaning
– Cornstarch for oil absorption between baths
– Commercial pet stain removers specifically designed for kittens

Preventing Future Bathing Emergencies

The best bath is the one you never have to give. Keep your kitten away from potential hazards by:
– Storing cooking oils and automotive products in sealed cabinets
– Using baby gates to restrict access to kitchens and garages
– Supervising outdoor time in secure enclosures
– Regularly checking your kitten after outdoor access

Final Safety Considerations Before Your Next Kitten Bath

Remember that Dawn is a temporary solution for emergencies only—never substitute it for proper kitten hygiene products. After any Dawn bath, schedule a veterinary checkup to ensure no skin damage occurred. Most importantly, trust your instincts: if you feel unsure about any step, contact your veterinarian before proceeding. With proper technique, what seems like a daunting task becomes manageable, keeping your kitten clean and healthy without unnecessary stress. Keep this guide handy for emergencies, but strive to create an environment where such baths become rarely needed.

How to Bathe a Kitten: Safe & Easy Steps


Your kitten’s first bath shouldn’t become a wrestling match that leaves both of you stressed and soaked. While cats are naturally fastidious groomers, there are times when your tiny feline friend needs human intervention—whether they’ve rolled in something sticky, can’t reach certain areas, or have medical reasons requiring cleaning. Knowing how to give kitten bath safely prevents unnecessary stress and keeps your bond strong. This guide walks you through the exact steps professional groomers and veterinarians recommend for bathing kittens under 6 months old, including when to skip the bath entirely and alternative cleaning methods that work just as well.

Why Most Kittens Don’t Need Regular Baths (But Exceptions Exist)

Cats’ tongues act like natural brushes with tiny hooks that remove dirt and loose fur, making frequent baths unnecessary for healthy adult cats. Kittens, however, haven’t fully developed these grooming skills and may need assistance when they encounter substances they can’t clean themselves. Only bathe your kitten when absolutely necessary—typically when they’re covered in something toxic, sticky, or otherwise harmful that they can’t remove through normal grooming.

Signs your kitten actually needs a bath include visible dirt or debris matted in their fur, exposure to toxic substances like motor oil or paint, or medical conditions requiring medicated cleaning. Never bathe kittens under 4 weeks old unless directed by a veterinarian, as they can’t regulate their body temperature effectively. If your kitten simply has a minor spot, try spot-cleaning with a damp cloth first before committing to a full bath.

Pre-Bath Preparation: Setting Up for Kitten Bathing Success

Gather all supplies before bringing your kitten into the bathing area—searching for items mid-bath creates stress for both of you. You’ll need kitten-specific shampoo (never use human products), two soft towels, a non-slip mat for the sink or tub, cotton balls for ears, and treats for positive reinforcement. Fill a shallow container with 2-3 inches of lukewarm water (test with your elbow—it should feel neutral, not warm).

Choose a small, enclosed space like a bathroom sink rather than a full bathtub to prevent your kitten from feeling overwhelmed. Ensure the room temperature is warm (75-80°F) to prevent chilling. Trim your kitten’s nails 24 hours beforehand to minimize scratches during the bath. Most importantly, bathe your kitten when both of you are calm—never attempt during or after a stressful event like a vet visit.

What Water Temperature Kills Bacteria Without Scalding Kitten Skin?

The ideal water temperature for kitten baths is 98-100°F (37-38°C), slightly warmer than room temperature but cooler than typical human bath water. This range effectively cleans without risking burns to their delicate skin. Always test water on your inner wrist before introducing your kitten—what feels lukewarm to you should feel neutral to them. Never use hot water, as kittens’ skin is thinner than adult cats and burns more easily.

Step-by-Step: How to Safely Give Your Kitten a Bath

kitten bath step by step guide

Gently Introducing Your Kitten to the Water

Place your kitten in the dry sink first and let them sniff the environment while speaking in calm, soothing tones. Slowly add water around them rather than placing them directly into water, which reduces shock. Support their chest and hindquarters with your hands—never grab by the scruff. If your kitten panics, pause and try again later; forcing the process creates negative associations that make future baths more difficult.

Using Proper Shampooing Techniques for Delicate Kitten Skin

Apply kitten shampoo to your hands first, lather, then gently massage onto your kitten’s coat, avoiding eyes, ears, and nose. Start at the neck and work toward the tail, keeping their head above water. Use circular motions with your fingertips to lift dirt without scratching their sensitive skin. Rinse thoroughly—leftover shampoo causes skin irritation and may be ingested during self-grooming. A cup for rinsing gives you better control than running water.

Drying Your Kitten Without Causing Panic

Wrap your kitten immediately in a warm, dry towel and hold them close to your body for security. Gently press (don’t rub) to absorb water—vigorous rubbing irritates their skin. Most kittens dislike hair dryers, but if you must use one, set it to the lowest heat and speed, keep it at least 18 inches away, and never point it directly at your kitten. Better yet, let them air-dry in a warm room while you monitor them closely. Never leave a damp kitten unattended—they can develop hypothermia quickly.

What to Do When Your Kitten Hates Bath Time

stressed kitten bath time signs

Signs your kitten is overly stressed include flattened ears, dilated pupils, excessive meowing, or attempts to escape. If you notice these, stop the bath immediately—your priority is preventing trauma. For future attempts, try shorter sessions: wash just one area at a time over multiple days. Use high-value treats like tuna juice on your finger during and after the bath to create positive associations. For extremely resistant kittens, consult your veterinarian about sedation options for medically necessary baths.

Common Kitten Bathing Mistakes to Avoid

Using human shampoo strips natural oils from kitten skin, causing dryness and irritation—always choose products labeled specifically for kittens. Bathing too frequently (more than once monthly) disrupts their skin’s pH balance. Never submerge your kitten’s head or spray water directly at their face. Most critically, don’t attempt to bathe newborn kittens—their temperature regulation systems aren’t developed, and they’re prone to chilling. For kittens under 4 weeks, use a warm, damp cloth instead of full immersion.

Alternative Cleaning Methods That Work Better Than Full Baths

waterless kitten shampoo application

For most routine cleaning, waterless kitten shampoo works effectively without stress. Apply the foam to your hands, massage into the coat, then wipe away with a damp cloth. Unscented pet wipes designed for kittens safely remove surface dirt without water. For oily substances, cornstarch sprinkled on the area, brushed through, then wiped away can absorb residue without water exposure. These methods address 90% of cleaning needs without the trauma of full immersion.

When to Skip the Bath and Call Your Veterinarian Instead

Contact your vet before bathing if your kitten shows signs of illness (lethargy, vomiting), is under 4 weeks old, or has been exposed to toxic substances like antifreeze, paint thinner, or pesticides. Never attempt to remove hazardous materials yourself—improper cleaning can increase absorption. Kittens with respiratory issues, recent surgery, or flea infestations require veterinary guidance before bathing, as standard procedures could worsen their condition.

Post-Bath Care: Ensuring Your Kitten’s Comfort

Keep your kitten in a warm room (75-80°F) until completely dry, providing a heated pad wrapped in a towel for comfort. Offer high-value treats and gentle petting to reinforce positive associations. Monitor for shivering or lethargy, which indicate chilling—wrap them in a warmed towel immediately if observed. Never use hair dryers on kittens under 8 weeks—their skin is too sensitive to heat damage. Most importantly, give your kitten space afterward—they may need quiet time to recover from the experience.

Establishing Positive Bath Associations for Future Sessions

Start with dry “bath practice” sessions where you simply hold your kitten near the sink without water. Gradually introduce damp cloths, then shallow water, rewarding calm behavior with treats. Keep initial sessions under 2 minutes—even successful partial baths build confidence. Always end on a positive note, never prolonging the experience past your kitten’s comfort point. Over time, these short, positive exposures teach your kitten that bath time isn’t threatening, making future necessary baths significantly easier for both of you.


Final Note: Most kittens only need bathing 2-3 times in their first year unless medically necessary. Focus instead on regular brushing to maintain coat health and reduce matting. If you must bathe your kitten, keep sessions brief (under 10 minutes), use proper kitten-specific products, and always prioritize their comfort over perfection. When in doubt about whether your kitten needs a bath, consult your veterinarian—they can often recommend safer alternatives that protect your kitten’s health while preserving your peaceful home environment.

How Often to Bathe a Cat: Vet-Approved Guide


Most cat owners wonder exactly how often cat bath sessions are necessary for their feline companions. Contrary to popular belief, cats are meticulous self-groomers who spend up to half their waking hours maintaining their coats. This natural ability means many cats rarely need human-assisted bathing. However, determining the right bathing frequency depends on multiple factors specific to your cat’s breed, lifestyle, health, and coat type. Getting this balance wrong can lead to skin problems, excessive oil production, or unnecessary stress for both you and your pet. Understanding your individual cat’s needs prevents over-bathing while ensuring proper hygiene when necessary.

The reality is that most healthy indoor cats require bathing only once every four to six weeks at most—with many thriving with even less frequent baths. Long-haired breeds typically need more regular attention, often requiring bathing every two to four weeks to prevent painful matting. Cats with specific health conditions, outdoor access, or those who’ve encountered sticky substances may need baths outside this standard schedule. This guide reveals exactly how often to bathe your cat based on scientific understanding of feline biology and professional grooming experience.

Short-Haired Cats: Minimal Bathing Required

Domestic Shorthairs and other short-haired breeds rarely need regular bathing if they’re healthy indoor cats. Their short coats dry quickly and maintain natural oils effectively with minimal human intervention. Most short-haired cats do well with occasional baths every two to three months or only when they’ve encountered something messy, sticky, or potentially toxic. These cats often go their entire lives without needing a bath if they maintain good self-grooming habits.

Warning: Over-bathing short-haired cats disrupts their natural oil balance, leading to dry, itchy skin and increased shedding. Unless your veterinarian recommends otherwise for a specific condition, avoid bathing short-haired cats more than once every four weeks. If you notice persistent odor or visible dirt despite regular self-grooming, investigate potential health issues before increasing bathing frequency.

Long-Haired Breeds Need Regular Bathing Schedules

Persian cat bathing tutorial

Persians, Maine Coons, and other long-haired cats require significantly more frequent bathing to prevent severe matting and maintain coat health. These breeds typically need bathing every two to four weeks, with some owners finding bi-weekly baths necessary between professional grooming sessions. Their thick, dense coats collect debris easily and are prone to painful tangles that can develop quickly behind ears, under legs, and around the tail base.

For Persian cats specifically, the bathing process should include multiple stages: an initial wash with quality cat shampoo, conditioning treatment to maintain softness, thorough rinsing to prevent residue buildup, and careful drying with low heat settings. Many Persian owners successfully combine professional grooming every six to eight weeks with home bathing between sessions for optimal coat maintenance. Maine Coons often enjoy water more than other breeds, potentially making the bathing process easier despite their long coats.

Outdoor Cats Require More Frequent Cleaning

Cats with outdoor access face entirely different hygiene challenges than indoor-only cats. These felines encounter dirt, mud, leaves, insects, and various environmental contaminants daily. Outdoor cats often need monthly baths during warmer months and additional baths whenever they get into something particularly dirty or problematic. They’re also more likely to pick up fleas, ticks, or mites requiring medicated bathing as part of comprehensive treatment protocols.

Pro Tip: Always check your outdoor cat thoroughly before bathing. They may have rolled in substances that smell unpleasant or could be harmful if ingested during subsequent grooming. If your cat has encountered toxic substances like antifreeze, oil, or paint, contact your veterinarian immediately before attempting to bathe them, as special decontamination procedures may be necessary.

Health Conditions Dictate Special Bathing Schedules

cat with seborrhea oily coat before and after bath

Cats with dermatological issues often require customized bathing frequency based on their specific condition. Allergies can cause skin irritation that therapeutic bathing may relieve, with veterinarians prescribing medicated shampoos containing hydrocortisone, oatmeal, or antifungal agents. These therapeutic baths follow strict protocols—sometimes requiring bathing every few days until symptoms improve, followed by maintenance bathing at longer intervals.

Cats with oily coats (seborrhea) produce excess skin oils leading to greasy, matted fur and unpleasant odors. These cats often need more frequent bathing with degreasing shampoos specifically formulated for feline use. Conversely, cats with dry, flaky skin benefit from less frequent bathing with moisturizing shampoos and dietary omega fatty acid supplements to improve skin health from within. Flea infestations require specific treatment protocols that may include bathing, but always consult your veterinarian about timing to avoid washing off topical flea medications prematurely.

Senior Cats and Kittens: Age-Specific Bathing Needs

Kittens under eight weeks old should generally avoid full baths as they cannot regulate body temperature effectively. For very young kittens needing cleaning, use a warm, damp washcloth to gently wipe soiled areas, then immediately dry with a soft towel. Kittens between eight weeks and four months can begin brief, gentle bath experiences to build familiarity with the process.

Senior cats often require adjusted bathing schedules based on mobility and cognitive function. Arthritic cats may struggle to groom themselves effectively, leading to mats and soiling that needs more frequent bathing assistance. Cats with cognitive decline might forget to groom altogether, necessitating regular bathing. However, elderly cats typically tolerate bathing less well, requiring gentler handling and potentially more frequent but shorter sessions to reduce anxiety.

Sphynx Cats: The Exception to the Rule

Hairless Sphynx cats present a unique bathing scenario despite lacking fur. Their exposed skin produces oils that would normally be absorbed by fur, leading to greasy skin that requires regular bathing every one to two weeks. These cats need gentle, fragrance-free shampoos designed for sensitive skin and careful drying to prevent chill since they lack fur insulation. Many Sphynx owners establish consistent weekly bathing routines to maintain their cats’ skin health and prevent residue buildup on furniture and clothing.

Recognizing When Your Cat Needs a Bath

Several clear indicators signal when bathing is necessary for your cat:

  • Visible mats or tangles, especially in long-haired breeds
  • Greasy or oily coat texture when running your hand against the fur
  • Persistent unpleasant odor that doesn’t resolve with normal grooming
  • Visible dirt, debris, or staining on the coat
  • Excessive scratching or skin irritation that might benefit from medicated bathing

If your cat shows persistent odor despite appearing clean, consult your veterinarian before bathing to rule out underlying health issues like urinary incontinence, anal gland problems, or skin infections.

Essential Bathing Mistakes to Avoid

Many cat owners unintentionally harm their pets’ skin health through common bathing errors:

  • Bathing too frequently disrupts natural oil balance, causing dry, itchy skin
  • Using human or dog shampoos with inappropriate pH levels that damage feline skin
  • Skipping thorough rinsing leaving residue that causes irritation and attracts dirt
  • Improper drying leading to matting, skin irritation, or hypothermia
  • Forcing resistant cats creating negative associations that make future baths harder

Critical Warning: Never use products containing essential oils like tea tree, peppermint, or eucalyptus on cats. These can be toxic even in small amounts due to cats’ limited ability to metabolize certain compounds.

Creating a Stress-Free Bathing Experience

Make bath time less traumatic for both you and your cat by:

  • Introducing kittens to bathing gradually with positive reinforcement
  • Maintaining consistent routines and locations for bathing
  • Using non-slip mats in the tub and lukewarm water
  • Enlisting a helper to hold and calm your cat during bathing
  • Offering high-value treats immediately after the bath

For cats who absolutely refuse baths, consider professional grooming services or waterless cleaning alternatives like dry shampoo sprays that absorb oils and dirt without water immersion.

When to Consult Your Veterinarian

Contact your veterinarian if:

  • Skin issues persist despite regular bathing
  • Your cat suddenly becomes aggressive during baths
  • You notice unusual odors, excessive shedding, or hair loss
  • Your cat has encountered potentially toxic substances
  • Your senior cat develops mats they can’t groom out themselves

Your veterinarian can determine if underlying health conditions require specific bathing protocols or if alternative treatments would better serve your cat’s needs.

Understanding how often cat bath sessions are truly necessary prevents both under-cleaning and over-bathing. Most indoor cats need bathing only every four to six weeks, while long-haired breeds typically require bathing every two to four weeks. Outdoor cats, those with health conditions, or Sphynx cats need more frequent attention. Always prioritize your individual cat’s specific needs over general recommendations, and consult your veterinarian when in doubt about appropriate bathing frequency for your feline companion. Regular observation of your cat’s coat condition provides the best indicator of when a bath is truly necessary.

Bathing a Hairless Cat: Safe Tips & Steps


That musty odor developing on your hairless cat just days after their last bath? You’re not imagining things—this is the reality of caring for a Sphynx, Peterbald, or other hairless breed. Without fur to absorb and distribute natural skin oils, these unique felines develop greasy buildup that leads to unpleasant smells and potential skin problems. Many new hairless cat owners learn this lesson quickly when their previously clean-smelling companion starts leaving oily paw prints on furniture. The good news is that with the right approach, bathing your hairless cat can become a peaceful routine rather than a stressful battle. Most hairless cats actually learn to appreciate the warmth and attention once they associate bath time with positive outcomes.

This comprehensive guide walks you through every step of successfully bathing your hairless cat, transforming what could be a traumatic experience into a bonding opportunity that keeps your cat healthy and odor-free.

Gather Essential Bathing Supplies Before Starting

Preparation is critical when bathing a hairless cat—having everything within arm’s reach prevents unnecessary stress during the process. Hairless cats feel vulnerable in water, and stepping away to grab a forgotten item can escalate their anxiety significantly. Your complete bathing kit should include:

  • Cat-specific shampoo formulated for sensitive skin (never use human products)
  • Large cup or pitcher for gentle water application
  • Soft washcloths for facial cleaning
  • Multiple absorbent towels (hairless cats retain more water)
  • Non-slip bath mat to prevent dangerous slips
  • Treats for positive reinforcement
  • Hair dryer set to low heat for drying

Warning: Avoid shampoos with sulfates, parabens, or artificial fragrances that can strip natural oils and cause skin irritation. Look for gentle formulas containing oatmeal or aloe vera to soothe sensitive skin during the bathing process.

Create the Perfect Bathing Environment

Setting up your bathing space correctly makes the difference between a smooth experience and a chaotic struggle. Begin by closing all doors and windows to prevent escapes, then place the non-slip mat firmly in your tub or sink. Fill with two to three inches of warm water (100-102°F) tested with your wrist—never introduce your cat to an empty tub that will later fill with water.

Having everything arranged within easy reach means you never need to leave your cat unattended. Some owners find that pre-warming towels in the dryer creates a cozy landing spot that reduces post-bath shivering. Remember that hairless cats are particularly sensitive to their surroundings, so a calm, controlled environment prevents traumatic associations with bathing.

Gradually Introduce Your Cat to Water

First baths require patience and gradual introduction—forcing a reluctant cat creates negative associations that persist for months. Start by letting your cat explore the empty tub on their own terms, rewarding exploration with treats. Once comfortable, add a small amount of warm water while staying nearby and calm.

Some successful techniques include:
– The “float test” where water fills slowly nearby while your cat observes
– Keeping initial water exposures brief (even 30 seconds counts as success)
– Using soothing tones and slow movements to avoid startling your cat
– Never forcing contact before your cat is ready

This patient approach builds trust and creates cats who view bathing as acceptable, if not enjoyable. Every hairless cat has unique water tolerance—some embrace baths immediately while others need weeks of desensitization training.

Proper Wetting and Shampooing Technique

Sphynx cat bathing technique hands holding cat

Once your cat accepts water, use specific techniques to protect their delicate skin. Support your cat’s body securely with one hand while pouring warm water over their body with a cup. Never spray directly at their face, ears, or eyes—use a damp washcloth for these sensitive areas instead.

Apply a small amount of shampoo and work into a gentle lather, focusing on oil-prone areas:
– Base of the tail
– Chin and chest
– Paw pads
– Skin folds (where debris collects)

Massage slowly with deliberate movements rather than vigorous scrubbing. Keep one hand on your cat at all times to monitor comfort. If you notice trembling or escape attempts, pause and comfort your cat before continuing. Most hairless cats require bathing every one to three weeks depending on their individual oil production.

Thorough Rinsing Prevents Skin Problems

Residue left behind causes more problems than no bathing at all—thorough rinsing is critical. Soap residue leads to irritation, itching, and potential infections. Rinse by pouring clean, warm water repeatedly, feeling for slick areas that indicate remaining shampoo.

Pay special attention to:
– Skin folds
– Under the chin
– Between the toes

The rinse water should run completely clear before considering the bath complete. When you squeeze the skin gently, no bubbles or film should appear. Some owners find a final rinse with diluted apple cider vinegar (never on irritated skin) helps restore skin pH, but this should be used sparingly.

Complete Drying Is Essential for Hairless Cats

Hairless cat drying with towel and hairdryer

Drying requires more attention than with furry cats—exposed skin retains moisture that can lead to chills or bacterial growth. Begin by gently squeezing excess water with a thick towel, wrapping your cat securely while absorbing moisture, switching towels as needed.

For cats who tolerate it:
– Use a hair dryer on lowest heat setting
– Hold several inches from skin
– Move constantly to prevent hot spots
– Test air temperature on your hand first

Never use high heat—many hairless cats enjoy the warm airflow once acclimated. For dryer-averse cats, extended towel drying in a warm room works as an alternative. Check that skin is completely dry to the touch before allowing free movement.

Establish a Consistent Bathing Schedule

Hairless cats thrive on routine—consistent bathing makes each session easier. Most do well with bathing every 7-14 days, though individual factors influence ideal frequency. Watch for signs your cat needs bathing sooner:
– Excessive oily texture
– Musty odor
– Visible debris accumulation

Consider aligning bath day with other grooming activities like nail trimming. Keep a simple log of bath dates and skin observations to identify patterns. Kittens often need more frequent bathing as they develop adult oil production, while seniors may need schedule adjustments.

Solve Common Bathing Challenges

Even with preparation, some hairless cats present specific challenges. Cats who scratch often feel insecure—better support or a second person can help. Temperature sensitivity sometimes masquerades as water aversion, so double-check water temperature.

For cats who escape repeatedly:
– Try shorter, more frequent sessions
– Experiment with shallow versus deeper water
– Use alternative locations like a sink

For extreme resistance, waterless shampoos or specialized cat wipes can supplement full baths. Never punish resistance—work with your cat’s comfort level and gradually expand tolerance through positive experiences.

Maintain Skin Health Between Baths

Daily maintenance keeps your cat comfortable between full baths. Regular wiping with pet-safe cleansing wipes removes surface oil, especially on the chin, chest, and tail base. Monitor skin condition for healthy characteristics:
– Soft texture
– Warm (not hot) temperature
– Minimal greasiness
– No flaking or red patches

Maintain home humidity between 30-50% to support healthy skin. Some owners apply small amounts of cat-safe moisturizer to very dry areas, but only with feline-specific products to avoid harmful ingredients.

When to Seek Professional Grooming Help

Some hairless cats benefit from professional services, particularly those with extreme anxiety, physical limitations, or skin conditions. Seek professional help if:
– Bathing resistance becomes dangerous
– You’re unable to safely handle your cat
– Your cat has skin conditions needing medicated baths

Many veterinary clinics offer specialized bathing services. First-time owners often benefit from professional demonstrations of proper technique. Verify groomer experience with hairless breeds specifically—these cats require different handling than furry counterparts.

Final Thoughts on Hairless Cat Bathing Success

Bathing your hairless cat doesn’t have to be stressful. With proper preparation, patient introduction, and consistent routines, most hairless cats accept—and some enjoy—their regular bathing sessions. Their exposed skin depends on you for oil management that fur would naturally handle, making bathing an act of care rather than preference.

Start slowly, stay calm, and celebrate small victories. Your hairless cat looks to you for security during these vulnerable moments, and your patient approach builds trust that strengthens your bond. Within months, bath day may become one of your cat’s favorite activities—the warm water, your focused attention, and resulting comfort all contributing to a positive association you’ll both appreciate. Remember that each successful bath brings you closer to a routine where both you and your hairless companion view bath time as valuable bonding rather than a battle to endure.

How to Bathe a Cat That Hates Water


Bathing a cat that despises water often feels like attempting the impossible. Many frustrated pet owners believe their feline companion will simply never tolerate bath time—but with the right techniques, even the most water-averse cat can be cleaned safely. The secret isn’t forcing your cat to accept water; it’s working with their natural instincts to minimize stress for both of you. This guide reveals proven methods to bathe your resistant cat effectively while preserving your relationship and your sanity. You’ll learn how to prepare properly, handle your cat gently, and create positive associations that make future baths progressively easier.

Why Your Cat Panics at the Sight of Water

Cats’ water aversion stems from their evolutionary history as desert-dwelling creatures who rarely encountered large bodies of water. Unlike dogs bred for water retrieval, cats developed without the need to enter water regularly. Their dense fur, designed for insulation and temperature regulation, becomes heavy and uncomfortable when wet, causing them to lose their natural agility. When your cat shakes violently after getting wet, they’re instinctively trying to restore their fur’s insulating properties.

The sensation of being restrained while wet triggers your cat’s most primal fear response. In the wild, being unable to move freely means vulnerability to predators. When you hold your cat over water, their instinct screams “danger” even though you’re trying to help. This explains why normally gentle cats suddenly become fierce defenders during bath time—it’s not personal, it’s survival instinct. Understanding this biological reaction helps you approach bathing with the patience necessary for success.

Essential Supplies for a Stress-Free Cat Bath

cat bath supplies kit non slip mat shampoo towels

Gathering everything before bringing your cat near water prevents frantic mid-bath scrambling that increases stress. Start with a cat-specific shampoo—human products disrupt your cat’s delicate skin pH balance, causing irritation and dryness. Look for sulfate-free formulas with soothing ingredients like colloidal oatmeal or aloe vera. Never use dog shampoos containing permethrin, which is toxic to cats.

Your setup needs three thick, absorbent towels placed within easy reach. A non-slip mat for the sink or tub bottom gives your cat crucial traction, reducing panic from slippery surfaces. A small plastic cup lets you control water flow without startling spray. Prepare cotton balls to gently plug ears before bathing begins, preventing water intrusion that could lead to ear infections. Consider wearing long sleeves and gardening gloves for protection during particularly resistant baths, but avoid anything that restricts your dexterity.

Transform Your Bathroom Into a Calm Zone

The bathing environment dramatically affects your cat’s stress level. Choose a small bathroom or utility sink rather than a large tub where your cat feels exposed. Close all doors and windows to prevent escape attempts—many cats bolt during baths and become difficult to recapture. Maintain a warm room temperature (75-80°F) since wet cats lose body heat rapidly through their fur.

Mask the sound of running water with white noise from a fan or calming cat music, as many felines find water sounds terrifying. Some owners find success using Feliway diffusers 30 minutes before bathing to release calming pheromones. Dim bright overhead lights to reduce sensory overload. Most importantly, regulate your own breathing and energy—cats detect human anxiety instantly. Take slow, deep breaths to calm yourself before calling your cat, and speak in a low, steady voice throughout the process.

Pre-Bath Preparation That Makes All the Difference

Help your cat mentally prepare through gradual desensitization in the days before bathing. Place the non-slip mat in the dry sink and reward your cat with treats for investigating it. Practice brief “sink visits” where your cat enters the tub, receives praise and a treat, then exits—no water involved. This builds positive associations with the bathing location rather than fear.

Schedule the bath after vigorous playtime when your cat is naturally calmer. Trim claws 24-48 hours beforehand to minimize accidental scratches during handling. Thoroughly brush your cat to remove mats and loose fur that worsen when wet. Avoid bathing immediately after meals to prevent nausea from stress. Feed a small treat right before starting to create an immediate positive association with the bathing process.

Gentle Handling Techniques for Maximum Cooperation

Support your cat’s entire body during the bath with one hand under their chest and the other under their hindquarters. Never restrain too tightly—allow some movement within safe boundaries to reduce panic. Pour water slowly using the cup method rather than direct shower spray, starting at the shoulders and working backward away from the head. Keep your voice calm and reassuring, even if your cat protests loudly.

Watch for stress signals like rapid breathing, dilated pupils, or flattened ears—these mean it’s time to pause and let your cat recover. If your cat becomes extremely distressed, stop immediately rather than forcing completion. A traumatic bath creates long-term resistance. For extremely resistant cats, consider bathing just one section at a time over multiple sessions. Most cats tolerate brief baths better than prolonged struggles, so work efficiently while maintaining gentleness.

Shampoo Application and Rinsing Without Resistance

cat shampoo application technique lukewarm water

Use lukewarm water (test with your inner wrist) and apply shampoo starting at the neck, working backward toward the tail. Avoid the face entirely—clean this area later with a damp cloth. Use minimal shampoo (a nickel-sized amount for medium cats) and work it into the fur with slow, circular motions rather than vigorous scrubbing. Focus on dirtiest areas first: underarms, belly, and hindquarters.

Rinsing requires equal attention to prevent skin irritation from residue. Cup water repeatedly over your cat’s body, starting where shampoo was applied and moving toward the tail. Pay special attention to armpit and groin areas where shampoo collects. Continue until water runs completely clear—this typically takes 3-5 rinsing cycles. Incomplete rinsing causes itching and excessive grooming afterward, making future baths more difficult.

Drying Techniques That Reduce Post-Bath Stress

Begin drying immediately after the final rinse by wrapping your cat in a towel and gently pressing (not rubbing) to absorb moisture. Use multiple towels as they become saturated—damp towels transfer moisture back to your cat’s fur. For towel-tolerant cats, continue switching to dry towels until your cat is merely damp. Most cats prefer towel drying to blow drying, but if using a hair dryer, select the lowest heat setting and hold it at least 18 inches away while continuously moving.

Keep your cat in a warm room during drying—never allow a wet cat near drafts or in cool spaces. Long-haired breeds require more thorough drying to prevent matting. Offer treats during drying to create positive associations. If your cat tolerates it, gently comb through fur with a wide-toothed comb while still damp to prevent tangles. The drying phase often causes less stress than the bathing itself, so maintain your calm energy through completion.

Positive Reinforcement Strategies That Work

Reward your cat with high-value treats (chicken, tuna) immediately after each successful step, not just at the end. This creates positive associations during the process rather than just after the stressful experience. Many owners make the mistake of withholding treats until the bath is complete, missing opportunities to reinforce cooperative behavior. Speak in an upbeat, happy voice throughout—even if your cat resists, maintain positivity to avoid reinforcing fear.

After the bath, provide extended cuddle time or play with your cat’s favorite toy to reinforce that the experience ends positively. Avoid scolding or showing frustration if the bath was difficult—this increases future resistance. Over multiple baths, most cats learn to tolerate the process better when consistently paired with rewards and calm handling. The goal isn’t making your cat love water—it’s teaching them that bathing ends and they receive affection afterward.

Alternative Cleaning Methods to Reduce Bath Frequency

Most cats need full baths only 2-4 times yearly if they’re otherwise healthy. Between baths, use waterless cat shampoos applied to a cloth and rubbed through the coat. Commercial cat grooming wipes effectively clean paws and faces without water immersion. For spot cleaning, mix a small amount of cat shampoo with water on a washcloth and target only soiled areas.

Regular brushing (daily for longhairs, weekly for shorthairs) removes loose fur and distributes natural oils, reducing the need for baths. For cats with chronic skin conditions requiring frequent medicated baths, consult your veterinarian about alternative treatments that might reduce bathing frequency. Remember that cats are naturally fastidious groomers—their saliva contains enzymes that clean their fur, so they rarely need the level of cleaning dogs require.

Recognize When Professional Help Is Necessary

Contact a professional groomer or veterinarian if your cat shows extreme aggression (biting, scratching that breaks skin) during bathing attempts. Cats with severe skin infections or allergies often require specific medicated baths that professionals can administer more safely. If your cat experiences respiratory distress, uncontrollable shaking, or collapse during bathing, stop immediately and seek veterinary guidance.

Some veterinary clinics offer “spa services” with trained technicians who specialize in handling resistant cats. These professionals use specialized equipment and techniques that make bathing safer and less stressful. For cats with profound water phobia, your veterinarian might recommend mild sedation for necessary baths. Never attempt to forcibly bathe a cat who becomes physically dangerous—it’s better to seek professional help than risk injury to both of you.

How to Bathe a Cat with Claws Safely


Bathing a cat ranks among the most challenging tasks any cat owner faces, and the presence of sharp claws only amplifies the difficulty. Unlike dogs, most cats have an innate aversion to water, and when you add the risk of deep scratches to the equation, bath time can quickly become a stressful ordeal for both you and your feline companion. However, certain situations make bathing unavoidable—whether your cat has gotten into something sticky, is dealing with a skin condition, or simply needs a good de-shedding session. The good news is that with proper preparation, the right techniques, and a calm approach, you can successfully bathe a clawed cat while minimizing stress and avoiding injury to yourself.

This comprehensive guide walks you through every step of the process, from pre-bath preparation to post-bath grooming. You’ll learn how to protect yourself from scratches, keep your cat as calm as possible, and establish routines that make future baths less traumatic for everyone involved. The key lies in treating bath time not as a battle to be won, but as a collaborative process that requires patience, preparation, and an understanding of your cat’s individual temperament and body language.

Trim Claws Before Bath Day to Reduce Scratch Risk

Blunting your cat’s claws one to two days before bath time dramatically reduces your risk of painful scratches. Never trim claws immediately before bathing, as this can make your cat’s paws sore and increase their anxiety during the water session. Instead, schedule claw trimming during a naturally calm moment, like after your cat has eaten or while they’re drowsy from sunbathing.

Proper claw trimming technique requires specific tools and careful handling. Use sharp cat nail clippers designed for feline anatomy—human clippers can crush the nail and cause pain. When trimming, gently press each toe pad to extend the claw, then cut only the transparent tip while avoiding the pink quick (which contains blood vessels). If you accidentally nick the quick, apply styptic powder immediately to stop bleeding. For cats who resist trimming, wrap them securely in a towel with only one paw exposed at a time, and reward calm behavior with treats.

Timing is critical—trimming too close to bath time leaves no recovery period, while trimming too early means claws may regrow sharp tips. The one-to-two-day window provides the perfect balance of safety and comfort for your cat. If your cat absolutely won’t tolerate claw trimming, skip this step and rely on other protective measures, but understand that the risk of scratches increases significantly.

Gather Essential Bath Supplies Before Bringing in Your Cat

cat bathing supplies checklist

Never start the bathing process without having every item within arm’s reach. A chaotic scramble for forgotten supplies during bath time escalates your cat’s anxiety and increases your risk of injury. Your essential supply list must include:

  • Cat-specific shampoo (human or dog products can irritate sensitive feline skin)
  • Non-slip mat for the sink or tub bottom (slippery surfaces trigger desperate clawing)
  • Thick absorbent towels (at least three for drying)
  • Cup or handheld sprayer with gentle water flow
  • Long-sleeved clothing and protective gloves for yourself
  • High-value treats to reward calm behavior
  • Treat-dispensing toy to create positive associations

Pro tip: Run warm water through the tub before bringing your cat in to warm the surface—cold porcelain terrifies cats and makes them more likely to struggle. Keep the water depth minimal (just 3-4 inches) and maintain a temperature between 100-102°F, which feels comfortable to cats. Having everything prepared means you can focus entirely on your cat’s needs without leaving them unattended for even a moment.

Create a Calm Bathing Environment to Reduce Cat Stress

Cats sense your anxiety and react to environmental stressors, so preparing the space before bringing your cat in is crucial. Start by closing all bathroom doors and windows to prevent escape attempts, then eliminate loud noises by turning off fans and exhaust systems. The ambient room temperature should be warm (75-80°F), especially for short-haired cats who chill quickly when wet.

Strategic environmental adjustments make a dramatic difference:
– Play calming music or white noise to mask unsettling sounds
– Apply feline pheromone spray to towels 15 minutes before bath time
– Keep lighting soft rather than bright and harsh
– Place a non-slip mat in the tub to prevent desperate clawing for traction
– Run warm water briefly to heat the room before draining it

Your cat’s stress level directly correlates with their likelihood to scratch, so anything you can do to create a peaceful atmosphere pays dividends during the actual bathing process. Remember that cats perceive their environment differently than humans—they’re sensitive to smells, sounds, and visual cues that you might not even notice.

Use Proper Handling Techniques to Prevent Panic Reactions

How you physically manage your cat during the bath determines whether the experience remains manageable or escalates into a dangerous struggle. Support your cat’s body weight evenly with one hand while washing with the other, keeping them positioned sideways in the tub rather than facing you. This gives them a psychological sense of having an escape route, reducing the trapped feeling that triggers panic.

Critical handling tips:
– Never lift a wet cat by the scruff (causes pain and strain)
– Use the palm of your hand flat against their chest for support
– If your cat starts struggling, freeze rather than tightening your grip
– Speak in a low, calm monotone voice (high-pitched tones excite cats)
– Give brief breaks by holding them still in the warm water

Watch for early signs of escalating stress: flattened ears, twitching tail, dilated pupils, and low growling. When you notice these, pause briefly and let your cat assess the situation before continuing. This prevents manageable resistance from becoming full panic that requires restarting the entire process.

Protect Yourself During the Bath Process

Despite precautions, some scratches may occur when bathing a clawed cat. Strategic self-protection minimizes injury while allowing you to maintain control. Wear long sleeves made of thin, stretchy material that won’t restrict movement but creates a barrier between claws and skin. Keep your arms pressed close to your sides rather than reaching across your cat’s body, which puts your forearms in the direct line of fire if they kick backward.

When scratches happen:
– React calmly with a quiet “ouch” rather than sudden movements
– Continue the bath if possible (stopping reinforces aggressive behavior)
– Address scratches thoroughly afterward with soap, water, and antiseptic
– Never punish your cat for scratching (creates negative associations)

The most dangerous moments occur when lifting your cat in and out of the water, so take these transitions slowly while supporting their full body weight. If your cat has a history of aggressive behavior during baths, consider professional grooming instead of risking serious injury to yourself or your cat.

Wet and Shampoo Your Cat Correctly to Minimize Resistance

The washing process requires a gentle touch and strategic approach to sensitive areas. Begin by wetting your cat’s fur from the neck down using a cup or handheld sprayer with gentle pressure—never direct spray at their face. Pour water slowly over their body rather than spraying, and work quickly through this initial wetting phase, which typically triggers the most resistance.

Effective shampoo application:
– Dilute shampoo in water first, then pour over fur
– Use gentle, kneading motions rather than vigorous scrubbing
– Pay special attention to greasy areas (base of tail, chin, underside)
– Keep shampoo away from eyes, ears, and nose at all costs
– Rinse thoroughly to prevent skin irritation from residue

For cats who tolerate it, use a wet washcloth to gently wipe the face after the body is soaped. Work efficiently but carefully—prolonged bathing increases stress exponentially. Most cats require only 5-10 minutes of actual washing time when done correctly.

Rinse and Dry Your Cat Thoroughly to Prevent Skin Issues

Rinsing is where many cat baths go wrong, as extended handling time pushes already-stressed cats over the edge. Cup your free hand in front of the water stream to break its force and prevent direct contact with your cat’s face. Check for soapy residue by running your fingers through the fur, especially in armpits, groin, and skin folds where residue accumulates.

Effective drying techniques:
– Lift your cat immediately into a thick, absorbent towel
– Wrap them burrito-style, covering their head if tolerated
– Press gently to absorb water (never rub vigorously)
– Replace wet towels with dry ones as needed
– For tolerant cats, use a hair dryer on lowest setting at least 12 inches away

Keep your cat in a warm, draft-free room until completely dry—damp fur chills cats quickly. Brush gently while drying to prevent matting, especially for long-haired breeds. The drying process often calms cats significantly once they’re warm and no longer wet.

Make Future Baths Less Stressful Through Positive Reinforcement

Every bath shapes your cat’s expectations for the next one, so ending on a positive note creates progressively better experiences. Always follow baths with a special treat, favorite play session, or extended cuddle time—timing matters, as rewards should come immediately while the experience is fresh.

Long-term stress reduction strategies:
– Create consistent positive associations with bathing
– Never punish during or after baths (compounds negative associations)
– Determine if frequent baths are truly necessary (many cats rarely need them)
– Use regular brushing to reduce need for full baths
– Consider alternatives like dry shampoos or cat wipes for resistant cats

Cats don’t forget traumatic experiences easily, but they do form positive associations when baths end with relief and comfort. Over time, many cats become at least marginally more tolerant—not because they enjoy water, but because they’ve learned the experience ends and they remain safe.

Know When to Seek Professional Help for Cat Bathing

Some cats become so aggressive during baths that home bathing becomes genuinely dangerous. Recognize when you’ve reached this threshold—if your cat’s fear response includes uncontrolled aggression, escape attempts risking injury, or stress symptoms persisting hours after bathing, professional help is warranted.

Professional options include:
– Cat-specific groomers experienced with difficult felines
– Veterinary staff who can perform medicated baths
– Veterinarian-prescribed sedatives for essential baths
– Mobile grooming services that come to your home

Building a relationship with a trusted professional groomer saves you from repeated failed bath attempts that damage your bond with your cat. Sometimes the most responsible choice is acknowledging that certain tasks require professional expertise—your cat’s health and your safety are worth more than the pride of doing everything yourself.

Bathing a cat with claws is never ideal, but with proper preparation and technique, you can minimize stress and avoid injury. The key is approaching each bath as a learning experience, adapting to your cat’s individual needs, and knowing when professional help is the better option. With patience and practice, even the most water-averse cats can learn to tolerate necessary baths without turning bath time into a battle.

How to Get Rid of Fleas Without Bathing Your Pet


Your pet is scratching incessantly, and you’ve spotted those tiny, fast-moving pests in their fur. You know you need to eliminate fleas immediately, but your pet absolutely hates water, or perhaps they’re too young, sick, or elderly for a traditional bath. This common dilemma leaves many pet owners searching for solutions that don’t involve dunking their furry friend in water. The good news is you can successfully eliminate fleas without subjecting your pet to a stressful bath. Understanding how to get rid of fleas without bath is essential knowledge for pet owners who need immediate, water-free solutions that work effectively while keeping their pets calm and comfortable.

Fleas multiply rapidly—a single female can lay up to 50 eggs daily—and they’re not just a nuisance. These parasites can cause allergic dermatitis, transmit diseases, and even lead to anemia in severe infestations. When traditional flea baths aren’t an option due to your pet’s health condition, anxiety, or your own limitations, knowing alternative methods becomes critical. This guide provides proven techniques that target fleas at every life stage without requiring water immersion. You’ll discover how to break the flea life cycle using methods that are safer for sensitive pets, less stressful for both you and your companion, and equally effective when applied correctly.

Flea Comb Treatment Protocol for Immediate Relief

metal flea comb close up pet fur

Selecting and Using the Right Flea Comb

Choose a fine-toothed metal flea comb specifically designed for flea removal—these have closer teeth spacing than regular pet combs. Before starting, prepare a small bowl of soapy water (dish soap works well) to dip the comb into after each pass through your pet’s fur. Begin combing when your pet is calm, preferably after a meal when they’re relaxed. Start at the head and work backward toward the tail, applying gentle pressure to reach close to the skin where fleas hide. Pay special attention to warmer areas like behind the ears, around the neck, and at the base of the tail where fleas congregate.

After each comb stroke, immediately dip the comb into the soapy water to drown any captured fleas—don’t wait or they’ll jump off. Expect to spend 10-15 minutes per session, and repeat this process daily until no fleas appear in the comb for at least three consecutive days. For long-haired pets, you may need to section the fur to ensure thorough coverage. This method provides immediate visual confirmation of your progress and gives your pet physical relief from itching almost instantly.

Maximizing Flea Comb Effectiveness

To enhance your flea combing results, apply a small amount of coconut oil to your pet’s fur before combing—this slows down the fleas and makes them easier to capture. Work in natural light or under a bright lamp to better spot the tiny pests against your pet’s coat. When you spot flea dirt (tiny black specks that turn red when wet), focus extra attention on those areas as they indicate active flea presence. Keep sessions positive with treats and praise to prevent your pet from associating combing with stress. For particularly anxious pets, try shorter, more frequent sessions rather than one long session. Remember that consistency is key—missing even one day allows fleas to continue their reproductive cycle.

Targeted Topical Treatments That Eliminate Fleas

Applying Spot-On Flea Medications Correctly

Spot-on treatments provide one of the most effective no-bath solutions for flea control. Part your pet’s fur at the base of their neck, between the shoulder blades, to expose clean skin before application. This location prevents your pet from licking off the medication. Squeeze the entire contents of the tube directly onto the skin, not the fur, as absorption happens through the skin. Keep your pet restrained for 30-60 minutes after application to ensure proper absorption and prevent transfer to furniture or family members. Most treatments begin killing adult fleas within 12 hours and continue working for 30 days.

Avoid bathing your pet for at least 48 hours before and after application, as water can interfere with absorption. Check that the product is specifically formulated for your pet’s species and weight—cat medications can be fatal to dogs and vice versa. Monitor your pet for any adverse reactions during the first 24 hours, though quality veterinary-approved products rarely cause issues when used correctly. These treatments work by spreading through your pet’s natural oils, creating a protective layer that kills fleas on contact without requiring water exposure.

Natural Topical Alternatives for Sensitive Pets

For pets with chemical sensitivities or owners preferring natural options, diluted essential oil sprays can provide relief. Mix 10-15 drops of flea-repelling essential oils (like lavender, cedarwood, or peppermint) with 1 cup of water in a spray bottle—never apply undiluted oils directly to your pet. Lightly mist your pet’s brush or comb before grooming rather than spraying directly on their skin to minimize irritation risk. Focus application on areas where fleas gather but avoid the face, ears, and genital areas. Reapply after each combing session for continuous protection.

Alternatively, create a soothing flea-relief spray by mixing equal parts apple cider vinegar and water. The acidic nature deters fleas while soothing irritated skin. Always perform a patch test on a small area first and monitor for any adverse reactions. These natural solutions work best as part of a comprehensive approach rather than standalone treatments, particularly for severe infestations.

Environmental Control Methods to Break the Flea Life Cycle

Vacuuming Techniques That Kill Fleas at All Life Stages

vacuum cleaner crevice tool flea treatment carpet

Vacuuming is your most powerful weapon against environmental flea populations. Use the crevice tool to thoroughly clean along baseboards, under furniture, and in pet bedding areas where fleas lay eggs. Focus on warm, dark spaces—flea larvae avoid light and prefer carpet fibers and floor cracks. After each vacuuming session, immediately dispose of the vacuum bag or empty the canister into a sealed plastic bag and throw it outside. Adding a few drops of flea spray or diatomaceous earth to your vacuum bag before use can help kill fleas inside the vacuum.

For maximum effectiveness, vacuum at least every other day during active infestations. The vibration from vacuuming stimulates flea eggs to hatch, making them vulnerable to subsequent treatments. Pay special attention to areas where your pet sleeps or rests frequently, as these become hotspots for flea development. Consistent vacuuming can eliminate up to 90% of flea eggs, larvae, and pupae from your home environment when performed correctly.

Strategic Use of Diatomaceous Earth for Home Treatment

food grade diatomaceous earth application carpet

Food-grade diatomaceous earth (DE) provides a chemical-free way to eliminate fleas in your home. Sprinkle a thin, even layer on carpets, rugs, and furniture—focus on areas your pet frequents but avoid creating visible piles. Let it sit for at least 24-48 hours before vacuuming to allow maximum contact time with flea stages. Reapply after vacuuming for persistent infestations. When applying DE, wear a mask to avoid inhalation and keep pets and children away until the powder settles.

DE works by dehydrating fleas on contact through microscopic fossilized algae particles that cut through their exoskeletons. It remains effective as long as it stays dry, making it ideal for hard-to-reach areas where moisture-based treatments won’t work. For pet bedding, sprinkle DE between layers rather than on top surfaces where your pet might contact it directly. This method targets fleas in their developmental stages without requiring any bathing of your pet.

Preventive Measures to Stop Future Flea Infestations

Establishing a Consistent Flea Prevention Routine

Create a monthly treatment schedule using veterinarian-approved topical or oral flea preventatives that don’t require bathing. Set phone reminders for application days to maintain consistent protection. Before bringing new pets into your home, keep them isolated and treated for at least two weeks to prevent introducing fleas. Regularly inspect your pet’s fur with a flea comb during weekly grooming sessions to catch problems early. Keep grass trimmed short in your yard and eliminate debris piles where wildlife might harbor fleas.

For households with multiple pets, treat all animals simultaneously—even those showing no symptoms—as asymptomatic carriers can maintain infestations. Rotate between different types of flea treatments every few months to prevent resistance development. Keep a log of treatment dates and any flea sightings to identify patterns and adjust your strategy as needed. Consistent prevention is always easier and less stressful than dealing with a full-blown infestation.

Creating Flea-Repellent Environments Indoors and Out

Strategically place cedar chips in your pet’s resting areas and around your home’s perimeter—fleas dislike the scent. Wash all pet bedding weekly in hot water (at least 130°F) to kill flea eggs and larvae. Use natural flea-repelling plants like lavender, rosemary, and mint around your home’s exterior to create barriers. For outdoor spaces, maintain dry conditions as fleas thrive in humidity—fix leaky outdoor faucets and improve drainage in damp areas.

Inside your home, reduce humidity with dehumidifiers since fleas require at least 50% humidity to survive. Regularly steam clean carpets and upholstery to eliminate flea stages without chemicals. Consider using flea-repelling collars as supplementary protection, but never as your sole defense method. These environmental strategies create inhospitable conditions for fleas while providing ongoing protection without requiring you to bathe your pet.

By implementing these targeted approaches, you can effectively eliminate fleas without subjecting your pet to stressful bathing sessions. The key is using a multi-pronged strategy that addresses fleas on your pet, in your home, and in your yard simultaneously. Remember that complete flea control typically takes 2-3 months to break the entire life cycle, so maintain your regimen consistently even after you stop seeing fleas. If your infestation persists despite diligent efforts, consult your veterinarian for prescription-strength options that don’t require bathing. With patience and the right techniques, you can restore your pet’s comfort and your home’s flea-free status without ever turning on the shower.

« Older posts Newer posts »