Smart Bathroom Solutions: Reviews, Tips & Expert Maintenance Guides

Category: Tips (Page 10 of 17)

How to Clean Jacuzzi Bath: Quick Steps


Your jetted bathtub delivers luxurious, spa-like relaxation right in your bathroom, but without proper care, that investment can quickly become a breeding ground for bacteria and mineral buildup. Unlike standard tubs, jacuzzi bath cleaning requires specialized attention to the internal plumbing and jet mechanisms that create your soothing hydrotherapy experience. Over time, soap residue, body oils, and mineral deposits accumulate inside the closed-loop system, causing clogged jets, reduced water pressure, and potentially unsanitary conditions. This guide reveals exactly how to maintain your jetted tub so it continues delivering clean, powerful jets for years to come—without expensive professional servicing or premature replacement.

Why Your Jetted Tub Needs Specialized Cleaning

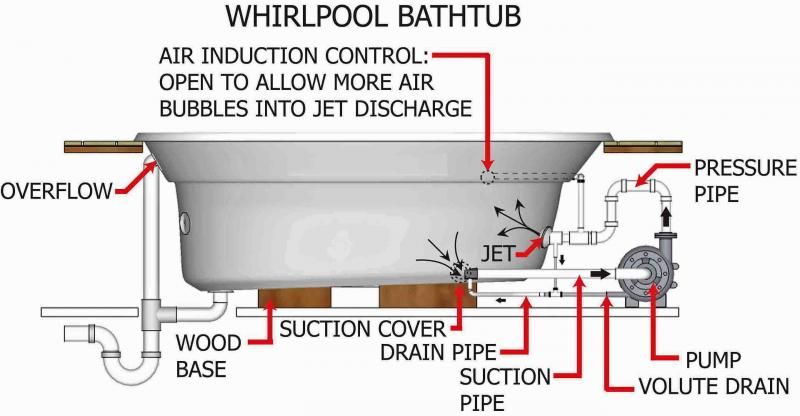
Jetted bathtubs create unique maintenance challenges because their internal plumbing systems circulate water through hidden pipes and jet mechanisms. When you activate your jets, water flows through a closed-loop system that includes pumps, pipes, and nozzles—all of which collect residue with every use. The combination of warm water, body oils, soap scum, and dead skin cells creates the perfect environment for biofilm formation inside your plumbing.

Ignoring regular jacuzzi bath cleaning leads to serious consequences: mineral deposits from hard water gradually calcify on jet nozzles, reducing spray pressure until jets stop working entirely. The biofilm that develops inside pipes becomes a breeding ground for bacteria including Aeromonas and Pseudomonas, organisms that can cause skin infections or respiratory issues. One homeowner discovered this the hard way after skipping maintenance for six months—her once-powerful jets produced only weak streams, and a foul odor emerged when she finally ran the system.

How Often Should You Clean Your Jetted Tub?

Jacuzzi’s manufacturer recommends monthly cleaning for standard maintenance, but your usage pattern determines the ideal schedule. Households using their tubs frequently (3+ times weekly) should clean every 2-3 weeks, while occasional users might extend to 6-8 weeks between sessions. The most practical approach many experienced owners use is cleaning “about every four to six uses” regardless of calendar time.

Watch for these warning signs that indicate immediate cleaning is needed:
– Reduced water pressure from jets
– Visible discoloration in water during jet operation
– Unpleasant odors when jets are activated
– Visible buildup around jet nozzles
– Gurgling or unusual sounds from the pump

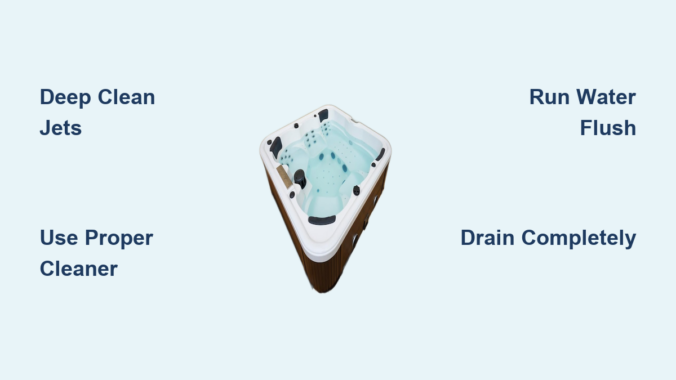
Jacuzzi Systems Cleaner: The Manufacturer-Recommended Solution

Jacuzzi T627000 Systems Cleaner kit packaging

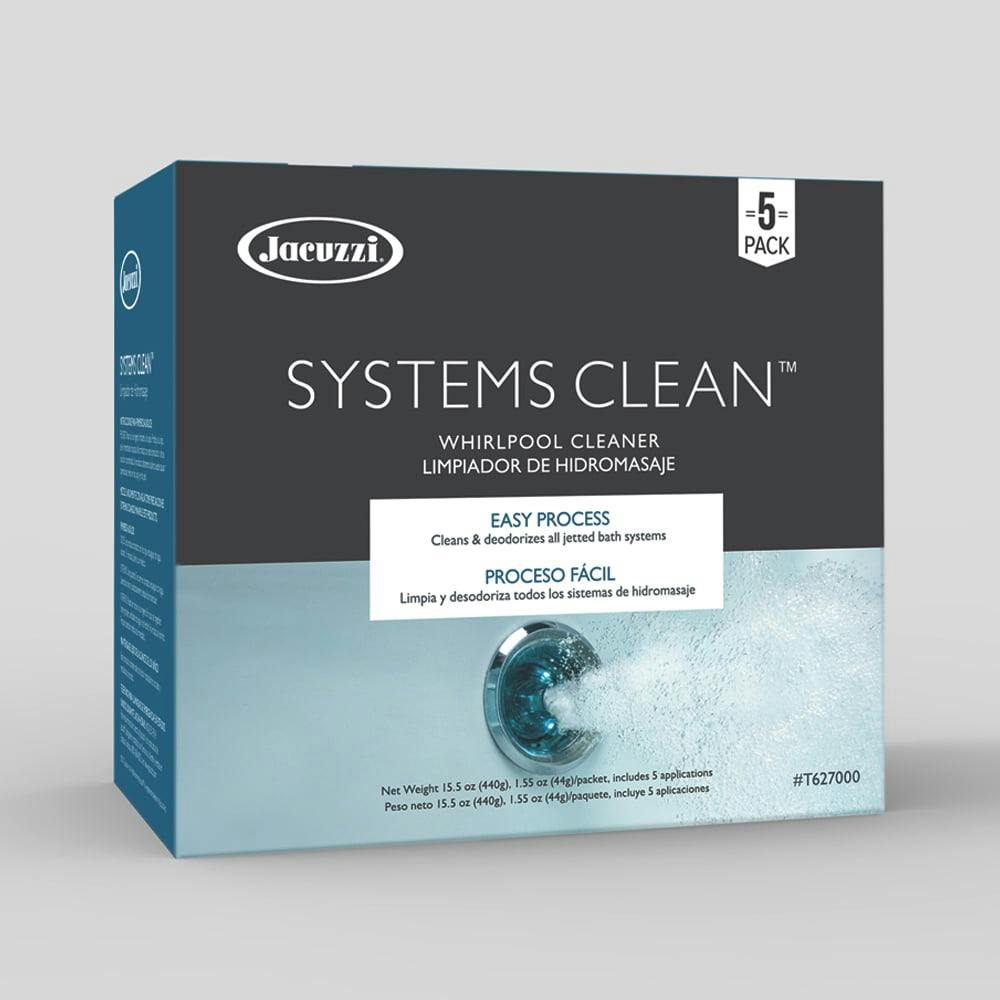
When it comes to jacuzzi bath cleaning, the official Jacuzzi Systems Cleaner represents the gold standard developed by the pioneers of whirlpool technology. This two-step system specifically targets the unique buildup inside jetted tubs without damaging sensitive components.

What Makes This Cleaner Different?

The Jacuzzi Systems Cleaner (Part Number: T627000) comes as 10 complete cleaning sessions—five packets of Step 1 solution and five of Step 2—packaged in a compact 6.26 x 4.88 x 3.23 inch container. Priced at $28.26, this equates to approximately $2.83 per cleaning session, a small investment compared to potential repair costs from neglected maintenance.

With 251 customer reviews averaging 4.6 out of 5 stars (85% perfect five-star ratings), users consistently praise its effectiveness where alternatives failed. One long-term user reported using the product successfully for twelve years, noting it “does the best and most thorough job” compared to other brands they tried. The cleaner’s two-step process ensures both deep cleaning and thorough rinsing of all internal components.

How to Use the Jacuzzi Systems Cleaner Properly

Follow this exact sequence for maximum effectiveness during your jacuzzi bath cleaning session:

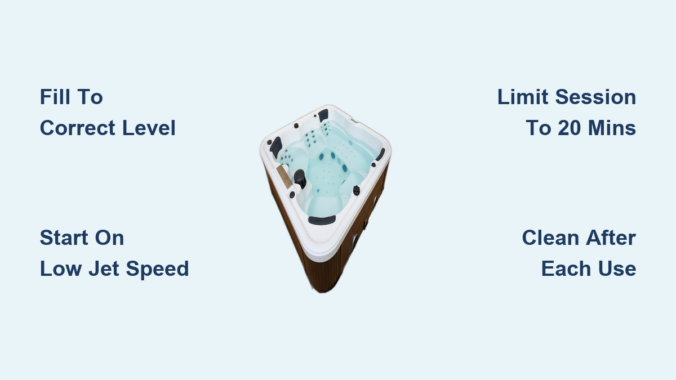
  1. Close the drain and fill your tub with warm water (not hot) to a level that completely covers all jet openings
  2. Add one Step 1 packet to the water and allow it to dissolve completely
  3. Activate all jets and run for 10-15 minutes to circulate the solution throughout the entire system
  4. Drain the tub completely—expect discolored water confirming removed buildup
  5. Refill with clean warm water to cover jets
  6. Add one Step 2 packet and run jets for another 10-15 minutes
  7. Drain completely and wipe down surfaces with a soft cloth

Pro Tip: After the final drain, run the jets for 2-3 minutes with no water to help expel any remaining residue from the lines. Some users report needing to “dunk your arm in to get the plug unplugged to drain,” but this minor inconvenience ensures complete system flushing.

Top 4 Alternative Jetted Tub Cleaners Worth Considering

SpaKleen jetted tub cleaner vs ACTIVE jetted tub cleaner vs CLYND jetted tub cleaner vs Bio Ouster jetted tub cleaner comparison

While the Jacuzzi brand cleaner delivers manufacturer-backed results, several quality alternatives offer effective jacuzzi bath cleaning at lower price points.

SpaKleen Jetted Tub Cleaner

With 1,875 reviews averaging 4.5 stars, SpaKleen provides 10 cleanings for $19.50 ($1.95 per session). This USA-made formula works with all jetted tub brands and features a fast-action formula that dissolves quickly. Many users appreciate its septic-safe composition and report results nearly matching the Jacuzzi brand at a lower cost.

ACTIVE Jetted Tub Cleaner Bathtub Tabs

These convenient pre-measured tablets (4.5 stars from 361 reviews) cost $17.96 for 12 tablets—approximately $1.50 per cleaning. The professional-grade formula removes scale and residue effectively while being septic safe. Amazon’s Choice designation and tablet format make this a popular option for those who prefer no measuring.

CLYND Jetted Tub Cleaner

Earning the highest rating among alternatives (4.7 stars from 53 reviews), CLYND offers 24 tablets for $18.99 ($0.79 per tablet). This heavy-duty formula contains no harsh chemicals while remaining septic safe. Its Compact by Design certification indicates sustainable packaging, appealing to eco-conscious users.

Bio Ouster Jetted Tub Cleaner Kit

Priced at $21.99 with 4.4 stars from 898 reviews, this kit includes a microfiber towel with the cleaning solution. The professional-grade formula effectively removes bacterial buildup and works with all jetted systems. Made in the USA, it provides a mid-range option for those seeking thorough cleaning without the premium Jacuzzi price.

Prevent Buildup Between Deep Cleaning Sessions

Monthly deep cleaning prevents major problems, but daily habits extend time between thorough sessions and keep your jets performing optimally.

Post-Use Maintenance Routine

After every bath, follow these simple steps to reduce buildup:
– Wipe down visible surfaces with a soft cloth to remove soap film and oils
– Run clean water through the jets for 2-3 minutes to flush loose residue
– Leave the drain open until the tub is completely dry
– Never use regular household cleaners—they leave residue that promotes bacterial growth

Hard Water Solutions

If you live in a hard water area, consider these additional measures:
– Install a water softener for your entire home
– Use distilled water for your cleaning sessions
– Increase cleaning frequency to every 2-3 weeks
– Add a vinegar rinse cycle monthly to dissolve mineral deposits

Troubleshooting Common Jetted Tub Problems

Even with regular jacuzzi bath cleaning, issues may arise. Here’s how to diagnose and fix them:

Weak Jet Pressure

Cause: Mineral deposits or biofilm restricting water flow
Fix: Run a deep cleaning cycle, then inspect individual jets for visible blockage. Use a soft toothbrush to gently clean nozzle openings if needed.

Unpleasant Odors

Cause: Bacterial growth in stagnant water
Fix: Perform immediate deep cleaning, then ensure complete draining after each use. Leave drain open between uses to allow air circulation.

Gurgling Noises

Cause: Air trapped in lines or partial blockages
Fix: Run jets with clean water for 15 minutes to clear air pockets. If persistent, perform deep cleaning and check for clogs.

Final Maintenance Checklist for Long-Lasting Performance

Protect your investment with these essential jacuzzi bath cleaning practices:

  • Schedule monthly cleanings using either the Jacuzzi Systems Cleaner or a quality alternative
  • Never skip the rinse cycle—incomplete rinsing leaves residue that attracts more buildup
  • Run jets at full power during cleaning to ensure solution reaches all internal passages
  • Keep a cleaning log to track sessions and identify usage patterns
  • Drain completely after every use to prevent stagnant water conditions
  • Wipe down surfaces regularly to prevent soap scum accumulation

The modest investment of $0.80-$2.83 per cleaning session preserves your jetted tub’s performance and prevents costly repairs down the line. By following this maintenance routine, you’ll enjoy powerful, clean jets that deliver the luxurious hydrotherapy experience you deserve—without worrying about hidden contamination in your relaxation sanctuary. Your jacuzzi bath cleaning routine shouldn’t feel like a chore; with the right products and schedule, it becomes a simple habit that protects your investment and ensures years of worry-free soaking.
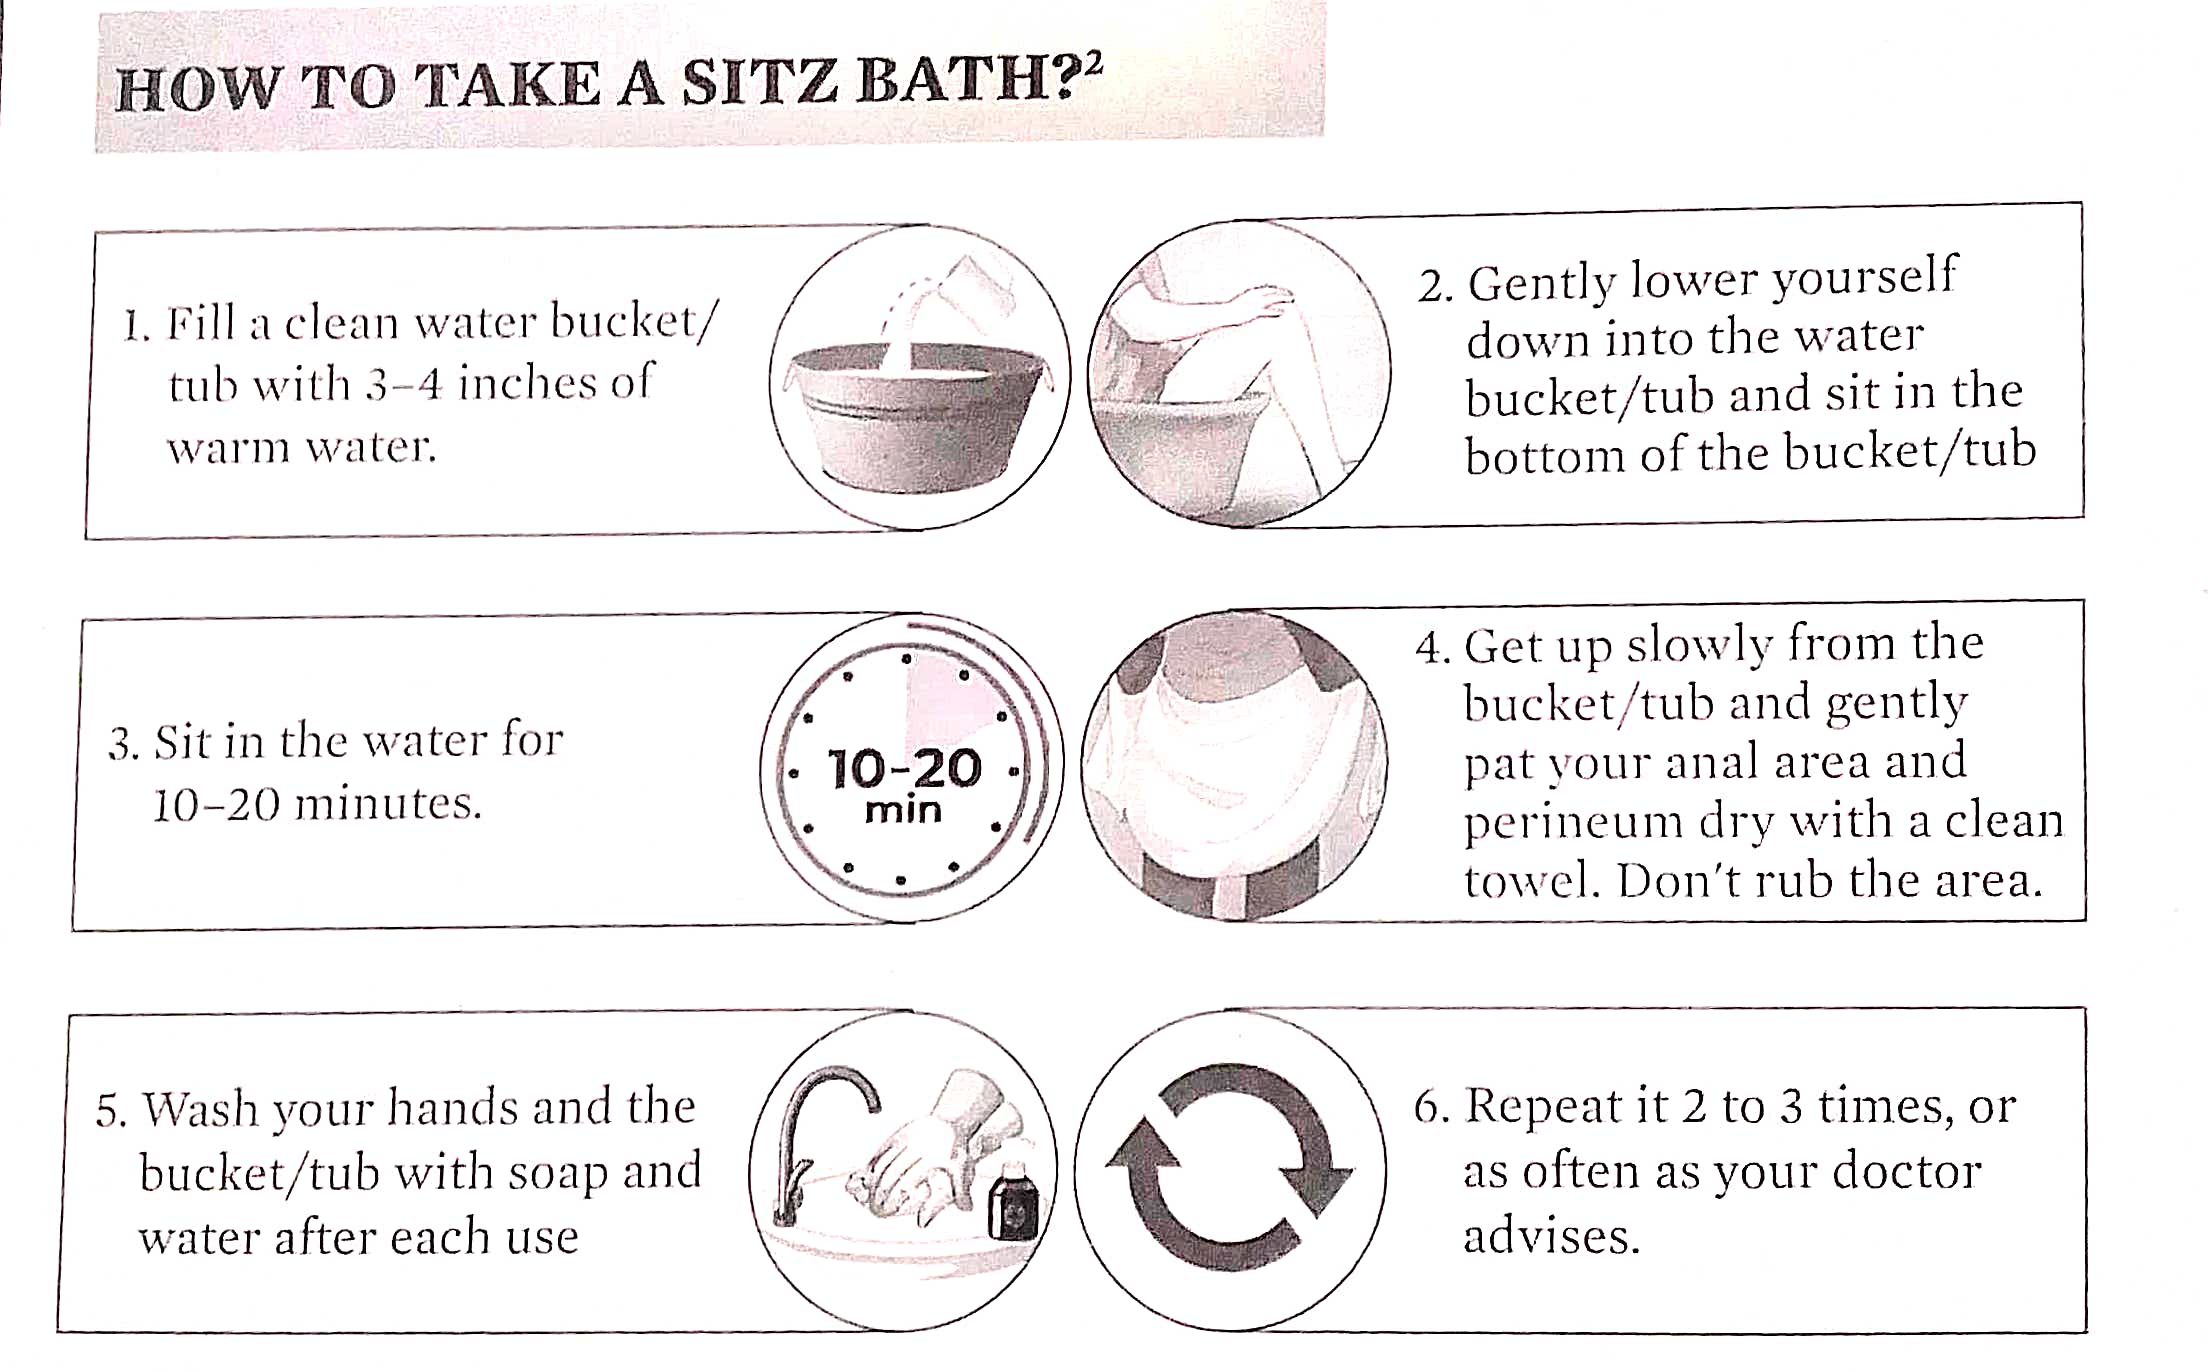
How to Use Jacuzzi Whirlpool Bath: Easy Steps


There’s nothing quite like sinking into your Jacuzzi whirlpool bath after a long day—the warm water enveloping your body as powerful jets target tired muscles. Yet many new owners hesitate to use their investment properly, worried they’ll damage the sophisticated system or miss out on key features. Knowing exactly how to use jacuzzi whirlpool bath equipment transforms uncertainty into confidence, ensuring you maximize therapeutic benefits while protecting your investment. This guide delivers precise, model-specific instructions for operating any Jacuzzi system, from basic Swirlpool models to advanced J-Shiatsu configurations.

Jacuzzi offers multiple bath system categories, each with unique operation methods. The Swirlpool line provides classic hydrotherapy with reliable jet performance, while the J-Quiet series incorporates noise-reducing pump technology. The J-Shiatsu systems simulate traditional massage techniques with adjustable intensity settings, and Lounge models feature ergonomic reclined seating for full-body immersion. Regardless of your model, these comprehensive instructions will help you master how to use jacuzzi whirlpool bath features correctly for optimal relaxation and longevity.

Prepare Your Bath for Proper Operation

Before filling your Jacuzzi, take 2 minutes to prepare for a safe, effective session. Remove all bath mats, loofahs, or other items stored in the tub, then inspect the surface for debris that could clog the system. Check that your drain stopper lifts and lowers smoothly—this prevents water from becoming trapped after your session. If your model has removable intake screens or filters (common in Aura and Aquasoul series), verify they’re clean and properly seated; clogged screens reduce jet performance by up to 70%.

Critical safety check: Examine your control interface to ensure all buttons respond properly. Pneumatic systems require firm presses, while electronic panels need light touches. If your bath has been idle for days, especially in cooler weather, don’t panic if jets make unusual sounds during initial activation—this typically resolves within 60 seconds as the pump primes. Gathering towels and bath products before filling lets you focus entirely on relaxation once the water reaches your ideal temperature.

Fill to the Correct Water Level and Temperature

Filling your Jacuzzi properly establishes the foundation for an effective hydrotherapy session. Most models perform best when filled to a level that fully covers the highest jet openings while leaving 2-3 inches of clearance at the top rim. Overfilling stresses seals and creates messy overflow, while underfilling causes the pump to draw air instead of water—potentially damaging the system over time. Consult your specific model manual, as water level requirements vary between collections like the Sharp series (compact models) versus the larger Aquasoul Double.

Water temperature requires careful attention for safe, comfortable use. Jacuzzi recommends 98-104°F (37-40°C) for most users, but your ideal temperature depends on personal preference and session duration. Water above 104°F carries risks of dizziness and cardiovascular stress, particularly during longer sessions. Test temperature with your elbow or wrist before entering—these areas sense heat more accurately than hands. If your model includes built-in heating (like many Skylounge® series), you can maintain temperature throughout extended use; otherwise, start slightly cooler than your target since water cools during use.

Activate the Jet System Without Damaging Components

Starting your Jacuzzi’s jet system correctly protects the pump motor and ensures years of reliable operation. Always begin by activating the pump on its lowest setting, allowing water to flow through the system before increasing intensity. Most models offer multiple speed settings controlled through pneumatic buttons, electronic panels, or rotary dials depending on your configuration. Starting low gives the pump time to prime fully and lets you assess jet action before committing to full intensity.

Once the pump runs smoothly, gradually increase jet intensity to your preferred level. Rotate individual jet faces or use adjustable nozzles to direct massaging streams where you need them most. If you own a J-Shiatsu system, explore the pre-programmed massage cycles that simulate professional techniques. Many users find starting with moderate intensity and gradually increasing provides the most satisfying experience as muscles relax and become more receptive to deeper pressure over time. Never jump straight to maximum intensity—this strains both your muscles and the pump system.

Target Specific Muscle Groups with Jet Adjustments

Jacuzzi whirlpool bath jet placement diagram

Mastering jet adjustment transforms your Jacuzzi from a simple warm bath into targeted therapy. Back jets positioned along tub walls deliver the most intense massage, ideal for relieving shoulder, lower back, and hip tension after physical activity. Foot and calf jets provide gentler stimulation that promotes circulation without overwhelming sensitive muscles, perfect for evening relaxation. Experiment with intensity settings to find your comfort zone—more intense doesn’t always mean better, as extended high-intensity exposure can cause muscle soreness rather than relief.

Many Jacuzzi models allow independent control of different jet banks, letting you activate only the jets you need while conserving energy and reducing noise. The J-Quiet series excels here with vibration-minimizing technology. If your model includes air injection systems alongside water jets (common in Design Series models), these create a gentler, effervescent sensation that provides light stimulation without deep pressure. For optimal results, spend 5 minutes on each major muscle group during your session.

Limit Session Duration for Maximum Therapeutic Benefit

Proper session timing ensures therapeutic benefits without health complications from extended hot water exposure. Standard hydrotherapy sessions of 15-30 minutes provide meaningful muscle relief while keeping core body temperature safe. Higher water temperatures require shorter sessions, as your body absorbs heat more rapidly. Similarly, higher jet intensities increase blood circulation and metabolic activity, generating additional body heat during your session.

Listen to your body’s signals throughout your bath. Dizziness, lightheadedness, or nausea indicate you’ve stayed too long or the temperature exceeds your tolerance. Pregnant individuals, those with cardiovascular conditions, and diabetics should consult healthcare providers about appropriate session limits before using their whirlpool bath. Never consume alcohol before or during hydrotherapy sessions—this significantly increases heat-related risks. For optimal results, most users find 20-minute sessions at moderate temperatures provide substantial relief without requiring constant monitoring of warning signs.

Implement Essential Safety Protocols During Use

Jacuzzi GFCI safety check

Jacuzzi whirlpool baths incorporate multiple safety features, but understanding these and additional precautions ensures your experience remains safe. GFCI (Ground Fault Circuit Interrupter) protection prevents shock hazards by cutting power if electrical leakage occurs—test this monthly to verify functionality. Never bypass GFCI protection, and contact a qualified electrician immediately if your system trips during normal operation.

Water temperature requires ongoing attention throughout each session. Test again before adding hot water, and consider lowering jet intensity when adding hot water to avoid dangerous splashing. Enter and exit your Jacuzzi carefully—wet surfaces create serious slip hazards. Many models include textured surfaces in critical areas, but adding an external bath mat provides additional protection. Children should never use whirlpool baths without direct adult supervision, and elderly users may benefit from handrails when entering and exiting.

Drain and Clean Immediately After Each Session

Proper post-use maintenance protects your investment and ensures hygiene for every session. Begin by running the jets with clear water for 2-3 minutes after each use, which flushes residual bath products, oils, and debris from internal plumbing. Some models include automatic purge cycles that activate when draining—these draw air through the system to clear remaining water from pipes and prevent stagnation. If your model lacks this feature, manually run pumps briefly after draining to remove standing water.

After purging, drain completely and wipe all surfaces dry with a soft cloth to prevent water spots. Use non-abrasive cleaners designed for acrylic or your bath’s specific surface material—avoid harsh chemicals that damage seals and finishes. Pay special attention to jet faces and control interfaces where residue accumulates most readily. For models with removable jet faces (like many Aura series), periodic manual cleaning provides more thorough maintenance than surface cleaning alone.

Follow Model-Specific Maintenance Schedules

Beyond daily cleaning, regular maintenance keeps your Jacuzzi operating at peak performance. Weekly maintenance includes surface cleaning with appropriate products, inspection of visible jets, and running filtration systems if equipped. Monthly deep cleaning targets internal plumbing using manufacturer-recommended solutions that dissolve buildup without damaging components. Never use standard household cleaners in jet cleaning—they deteriorate rubber seals and leave harmful residues.

Quarterly maintenance addresses components that wear over time. Inspect all seals and gaskets for cracking or drying, replacing damaged components before they fail. Check that all control functions respond properly and that pump operation sounds smooth. Annual professional inspection provides comprehensive evaluation of internal plumbing, electrical safety, and overall system condition. Many Jacuzzi owners schedule annual service in early autumn to prepare for heavy winter use when relaxation needs peak.

Troubleshoot Common Operational Issues

Understanding common problems saves time and frustration when issues arise. Reduced jet performance typically indicates clogged intake screens, insufficient water level, or air in the pump system. Check that water covers all jet openings and that intake screens are clean. If jets sputter, the pump likely contains air—activate on low speed for several minutes to purge air before increasing intensity.

Unusual pump sounds require investigation. Grinding noises often indicate debris in the impeller chamber—remove the intake screen and check for obstructions. Whining sounds may signal bearing wear, suggesting professional service is needed. Temperature issues often relate to settings or heater malfunctions—verify settings are correct and that the heater indicator shows active heating. Control interface problems typically stem from electrical issues or moisture—check power supply and ensure controls are clean and dry. Persistent problems require professional diagnosis.

How to Make a Sitz Bath in Tub: Easy Steps


Struggling with hemorrhoids, postpartum discomfort, or anal fissures? Learning how to make a sitz bath in tub could be your ticket to relief. This targeted therapy involves soaking only your hips and buttocks in warm water to boost blood flow and accelerate healing in sensitive pelvic tissues. Unlike a full bath, a sitz bath focuses precisely where you need it most—on the perineal area where nerves and blood vessels converge near the surface. Most people experience noticeable improvement within days when following proper sitz bath techniques. In this guide, you’ll discover exactly how to prepare, perform, and maximize your sitz bath sessions for optimal results—using just your standard bathtub and common household items.

Transform Your Bathtub into a Healing Station Today

Creating an effective sitz bath requires transforming your ordinary bathtub into a therapeutic healing environment. Start by thoroughly cleaning your tub with a mild, non-abrasive cleaner to remove any soap residue or bacteria that could irritate sensitive tissues. Pay special attention to the drain area and corners where grime accumulates. After cleaning, rinse multiple times to eliminate all traces of cleaning products—your goal is a completely neutral environment for your delicate pelvic area.

Fill your tub with just enough warm water to submerge your hips and buttocks—typically 4-6 inches (10-15 cm) deep, or about one-quarter to one-third of your tub’s capacity. This shallow depth conserves water while ensuring proper coverage. For most adults, this amount creates the perfect therapeutic zone without unnecessary water waste. If you have mobility concerns, consider placing a non-slip mat in the tub before filling to prevent accidents when entering.

Perfect Your Water Temperature in 60 Seconds

The right water temperature makes or breaks your sitz bath experience. Your ideal range sits between 100-105°F (38-41°C)—warm enough to boost circulation but cool enough to prevent burns. Never test with your hand; instead, use your elbow or inner wrist, which have sensitivity closer to your treatment area. The water should feel comfortably warm, allowing you to sit for 15-20 minutes without discomfort.

If you’re unsure about temperature accuracy, invest in an inexpensive bath thermometer—it pays for itself in preventing painful mistakes. For those with diabetes or reduced temperature sensitivity, consult your doctor before starting sitz bath therapy. Remember: water above 110°F can worsen inflammation and cause tissue damage, while water that’s too cool won’t deliver therapeutic benefits.

Choose the Right Additives for Your Specific Condition

Epsom salt baking soda apple cider vinegar chamomile tea sitz bath

Enhance your sitz bath’s effectiveness by selecting additives tailored to your condition:

  • For hemorrhoids: Add 2 cups Epsom salt to reduce swelling and improve circulation
  • For itching or yeast infections: Mix in 4-5 tablespoons baking soda to restore pH balance
  • For vaginal irritation: Use 1 cup raw apple cider vinegar for its natural antibacterial properties
  • For general soothing: Steep 2-3 chamomile tea bags in hot water, then add to your bath

Always dissolve additives completely before entering the tub. If using essential oils like tea tree or lavender, dilute 5-10 drops in a carrier oil first to prevent skin irritation. Avoid harsh soaps, bubble baths, or heavily scented products—they’ll do more harm than good for sensitive tissues.

Execute Your Sitz Bath with Precision

Position Yourself Correctly for Maximum Benefit

How you sit in your tub dramatically affects your sitz bath’s effectiveness. Carefully lower yourself into the water backward, supporting your weight with both hands on the tub edges to prevent slipping. Once seated, ensure your hips and buttocks are fully submerged with water reaching your lower abdomen. Adjust your position until you feel complete coverage of the affected area without water rising too high on your torso.

Lean back against the tub wall for support if needed, but maintain enough upright posture to keep water at the proper level. During your soak, gently splash water over problem areas to ensure complete coverage. Some people find rocking side-to-side helps water reach all tissues effectively. If you feel lightheaded at any point, exit immediately and consult your doctor before your next session.

Time Your Session for Optimal Healing

Set a timer for exactly 15-20 minutes—this duration provides maximum therapeutic benefit without risking skin irritation from prolonged moisture exposure. Shorter sessions rarely deliver full relief, while longer soaks can cause tissue breakdown. Many people find it helpful to schedule sitz baths after bowel movements when pain and discomfort peak.

As you soak, focus on deep breathing to enhance relaxation and blood flow. This mindful approach amplifies your body’s natural healing response. When the timer sounds, exit slowly and deliberately—warm water can cause dizziness, especially if you have low blood pressure. Never rush this critical transition phase.

Dry and Care for Treated Areas Properly

Pat dry perineal area after sitz bath

Avoid Post-Bath Mistakes That Undermine Your Results

Your healing journey continues after you leave the tub. Gently pat the treated area dry with a clean, soft towel—never rub, as friction can damage delicate healing tissues. For hard-to-reach areas or skin folds, use a hair dryer on cool setting held at least 12 inches away. Complete dryness prevents moisture-related irritation and infection.

If your doctor recommended a protective ointment, apply a thin layer now using clean fingertips. Products containing zinc oxide or petroleum jelly create a healing barrier without trapping moisture. Immediately afterward, slip into loose, breathable cotton underwear and pants—tight clothing traps heat and moisture, counteracting your bath’s benefits. Some people find going commando for an hour post-bath speeds healing when privacy allows.

Follow This Daily Sitz Bath Schedule

Adjust Frequency Based on Your Healing Progress

Most people benefit from 2-3 sitz baths daily during acute flare-ups or initial recovery phases. Postpartum women often start with this frequency within 24-48 hours after delivery. As symptoms improve, gradually reduce to once daily, then every other day. Chronic condition sufferers typically maintain 1-3 weekly baths for ongoing prevention.

Track your symptoms in a simple notebook to identify patterns. Note what additives work best, optimal timing relative to bowel movements, and any triggers to avoid. This personalized data helps you refine your routine faster than generic advice ever could. Remember: consistency matters more than perfection—better to do shorter, regular baths than occasional marathon sessions.

Dodge These 5 Costly Sitz Bath Errors

Sitz bath mistakes infographic

Water Temperature Mismanagement

Using water that’s too hot represents the most dangerous sitz bath mistake. That “pleasantly hot” sensation often exceeds safe limits, potentially causing burns on sensitive tissues. Always test with your elbow, not your hand, and when in doubt, choose cooler water—you can always add warmth but can’t undo damage.

Ignoring Equipment Hygiene

Failing to clean your tub or portable basin after each use breeds bacteria that can infect healing tissues. Wash thoroughly with mild soap and hot water, then dry completely before storage. For standard bathtubs, give them an extra rinse cycle before your next session to remove any residual soap.

Overlooking Warning Signs

If your symptoms worsen after starting sitz baths, or if you develop fever, unusual discharge, or increased pain, stop immediately and consult your doctor. Sitz baths support healing but don’t replace medical treatment for serious conditions.

Using Harsh Additives

Bubble baths, heavily scented soaps, and undiluted essential oils can irritate sensitive areas. Stick to plain water or doctor-recommended additives in proper concentrations. When trying new ingredients, test on a small skin patch first.

Rushing the Process

Skipping proper preparation or cutting sessions short sabotages results. Allow 30 minutes total for setup, soaking, and post-bath care—this investment pays off in faster healing and reduced discomfort.

Know When Professional Help Outweighs Home Treatment

While learning how to make a sitz bath in tub solves many issues, certain red flags demand medical attention. If symptoms persist beyond 1-2 weeks of consistent sitz baths, schedule a doctor’s visit—your condition may require prescription treatment. Heavy or persistent rectal bleeding, fever above 100.4°F, or sudden symptom worsening all warrant immediate consultation. Always discuss sitz bath therapy with your healthcare provider before starting, especially if you have diabetes, heart conditions, or take blood thinners.

Creating an effective sitz bath requires minimal equipment but delivers maximum relief when done correctly. By mastering water temperature control, selecting condition-specific additives, and following proper post-bath care, you’ll transform your standard bathtub into a powerful healing station. Remember: consistent 15-20 minute sessions with appropriate frequency yield better results than occasional marathon soaks. Start today with plain warm water, then gradually incorporate targeted additives as your comfort level increases. With this simple, drug-free therapy, you’re taking an important step toward reclaiming your comfort and quality of life.

Wet Room Bath Ideas for Small Spaces 2026


Nothing transforms a bathroom quite like a well-designed wet room. These seamless, open-concept bathing spaces have revolutionized bathroom design by merging shower areas with the rest of the room in a single, cohesive layout. If you’ve noticed water pooling near your shower door or feel cramped in your current bathroom, a wet room solution could be your answer. Over 65% of homeowners who convert to wet rooms report significantly improved daily bathroom experiences, citing easier cleaning and a more luxurious feel. This guide delivers actionable wet room bath ideas that solve common problems while creating stunning spaces you’ll love for years.

Why Your Small Bathroom Needs a Curbless Wet Room Design

Curbless wet room designs eliminate the traditional shower threshold, creating smooth transitions that make compact bathrooms feel larger and more accessible. Unlike conventional shower enclosures that eat up valuable square footage with doors and frames, curbless designs maximize every inch of space while providing universal access for all ages and abilities.

The secret to successful curbless wet rooms lies in precise floor gradient calculations. Professional installers create a subtle 2% slope toward the drain—just enough to direct water flow without being noticeable underfoot. This engineering detail prevents water from spreading into dry areas while maintaining the seamless aesthetic that defines modern wet rooms.

For optimal performance in small spaces, pair your curbless design with a linear drain along one wall instead of a center drain. This strategic placement allows for more flexible shower positioning and creates clean sightlines that enhance the perception of space. Choose a drain finish that complements your fixtures—matte black for contemporary spaces or brushed brass for warmer aesthetics.

Tile Selection Secrets for Wet Room Durability and Style

porcelain tile large format wet room

Your tile choice dramatically impacts both the longevity and visual impact of your wet room. Porcelain tiles have become the gold standard for wet areas due to their near-zero water absorption rate and exceptional durability. Large-format porcelain panels measuring 24×48 inches or larger minimize grout lines, reducing maintenance while creating that coveted seamless look.

Natural stone brings undeniable luxury but requires careful consideration. Marble offers timeless elegance with its distinctive veining, but needs regular sealing to prevent staining. For higher-traffic wet rooms, consider porcelain tiles that mimic natural stone—modern manufacturing creates incredibly realistic alternatives that withstand daily use without maintenance headaches.

Don’t overlook the slip resistance factor when selecting wet room tiles. Look for tiles rated R10 or higher on the anti-slip scale, especially for floor applications. Textured finishes, mosaic patterns, and matte surfaces all provide better traction than perfectly smooth options. Test samples by wetting them and walking on them before committing to your selection.

Smart Tile Layout Techniques for Visual Impact

Strategic tile placement can transform your wet room from ordinary to extraordinary. Consider these professional techniques:

  • Directional patterns: Lay rectangular tiles vertically to create the illusion of higher ceilings
  • Accent bands: Use contrasting mosaic tiles at shoulder height to break up large wall areas
  • Floor inlays: Create subtle geometric patterns with darker tiles to define the shower zone
  • Waterfall effect: Continue wall tiles down onto the floor for seamless visual flow

Space-Maximizing Wet Room Layouts for Compact Bathrooms

small wet room layout corner shower

When square footage is limited, every element in your wet room must serve multiple purposes. Corner shower configurations make brilliant use of often-wasted space while leaving the room’s center clear for movement. Quadrant-shaped enclosures with curved glass panels soften the visual impact and prevent the room from feeling cramped.

Wall-mounted fixtures provide immediate space savings in small wet rooms. Floating toilets eliminate bulky cisterns, while wall-hung vanities create visual breathing room beneath. The space-saving benefits extend beyond aesthetics—these installations also make floor cleaning significantly easier, reducing maintenance time by up to 40%.

Partial glass partitions offer the perfect compromise between water containment and spatial openness. Instead of enclosing the entire shower area, install a single frameless panel that blocks splash zones while preserving sightlines. This solution works particularly well when positioned to protect the vanity area from direct spray.

Lighting Strategies That Elevate Wet Room Ambiance

Proper lighting transforms functional wet rooms into atmospheric retreats. Recessed LED downlights with IP65+ ratings provide essential task lighting while withstanding steam and moisture. Arrange these fixtures in a grid pattern rather than clustering them over the shower to ensure even illumination throughout the space.

Backlit mirrors serve dual purposes as both functional grooming tools and atmospheric elements. LED strips concealed behind mirror frames create shadow-free illumination perfect for makeup application, while some premium models offer color temperature adjustment from energizing cool tones to relaxing warm hues. The reflected light also makes the space feel significantly larger.

For evening relaxation, incorporate subtle ambient lighting at multiple levels. Consider these options:

  • Floor-level cove lighting that washes walls with soft glow
  • Recessed niche lighting to highlight decorative tiles
  • Towel warmer lighting that creates warm focal points
  • Color-changing LED strips under floating vanities

Color Psychology in Wet Room Design

Your color choices directly impact how you experience your wet room daily. Neutral palettes featuring whites, creams, and soft grays maximize light reflection and create serene backdrops that never feel dated. These timeless schemes work particularly well in north-facing bathrooms with limited natural light.

Dark color schemes introduce dramatic sophistication to wet rooms with ample square footage and good ventilation. Charcoal floors paired with matte black fixtures create moody, spa-like atmospheres, but require careful balancing with lighter elements to prevent the space from feeling oppressive. Reserve dark schemes for master bathrooms rather than small guest facilities.

Green-infused palettes connect wet rooms to biophilic design principles, bringing organic warmth to otherwise sleek spaces. Consider these approaches:

  • Sage green accent tiles paired with natural wood elements
  • Moss-colored mosaic bands that mimic forest floors
  • Living walls featuring humidity-loving ferns and orchids
  • Stone textures with subtle green veining for natural variation

Essential Fixtures for Luxury Wet Room Experiences

rainfall shower head thermostatic mixer wet room

Your shower system defines the wet room experience more than any other element. Thermostatic mixers ensure consistent temperature control regardless of other water usage in your home—a critical safety feature for households with children. Digital shower systems with programmable settings take personalization further, remembering individual preferences for true luxury.

Rainfall shower heads have become the signature feature of premium wet rooms. For authentic spa-like experiences, select heads with at least 10 inches diameter positioned at ceiling height. Pair your rainfall fixture with a handheld wand on a slide bar for flexible cleaning and practical use—this combination delivers both luxury and functionality.

Fixture finishes significantly impact your wet room’s personality. While chrome remains popular for its versatility, consider these trending alternatives:

  • Brushed brass for warm, inviting spaces
  • Matte black for contemporary contrast
  • Satin nickel for subtle sophistication
  • Polished gold for statement luxury

Waterproofing Fundamentals Every Homeowner Should Know

Linear drains represent one of the most important wet room innovations, replacing traditional center drains with sleek channel systems along walls. These elongated drains handle high water volumes efficiently while enabling the subtle floor gradients necessary for curbless designs. Choose stainless steel models with removable grates for easy maintenance.

The waterproofing membrane forms your wet room’s invisible foundation—compromise here leads to catastrophic failures. Modern liquid-applied membranes create seamless barriers that accommodate building movement without cracking. Professional installation is non-negotiable; waterproofing failures cause structural damage that far exceeds initial installation costs.

Annual sealant maintenance prevents expensive water damage in wet rooms. Silicone seals around fixtures, glass panels, and floor-wall junctions should be inspected for signs of mould, cracking, or separation. Replace failing seals immediately—waiting allows moisture to penetrate substrates where damage becomes invisible and extensive.

Personal Touches That Make Your Wet Room Unique

Freestanding bathtubs transform functional wet rooms into luxurious personal retreats, serving as dramatic focal points in larger designs. Position your tub away from walls for 360-degree visual appeal, and select materials that complement your overall scheme—stone resin for contemporary spaces or cast iron for traditional charm.

Strategic plant placement brings life to wet rooms without compromising functionality. Ferns, orchids, and air plants thrive in humid environments, adding organic elements that soften hard surfaces. Place plants on floating shelves away from direct shower spray, and ensure adequate ventilation to prevent excess moisture damage.

Custom cabinetry reflects your personal style while maximizing storage. Consider locally made or bespoke pieces for unique wet room bath ideas that standard fixtures can’t achieve. Quality materials and craftsmanship ensure longevity in the demanding wet room environment—invest in solid wood cores with marine-grade finishes.

Smart Maintenance Practices for Long-Lasting Wet Rooms

Effective ventilation prevents moisture damage and mold growth in wet rooms. Extractor fans rated for bathroom use should run continuously or with humidity sensors that activate automatically. Proper ventilation reduces maintenance time by preventing limescale buildup and mold formation.

Daily squeegeeing of glass surfaces prevents hard water staining and limescale accumulation. Keep a dedicated squeegee mounted near the shower exit for quick use after each session. This simple 30-second habit extends the time between deep cleaning sessions by months.

Weekly cleaning routines maintain your wet room’s appearance without damaging surfaces. Use pH-neutral cleaners specifically formulated for bathroom surfaces—avoid vinegar-based solutions that can degrade grout and stone sealants over time. Focus on high-moisture areas where mold tends to begin forming.

Professional inspections every 18-24 months catch potential issues before they become major problems. Certified wet room specialists can identify early signs of waterproofing failure, drainage issues, or fixture wear that homeowners often miss. This preventative maintenance extends your wet room’s lifespan by 5-7 years on average.


Wet room bath ideas offer remarkable versatility for homeowners seeking modern, functional bathroom spaces. From compact corner solutions to expansive luxury designs, the right wet room transforms daily routines into everyday indulgence. Prioritize quality waterproofing, thoughtful drainage, and materials that balance aesthetics with durability to create spaces that perform beautifully for years. Whether you prefer sleek minimalism or spa-like opulence, these design principles ensure your wet room delivers both style and substance in equal measure. Start planning your transformation today—your perfect bathroom experience awaits.

How to Bathe a 3 Month Old Baby: Safe Tips


Bathing your three-month-old baby can feel intimidating at first. Those tiny limbs seem fragile, and your newborn who just arrived home from the hospital now weighs more and moves more than before. Many parents feel uncertain about proper technique, water temperature, how long the bath should last, or whether they’re doing everything correctly. The good news is that bathing a three-month-old becomes straightforward once you understand the essential safety principles, preparation steps, and gentle handling techniques that pediatricians recommend.

This guide walks you through everything you need to know to give your three-month-old a safe, comfortable, and enjoyable bath experience—from gathering supplies before you start to the final gentle towel dry. Whether you’re a first-time parent or caring for a baby again after years, these practical steps will build your confidence and keep your little one safe during each bath time.

Gather Everything Before Starting

Preparation is the most important aspect of bathing a three-month-old. Babies can slip unexpectedly, and leaving your baby unattended—even for seconds—to grab a forgotten item creates serious safety hazards. Before you begin, ensure every supply sits within arm’s reach of the bathing area.

Essential supplies for a three-month-old bath include: a baby bathtub or clean sink with warm water, baby wash or gentle cleanser formulated for infant skin, a soft washcloth, baby shampoo if your little one has hair, clean diapers and clothing, a soft hooded towel, cotton balls or gauze pads for cleaning around the eyes, and a diaper cream or moisturizer if needed. Having these items ready before you start keeps your attention fully on your baby throughout the bath.

Consider setting up a designated bathing station on a changing table or flat, safe surface near the sink or bathtub. Keep the room warm—babies lose body heat quickly when wet, and a chilly environment can make bath time stressful rather than enjoyable. A room temperature between 75 and 80 degrees Fahrenheit helps your baby stay comfortable.

Set Up the Bathing Area Safely

baby bathtub setup safety newborn

The surface where you place your baby during bath time requires careful attention. If using a baby bathtub, ensure it sits securely on a stable countertop, the edge of a regular bathtub, or a specialized bath stand designed for infant tubs. Never place the tub on an elevated surface where it could fall, and never leave your baby unattended in any amount of water.

For three-month-olds, the traditional baby bathtub works well because it supports the baby’s body while allowing you to keep one hand on your little one at all times. Some parents prefer using a clean kitchen sink, which provides a convenient height and often has a faucet that allows for easy temperature adjustments. If using a sink, remove any dishes or food residue first and line the bottom with a soft towel or non-slip bath mat to prevent sliding.

Fill the tub with warm water—around 100 degrees Fahrenheit or roughly 38 degrees Celsius. Test the water temperature by dipping your elbow or inner wrist into the tub, as these areas sense temperature more accurately than your hands. The water should feel warm but not hot, similar to the temperature you’d find comfortable for a warm compress. Aim for a water depth of about two to four inches, enough to cover your baby’s legs and bottom without covering the face.

Master Proper Holding Technique

Supporting your three-month-old correctly during bath time requires understanding how to keep their head, neck, and body stable while you clean them. At this age, babies lack the muscle control to hold their heads upright, so your hands provide all the necessary support.

The cradle hold works best for most parents during infant baths. Place your baby’s head and neck along your forearm, with your hand supporting their bottom and legs. Your fingers should wrap gently around the baby’s upper arm on the far side, creating a secure cradle that keeps the head above water while your other hand does the washing. This position feels natural once you practice it a few times and allows you to control the baby’s movement while keeping their face dry.

Keep a firm but gentle grip throughout the bath. Babies are surprisingly strong and can suddenly kick or twist, potentially slipping from your hands. Maintain constant physical contact with your baby from the moment you lower them into the water until you lift them out and wrap them in a towel. If you must briefly step away—though this isn’t recommended—ask another adult to hold the baby while you attend to something, even if it means cutting the bath short.

What to Do If Your Baby Cries During Bath Time

If your three-month-old becomes upset during bath time, stay calm and assess the situation. Check if the water temperature has cooled, if your grip feels insecure to them, or if light is bothering their sensitive eyes. Gently talking or singing can soothe many babies, as can maintaining eye contact and showing a calm expression. If crying persists despite your efforts, don’t force the bath—wrap your baby in a towel and try again later. Some babies simply need time to adjust to the bathing experience.

Wash Your Baby Effectively

baby bath washing technique skin folds

With your baby securely supported, begin the bath by using a soft washcloth dampened with warm water to gently wipe their face. Pay special attention to the eye corners, using a clean corner of the cloth for each eye to prevent spreading any discharge or crust. Clean around the nose and mouth, being very gentle around the delicate nostrils and lips.

Move to the body next, using a small amount of baby wash on the washcloth or directly in the bathwater. Clean all skin folds thoroughly—behind the ears, around the neck, under the arms, between the fingers and toes, and in the genital area. Three-month-olds often have folds of skin that can collect milk residue, drool, or dead skin, so these areas need particular attention. Use gentle circular motions and avoid scrubbing, which can irritate sensitive infant skin.

For the hair, if your baby has any, use a tiny amount of baby shampoo and gently massage the scalp with your fingertips or a soft brush designed for infants. Rinse carefully using a cup of clean warm water poured slowly over the head, always using your free hand to shield the baby’s eyes and forehead from the running water. Keep the bath brief—five to ten minutes is sufficient for a three-month-old. Prolonged exposure to warm water can dry out their skin and make them uncomfortably cold.

Keep Bath Time Comfortable Throughout

Temperature regulation matters significantly for three-month-olds, who can’t yet shiver effectively to generate body heat. Monitor your baby throughout the bath for signs of discomfort or cold. If you notice trembling, bluish lips, or fussiness that wasn’t present at the start, the water may be cooling too quickly or the room temperature may be too low.

Keep adding small amounts of warm water as needed to maintain a comfortable temperature, but be careful not to make the water too hot. Never add hot water directly to a baby in the tub—always mix it in a separate container first and test it thoroughly. The safest approach is to prepare the bath at the correct temperature from the start and keep the session short enough that reheating isn’t necessary.

Watch your baby’s cues to determine their tolerance for bath time. Some three-month-olds love the warm water and relaxed feeling, while others find the experience overstimulating. If your baby becomes fussy or cries throughout the bath, keep sessions brief and try different times of day to find when your baby is most relaxed. Some babies bath best in the morning when they’re alert, while others prefer evening baths as part of a calming bedtime routine.

Complete the Bath and Dry Thoroughly

drying baby after bath towel wrap newborn

When the bath concludes, lift your baby out of the water immediately using the secure cradle hold, supporting the head and neck at all times. Place them on a soft, dry towel spread out on a flat, safe surface like a changing table or bed. Don’t wait to dry—babies lose heat quickly once removed from the warm water.

Pat your baby’s skin dry gently rather than rubbing, paying special attention to all skin folds where moisture can collect. Leaving these areas damp can lead to irritation or yeast infections in the folds. Once the skin is mostly dry, apply baby moisturizer if your baby’s skin tends to be dry, though many three-month-olds don’t need lotion after every bath.

Dress your baby promptly in clean, warm clothing. At this age, babies can’t regulate their body temperature well, so layering works better than heavy single garments. A onesie topped with a light shirt and pants, plus socks, typically provides appropriate warmth. If your baby has cradle cap or dry skin on the scalp, you can gently brush the affected areas after the bath while the skin is softened.

Avoid Common Bath Time Mistakes

New parents sometimes make innocent mistakes that create unnecessary risks during bath time. Understanding these common errors helps you avoid them and keep your baby safe.

Never leave your baby unattended in the bath, even for a moment. Babies can drown in just inches of water, and drowning happens silently without the dramatic splashing many people expect. If you must answer the phone or door, take your baby with you wrapped in a towel—never rely on a sibling or other child to supervise.

Avoid using adult soaps, shampoos, or bubble baths on your three-month-old. These products contain fragrances, dyes, and chemicals that can irritate infant skin and cause rashes or dryness. Stick to products specifically formulated for babies, and even then, test new products on a small patch of skin before using them all over.

Don’t fill the tub too deeply. Water above your baby’s chest increases the risk of accidental drowning and makes temperature regulation more difficult. Two to four inches provides enough water for effective cleaning while keeping your baby’s face safely above water level.

Finally, resist the temptation to use bath seats or rings designed to hold babies upright. These products give parents a false sense of security and have been linked to drownings when babies slip or the devices tip over. Your hands remain the safest support for your three-month-old throughout every bath.

Make Bath Time Enjoyable for Baby

Beyond safety, bath time offers valuable bonding opportunities and can become something your three-month-old genuinely enjoys. Talk to your baby calmly throughout the bath, describing what you’re doing and using a gentle, reassuring tone. Your voice provides comfort and helps your baby associate bath time with positive experiences.

Introduce bath toys gradually—though three-month-olds aren’t yet ready for elaborate play, they often enjoy watching a soft rubber duck float or feeling the water splash from a cup. Some babies love having their feet kicked in the water, which you can gently demonstrate while maintaining control of their body. These positive associations make future baths easier and turn routine hygiene into an anticipated activity.

Pay attention to what specifically your baby enjoys and adapt your approach accordingly. Some babies prefer being more submerged with warm water covering their chest, while others feel more secure with less water coverage. Some love having their hair washed, while others find it startling at first. By tuning into your baby’s preferences and responses, you can customize bath time to create the most pleasant experience for your little one.

How to Make a Milk Bath at Home


Your bathroom fills with the comforting scent of warm milk as you sink into the tub—imagine silky-smooth skin without harsh chemicals. Milk baths have been cherished since Cleopatra’s era for their gentle exfoliation and moisture-locking properties. Whether you’re soothing sunburn, calming eczema flare-ups, or just craving deep hydration, making a milk bath takes under 10 minutes with pantry staples. Forget expensive spa treatments; this guide reveals exactly how to make milk bath blends that transform dry, irritated skin into a supple, glowing canvas using ingredients already in your kitchen. You’ll learn precise ratios to prevent clogging drains, pro tips for maximizing benefits, and critical safety steps most DIY tutorials skip.

Essential Ingredients for Maximum Skin Benefits

Skip store-bought kits with questionable additives. Real milk bath magic happens with three core components working together: lactic acid for exfoliation, fats for moisture barrier repair, and proteins for skin strengthening.

Choosing Your Milk Base: Cow, Goat, or Powder?

Cow milk (whole or buttermilk) delivers instant lactic acid for gentle exfoliation but spoils fastest. Goat milk contains smaller fat molecules that penetrate deeper—ideal for eczema or psoriasis. For longest shelf life, dry milk powder (1 cup per bath) avoids refrigeration needs while providing identical benefits. Never use skim milk; fat content is essential for skin barrier support.

Must-Have Additives for Targeted Results

  • Oatmeal (colloidal): Grind ½ cup rolled oats into fine powder to calm itching from rashes or insect bites
  • Raw honey: 2 tablespoons boosts moisture retention and adds antibacterial properties
  • Carrier oils: 10 drops almond or jojoba oil prevents post-soak tightness (skip if acne-prone)
  • Dried rose petals: Purely aesthetic—adds luxury but zero skin benefits

⚠️ Critical Warning: Avoid essential oils like citrus or cinnamon—they become phototoxic when diluted in bathwater and cause chemical burns. Stick to skin-safe additives only.

Preparing Your Tub: 3 Non-Negotiable Safety Steps

bathroom slip prevention mat placement

Most milk bath guides ignore how slippery ingredients make surfaces. Skip these steps, and you risk serious falls or clogged pipes.

Drain Protection First—Before Adding Water

Place a fine-mesh strainer over your tub’s drain opening. Milk solids and oatmeal will inevitably wash down, causing expensive plumbing backups within days. Test this before running water—strainers shift when submerged.

Water Temperature Rules for Skin Safety

Fill your tub with warm (not hot) water at 98-102°F (37-39°C). Hot water:
– Denatures milk proteins, reducing effectiveness
– Opens pores excessively, worsening irritation
– Causes rapid cooling that shocks sensitive skin
Use a bath thermometer—guessing leads to scalding or ineffective baths.

Surface Prep to Prevent Slips

Wipe tub edges with vinegar-water solution (1:3 ratio) to remove soap scum. Milk creates invisible slick films on previously soapy surfaces. Place a non-slip mat under where you’ll sit—never over milky water where it floats away.

Step-by-Step Milk Bath Recipe (5 Minutes Total)

Follow this exact sequence to avoid clumping or uneven distribution. Timing matters—add ingredients while water flows for perfect dispersion.

Mixing Your Base Solution

  1. Start warm water flow at medium pressure
  2. Whisk 1 cup dry milk powder into 2 cups cool water in a bowl until smooth (prevents lumps)
  3. Slowly pour mixture under running water while swirling tub with hand
  4. Add ½ cup ground oatmeal and 2 tbsp honey, continuing to swirl for 30 seconds

💡 Pro Tip: For goat milk baths, use 1 cup reconstituted goat milk (powder + water) + ½ cup dry cow milk powder. The dual-protein blend prevents rapid spoilage while boosting efficacy.

Final Additions for Skin-Specific Needs

  • For dry/sunburned skin: Stir in 1 tbsp coconut oil after turning off water (oil floats if added too early)
  • For sensitive/rosacea skin: Omit oils—add ¼ cup cooled chamomile tea instead
  • For dull skin: Mix in 1 tsp ground almonds for light physical exfoliation

Soaking Protocol: Timing and Technique

How long you soak determines results—too short yields no benefits, too long strips natural oils.

Optimal Duration by Skin Type

Skin Condition Max Soak Time Critical Signs to Exit
Eczema/Psoriasis 15 minutes Skin feels tight or starts itching
Sunburn 10 minutes Water cools below 95°F (35°C)
Normal/Dry Skin 20 minutes Fingertips prune deeply

Never exceed 20 minutes. Lactic acid continues working after you exit the tub—prolonged exposure causes over-exfoliation.

Post-Soak Routine for Lasting Results

  1. Rinse quickly with lukewarm shower spray (cold water closes pores too fast)
  2. Pat dry—never rub—with 100% cotton towel
  3. Apply moisturizer within 3 minutes while skin is damp
  4. Clean tub immediately with vinegar spray to prevent milky film buildup

Troubleshooting Common Milk Bath Failures

clogged bathroom drain oatmeal milk bath

Even with perfect recipes, issues arise. Fix these fast before they ruin your results.

Why Your Skin Feels Sticky After Soaking

This means honey wasn’t fully dissolved. Solution: Always mix honey with 1 tbsp warm water first until liquid, then add to bath. If already sticky, rinse with diluted apple cider vinegar (1 part vinegar to 4 water).

Milky Residue Clogging Your Drain

Oatmeal or undissolved powder is the culprit. Solution: Run hot water for 2 minutes before removing drain strainer. If clogged, pour ½ cup baking soda followed by 1 cup boiling vinegar—wait 15 minutes before flushing.

No Noticeable Skin Improvement?

You’re likely using skim milk or expired powder. Solution: Whole-fat dairy is non-negotiable—fat carries nutrients into skin. Test powder freshness: mix 1 tsp with water; clumps mean it’s rancid.

Cost Comparison: DIY vs. Store-Bought

Lush bath milky vs diy milk bath cost comparison chart

Save 73% with homemade versions while avoiding synthetic preservatives.

Product Cost Per Bath Key Downsides
DIY Milk Bath $1.20 Requires 5-minute prep
Lush “Bath Milky” $4.50 Contains synthetic fragrances
Dr. Teal’s Milk Bath $3.80 Uses sodium lauryl sulfate

Based on average U.S. grocery prices for organic ingredients

Preserving Leftover Mixes Safely

Never store wet mixtures—they breed bacteria in hours. Instead:

  1. Blend dry ingredients only: 2 cups milk powder + 1 cup oat flour + ¼ cup cornstarch
  2. Store in airtight glass jar away from light
  3. Shelf life: 3 months (discard if clumps form)
  4. Per bath: Use 1½ cups dry mix + 2 tbsp honey added at tub

When to Avoid Milk Baths Entirely

These situations require doctor consultation first:

  • Open wounds or severe burns (milk proteins can trap bacteria)
  • Dairy allergies (even topical use risks reactions)
  • Active fungal infections (moisture feeds yeast)
  • Immediately after chemical peels (over-exfoliation risk)

🌿 Eco Note: Reuse bathwater for watering non-edible plants—diluted milk nourishes soil but harms vegetables.

Final Tips for Spa-Worthy Results Every Time

Maximize your milk bath investment with these tested refinements. Always test new additives on your inner wrist 24 hours before full immersion. For extra luxury, light unscented soy candles—essential oil diffusers create dangerous inhalation risks near steam. Store dry mixes with bay leaves to deter pantry moths. And never skip the post-soak moisturizer; milk baths work best as part of a complete routine.

Transform your next soak into a skin-renewing ritual with these precise methods. Within 3 baths, you’ll notice fewer flakes, calmer redness, and that coveted “just-stepped-out-of-the-spa” glow—all for pennies per use. Ready to customize further? Try our oatmeal honey variation for sensitive skin or explore rose petal upgrades for special occasions. Your softest skin awaits.

How to Clean Baby Bath Toys: Easy Steps


Your baby splashes happily in the tub, clutching their favorite rubber duck—unaware that hidden mold could be growing inside that seemingly clean toy. When water seeps into bath toys through tiny openings, it creates a breeding ground for dangerous bacteria and fungi that thrive in warm, damp environments. Pediatric studies show mold exposure in bath toys can trigger respiratory issues and skin irritations in infants with developing immune systems. Without proper cleaning, those cheerful bath time companions become silent health hazards. This guide delivers actionable, pediatrician-approved methods to eliminate mold and bacteria from every type of bath toy—using techniques verified by material safety experts. You’ll learn exactly how to deep-clean squeeze toys, inspect for hidden damage, and establish a foolproof drying routine that prevents 95% of mold recurrence.

Locate Hidden Drain Holes Before Cleaning Bath Toys

bath toys hidden drain holes diagram

Most parents miss critical drainage points that trap water inside bath toys. Squeeze toys like rubber ducks often have microscopic openings near the base or seam lines—not the obvious mouth hole. Submerging these toys completely during cleaning pushes contaminated water deeper into internal chambers. Start by holding toys under running water while squeezing firmly. Watch for bubbles emerging from unexpected spots like tail seams or wheel axles. Mark these drainage points with a waterproof pen before cleaning. For toys without visible holes (common in newer silicone designs), press firmly along all edges while submerged. If water escapes anywhere besides intentional openings, that spot requires targeted drying attention later. Never force open sealed compartments—this damages internal valves in musical toys.

Why Forgetting Drain Points Causes Persistent Mold

  • Water retention: Toys with unaddressed drain holes retain 3-5x more moisture internally
  • Mold acceleration: Trapped water reaches ideal mold-growing temperature (86°F/30°C) in 20 minutes
  • Material damage: Repeated water trapping cracks plastic seams, creating permanent mold reservoirs

How to Test for Complete Water Drainage

  1. Fill sink with 2 inches of warm water
  2. Submerge toy completely while squeezing
  3. Release pressure and lift vertically—no dripping should occur after 10 seconds
  4. If water escapes during lift, repeat squeeze-drain cycle 3x
  5. For stubborn toys, use turkey baster to inject air through drain holes

Weekly Deep Cleaning Protocol for Different Toy Materials

Hard plastic toys (boats, cups) withstand dishwasher cleaning but require pre-treatment. Place toys upside-down on the top rack to prevent water trapping. Run an empty cycle with white vinegar first to neutralize mineral deposits, then add toys with regular detergent. High heat (140°F/60°C) is essential—verify your dishwasher reaches this temperature with a thermometer. For rubber and silicone toys (squirt animals, teething rings), hand washing is mandatory. Mix 1 tablespoon hydrogen peroxide (3%) with 1 cup warm water in a container large enough to fully submerge toys. Soak 15 minutes, then scrub seams with a soft toothbrush. Never use bleach—its residue damages rubber elasticity and creates toxic fumes when mixed with bath products. Electronic toys (floating projectors, musical frogs) only allow surface cleaning: dip microfiber cloth in 50/50 water-rubbing alcohol solution, then wipe all touchpoints.

Cleaning Hard Plastic Bath Toys Without Clouding

  • Avoid: Citrus-based cleaners (etch plastic), abrasive sponges (create mold-harboring micro-scratches)
  • Must-do: Add ½ cup white vinegar to dishwasher rinse aid compartment to prevent film buildup
  • Pro tip: Place toys in mesh laundry bag during washing to prevent tumbling damage

Why Hydrogen Peroxide Beats Vinegar for Rubber Toys

Hydrogen peroxide’s oxygen molecules penetrate rubber pores to destroy mold roots where vinegar only sanitizes surfaces. Its 3% concentration is safe for infant contact after thorough rinsing. Vinegar’s acidity degrades rubber seals over time, causing permanent water leakage. Always rinse peroxide-treated toys under running water for 60+ seconds—swirl water inside squeeze toys by pumping air through drain holes.

Emergency Mold Removal for Infested Bath Toys

mold removal from bath toys syringe hydrogen peroxide

When black or pink slime appears inside toys, standard cleaning won’t suffice. First, disassemble removable parts (hats, propellers) using child-safe pliers. For squeeze toys, inject ¼ cup undiluted hydrogen peroxide through drain holes using a medicine syringe. Seal openings with painter’s tape and let sit 20 minutes—do not exceed this time as prolonged exposure weakens plastic. For stubborn mold, add 1 teaspoon citric acid powder to the peroxide solution before injecting. Rinse by repeatedly squeezing under running water until water runs clear (typically 50+ pumps). Discard toys with visible cracks or persistent discoloration—mold roots embed permanently in damaged materials. Never scrub moldy interiors with brushes; this spreads spores through drainage holes.

When to Immediately Trash Bath Toys

Toy Condition Risk Level Action
Visible cracks or cloudiness Critical Discard immediately—mold is embedded
Persistent pink slime after 2 cleanings High Replace—biofilm has colonized interior
Soft spots in rubber Moderate Quarantine for 72 hours post-cleaning; if unchanged, discard
Foul odor after drying Low Repeat deep clean with peroxide solution

Foolproof Drying System That Prevents 95% of Mold

bath toy drying rack mesh bag setup

Air-drying upside-down on towel-covered racks causes cross-contamination—lint and bacteria transfer from towels to toys. Instead, install a dedicated bath toy drying station: mount small plastic mesh bags (like onion sacks) on shower curtain hooks. Place cleaned toys inside bags while still damp, ensuring all drain holes face downward. The mesh allows 360° airflow while catching stray water droplets. Hang bags in direct sunlight for 2 hours when possible—UV rays kill residual mold spores. For non-sunny climates, place near bathroom exhaust fan on low setting. Verify complete dryness by shaking toys; no water sloshing should be heard. This method dries toys 40% faster than traditional rack drying by eliminating surface contact points.

Why Bathroom Humidity Dooms Standard Drying Methods

  • Humidity trap: Closed bathroom doors create 80-90% humidity—ideal for mold growth
  • Surface contamination: Towels transfer Staphylococcus bacteria to clean toys
  • Incomplete evaporation: Toys touching surfaces develop “wet zones” where mold colonizes

Monthly Maintenance Checklist for Bath Toy Safety

Preventative care reduces deep cleaning frequency by 70%. Every 30 days:
1. Inspect seams under bright light for hairline cracks using magnifying glass
2. Test buoyancy—waterlogged toys sink faster due to internal mold weight
3. Smell test—persistent mildew odor indicates hidden growth
4. Rotate toys—store 50% in sealed container; use only half at a time to extend lifespan
5. Replace squeeze valves on aging toys using manufacturer repair kits

Discard toys showing any wear after 6 months of regular use. Pediatricians recommend replacing all bath toys quarterly for infants under 12 months—their immune systems can’t fight mold-related infections. For older toddlers, extend to 6-month replacement cycles if passing all monthly checks.

Pro Storage Hack for Off-Season Toys

Before storing toys between bath seasons, place them in ziplock bags with silica gel packets (from shoeboxes). Squeeze out all air before sealing—this creates a moisture-free environment preventing mold during storage. Never store bath toys in airtight plastic bins; residual humidity becomes a mold incubator.

Final Prevention Strategy: The 2-Minute Post-Bath Routine

Spend just 120 seconds after every bath to eliminate future mold:
1. Squeeze all water from toys while still in tub (prevents suction-lock water retention)
2. Rinse under hot running water for 15 seconds per toy
3. Hang in mesh drying bags immediately—do not towel-dry
4. Wipe shower walls where toys were stored to remove moisture

This daily habit prevents 95% of mold issues by denying fungi the 24-hour moisture window they need to establish colonies. Pair this with weekly peroxide soaks for rubber toys and monthly deep cleans for hard plastics, and your baby’s bath toys will stay truly clean. Always prioritize manufacturer instructions over generic advice—when in doubt, contact the toy maker directly for material-specific guidance. Your pediatrician can also recommend hospital-grade sanitizers safe for infant use if mold concerns persist despite proper cleaning. Remember: mold prevention isn’t just about cleanliness—it’s protecting your baby’s fragile respiratory system from invisible threats hiding in plain sight.

How to Clean Squirt Bath Toys


Squeeze a rubber duck after bath time and watch murky water drip out? You’ve just witnessed why knowing how to clean squirt bath toys properly is essential for your child’s health. These seemingly harmless toys harbor dangerous mold and bacteria in their hidden chambers, creating a breeding ground that standard cleaning often misses. When water gets trapped inside these toys with nowhere to escape, it transforms your child’s favorite bath companions into potential health hazards. The moist, dark interior provides the perfect environment for microorganisms to multiply rapidly, putting your family at risk every time those toys hit the water.

This isn’t just about unpleasant surprises during bath time—it’s a genuine health concern that pediatricians increasingly warn about. Children’s developing immune systems make them particularly vulnerable to the respiratory issues, skin irritations, and infections that mold-contaminated toys can cause. The good news? With the right cleaning techniques, you can rescue your existing toys and prevent future problems without spending a fortune on replacements. In the next few minutes, you’ll discover practical, proven methods to clean, dry, and maintain your squirt toys so they stay safe for years of splashing fun.

Why Standard Cleaning Fails for Squirt Toys

The very design that makes squirt bath toys entertaining creates their biggest cleaning challenge. When your child squeezes these toys underwater, water enters through small openings but rarely drains completely. This trapped moisture sits in dark, enclosed spaces where mold thrives undetected until it’s too late. Unlike surface cleaning that removes visible grime, effective cleaning must address the hidden interior where microbial growth occurs.

Mold inside these toys releases spores into bathwater, which children can easily inhale or swallow during play. The Centers for Disease Control and Prevention has documented cases of respiratory problems and infections directly linked to contaminated bath toys. Even mild mold exposure can trigger coughing, wheezing, and skin reactions in sensitive children. Beyond health risks, mold breaks down rubber and plastic materials over time, causing toys to deteriorate faster and develop unpleasant odors that soap alone can’t eliminate.

Essential Supplies for Effective Squirt Toy Cleaning

Skip the guesswork and gather these specific items before starting your cleaning session. Having everything prepared saves time and ensures you complete the process thoroughly without interruptions.

Your squirt toy cleaning arsenal should include:

  • White distilled vinegar (5% acidity, no additives)
  • Baking soda for gentle scrubbing
  • Mild dish soap formulated for baby items
  • Medium-sized bowl for soaking
  • Soft-bristled toothbrush (dedicated to cleaning)
  • Clean microfiber towels
  • Mesh laundry bag (for vinegar soaks)
  • Hydrogen peroxide (3% concentration) for stubborn mold

For toys with severe mold issues, consider adding a small funnel to help direct cleaning solutions into narrow openings. Keep all cleaning supplies in a designated container that stays out of children’s reach when not in use. Remember: never mix vinegar and bleach, as this creates toxic fumes.

Daily Cleaning Routine That Prevents Mold

Establish this simple 2-minute process after every bath to stop mold before it starts. The key is removing trapped water immediately while toys are still wet.

Squeeze each toy repeatedly under running water, alternating between submerging and releasing. Continue this pumping action until only clear water emerges—this typically takes 10-15 squeezes per toy. Shake each toy vigorously while holding openings downward, then place them on a clean towel with openings facing down to encourage drainage. Never stack wet toys or store them in sealed containers, as this traps moisture inside.

This daily habit removes 80% of the water that would otherwise remain trapped, dramatically reducing the conditions mold needs to grow. Families who implement this routine report mold-free toys lasting 2-3 times longer than those cleaned only occasionally.

Vinegar Deep Cleaning Method for Stubborn Mold

When regular cleaning isn’t enough, this vinegar soak eliminates established mold without harsh chemicals. Vinegar’s natural acidity breaks down biofilm—the slimy layer that protects mold colonies inside toys.

Fill a bowl with equal parts white vinegar and warm water, ensuring depth for complete submersion. Place toys in a mesh bag (to prevent floating) and soak for 30 minutes minimum. For severe cases, extend to 2 hours—but never exceed 4 hours as prolonged exposure can degrade rubber. After soaking, remove toys and rinse under running water while squeezing repeatedly to flush out loosened debris.

For persistent spots inside openings, create a baking soda paste and use your toothbrush to gently scrub the affected areas. Rinse thoroughly until water runs clear, then proceed immediately to drying—never let vinegar-treated toys air dry without rinsing, as residue can cause skin irritation.

Emergency Protocol for Heavy Mold Infestations

Black mold inside bath toys comparison bleach vs hydrogen peroxide

When black mold appears inside toy chambers, standard cleaning won’t suffice. Use this targeted approach for serious contamination while prioritizing child safety.

For hard plastic toys without rubber components, prepare a bleach solution of 1 tablespoon household bleach per quart of water. Submerge toys for exactly 5 minutes—no longer, as extended exposure damages materials. Immediately following, rinse under running water for 2 full minutes while squeezing repeatedly. Hydrogen peroxide offers a safer alternative: submerge toys in 3% solution for 15 minutes, then rinse thoroughly.

If mold persists after two treatment cycles or has penetrated deep into rubber components, discard the toy immediately. No cleaning method can safely eliminate mold that has compromised the material’s integrity. When in doubt, replace—your child’s health isn’t worth risking for a $2 toy.

The Critical Drying Process Most Parents Skip

Proper drying eliminates the final 20% of moisture that causes recurring mold problems. This step takes longer than cleaning but makes the difference between temporary relief and permanent solution.

After cleaning, squeeze toys 20-30 times while holding openings downward. Place them on a clean towel with openings angled downward to encourage drainage. Position near a fan or open window for faster drying—direct sunlight helps kill residual spores but may fade colors. For toys with complex interiors, use a hair dryer on cool setting to force air through openings for 30 seconds per toy.

Never store toys until completely dry—press your finger against openings to check for moisture. What feels dry to the touch may still harbor dampness inside. When uncertain, extend drying time by several hours. Toys should feel room temperature (not cool) and show no condensation inside openings before storage.

Smart Storage Solutions That Prevent Future Mold

Bath toy storage ideas mold prevention

Where you store toys between baths matters as much as how you clean them. The bathroom’s humid environment defeats all your cleaning efforts if toys remain there between uses.

Transfer completely dry toys to an open basket in a well-ventilated area outside the bathroom—like your child’s bedroom or a hallway closet. Avoid sealed containers that trap residual moisture. If storing in the bathroom is unavoidable, use a mesh bag hung from the showerhead that allows 360-degree air circulation.

Consider drilling small drainage holes in toy bases for better airflow, but only if this won’t compromise the toy’s functionality. Rotate toys weekly to ensure each gets adequate drying time—this simple habit extends toy life by months while reducing cleaning frequency.

Monthly Maintenance Schedule for Long-Lasting Toys

Preventative care beats emergency cleaning every time. Implement this simple schedule to keep toys consistently clean:

After each bath: Squeeze toys under running water until clear, shake vigorously, store openings-down on towel
Weekly: Wipe exteriors with mild soapy water, inspect openings for discoloration
Monthly: Full vinegar soak for all toys, thorough drying verification
Quarterly: Replace any toys showing material degradation or persistent mold issues

This tiered approach takes less than 15 minutes monthly yet prevents 90% of serious mold problems. Set phone reminders until the routine becomes habit—your future self will thank you when bath time remains fun and worry-free.

When Cleaning Becomes Replacement Time

Some toys reach a point where cleaning can’t restore safety. Replace squirt bath toys immediately if you notice:

  • Mold returns within days of thorough cleaning
  • Material feels sticky or slimy even when dry
  • Cracks or splits create inaccessible mold pockets
  • Persistent unpleasant odors after multiple cleanings
  • Your child develops unexplained coughing or skin reactions during bath time

Many parents find success with a toy rotation system—keep 3-4 toys in active use while others rest completely dry in storage. This extends overall toy life while ensuring no single toy accumulates excessive wear. Track purchase dates with a simple sticker on the toy’s base to anticipate replacement needs before problems arise.


Implementing these cleaning techniques transforms squirt bath toys from hidden health hazards into safe, long-lasting playthings. Start today with the vinegar soak method for your current collection, establish the 2-minute post-bath drying routine, and schedule monthly maintenance sessions. Within weeks, you’ll notice cleaner water, fresher-smelling toys, and peace of mind knowing your child’s bath time remains both fun and safe. Remember: consistent attention to these small details prevents major problems down the road—your child’s health is worth the few extra minutes it takes to clean squirt bath toys properly.

How to Clean Bath Squeeze Toys


Waterlogged bath squeeze toys might seem harmless, but they’re actually notorious breeding grounds for mold, mildew, and bacteria that can make your child sick. When your toddler squeezes that smiling duck during bath time, they’re potentially inhaling microscopic contaminants trapped inside the toy’s hidden chambers. The warm, moist environment combined with residual soap and organic matter creates the perfect storm for microbial growth that standard rinsing can’t eliminate. This comprehensive cleaning guide delivers proven methods to sanitize bath squeeze toys effectively—methods that pediatricians recommend to protect your child’s respiratory health while extending toy longevity.

Most parents don’t realize that the squeeze mechanism designed for fun actually works against hygiene. Each time your child squeezes the toy, they’re forcing contaminated bathwater deep into crevices where it becomes trapped, creating a hidden ecosystem for harmful microorganisms. Visible mold on the exterior is just the tip of the iceberg—what you can’t see inside poses the real danger. By implementing the right cleaning routine, you’ll transform these potential health hazards into safe bath companions that provide clean entertainment for months.

Gather Supplies Before Cleaning

Before tackling those moldy bath toys, assemble your cleaning arsenal to ensure a thorough sanitization process. Having everything within arm’s reach prevents interrupted cleaning sessions and guarantees you complete each critical step without cutting corners. The vinegar-based cleaning system we recommend uses household items that effectively eliminate mold without exposing your child to harsh chemicals.

Your essential cleaning kit should include:

  • White distilled vinegar (5% acidity for optimal cleaning power)
  • Baking soda for gentle abrasion and odor neutralization
  • Unscented dish soap (free from dyes and artificial fragrances)
  • Soft-bristled toothbrush for reaching tight spaces
  • Microfiber towels for streak-free drying
  • Large container for soaking (glass or food-grade plastic)
  • Rubber gloves to protect your hands from mold exposure

Vinegar serves as your primary weapon against mold because its acetic acid content penetrates deep into toy crevices to destroy microbial colonies at their source. Unlike bleach, vinegar won’t leave toxic residues that could transfer to your child’s skin during bath time. The combination of vinegar’s acidity and baking soda’s mild abrasiveness creates a powerful cleaning duo that safely handles even stubborn mold growth without damaging toy materials.

Disassemble and Inspect Each Toy Thoroughly

bath squeeze toy disassembly mold inspection

Complete disassembly is the non-negotiable first step in effective bath toy cleaning—most squeeze toys feature snap-on or screw-off components that hide problem areas where mold thrives. Twist or pull apart each component carefully, keeping track of how pieces fit together for reassembly. This separation allows you to access interior surfaces that standard cleaning misses.

Examine each piece under bright light, paying special attention to the squeeze bulb interior, connection points, and any textured surfaces where moisture collects. Look for telltale signs of mold growth: black, green, or pinkish spots that indicate microbial colonies have established themselves. If you spot mold inside the squeeze mechanism that you can’t physically reach, consider replacing the toy immediately—no cleaning method can eliminate deeply embedded mold from inaccessible areas.

Check for physical damage that compromises the toy’s integrity. Hairline cracks, worn seals, or deteriorating plastic create perfect hiding spots for bacteria that cleaning solutions can’t penetrate. Toys showing these signs should be retired immediately, as they’ll continue harboring contaminants even after thorough cleaning. Document which toys pass inspection to establish your replacement schedule—most pediatricians recommend replacing bath squeeze toys every 3-6 months regardless of visible condition.

Vinegar Soaking Method for Deep Sanitization

The vinegar soak provides the most effective deep cleaning for bath squeeze toys by reaching interior surfaces that scrubbing alone cannot access. Fill a large container with equal parts white vinegar and warm water (not hot, which could warp plastic components). Submerge all disassembled toy parts completely, ensuring liquid penetrates inside each squeeze bulb. For toys with narrow openings, use a turkey baster to force the solution inside.

Allow components to soak for 30-60 minutes—the acetic acid needs sufficient contact time to break down biofilm and kill mold spores at their source. During soaking, periodically squeeze the bulbs underwater to circulate the solution through internal chambers. Don’t be alarmed if the water turns cloudy; this indicates the vinegar is successfully dissolving organic buildup.

After soaking, remove pieces and rinse thoroughly under running water. The vinegar smell dissipates completely once dry, but proper rinsing ensures no residual acidity remains. For heavily contaminated toys, repeat the soaking process rather than extending soak time, as prolonged exposure won’t increase effectiveness and might damage certain plastics.

Scrub Interior and Exterior Surfaces Effectively

cleaning bath toy interior with toothbrush

Post-soak scrubbing removes loosened residue and ensures complete sanitization of all surfaces. The interior squeeze mechanism requires special attention—this hidden area traps the most moisture and accumulates the most contaminants. Dip your soft-bristled brush into fresh vinegar solution and carefully insert it into each toy opening. Rotate the brush while applying gentle pressure to contact all interior surfaces.

For toys with particularly narrow openings, create a cleaning solution of baking soda and vinegar in the bulb itself: add one teaspoon baking soda, then squeeze in white vinegar until the bulb is half full. The resulting fizzing action creates mechanical agitation that dislodges stubborn buildup. Let the reaction work for 5 minutes before scrubbing with your brush.

Exterior surfaces need equal attention—scrub textured areas, ridges, and decorative elements where dirt accumulates. Pay special attention to the squeeze mechanism’s moving parts, which often harbor hidden mold colonies. Rinse each component thoroughly under running water, squeezing bulbs repeatedly to flush out any remaining debris from internal chambers. Proper rinsing prevents vinegar residue from irritating your child’s skin during future bath time.

Baking Soda Paste for Stubborn Stains and Odors

baking soda paste cleaning pink mold bath toys

When standard cleaning fails to remove persistent stains or musty odors, baking soda paste provides targeted treatment without damaging toy materials. Mix baking soda with just enough water to form a thick paste—similar to toothpaste consistency. Apply this paste directly to stained areas using your fingertip or soft brush, working it into textured surfaces with circular motions.

Allow the paste to sit for 10-15 minutes while the mild alkalinity neutralizes acidic buildup and lifts stains. For particularly stubborn discoloration, wrap the treated area in plastic wrap to prevent drying and extend contact time. After the waiting period, scrub again with your brush using gentle pressure, then rinse thoroughly. The dual-action cleaning—chemical neutralization from the baking soda combined with mechanical scrubbing—effectively removes most stubborn stains without harsh chemicals.

This method works especially well for “pink slime” buildup (Serratia marcescens bacteria) that sometimes appears in bathroom fixtures. If the paste treatment doesn’t eliminate persistent odors or discoloration after two applications, consider replacing the toy—deeply embedded contamination likely remains.

Proper Drying Techniques to Prevent Mold Regrowth

Inadequate drying after cleaning guarantees rapid mold regrowth—many parents unknowingly undo their cleaning efforts by skipping this critical step. After rinsing, squeeze each component multiple times to expel trapped water, then shake vigorously to dislodge interior droplets. Position toys with openings facing downward to allow complete drainage—hanging them on a drying rack works perfectly.

Place components in a well-ventilated area with direct airflow, ideally near a fan or in sunlight if possible. Sunlight’s UV rays provide additional sanitizing benefits. Never reassemble or store toys until they’re completely dry to the touch inside and out—this typically requires 24 hours in average humidity. In damp climates, extend drying time or use a cool-setting hair dryer to accelerate the process.

Consider investing in a mesh bath toy bag that hangs in your shower—these allow toys to air-dry completely between uses while keeping them organized. Proper drying extends time between deep cleanings and significantly reduces mold risk.

Weekly Maintenance Between Deep Cleans

Implement these quick maintenance habits after every bath to dramatically reduce mold buildup between deep cleanings. Immediately after bath time, squeeze each toy repeatedly while still wet to flush out soapy water and debris. Then squeeze them completely dry—get out every last drop of water with firm pressure.

Store toys in an open container or mesh bag rather than a closed cabinet where moisture gets trapped. Some parents find success designating a specific shower caddy that hangs in the shower, allowing toys to air-dry continuously between uses. Wipe down exterior surfaces with a vinegar-dampened cloth once weekly to prevent surface mold.

This simple routine takes less than 30 seconds per toy but extends the time between deep cleanings from weekly to bi-weekly. Consistent maintenance prevents the heavy buildup that makes deep cleaning more difficult over time.

When to Replace Rather Than Clean Bath Toys

Know these critical warning signs that indicate it’s time to discard bath squeeze toys regardless of sentimental value. Persistent mold growth that returns within days of cleaning signals deeply embedded contamination that no surface treatment can eliminate. Visible mold inside the squeeze mechanism—especially black or pink varieties—means replacement is non-negotiable for your child’s safety.

Discard toys showing physical deterioration: cracks that trap water, warped shapes that prevent complete drying, or degraded plastic that feels sticky or brittle. These structural issues create perfect breeding grounds for bacteria that cleaning can’t address. Toys that develop persistent musty odors despite thorough cleaning should also be retired immediately.

Follow pediatricians’ recommendations to replace all bath squeeze toys every 3-6 months as a proactive health measure. Mark purchase dates on your calendar to stay on schedule—your child’s respiratory health is worth the small investment in new toys.

Prevent Mold Growth Long-Term with Smart Habits

Implement these prevention strategies to keep bath toys cleaner between cleanings and extend their usable lifespan. Always squeeze toys completely dry after each bath and store them in a well-ventilated area—never in a closed container where moisture gets trapped. Choose toys with simple designs and fewer crevices when purchasing replacements, as intricate shapes harbor more moisture.

Consider toys made with antimicrobial materials or featuring drainage holes that prevent water trapping. Some modern bath toys incorporate silicone construction that resists mold better than traditional rubber. Reduce soap residue buildup by rinsing toys with clean water before storing them after bath time—this simple step removes the organic matter mold feeds on.

Establish a cleaning schedule that works for your family: weekly deep cleaning for daily-use toys, bi-weekly for occasional use. Combine this with daily squeeze-and-dry habits, and you’ll dramatically reduce mold risks while keeping bath time fun and safe for your child.

How to Clean Loofah Bath Mat: Easy Steps


Loofah bath mats add comfort and style to any bathroom, but they also absorb moisture and can become breeding grounds for mold, mildew, and bacteria if not properly maintained. Learning how to clean loofah bath mat properly not only keeps your bathroom looking fresh but also prevents unpleasant odors and extends the life of your mat. Whether your loofah bath mat is made from natural dried loofah gourd, synthetic materials, or a combination of fabrics, regular cleaning is essential for maintaining hygiene and appearance.

This comprehensive guide covers everything you need to know about cleaning and maintaining your loofah bath mat, from quick weekly refreshes to deep cleaning methods that tackle stubborn stains and odors. You’ll find step-by-step instructions for different mat types, expert tips for preventing mold growth, and guidance on when it’s time to replace your mat entirely.

Gather Your Essential Cleaning Supplies

Before you begin cleaning your loofah bath mat, having the right supplies on hand makes the process faster and more effective. Most cleaning methods require items you likely already have in your home, though a few specialized products can improve results for heavily soiled mats.

For routine cleaning, you’ll need mild detergent or dish soap, white vinegar, baking soda, and a soft-bristled brush. These basic supplies handle most everyday cleaning needs without damaging delicate loofah fibers. A washing machine is convenient for machine-washable mats, while a bathtub or large sink works well for hand washing larger or more delicate pieces.

Consider adding oxygen bleach powder for tougher stains, a spray bottle for easy application of cleaning solutions, rubber gloves to protect your hands, and old towels for quick drying. Having these items ready ensures you can tackle any cleaning challenge without interrupting your process to search for supplies.

Execute a Weekly Surface Refresh

Regular weekly maintenance prevents the buildup of soap scum, body oils, and moisture that lead to odor and mold. A quick refresh takes only a few minutes but significantly extends the time between deep cleans and keeps your loofah bath mat looking and smelling fresh.

Start by shaking your mat outdoors to remove loose debris, hair, and surface particles. Take the mat outside and give it several vigorous shakes, paying attention to corners and edges where debris collects. This simple step eliminates accumulated dust and prevents it from working deeper into the fibers during washing.

Mix a solution of warm water and mild dish soap in a spray bottle or bucket. Lightly mist or sponge the solution over the entire surface of the mat, focusing on areas that contact bare feet most frequently. Use a soft-bristled brush to work the soap into the fibers in gentle circular motions, paying extra attention to any visible spots or discoloration. Rinse thoroughly with clean water, squeezing out excess moisture without wringing or twisting the mat.

Allow the mat to air dry completely before placing it back on the bathroom floor. Hanging it over a shower rod or towel rack with good air circulation speeds drying and prevents the moisture buildup that causes mold. Position a fan nearby to accelerate the drying process, especially in humid environments.

Why Air Circulation Matters After Cleaning

Proper air circulation is crucial after cleaning your loofah bath mat because trapped moisture creates the perfect environment for mold and bacteria growth. Even if the surface feels dry, moisture can remain deep within the fibers. Hanging your mat vertically rather than laying it flat exposes more surface area to air, significantly reducing drying time. In bathrooms with poor ventilation, consider using a small fan specifically for drying bath mats between uses.

Deep Clean Machine-Washable Loofah Mats

washing machine cleaning loofah bath mat gentle cycle

Machine washing provides the most thorough cleaning for loofah bath mats that can withstand the agitation and water exposure. This method works well for synthetic loofah mats, cotton-backed loofahs, and most machine-washable designs, though you should always check the manufacturer’s care label first.

Prepare your mat for washing by inspecting it for any loose threads or damaged areas that could worsen during the machine cycle. Shake out any debris and spot-treat visible stains with a mixture of baking soda and water applied directly to the affected areas. Allow the paste to sit for fifteen minutes before washing to give it time to penetrate and lift the stain.

Set your washing machine to a gentle or delicate cycle with cool to lukewarm water. Hot water can shrink natural loofah fibers and damage adhesive backing on some mats. Add a mild detergent along with one cup of white vinegar, which helps break down soap scum and eliminates odors without leaving chemical residue.

Avoid fabric softener, as it can leave a residue that reduces the mat’s absorbency and creates a slippery surface. Once the cycle completes, remove the mat promptly to prevent mildew growth in the damp environment of the washing machine. Never mix loofah mats with heavily soiled items like workout clothes, as the additional dirt and oils will transfer to your bath mat.

Hand Wash Delicate Natural Loofah Mats

Natural loofah bath mats made from dried loofah gourds, delicate woven designs, or mats with non-slip backings that aren’t machine-safe require gentle hand washing. This method gives you more control over the cleaning process and allows you to protect vulnerable areas while still achieving a thorough clean.

Fill a bathtub or large sink with lukewarm water and add a generous amount of mild detergent or specialized gentle cleaner. Submerge the mat completely and allow it to soak for fifteen to thirty minutes, which loosens embedded dirt and makes scrubbing more effective. For particularly dirty mats, add a half-cup of baking soda to the water for enhanced cleaning power.

After soaking, agitate the mat gently with your hands, working the water through the fibers to release dirt and buildup. Use a soft-bristled brush to scrub the surface, focusing on high-traffic areas and any spots showing discoloration. Pay attention to the edges and corners where dirt accumulates, but avoid scrubbing too vigorously on delicate natural loofah sections that could fray or break.

Rinse the mat thoroughly with clean water, squeezing gently to remove excess moisture without twisting or wringing. Rinse multiple times until the water runs completely clear, indicating all soap residue has been removed. Residual soap attracts dirt and can cause the mat to feel stiff or slippery when dry.

Remove Mold and Mildew Stains Effectively

vinegar baking soda mold removal loofah bath mat

Mold and mildew growth is the most common problem with loofah bath mats, particularly in humid bathrooms with poor ventilation. Addressing this issue promptly prevents health concerns and stops the spread of spores to other bathroom surfaces.

For mild cases of mold or mildew, create a solution of one part white vinegar to three parts water in a spray bottle. Liberally spray the affected areas, ensuring the solution penetrates the fibers where mold roots embed themselves. Allow the vinegar solution to sit for at least thirty minutes, as the acetic acid needs time to break down the mold structure.

After the vinegar treatment, make a paste of baking soda and water and apply it to any remaining discoloration. Scrub gently with a soft brush, then rinse thoroughly with clean water. For stubborn mold that penetrates deep into natural loofah fibers, you may need to repeat this process several times.

When Mold Means Replacement Time

Severe mold infestations that have penetrated deep into the mat structure may be impossible to fully eliminate through cleaning alone. If the mold returns quickly after cleaning or you notice a persistent musty odor that doesn’t disappear with treatment, the mat likely needs replacement. Mold in bathroom textiles poses health risks, particularly for those with respiratory conditions or allergies.

Dry Your Mat Properly to Prevent Future Problems

air drying loofah bath mat proper ventilation

Proper drying is perhaps the single most important factor in maintaining a clean, odor-free loofah bath mat. The moisture that makes bath mats functional also creates the environment where mold, mildew, and bacteria thrive.

After cleaning, squeeze the mat gently to remove excess water without twisting or wringing, which damages fibers and alters shape. Lay the mat flat on a clean, dry towel and roll both together to press out additional moisture. Repeat with fresh towels as needed until the mat feels damp rather than wet.

Air drying in a well-ventilated area produces the best results for maintaining mat texture and preventing damage. Hang the mat over a shower rod, towel rack, or clothesline, ensuring good air circulation on all sides. If hanging vertically, periodically flip or rotate the mat to ensure even drying.

For faster drying, position a fan to circulate air across the mat or place it in a room with a dehumidifier. The goal is completely dry fibers throughout the mat, not just surface dryness that masks lingering dampness inside.

Maintain a Regular Care Schedule

Consistent maintenance prevents the heavy buildup that makes cleaning difficult and extends the life of your loofah bath mat significantly. A simple weekly routine takes minutes but prevents the mold, odor, and staining problems that lead to premature replacement.

Establish a weekly schedule that includes shaking out the mat, quick spot cleaning of any visible marks, and ensuring complete drying after each use. Bath mats that see daily use benefit from a light misting with a diluted vinegar solution every few days, which prevents soap scum accumulation and neutralizes odor-causing bacteria before it establishes itself.

Monthly deep cleaning should become a habit regardless of visible soiling. Machine wash machine-safe mats or perform thorough hand washing for delicate pieces. Inspect the mat during each cleaning for signs of wear, thinning fibers, or damage that might indicate it’s time for replacement.


Keeping your loofah bath mat clean requires consistent effort but doesn’t need to consume significant time or energy. By establishing simple weekly routines, addressing problems promptly, and ensuring thorough drying after every use, you maintain a hygienic bathroom surface that looks and smells fresh. When cleaning becomes ineffective despite your best efforts, replacement offers a fresh start with an opportunity to select a mat design that better suits your bathroom’s conditions and your maintenance preferences. Remember that proper drying is your most powerful tool against mold and bacteria, so prioritize airflow and ventilation in your bathroom maintenance strategy.

« Older posts Newer posts »