You’ve drawn the perfect bath, settled in, and suddenly notice the water level dropping as your plug mysteriously rises. This frustrating issue affects countless homeowners weekly, turning relaxation into a race against time. When your bath plug not staying down becomes a recurring problem, it typically stems from one of three mechanical failures: worn components, misaligned mechanisms, or accumulated debris. The good news is that most causes are easily diagnosable and fixable without professional help. This guide delivers immediate solutions for every drain type, helping you restore proper function and enjoy uninterrupted baths again.
Identify Your Bathtub Drain Mechanism Type
:max_bytes(150000):strip_icc()/bathtub-drain-stopper-types-2718995_FINAL-0e6bd206cdf84844a04c5edfbff5a957.jpg)
Before attempting repairs, you must determine your specific drain configuration. Applying universal fixes often wastes time and may worsen the problem. Most residential bathtubs use one of four common drain systems, each requiring distinct troubleshooting approaches.
Rubber Plug Systems: Simple Design, Common Failures
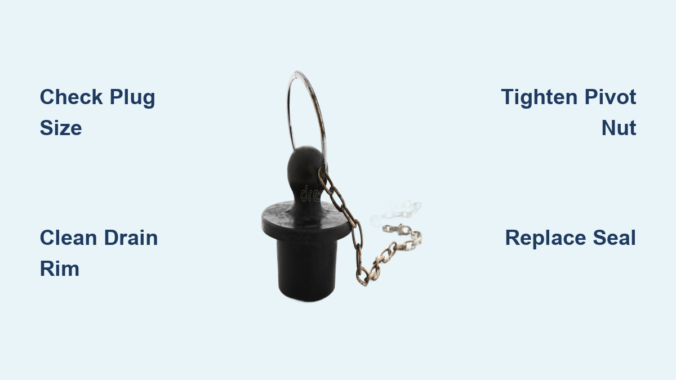
Traditional rubber bath plugs rely on suction to maintain position. When your rubber bath plug won’t stay down, the issue usually involves material degradation or improper sizing. Check if the plug has hardened, cracked, or lost its original shape from repeated hot water exposure. An undersized plug simply can’t create sufficient suction against water pressure. Measure your drain opening (typically 1.5-2 inches) and compare it to your plug’s diameter. If they don’t match closely, replacement with a properly sized plug will solve your problem immediately.
Pop-Up Stopper Mechanisms: Lever-Operated Troubleshooting
Pop-up stoppers operate through an overflow plate lever connected to internal rods. When this type won’t stay down, the pivot nut has likely loosened or the connector rod has disconnected. Remove the overflow plate (two screws) to inspect the rod assembly. Move the lever through its full range while observing rod movement. If rods don’t respond properly, they’ve either bent, corroded, or become disconnected from pivot points. Reconnect any loose rods and straighten bent components carefully—excessive force will cause further damage.
Immediate Visual Inspection Steps
Conduct these checks before disassembling anything—they solve 60% of bath plug issues without tools.
Drain Opening and Plug Surface Examination
Remove your plug completely and inspect both components. Hair, soap scum, and mineral deposits often prevent proper sealing. Clean the drain rim thoroughly with an old toothbrush, focusing on the sealing edge. For rubber plugs, check for cracks, flattened edges, or stiffness that compromises the seal. Plastic and metal stoppers frequently develop scratches or mineral buildup on sealing surfaces that create leak paths allowing water pressure to lift the plug.
Overflow Plate and Visible Hardware Check
Remove the overflow plate (take a photo first for reassembly reference) and inspect the internal mechanism. Look for disconnected rods, corrosion, or mineral deposits interfering with movement. A common issue involves the pivot ball becoming coated with residue, preventing the stopper from seating properly. Clean all visible components with white vinegar to dissolve mineral deposits before attempting mechanical adjustments.
Fix Rubber Bath Plugs That Won’t Stay Seated

Rubber plug issues typically have straightforward solutions requiring minimal tools.
Correct Sizing and Weight Solutions
If your bath plug not staying down involves a traditional rubber stopper, first verify proper sizing. An undersized plug creates insufficient suction to counteract water pressure. Measure your drain opening and purchase a replacement with matching dimensions. For properly sized plugs that still rise, add weight by attaching a metal chain or weighted disc to the handle. These accessories provide enough downward force to resist water pressure while maintaining easy removal.
Mechanism Cleaning and Replacement
For center-action rubber plugs with metal springs, mineral deposits often cause failure. Soak the mechanism in white vinegar for 30 minutes, then scrub with an old toothbrush. If the spring has lost tension permanently, replace the entire mechanism—most hardware stores sell these separately, allowing you to keep the rubber portion if still functional. When rubber shows significant deterioration, replacement costs less than repeated temporary fixes.
Repair Pop-Up Stoppers That Rise Unexpectedly
Pop-up mechanisms require precise alignment to maintain position.
Pivot Nut and Connector Rod Adjustments
Remove the stopper by lifting straight up (most pop-up stoppers lift out once the pivot nut is accessible). Check if the pivot nut has loosened—this allows excessive movement that prevents proper sealing. Tighten or replace the pivot hardware while ensuring the stopper moves freely without excessive play. Reconnect any detached connector rods, ensuring they engage properly with pivot points. A single disconnected rod explains why the plug appears to rise on its own.
Travel Limit and Seal Maintenance
Adjust the set screw controlling how far the stopper travels downward. Too little travel prevents a complete seal; too much causes binding. Clean the stopper’s rubber seal thoroughly with bathroom cleaner to remove residue that prevents tight closure. Replace cracked or hardened seals immediately—most manufacturers offer these as separate components.
Solve Push-Pull Drain Failures
Modern push-pull mechanisms hide internal components that often cause problems.
Internal Mechanism Cleaning Procedure
Remove the stopper by twisting counterclockwise while pulling upward (some models require removing a set screw first). Examine the interior for mineral deposits, hair, or corrosion. Soak components in white vinegar for 30 minutes, then scrub with a toothbrush. Dry completely before reinstalling. If the internal spring has broken or the weighted mechanism failed, replacement becomes necessary—repairing these components often costs more than new units.
Temperature-Sensitive Plug Behavior
Hot water causes rubber components to soften and deform under pressure. If your bath plug only fails with hot water, replace rubber elements with silicone alternatives that maintain shape at higher temperatures. For households with frequent hot baths, consider installing a thermostatic mixing valve to reduce maximum water temperature and extend component lifespan.
Avoid Costly Repair Mistakes
Prevent common errors that worsen the problem or create new issues.
Force Application and Chemical Damage
Never apply excessive force to stuck components—pop-up rods bend easily and overflow plates crack under pressure. Use white vinegar or manufacturer-recommended cleaners instead of bleach or ammonia that deteriorate rubber seals. Always rinse thoroughly after cleaning to prevent chemical residue buildup.
Premature Part Replacement
Don’t replace parts without proper diagnosis. Many homeowners purchase new stoppers only to discover the real issue was a disconnected rod or clogged overflow that would have cost nothing to fix. Verify the actual problem before investing in replacement components.
Prevent Future Plug Failures
Implement these maintenance practices to avoid recurring issues.
Monthly Cleaning Routine
Remove hair and soap scum weekly using a drain snake or old toothbrush. For pop-up systems, remove the overflow plate quarterly to clean the rod mechanism. A small flashlight helps illuminate hidden components for thorough cleaning. After each bath, drain completely and wipe the drain opening dry to prevent mineral deposits.
Annual Component Inspection
Check rubber seals annually for cracking, hardening, or deterioration. Keep replacement gaskets and connector rods on hand—they’re inexpensive and simple to swap during planned maintenance rather than emergency situations. For hard water areas, monthly vinegar treatments prevent mineral buildup that compromises seals.
When Professional Help Becomes Necessary
Call a plumber if you notice water leaks around the drain assembly, persistent odors, or multiple fixtures showing drainage problems simultaneously. Complex systems in freestanding or therapeutic tubs often require specialized knowledge. If your plug problems persist after trying all relevant troubleshooting steps, professional diagnosis can identify hidden issues beyond obvious mechanical failures.
A bath plug not staying down disrupts your relaxation but rarely requires expensive solutions. By identifying your specific drain type, conducting targeted inspections, and applying the appropriate fixes for your configuration, you can restore reliable performance quickly. Regular maintenance prevents most recurring issues—clean monthly, inspect annually, and address minor problems before they escalate. With these solutions, you’ll transform frustrating bath experiences into the relaxing soaks you deserve, without water level surprises ruining your peace.
Leave a Reply