You’re standing in your bathroom, ready for a quick shower, but when you pull up the diverter knob, water keeps flowing from the tub spout instead of switching to the showerhead. This frustrating problem—bath faucet not switching to shower—disrupts your routine and signals a malfunction in your plumbing system. The diverter valve, that small but critical component responsible for redirecting water flow, has likely failed due to mineral buildup, worn parts, or mechanical damage. Whether you’re experiencing complete failure with no shower flow, simultaneous water from both outlets, or just a weak trickle from the showerhead, this guide provides step-by-step solutions to restore proper function. You’ll learn how to diagnose the exact cause, implement effective repairs, and prevent future switching failures—all without immediately calling a plumber.
Diagnose Your Exact Diverter Failure Type
Before grabbing tools, precisely identify how your bath faucet not switching to shower is manifesting. The specific symptom determines your repair approach and whether you can fix it yourself or need professional help.
Complete Shower Flow Failure
When absolutely no water reaches your showerhead regardless of diverter position, you’re dealing with a total switching failure. This typically indicates mineral-locked internal components, a completely broken stem connection, or severe diverter seat damage. The valve mechanism has stopped redirecting water flow entirely—you operate the knob, but water continues emerging exclusively from the tub spout. This failure rarely resolves without intervention; expect to perform cleaning or part replacement to restore function. Check if the diverter knob feels completely loose or spins freely, which suggests a disconnected stem rather than internal valve failure.
Partial Diversion with Water Flowing from Both Outlets
If water flows from both the tub spout and showerhead simultaneously when attempting to switch modes, your diverter moves but can’t create a proper seal. This partial failure points to worn rubber seals, a damaged diverter seat, or debris preventing complete closure. Unlike complete failure, you’ll notice the diverter knob reaches its full travel position, yet water escapes through both outlets because the sealing surface no longer creates a complete barrier. This symptom often worsens over time as seals degrade further and mineral deposits accumulate in the sealing surfaces.
Weak Shower Flow Despite Normal Tub Fill
Before assuming diverter failure, verify if restricted water supply causes your bath faucet not switching to shower issue. When the showerhead produces only a weak trickle while the tub spout flows normally, check these common culprits first:
– Partially closed supply valves beneath the sink
– Kinked or damaged supply lines restricting flow
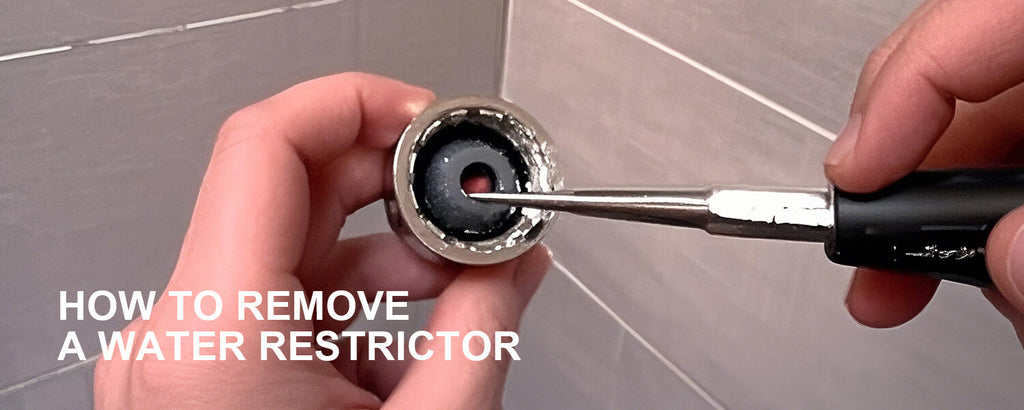
– Clogged showerhead nozzles or flow restrictor
Address these supply restrictions before investigating the diverter mechanism itself. Simply removing the showerhead and testing flow directly from the shower arm often reveals if the problem lies in the diverter or just the showerhead.
Remove Mineral Buildup from Diverter Components
Hard water mineral deposits cause approximately 70% of bath faucet not switching to shower problems. Calcium and lime accumulate in the small passages of your diverter valve, eventually preventing proper operation. The good news? Cleaning often restores full function without part replacement.
Disassemble for Effective Cleaning
Shut off water supply valves, then open the faucet to drain residual water. Remove the diverter knob using an Allen wrench on the set screw (typically hidden under a decorative cap). Extract the stem assembly—unscrew compression stems or use a cartridge puller for cartridge designs. Place metal components in a container filled with white vinegar; for severe buildup, gently heat the vinegar to accelerate mineral dissolution. Soak components for 2-4 hours, checking periodically to see when deposits loosen.
Refinish Critical Sealing Surfaces
After soaking, scrub all surfaces with a soft brush, paying special attention to the diverter seat—the small circular area where the stem creates the water seal. For slightly damaged seats, use 400+ grit sandpaper to gently refinish the surface in one direction only to maintain flatness. For stubborn deposits in tight crevices, carefully use a toothpick or small wire brush. Never use metal scrapers that could damage precision surfaces. Thoroughly flush components with clean water before reassembly to remove vinegar residue.
Reassemble with Protective Lubrication
Apply plumber’s grease to all O-rings and moving surfaces before reinstallation—this prevents future mineral adhesion and ensures smooth operation. Reinstall the stem or cartridge exactly as it came out (refer to your disassembly photos). Secure the diverter knob and test operation with water supply gradually restored. Cycle the diverter 5-6 times to confirm consistent switching. If shower flow remains weak, mineral deposits likely still block the showerhead itself, not the diverter mechanism.
Replace Critical Worn Diverter Components

When cleaning fails to restore proper switching, worn internal parts require replacement. Most diverter failures stem from degraded rubber components that lose elasticity over time.
Fix Leaky Seals with Washer Replacement
On compression stem diverters, the rubber washer at the stem base frequently causes switching failures when it becomes hard or cracked. Remove the retaining screw, discard the old washer, and install an identical replacement. Ensure the new washer sits flush against the stem shoulder with the screw tightened securely but not overtightened. Apply plumber’s grease to the new washer before reassembly—this simple step extends seal life by 30-50% in hard water areas.
Restore Smooth Operation with O-Ring Replacement
O-rings prevent leaks around the stem and ensure smooth diverter movement. Remove old O-rings from their grooves using a dental pick, being careful not to scratch the stem. Apply plumber’s grease to new O-rings before installation, seating them without twisting or stretching. Work the stem in and out several times to distribute the grease evenly. Properly lubricated O-rings reduce friction that causes premature wear and make diverter operation noticeably smoother.
Upgrade to Durable Cartridge Systems
Cartridge-style diverters offer superior durability compared to traditional compression stems. If your faucet uses an older design, consider upgrading during replacement. Remove the handle retaining clip, extract the old cartridge with a puller tool, and install an exact replacement. Modern ceramic disc cartridges resist mineral buildup better and typically last 2-3 times longer than rubber washer systems. While cartridge replacements cost $25-$80 versus $5-$15 for basic washers, the longevity often justifies the investment.
Address Supply Flow Restrictions First
Before diving into complex diverter repairs, verify that supply restrictions aren’t causing your bath faucet not switching to shower problem. These simpler fixes often resolve apparent diverter failures.
Clear Clogged Showerhead Nozzles
Remove the showerhead and submerge it in white vinegar for several hours. Use a toothpick to clear each individual nozzle opening—mineral deposits frequently clog these small passages. Some showerheads contain removable flow restrictor discs; clean or replace these if present. After cleaning, flush the showerhead by running water through it backward before reinstalling to dislodge remaining debris.
Verify Full Supply Valve Opening
Locate supply valves beneath the sink or behind an access panel and ensure they’re fully open—turn handles counterclockwise until they stop. Partially closed valves restrict shower flow, mimicking diverter failure. If valves don’t open fully despite handle rotation, remove the handle and stem to clean internal valve seats. Replace valves showing corrosion or leakage, as compromised valves can’t deliver adequate pressure to the showerhead.
Straighten Kinked Supply Lines
Inspect flexible supply lines for sharp bends or kinks that restrict flow. Gently straighten any bent sections, or replace damaged lines entirely. When installing new supply lines, ensure they have gentle curves without tight bends that could recirculate flow restrictions. Properly routed supply lines maintain consistent water pressure to both tub spout and showerhead.
Implement Preventive Maintenance Strategies
Regular maintenance prevents most bath faucet not switching to shower problems before they disrupt your routine. These simple practices extend component life significantly.
Monthly Cleaning Routine for Hard Water Areas
In areas with hard water (exceeding 120 ppm), implement a monthly cleaning schedule even when your diverter functions properly. Remove the showerhead and soak it in vinegar for 30 minutes. Wipe down visible diverter components with a vinegar-soaked cloth to prevent mineral accumulation. This proactive approach keeps moving parts free from buildup that eventually causes binding and failure.
Proper Diverter Operation Technique
Avoid excessive force when operating the diverter knob—gentle, consistent pressure prevents stem damage. Always allow the diverter to complete its full travel before releasing; partial activation leaves internal components stressed and accelerates wear. When switching modes, pause for 2-3 seconds after reaching the end position to ensure complete water redirection before adjusting temperature.
Periodic Component Lubrication
Apply plumber’s grease to diverter stems and O-rings every 6-12 months to maintain smooth operation. Shut off water supply, remove the diverter knob, and apply a thin layer of grease to exposed moving parts. This simple maintenance step prevents rubber components from bonding to metal surfaces and reduces friction that causes premature wear.
Know When Professional Help Is Required

Some bath faucet not switching to shower problems require professional expertise, especially when dealing with complex installations or valve body damage.
Concealed Valve Repair Complexity
Faucets with valves installed behind walls or beneath permanent enclosures often warrant professional attention. Attempting DIY repairs in these situations typically requires cutting into drywall or removing tile, creating more work than the original problem. Plumbers possess specialized tools to access concealed valves with minimal damage to your bathroom surfaces.
Cracked Valve Body Replacement
When the valve body itself shows cracks or severe corrosion, complete replacement becomes necessary. This repair involves significant plumbing work to disconnect supply lines, remove the old valve, and install a new assembly without causing leaks. Improper installation can lead to water damage far exceeding the original repair cost, making professional service the safer choice.
Recurring Problems Indicate Systemic Issues
If diverter problems persist after multiple repairs, underlying issues likely exist beyond simple component failure. Professionals can diagnose systemic problems like water pressure imbalances, improper valve installation, or incompatible replacement parts that cause recurring failures. Their expertise identifies root causes rather than just treating symptoms.
Final Note
When your bath faucet not switching to shower disrupts your morning routine, targeted diagnosis and repair can restore normal function without expensive professional service. Start by identifying your specific failure type—complete blockage, partial diversion, or weak flow—then systematically address the most likely causes beginning with simple supply restrictions before moving to diverter-specific repairs. Regular maintenance including monthly cleaning in hard water areas and proper lubrication significantly extends diverter component life. For complex installations or valve body damage, professional help ensures proper repair without creating additional problems. Implement these strategies to maintain reliable shower switching and avoid the frustration of a bath faucet that won’t cooperate when you need it most.
Leave a Reply