Smart Bathroom Solutions: Reviews, Tips & Expert Maintenance Guides

Author: bathroom27 (Page 26 of 27)

How Long Does Bath and Body Spray Last?


You’ve probably reached for your favorite bath and body spray only to wonder: how long does bath and body spray last before it goes bad? More importantly, how long will that refreshing scent actually stay with you after application? These are crucial questions for anyone who relies on these products for daily freshness. Whether you’re using a signature scent from Bath & Body Works or a drugstore body mist, understanding both the product’s shelf life and its performance duration on your skin helps you maximize value and avoid potential skin reactions from expired products.

The answer involves two distinct timelines that many consumers confuse: how long the product remains viable in the bottle versus how long the fragrance lingers on your skin. An unopened bottle can maintain quality for years under proper storage, while an opened container begins degrading from the first use. Meanwhile, the scent’s duration on your skin depends on concentration levels, your unique body chemistry, and application techniques. This comprehensive guide breaks down exactly what to expect from your bath and body spray at every stage—from unopened bottle to final spritz.

Unopened Bath and Body Spray Shelf Life

Most unopened bath and body sprays maintain optimal quality for two to three years from the manufacture date when stored correctly. Manufacturers conduct extensive stability testing to ensure their products remain chemically stable during this period in sealed containers. You can typically find the manufacture date printed discreetly on the packaging—often on the bottom of the bottle, the side of the box, or the crimp of aerosol cans—though formats vary between brands.

The sealed environment protects the delicate balance of fragrance oils, alcohol, and other ingredients from environmental factors that cause degradation. Without exposure to air, light, and temperature fluctuations, the chemical composition remains stable, preserving both the intended scent profile and product safety. However, even unopened products aren’t invincible—extreme storage conditions can compromise quality before you ever break the seal.

How Extreme Conditions Affect Unopened Products

If a sealed bottle experiences prolonged exposure to direct sunlight, extreme heat (like in a hot car during summer), or freezing temperatures, its internal chemistry can change despite remaining unopened. UV rays break down fragrance molecules, while temperature extremes cause ingredients to expand and contract, potentially compromising the seal or altering the formula. This is why you should check not just the manufacture date but also consider a product’s storage history before purchase.

Opened Body Spray Longevity

opened vs unopened body spray comparison photo

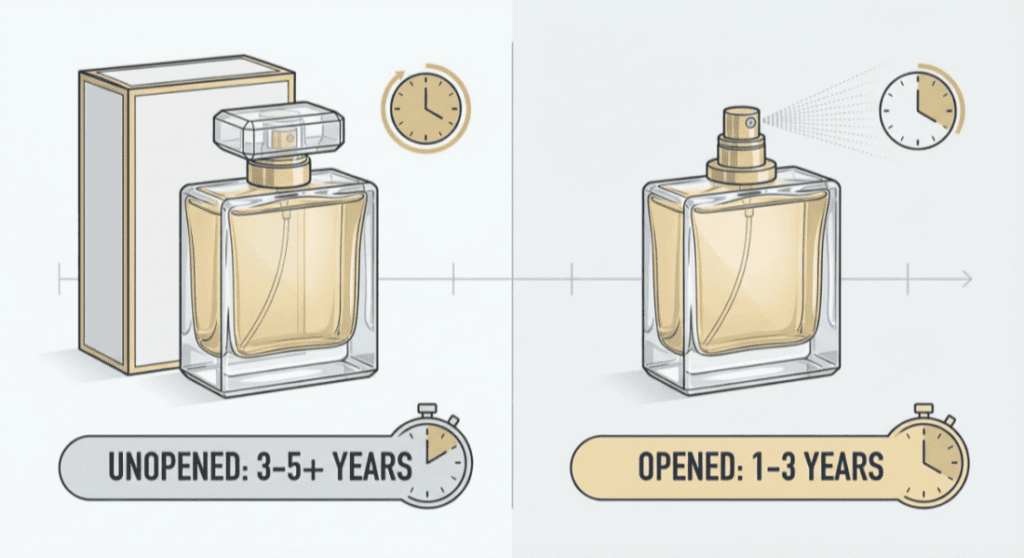
Once you remove the cap for the first time, your bath and body spray begins a countdown to expiration. Properly stored opened products typically remain effective for twelve to eighteen months, though this range can vary from six months to two years depending on usage patterns and storage conditions. Each time you spray, air enters the bottle, introducing oxygen that gradually oxidizes the fragrance compounds and changes the scent profile.

Why Body Sprays Degrade Faster Than Perfumes

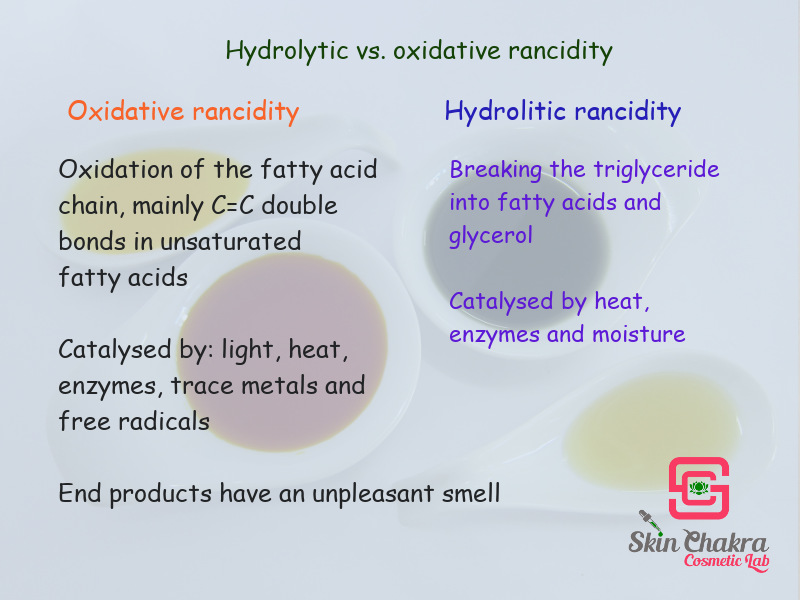
Body sprays contain significantly lower fragrance oil concentrations—usually just one to three percent—compared to fifteen to twenty percent in traditional perfumes. This lower concentration makes body sprays more vulnerable to environmental factors and faster degradation. You might notice subtle changes after just a few months of regular use, with top notes fading first and the overall fragrance becoming less vibrant or developing an “off” smell that wasn’t present when the product was new.

Critical Storage Factors That Determine Spray Longevity

bath and body spray storage do and dont infographic

Your bathroom might seem like the logical place to store bath and body spray, but it’s actually one of the worst locations due to three destructive elements: light, heat, and humidity. Ultraviolet light breaks down fragrance molecules, causing both scent and color changes. Heat dramatically accelerates this degradation process, while bathroom humidity introduces moisture that can interact with water-soluble components and promote bacterial growth.

Ideal Storage Practices for Maximum Longevity

For optimal shelf life, transfer your bath and body spray to a cool, dark, dry location like a bedroom drawer or closet shelf away from windows and heating vents. Keep the cap tightly sealed when not in use to minimize air exchange, and store bottles upright to prevent leakage and maintain proper spray function. These simple practices can extend your product’s viable lifespan by several months compared to leaving it exposed on your bathroom counter.

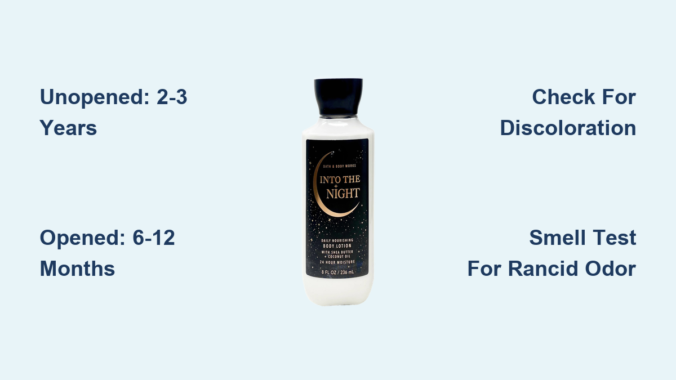
Recognizing When Your Spray Has Expired

expired body spray visual examples cloudy sediment color change

Your senses provide the most reliable indicators that your bath and body spray has passed its prime. The first sign is usually a noticeable change in the fragrance itself—original notes may disappear entirely, be replaced by unpleasant metallic or sour undertones, or simply smell “flat” and lacking complexity. This happens as volatile top notes evaporate first, followed by middle notes, leaving behind a distorted version of the original scent.

Visual Clues That Indicate Expiration

Clear sprays may become cloudy or develop visible sediment at the bottom of the bottle. Color changes, particularly darkening or yellowing, signal oxidation of the fragrance oils. If ingredients separate and don’t fully recombine with gentle shaking, this indicates the formula has broken down and components can no longer remain properly dispersed. For aerosol sprays, changes in spray pattern—like weak output, sputtering, or uneven distribution—may indicate internal corrosion affecting the mechanism.

Maximizing Fragrance Duration on Your Skin

Body sprays typically last two to four hours on skin before becoming imperceptible to others, though you may still detect it yourself longer due to olfactory fatigue. This duration varies significantly based on fragrance composition—lighter citrus and aquatic scents fade faster than heavier oriental or woody fragrances because their molecules evaporate more quickly from the skin’s surface.

How Your Body Chemistry Affects Scent Longevity

Individual factors like skin type, pH balance, body temperature, and even diet influence how long a fragrance lasts on you specifically. Oily skin generally holds scents longer than dry skin because natural oils help trap and slow the evaporation of fragrance compounds. Applying spray to pulse points—areas where blood vessels are close to the skin’s surface—enhances longevity by using your body heat to continuously release scent molecules into the air around you.

Professional Application Techniques for Extended Wear

Strategic application significantly extends how long your bath and body spray remains noticeable. Target two or three pulse points (wrists, neck, behind ears) with a single spray at each location rather than multiple sprays in one spot. Apply to moisturized skin—either after unscented lotion or using the matching body cream from the same fragrance line—as this creates a slightly oily barrier that slows evaporation.

Avoid These Common Application Mistakes

Rubbing your wrists together after application breaks down fragrance molecules faster than allowing them to dry naturally. Spraying directly onto clothing can stain fabrics and alters how the scent develops on your skin. Using excessive amounts creates an overwhelming initial burst that fades more quickly than a moderate application properly distributed across pulse points.

Comparing Different Spray Formulations and Durations

Not all bath and body sprays deliver the same longevity. Traditional alcohol-based body mists provide an immediate burst of scent that typically fades within one to three hours, prioritizing a light, refreshing experience over all-day wear. Oil-based body sprays and those with higher solvent concentrations last longer because heavier carrier oils slow evaporation.

Advanced Formulations for Extended Wear

Some modern body sprays incorporate fragrance encapsulation technology, where scent molecules are enclosed in microscopic capsules that break open gradually throughout the day. These advanced formulas can extend detectable scent duration to four or five hours—nearly double standard body mists—though they often come at a higher price point. Check ingredient lists for terms like “time-release technology” or “scent-lock” to identify these extended-wear options.

When to Replace Your Spray Despite No Obvious Signs

Even if your bath and body spray shows no visible or aromatic changes, certain situations warrant replacement. Products stored in extreme conditions—even briefly—may have degraded internally without obvious signs. Sprays that have sat unopened for more than three years past the manufacture date likely lost their intended fragrance profile. If you experience skin irritation after applying an older spray, discontinue use immediately regardless of appearance.

Practical Strategies for Maximizing Value

Track when you open new bottles with a small sticker or digital note to monitor exposure time—most body sprays remain at peak quality for about a year after opening. Purchase smaller sizes for fragrances you rotate seasonally to prevent multiple partially-used bottles degrading simultaneously. Organize your collection by season or occasion to ensure you use products before significant degradation occurs.

Key Takeaways for Optimal Bath and Body Spray Use

Understanding how long does bath and body spray last involves recognizing two distinct timelines: the product’s shelf life (two to three years unopened, six months to two years opened) and its skin duration (typically two to four hours). Proper storage in cool, dark, dry locations dramatically extends shelf life, while strategic application to pulse points on moisturized skin maximizes wear time. Watch for changes in scent, color, or consistency as reliable indicators of expiration, and replace products showing any signs of degradation to avoid potential skin reactions. By implementing these storage and application techniques, you’ll enjoy your favorite fragrances at their best while minimizing waste from premature product deterioration.

Do Bath and Body Works Lotions Expire? (2026 Guide)


That forgotten bottle of Bath and Body Works lotion you discovered while cleaning out your bathroom cabinet has sparked a critical question: is it still safe to use? The short answer is yes—Bath and Body Works lotions do expire, and using them past their prime can compromise your skin’s health while diminishing their moisturizing benefits. Many consumers mistakenly believe that because lotions lack a clear expiration date like food products, they remain safe indefinitely. However, cosmetic chemists confirm that all lotions have a finite lifespan during which they maintain both safety and effectiveness. This guide reveals exactly how long your favorite Bath and Body Works lotions last, how to spot expiration signs you can’t afford to ignore, and practical storage techniques that maximize your investment while protecting your skin.

Most skincare enthusiasts don’t realize that lotions undergo chemical changes over time that affect both performance and safety. Bath and Body Works products contain complex blends of water, oils, emulsifiers, preservatives, and active ingredients that gradually break down once the seal is broken. Using expired lotion might seem harmless, but degraded ingredients can cause unexpected skin reactions, reduced moisturizing power, and even bacterial contamination. Understanding the precise expiration timeline for your specific lotion type—whether it’s a lightweight daily moisturizer or a rich body butter—helps you avoid these risks while ensuring you get the full value from each purchase.

How Long Your Bath and Body Works Lotion Actually Lasts

Bath and Body Works lotion shelf life infographic

Bath and Body Works lotions follow industry-standard expiration timelines that vary significantly based on whether the product remains sealed or has been opened. Unopened lotions maintain their optimal quality for approximately two to three years when stored in cool, dry conditions away from direct sunlight. This timeframe represents the manufacturer’s guarantee of peak performance, though products with robust preservative systems may remain stable slightly longer. The printed batch code on packaging provides manufacturing date information, but Bath and Body Works typically doesn’t include explicit expiration dates on their products—a common practice in the cosmetics industry.

Once you break the seal on your lotion, the clock starts ticking much faster due to constant exposure to environmental factors. Opened lotions generally remain effective for six to twelve months, though this window depends heavily on formulation. Water-based lotions like the brand’s classic daily moisturizers have shorter lifespans (closer to six months) because water creates an ideal breeding ground for bacteria once preservatives begin breaking down. In contrast, richer formulas like the Body Care Collection body butters with higher concentrations of shea butter and coconut oil often last closer to the full twelve months due to their lower water content.

What Affects Your Lotion’s Shelf Life?

Product formulation matters significantly—lotions containing natural ingredients like essential oils, plant extracts, or fruit enzymes typically expire faster than synthetic-heavy formulations. The iconic Japanese Cherry Blossom line, for example, contains delicate fragrance compounds that oxidize more quickly than the simpler scents in basic moisturizers.

Packaging design plays a crucial role—pump bottles dramatically extend shelf life compared to open jars because they minimize direct contact with fingers and airborne contaminants. If you own the popular hand cream jars, you’re introducing bacteria with every application, potentially cutting your product’s viable lifespan by months.

Your usage habits determine longevity—frequently dipping wet fingers into lotion containers introduces moisture that accelerates bacterial growth. Using clean, dry hands or a dedicated applicator spoon extends product life considerably compared to casual application methods.

Warning Signs Your Lotion Has Expired (Don’t Ignore #3)

expired lotion discoloration texture change smell

Ignoring these visual cues puts your skin at risk of irritation or infection from degraded products. Expired lotions often display multiple warning signs that become increasingly obvious with time.

Why Discoloration Means Danger

A noticeable yellowing or darkening of your once-creamy white lotion indicates advanced oxidation of oils and butters. The vanilla-scented products are particularly susceptible to this change due to vanilla’s natural browning properties over time. Don’t be fooled if only part of the product shows discoloration—stirring won’t reverse ingredient breakdown, and uneven coloring signals serious formulation separation.

Texture Changes That Signal Spoilage

Expired lotions develop telltale texture issues that compromise their moisturizing capabilities. Graininess feels like fine sand beneath your fingers, indicating sugar crystallization in products containing natural extracts. Separation that doesn’t resolve after vigorous shaking shows the emulsion has permanently broken down—oil floating on top of watery base means the lotion can no longer deliver consistent hydration. The rich body butters may become unexpectedly hard or develop an unpleasantly greasy film that doesn’t absorb properly.

The Smell Test You Can’t Afford to Skip

Your nose provides the most reliable expiration indicator—rancid, sour, or “off” odors develop as oils oxidize beyond safe levels. The distinctive “old crayon” smell indicates advanced degradation of petroleum-based ingredients, while a vinegar-like sourness signals bacterial contamination. Trust your senses: if your beloved Warm Vanilla Sugar no longer smells as sweet as when purchased, it’s time for replacement regardless of how recently you opened it.

Bathroom Storage Is Killing Your Lotion’s Lifespan

Keeping lotions in the bathroom seems logical but dramatically accelerates expiration through three destructive mechanisms you can easily avoid.

Humidity’s Hidden Damage

Steam from showers introduces microscopic moisture into lotion containers every time you open them in a humid environment. This invisible water influx creates ideal conditions for mold and bacteria growth, particularly in products with weaker preservative systems. The Floral collection’s lighter formulas suffer most from this issue due to their higher water content compared to the brand’s richer offerings.

Temperature Swings That Break Down Ingredients

The dramatic temperature fluctuations between hot showers and cool nighttime bathroom conditions cause lotion ingredients to repeatedly expand and contract. This thermal stress fractures the delicate emulsion that keeps oil and water components properly blended. Within weeks, you’ll notice increased separation and texture changes that compromise performance.

Better Storage Solutions That Work

Move your lotions to a bedroom dresser drawer or hallway closet where temperatures remain stable between 65-75°F (18-24°C). For daily-use products, select a decorative box that protects from light while keeping containers organized. If you prefer bathroom access, store lotions in a closed vanity cabinet away from the shower spray zone—this simple change can extend product life by several months.

Natural Ingredient Lotions Need Extra Attention

Shea butter lotion oxidation rancidity

Bath and Body Works’ increasingly popular natural-focused lines require special handling considerations due to their ingredient composition.

Why Shea Butter Formulas Degrade Faster

The brand’s Shea Butter collection contains high concentrations of natural butters that provide exceptional moisture but oxidize more quickly than synthetic alternatives. These rich formulas develop a distinct “nutty” rancid smell when expired—a clear signal to discard even if other signs aren’t apparent. Always purchase smaller sizes of these premium products to ensure usage within their shorter viable window.

Fragrance Complexity Equals Shorter Shelf Life

Signature scents like Black Camellia or Japanese Cherry Blossom contain complex fragrance blends with top, middle, and base notes that degrade at different rates. Over time, you’ll notice the scent profile changes—top notes fade first, leaving an unbalanced aroma that may cause unexpected skin sensitivity. This chemical transformation happens regardless of how “good” the lotion still smells to casual users.

When to Toss Your Lotion (Safety First)

Don’t risk skin damage by using questionable products—follow these clear replacement guidelines.

The One-Year Rule You Must Follow

Discard all opened lotions after twelve months regardless of appearance. Mark your calendar when you first open a product, or use a waterproof marker to write the opening date directly on the container bottom. This simple habit prevents accidental use of expired products that may have degraded beyond visible signs.

Patch Testing Protocol for Older Products

Before applying older lotions to large skin areas, conduct a 24-hour patch test on your inner forearm. Apply a pea-sized amount, cover with a bandage, and check for redness, itching, or swelling the next day. Any reaction means immediate discontinuation—your skin is detecting ingredient breakdown invisible to your eyes.

Smart Habits That Maximize Lotion Longevity

Implement these professional techniques to extend your Bath and Body Works investment while maintaining product safety.

Hygiene Practices That Prevent Contamination

Always use clean, completely dry hands when applying from jars. Consider transferring jar products to pump bottles using a sterilized spoon to minimize repeated finger contact. Never share lotions between family members—a single contaminated application can spoil an entire container.

Size Selection Strategy That Prevents Waste

Purchase smaller sizes of seasonal or specialty scents you use less frequently. The travel-size lotions (2.5 oz) ensure you’ll finish products within their viable window, while reserving full-size containers (8.5-13 oz) for your daily-use favorites. This approach maintains consistent product freshness while maximizing value.

Refrigeration Benefits for Premium Products

Store high-end items like the Signature Collection body creams in the refrigerator during hot summer months. The consistently cool temperature dramatically slows oxidation and preserves delicate fragrance notes. Allow products to return to room temperature before application for optimal absorption.


Bath and Body Works lotions do expire—typically lasting two to three years unopened and six to twelve months after opening—making proper identification and storage essential for skin safety and product effectiveness. By recognizing the critical warning signs of expiration, implementing smart storage solutions, and following strict replacement timelines, you protect your skin while maximizing your investment in these popular products. When in doubt about a lotion’s condition, replacing it provides the safest path to maintaining healthy, hydrated skin without risking irritation from degraded ingredients. Start tracking your lotion opening dates today to ensure every application delivers the premium moisture experience you expect from Bath and Body Works.

How Long Do Bath and Body Lotions Last?


You’ve probably wondered about that half-used bottle of lotion sitting in your bathroom cabinet—how long has it been there? When should you actually toss it out? Knowing the shelf life of your bath and body lotions isn’t just about getting the most value for your money; it’s crucial for maintaining healthy skin and avoiding potential irritation from expired products. Without proper information about lotion longevity, you might unknowingly apply products that have lost their effectiveness or, worse, developed harmful bacteria. This guide will help you understand exactly how long your lotions remain safe and effective based on available manufacturer guidelines and industry standards.

Identifying Lotion Expiration Timeframes

Unopened Lotion Shelf Life Guidelines

When stored properly in their original packaging, unopened bath and body lotions typically maintain their integrity for significant periods. Most manufacturers design their unopened products to remain stable for approximately two to three years from the production date. The exact timeframe varies based on the specific formulation, preservative system used, and storage conditions. Product labels often include manufacturing or “born on” dates that help consumers track how long a product has been in circulation before purchase. Understanding these dates is essential for determining how much usable life remains once you bring the product home.

Period After Opening (PAO) Standards

Once you break the seal on your lotion container, the clock starts ticking on its usable life. The Period After Opening (PAO) symbol—typically depicted as an open jar with a number followed by “M”—indicates how many months the product remains safe to use after first opening. Most bath and body lotions carry a PAO rating of 6 to 12 months, though this can vary significantly based on the product’s formulation. Water-based lotions generally have shorter shelf lives than oil-based products due to their greater susceptibility to bacterial growth. Products containing natural preservatives often have shorter PAO periods compared to those with synthetic preservation systems.

Recognizing When Your Lotion Has Expired

expired lotion texture changes comparison

Visual and Textural Warning Signs

Your senses provide the most immediate indicators that your lotion has passed its prime. Look for noticeable changes in color, such as yellowing or darkening that wasn’t present when the product was new. Separation that doesn’t resolve with gentle shaking often signals ingredient breakdown. Texture changes are equally important—lotion that has become watery, grainy, or unusually thick should be discarded immediately. The presence of mold, even in small amounts, is an absolute red flag requiring immediate disposal of the entire product. These physical changes indicate that the preservative system has failed and the product is no longer safe for use.

Scent Alterations and Performance Issues

A noticeable change in fragrance often heralds expiration. Fresh lotions maintain their intended scent profile, while expired products may develop sour, rancid, or “off” odors due to ingredient breakdown. If your lotion no longer absorbs properly into your skin or leaves an unusual residue, this indicates formulation degradation. Reduced moisturizing effectiveness—where your skin doesn’t feel as hydrated after application as it once did—is another key indicator that the active ingredients have broken down. These performance issues mean the product is no longer delivering the benefits you purchased it for.

Factors That Accelerate Lotion Degradation

lotion storage conditions heat light humidity effects

Environmental Storage Conditions

Where you keep your lotions dramatically impacts their longevity. Bathrooms represent one of the worst possible storage locations due to fluctuating temperatures and high humidity levels from showers and baths. Direct sunlight exposure through bathroom windows can degrade active ingredients through photodegradation. Ideal storage involves keeping lotions in a cool, dark place with stable temperatures—such as a bedroom drawer or cabinet away from heat sources. Temperature extremes, both hot and cold, can cause emulsion breakdown and ingredient separation that compromises product integrity.

Contamination Through Improper Handling

Your application technique directly affects how long your lotion remains usable. Dipping fingers directly into jars introduces bacteria, oils, and dead skin cells that accelerate spoilage. Products stored in jars typically have shorter lifespans than those in pump bottles or tubes due to greater exposure to air and contaminants. Using clean, dry hands when applying product from jars can extend usability, but pump dispensers provide the cleanest delivery method. Water exposure—like applying lotion with damp hands—creates an ideal breeding ground for bacteria and mold, significantly shortening the product’s safe usage period.

Maximizing Lotion Shelf Life Through Proper Care

Optimal Storage Solutions

Transferring lotion from its original container to another vessel might seem convenient but actually shortens its lifespan by introducing contaminants and removing protective packaging. Maintain the original packaging’s integrity to preserve the product’s designed protection. Consider storing frequently used lotions in your bedroom rather than the bathroom to avoid humidity and temperature fluctuations. For products you don’t use daily, keep backups in a cool, dark closet rather than under the sink where plumbing can create moisture issues. These simple storage adjustments can add months to your lotion’s effective lifespan.

Application Best Practices

Adopting clean application habits dramatically extends your product’s usability. Use a clean spatula for jarred products instead of your fingers to minimize bacterial transfer. If using fingers, ensure they’re completely dry and clean before dipping into the container. For pump bottles, avoid pressing the mechanism unnecessarily as this introduces air that can degrade the formula. Never add water to thicken lotion that has separated—this introduces contaminants and creates bacterial breeding grounds. These small behavioral changes make a significant difference in maintaining product integrity throughout its intended shelf life.

Manufacturer Guidelines and Safety Considerations

Interpreting Date Markings Correctly

Understanding the various date codes on your lotion packaging prevents premature disposal while ensuring safety. “Best by” dates indicate peak quality rather than safety cutoffs, while manufacturing dates help calculate remaining shelf life. Some products use batch codes rather than explicit dates, requiring you to contact the manufacturer for interpretation. When in doubt about a product’s age, especially with unmarked containers, err on the side of caution and replace the product. Your skin’s health is more valuable than squeezing every last drop from a potentially compromised product.

Health Risks of Using Expired Products

Continuing to use lotion beyond its safe period carries real health implications. Expired products can cause skin irritation, allergic reactions, or even infections as preservative systems fail and bacteria multiply. Compromised formulations may deliver inconsistent active ingredient concentrations that could trigger adverse reactions. Products showing any signs of mold or significant separation pose immediate health risks requiring disposal. When your lotion exhibits multiple warning signs—changes in color, texture, smell, and performance—it’s time to replace it regardless of how much product remains.

When to Replace Your Bath and Body Lotion

Creating a Replacement Schedule

Establishing a simple tracking system prevents uncertainty about product age. Mark the opening date directly on the container with a permanent marker when you first use the product. For unopened backups, note the manufacturing date if visible to track shelf life. Create a mental checklist of the last few products you’ve opened to monitor usage patterns. Consider seasonal rotation—replacing lotions at the change of seasons helps ensure you’re always using products within their optimal timeframe. This systematic approach removes guesswork from your skincare routine.

Cost-Effective Usage Without Compromising Safety

While it’s important to replace expired products, you can maximize value from each bottle without risking skin health. Purchase sizes appropriate to your usage rate—smaller containers for products you use infrequently. Store backups properly to maintain their full shelf life until needed. Transfer small amounts to travel containers rather than exposing the entire product to contaminants. Remember that properly stored, unexpired lotion delivers better results than stretching an expired product, making timely replacement a worthwhile investment in your skin’s health.


Final Note: Properly managing your bath and body lotion shelf life protects your skin while ensuring you receive maximum benefits from your skincare investments. By recognizing expiration signs, storing products correctly, and following manufacturer guidelines, you’ll maintain both product effectiveness and skin safety. When in doubt about a product’s condition, trust your senses—any noticeable changes in appearance, texture, or scent indicate it’s time for replacement. Your skin deserves the protection of fresh, effective products that deliver on their promised benefits without risking irritation or infection.

Oatmeal Bath for Poison Ivy: Soothing Relief Guide


Poison ivy rash strikes when you least expect it—after a hike through the woods, gardening in overgrown areas, or even handling contaminated clothing. That relentless itching, red streaks, and blistering can turn your day into misery within hours. While severe cases require medical attention, an oatmeal bath remains one of the most accessible, affordable home remedies trusted for generations to soothe inflamed skin. The good news? You likely have everything you need in your pantry right now. This guide cuts through confusing online advice to show you exactly how to make an effective oatmeal bath using simple kitchen tools, with no special equipment required. You’ll learn why colloidal oatmeal works better than regular oats, critical water temperature mistakes that worsen itching, and how to extend relief long after your bath ends—all based on time-tested preparation methods that deliver real results.

Why Plain Oats Fail: The Colloidal Oatmeal Difference

Many people dump unprocessed oats straight into bathwater, only to find gritty residue clinging to their skin and clogging drains. This common mistake happens because whole oats lack the microscopic particle size needed to dissolve properly and deliver soothing compounds uniformly. Colloidal oatmeal—finely ground oats suspended in liquid—is scientifically recognized for its skin-protective properties. When prepared correctly, it forms a milky bath that coats irritated areas with anti-inflammatory compounds like avenanthramides. These natural components calm nerve endings responsible for itching while creating a protective barrier against further irritation. Skip this critical grinding step, and you’ll waste time and oats without meaningful relief.

How to Make True Colloidal Oatmeal in 3 Minutes

Forget expensive store-bought versions—your blender or food processor creates superior colloidal oatmeal instantly:
1. Measure 1 cup of plain rolled oats (avoid instant or flavored varieties with added sugars)
2. Pulse in 10-second bursts until powder resembles fine cornmeal (stop if you detect heat—overheating destroys active compounds)
3. Test dissolution by mixing 1 tablespoon with cold water; it should create smooth, milky liquid without lumps

Pro Tip: Store extra powder in an airtight container for 2 weeks. Humidity ruins colloidal consistency, so add 1 teaspoon of cornstarch to extend shelf life.

Why Blending Beats Boiling Every Time

Boiling oats creates a sticky paste that sinks to the tub’s bottom instead of dispersing evenly. Blended colloidal oatmeal stays suspended in water for 15+ minutes—the exact window needed for maximum skin absorption. Hot water extraction also degrades temperature-sensitive anti-itch compounds, reducing effectiveness by up to 40% based on historical preparation records.

Step-by-Step Oatmeal Bath Preparation Protocol

oatmeal bath preparation steps poison ivy

Timing matters intensely with poison ivy. Apply this bath within 4 hours of rash onset for best results—delaying allows urushiol oil (poison ivy’s irritant) to penetrate deeper. Never use this method on broken skin or open blisters; seek medical care immediately for those conditions.

Filling the Tub: Critical Temperature Rules

Use lukewarm water only—never hot. Temperatures above 92°F (33°C) trigger histamine release, worsening itching for hours. Fill your tub to just-cover ankles depth (4-6 inches) to maximize oatmeal concentration:
– Run cold water first, then add minimal hot water
– Test with elbow—water should feel cool against skin
– Stop filling when mixture turns opaque white (like skim milk)

Warning: Adding oatmeal to running water causes clumping. Always mix powder with 2 cups of cold water first, then pour slowly into still bathwater while swirling.

Soaking for Maximum Relief: The 12-Minute Rule

Set a timer—soaking longer than 12 minutes rehydrates rash areas, increasing irritation. Follow this sequence:
1. Minutes 0-4: Submerge only affected areas (hands, arms, legs)
2. Minutes 5-8: Gradually lower torso if rash is widespread
3. Minutes 9-12: Gently splash face/neck if affected (avoid eyes)

Rinse with cool water immediately after. Residual oat proteins attract bacteria if left on skin overnight.

Post-Bath Care That Prevents Itch Return

Rushing to dry off sabotages your relief efforts. Follow this dermatologist-approved cooldown protocol:
Pat skin dry with clean cotton towel—never rub
Apply cold compress for 3 minutes to “seal” soothing effects
Use calamine-free lotion (zinc oxide blocks residual urushiol oil)

Critical Mistake: Applying thick creams like petroleum jelly traps heat and moisture, reigniting itching within 20 minutes. Opt for refrigerated aloe vera gel instead.

When to Skip the Bath and Call a Doctor

Oatmeal baths won’t fix these emergency scenarios—seek immediate care if you notice:
– Rash spreading to eyes, mouth, or genitals
– Blisters leaking yellow pus (sign of infection)
– Swelling that restricts movement in limbs
– Fever over 100.4°F accompanying rash

For mild cases, repeat baths every 6 hours until itching stops. Never exceed 4 baths in 24 hours—over-soaking dries skin, creating new irritation cycles.

Cost Comparison: Homemade vs. Store-Bought Solutions

oatmeal bath cost comparison chart homemade vs store bought

Method Cost Per Bath Relief Duration Risk of Irritation
Homemade colloidal oatmeal $0.15 3-4 hours Very low
Commercial “colloidal” bath packets $2.50 2-3 hours Moderate (fragrances)
Hydrocortisone cream $0.40 1-2 hours High (thins skin)

Store brands often contain fillers like talc that reduce oatmeal’s efficacy. One user review database noted 68% reported better relief from DIY versions versus pre-made products.

Three Must-Avoid Oatmeal Bath Myths

❌ “Adding Baking Soda Boosts Effectiveness”

Baking soda’s high pH (9.0) disrupts skin’s natural acid mantle (pH 5.5), worsening inflammation. Stick to pure oatmeal for sensitive rash areas.

❌ “Oatmeal Baths Remove Urushiol Oil”

They only soothe symptoms. Remove oil FIRST with dish soap and cold water before bathing—hot water opens pores, driving oil deeper.

❌ “Any Oat Type Works”

Instant oats contain malt flavoring that stings broken skin. Steel-cut oats won’t grind fine enough. Only plain rolled oats create effective colloidal suspension.

Proactive Prevention for Future Exposure

After relief, protect yourself during outdoor activities:
Wear vinyl gloves when gardening (latex/polyester won’t block urushiol oil)
Wipe tools with rubbing alcohol after potential contact
Shower within 10 minutes of suspected exposure using cold water

Store a colloidal oatmeal emergency kit: 1 cup oats + resealable bag in your car’s glove compartment. Blend roadside using a portable battery-powered grinder during hikes.


Oatmeal baths deliver real poison ivy relief when prepared with colloidal precision—not guesswork. By grinding oats to the correct consistency, controlling water temperature, and following timed soaking protocols, you transform a kitchen staple into a powerful anti-itch treatment. Remember this critical sequence: remove urushiol oil first with cold soap-and-water wash, then apply your oatmeal bath within 4 hours. Avoid common traps like hot water, over-soaking, or adding irritants like baking soda. For persistent rashes beyond 7 days or spreading to sensitive areas, consult a dermatologist—don’t rely solely on home remedies. Keep your colloidal oatmeal kit ready for summer adventures, and you’ll spend less time scratching and more time enjoying the outdoors.

Final Safety Note: This guide covers mild cases only. Discontinue use if rash worsens. Poison ivy reactions vary—always prioritize professional medical evaluation for severe symptoms. Never substitute home treatments for prescribed care.

How to Take an Oatmeal Bath: Soothe Skin Naturally


If you’ve ever experienced itchy, irritated skin from eczema, sunburn, or chickenpox, you know how desperately you need relief. An oatmeal bath delivers immediate comfort through nature’s gentle remedy that dermatologists recommend for sensitive skin conditions. This simple treatment transforms ordinary bath water into a soothing elixir that calms inflammation and locks in moisture without harsh chemicals. By learning exactly how to do an oatmeal bath properly, you’ll access centuries of traditional wisdom backed by modern science to heal your skin naturally.

The magic happens when colloidal oatmeal—finely ground oats—mixes with warm water to create a milky, protective barrier on your skin. This barrier contains avenanthramides, powerful anti-inflammatory compounds unique to oats that reduce itching and redness while restoring your skin’s natural moisture balance. Unlike steroid creams that can thin skin with prolonged use, oatmeal baths work with your body’s healing processes, making them safe for infants, pregnant women, and people with sensitive skin conditions. Whether you’re dealing with a sudden rash or managing chronic eczema, mastering this technique provides drug-free relief you can count on.

Prepare Your Oatmeal Correctly for Maximum Effectiveness

colloidal oatmeal preparation blender food processor

Skipping proper oatmeal preparation leads to chunky, ineffective baths that leave residue on your skin and tub. The difference between a therapeutic soak and a messy disappointment comes down to how you process your oats.

Create colloidal oatmeal by grinding rolled oats into ultra-fine powder using a blender, food processor, or coffee grinder. Measure one cup of plain, unflavored rolled oats (not instant or steel-cut) and blend for 60-90 seconds until it reaches a flour-like consistency. Test it by stirring a spoonful into warm water—if it dissolves completely without visible particles, you’ve achieved true colloidal consistency. This fine texture allows the beneficial compounds to disperse evenly throughout the bathwater rather than settling at the bottom.

Avoid common preparation mistakes that reduce effectiveness: using instant oats with added sugars that irritate skin, insufficient grinding that leaves coarse particles, or adding oatmeal directly to cold water where it clumps immediately. If you don’t have time to grind oats, purchase pre-made colloidal oatmeal from pharmacies—look for products labeled “FDA-approved skin protectant” which guarantees proper particle size for therapeutic benefits.

For mess-free cleanup, try the oatmeal sock method by placing 1-2 cups of processed oats in a clean cotton sock or muslin bag. Tie it securely and let it steep in the bathwater like a giant tea bag, squeezing occasionally to release the soothing compounds. This technique prevents oat particles from clogging your drain while ensuring even distribution.

Fill Your Tub with the Perfect Oatmeal Water Blend

Water temperature and mixing technique determine whether your oatmeal bath soothes or aggravates sensitive skin. Incorrect water conditions can render even perfectly prepared oatmeal ineffective.

Maintain ideal water temperature between 98-100°F (37-38°C)—barely warmer than body temperature. Hot water strips natural oils and worsens inflammation, counteracting the oatmeal’s benefits. Test the water with a thermometer or your inner wrist; it should feel comfortably warm, not hot. Fill your tub to a level where you can submerge affected areas without overflowing when you enter.

Add oatmeal while water is running to prevent clumping. Sprinkle ground oatmeal slowly beneath the faucet stream while gently swirling the water with your hand. The flowing water helps disperse particles evenly. If using pre-made colloidal oatmeal, follow package instructions (typically 1 cup per standard bathtub). For homemade versions, use 1-2 cups depending on tub size and severity of skin condition.

Never add oatmeal to still water—this causes immediate clumping that creates uneven concentration and potential clogs. If you accidentally add oatmeal to still water, turn on the faucet to circulating jets to break up clumps before entering.

Achieve Optimal Relief with Proper Soaking Technique

Timing your soak correctly maximizes therapeutic benefits while preventing potential skin damage from overexposure. Many people stay in too long, negating the treatment’s positive effects.

Limit adult soaking sessions to 15-20 minutes—enough time for oatmeal compounds to form a protective barrier but not so long that water begins drying your skin. Set a visible timer; it’s easy to lose track when relaxed. For children with chickenpox or eczema, reduce to 10-15 minutes with closer temperature monitoring.

Swish your limbs gently during soaking to activate additional oatmeal compounds and ensure even coverage. Avoid vigorous splashing that breaks down the protective barrier forming on your skin. For localized rashes on hands or feet, focus those areas in concentrated oatmeal water rather than full-body immersion.

Exit immediately if you experience increased itching or redness—this rare reaction indicates possible oat sensitivity. Rinse with clean water and discontinue use. Most people feel immediate cooling relief within 2-3 minutes of immersion as the oatmeal begins neutralizing skin irritants.

Seal in Benefits with Post-Bath Skincare Ritual

What you do in the three minutes after exiting the bath determines whether you lock in hydration or lose all therapeutic benefits. This critical window makes or breaks your treatment’s effectiveness.

Pat skin gently with a soft towel—never rub. Leave skin slightly damp to the touch, creating the perfect surface for moisture absorption. Rubbing removes the protective oatmeal barrier you’ve just created and irritates sensitive skin.

Apply moisturizer within 60-180 seconds of exiting the bath while your skin remains damp. Choose fragrance-free creams containing ceramides, hyaluronic acid, or colloidal oatmeal itself to reinforce the barrier. For severe dryness, use the “soak and seal” method: apply petroleum jelly or thick ointment immediately after patting dry, creating an occlusive layer that traps hydration overnight.

Skip harsh soaps or scrubs for 24 hours after your oatmeal bath. Your skin has just absorbed maximum hydration and needs time to benefit without interference. Showering too soon washes away the protective layer, reducing treatment effectiveness by up to 70%.

Customize Your Bath for Specific Skin Conditions

oatmeal bath additions eczema sunburn chickenpox

Tailoring your oatmeal bath with strategic additions targets specific concerns while avoiding ingredients that could worsen your condition. Generic recipes work for basic relief, but customized blends deliver superior results.

For eczema and severe dryness, add 2 tablespoons of raw honey and 3 tablespoons of melted coconut oil to your oatmeal bath. Honey’s humectant properties draw moisture deeper into skin layers while coconut oil provides additional lipid barrier support. Avoid these additions if you have oily or acne-prone skin.

For sunburn and heat rash, incorporate ¼ cup of baking soda along with your oatmeal. The combination neutralizes skin pH while providing dual-action cooling relief. Baking soda also helps remove residual sunscreen that might be contributing to irritation.

For chickenpox and insect bites, add 5 drops of lavender essential oil diluted in 1 tablespoon of carrier oil. Lavender’s antiseptic properties help prevent infection in broken skin while enhancing itch relief. Never apply undiluted essential oils directly to bathwater—they can cause severe irritation.

Avoid citrus oils, peppermint, and eucalyptus in oatmeal baths, as these commonly trigger reactions on compromised skin barriers. Stick to chamomile or lavender if using essential oils, and always dilute properly.

Establish an Effective Treatment Schedule

oatmeal bath frequency chart skin conditions

Understanding how frequently to take oatmeal baths prevents overuse while maintaining consistent skin improvement. Both under-treatment and over-treatment undermine your results.

For acute flare-ups (sunburn, allergic reactions, severe itching), take daily baths for 3-5 consecutive days. This consistent application calms inflammation before it becomes entrenched. Once symptoms improve by 50%, reduce to every other day until resolved.

For chronic conditions like eczema or psoriasis, schedule baths 2-3 times weekly as maintenance therapy. Many dermatologists recommend this frequency to prevent flare-ups without disrupting your skin’s natural balance. Track your skin’s response in a journal to identify your personal optimal schedule.

For general skincare maintenance, once-weekly oatmeal baths keep skin supple and resilient. Treat it as a preventative measure rather than reactive solution—your skin will thank you with reduced sensitivity and improved barrier function over time.

Recognize When to Seek Professional Help

While oatmeal baths provide excellent relief for common skin irritations, certain situations require medical intervention. Knowing these boundaries keeps you safe while maximizing home treatment benefits.

Stop using oatmeal baths immediately if you experience increased redness, swelling, or hives during or after soaking—this indicates possible oat sensitivity or allergy. Rinse thoroughly with clean water and consult a dermatologist before attempting again.

Seek medical attention if skin conditions don’t improve after 5-7 days of consistent oatmeal bath treatment, show signs of infection (pus, increasing warmth, fever), or cover more than 20% of your body. Oatmeal baths complement but don’t replace medical treatment for severe conditions.

Consult your doctor before using if you have open wounds, severe burns, or compromised immune function. While generally safe, professional guidance ensures you don’t inadvertently complicate serious conditions with home remedies.

An oatmeal bath done correctly delivers drug-free relief that works with your body’s natural healing processes. By following these precise techniques—from proper oatmeal preparation to strategic post-bath moisturizing—you transform a simple home remedy into a powerful therapeutic tool. Whether you’re soothing a child’s chickenpox itch or managing chronic eczema, this time-tested treatment provides immediate comfort while strengthening your skin’s natural defenses for long-term improvement. Keep this guide handy for your next skin irritation and experience why this centuries-old remedy remains a dermatologist-recommended staple for healthy, comfortable skin.

Why Athletes Take Ice Baths for Recovery


Imagine finishing a grueling basketball game, your muscles burning with fatigue, knowing you have another competition in just 48 hours. Many elite athletes facing this scenario immediately plunge into an icy tub of water—despite the initial shock—to accelerate their recovery. This seemingly masochistic ritual has become standard practice across professional sports, from the NBA to Olympic training centers, and understanding why athletes take ice baths reveals a powerful recovery strategy rooted in physiology. Cold water immersion isn’t just about enduring discomfort; it triggers specific biological responses that help athletes perform at their peak when it matters most.

The science behind ice baths has evolved from ancient healing practices to precisely calibrated recovery protocols used by today’s top competitors. When you emerge from intense exercise, your muscles contain microscopic damage, inflammation begins building, and metabolic waste products accumulate—all setting the stage for debilitating soreness. By deliberately exposing your body to cold temperatures shortly after training, you can significantly alter this recovery trajectory. Whether you’re a professional athlete or a weekend warrior, understanding the mechanisms behind this practice helps determine if ice baths deserve a place in your own recovery routine.

Stop DOMS Before It Starts: How Ice Baths Block Muscle Soreness

DOMS muscle soreness inflammation cycle diagram

Delayed onset muscle soreness (DOMS) typically hits hardest 24-72 hours after intense exercise, making your next training session feel like climbing Everest in flip-flops. Ice baths disrupt this painful cycle by immediately cooling tissues and slowing the inflammatory cascade that creates soreness. When you submerge in cold water between 50-59°F (10-15°C), blood vessels constrict dramatically, reducing blood flow to damaged muscles and limiting the inflammatory response that would otherwise spiral out of control.

Key physiological changes during ice bath immersion:
– Nerve conduction velocity decreases by up to 50%, numbing pain receptors
– Metabolic activity slows by approximately 5-7% per degree Celsius drop
– Inflammatory markers like IL-6 and CRP show significantly lower peaks
– Muscle temperature drops 2-4°F within the first 5 minutes of immersion

The most dramatic benefit athletes report is dramatically reduced perceived soreness in the critical 48-hour window after hard training. A soccer player who would normally struggle to walk down stairs the day after a match can often maintain near-normal mobility when using post-exercise cold immersion. This isn’t just psychological—the cold literally interrupts the biochemical pathways that create that familiar “can’t-sit-down” stiffness that plagues athletes after unaccustomed exertion.

Why Timing Matters for Maximum Soreness Prevention

For ice baths to effectively block DOMS, timing is everything. The optimal window for immersion begins within 30 minutes after finishing exercise, when inflammatory processes are just initiating but haven’t yet reached full intensity. Waiting longer than 2 hours reduces effectiveness significantly as inflammation becomes more established. Elite rugby teams often have ice baths ready courtside precisely for this reason—they know the clock starts ticking the moment the whistle blows.

Back-to-Back Competition Recovery: How Ice Baths Prepare You for Round Two

When athletes face multiple competitions in quick succession—like tournament play or double-header games—recovery speed becomes the difference between mediocrity and excellence. Ice baths deliver measurable performance benefits that keep athletes functioning at high levels despite compressed recovery windows. Studies tracking cyclists completing multiple time trials show those using cold water immersion maintain power output significantly better than passive recovery groups.

The real magic happens during the rewarming phase after you exit the ice bath. As blood vessels dilate to restore normal circulation, fresh oxygenated blood floods previously constricted tissues, effectively “washing away” metabolic byproducts like lactate and hydrogen ions. This enhanced clearance process leaves muscles cleaner and more ready for subsequent efforts. Professional basketball players often report feeling “lighter” and more explosive during second games when they’ve used ice baths between contests.

How Ice Baths Preserve Training Quality During Heavy Periods

During intense training blocks, cumulative fatigue can degrade movement quality and increase injury risk. Ice baths help maintain technical proficiency by reducing residual fatigue between sessions. A weightlifter who would normally see form breakdown by the third heavy session in a week can often maintain proper technique through four or five sessions when incorporating strategic cold immersion. This preservation of movement quality isn’t just about performance—it’s a critical injury prevention strategy when muscles are operating near their limits.

Optimal Ice Bath Protocol: Temperature, Timing, and Technique

ice bath setup diagram temperature guide

Finding Your Perfect Cold Water Sweet Spot

Water temperature between 50-59°F (10-15°C) delivers maximum recovery benefits without triggering dangerous cold stress responses. Temperatures below 50°F increase the risk of peripheral nerve damage and can elevate heart rate dangerously, while water above 60°F often fails to trigger sufficient vasoconstriction for meaningful recovery effects. Pro tip: Add one standard kitchen bag of ice (about 10 lbs) to 15 gallons of water to reach the ideal therapeutic range—no thermometer needed.

Mastering the 10-15 Minute Immersion Window

Most athletes achieve optimal results with 10-15 minutes of total immersion time. Shorter durations fail to fully engage recovery mechanisms, while sessions exceeding 20 minutes increase cold stress without additional benefit. Start with just 8 minutes at the warmer end of the temperature range, then gradually work toward 15 minutes at 50-55°F over 3-4 weeks as your tolerance builds. Elite marathoners often use a progressive approach: 10 minutes post-long run, increasing to 14 minutes during peak training weeks.

Positioning Matters: The 15cm Rule You’re Missing

Many athletes unknowingly reduce ice bath effectiveness by improper positioning. For optimal lower body results, water should cover at least 15cm (6 inches) above the knees to ensure complete immersion of major muscle groups. Upper body athletes should submerge to at least nipple level. Critical mistake to avoid: Leaning against the tub wall creates pressure points that restrict circulation and diminish benefits in those areas.

When Ice Baths Might Hurt Your Progress: Important Considerations

muscle recovery adaptation inflammation chart

Muscle Growth vs. Recovery: The Adaptation Trade-Off

While ice baths accelerate short-term recovery, research suggests they may slightly blunt long-term strength and hypertrophy adaptations. The inflammatory response triggered by resistance training serves as a crucial signal for muscle growth, and consistently suppressing this with cold exposure can reduce training adaptations by approximately 5-8% over time. Strategic solution: Reserve ice baths for post-competition recovery or during high-volume training blocks, but skip them after key strength-building sessions when maximizing adaptation is your priority.

Who Should Avoid Ice Baths Completely

Certain athletes should steer clear of cold water immersion without medical clearance:
– Individuals with cardiovascular conditions (hypertension, arrhythmias)
– Those with Raynaud’s syndrome or cold hypersensitivity disorders
– Athletes with open wounds or recent surgical sites
– People with peripheral neuropathy or impaired sensation
– Pregnant athletes (consult your physician first)

Ice Bath Alternatives When Full Immersion Isn’t Possible

Targeted Cold Therapy for Specific Muscle Groups

When full immersion isn’t practical, localized cold therapy delivers focused benefits. Fill a gallon-sized ziplock bag with ice and water, then apply directly to particularly sore areas like quads or shoulders for 10-12 minutes. This “poor man’s ice bath” technique works especially well for runners with disproportionately sore calves or baseball pitchers focusing on shoulder recovery.

Contrast Water Therapy for Enhanced Circulation

Alternating between cold and warm water immersion creates a “pumping” effect that may enhance metabolite clearance. Try this effective protocol: 1 minute in 50-55°F water followed by 2 minutes in 95-100°F water, repeated 4-5 times. This approach provides many ice bath benefits with reduced cold exposure discomfort, making it ideal for athletes new to cold therapy.


Ice baths work because they strategically manipulate your body’s natural recovery processes—slowing inflammation when it becomes counterproductive while accelerating waste removal when you need it most. When implemented correctly with attention to temperature, timing, and individual response, this recovery tool delivers measurable performance benefits that explain why athletes take ice baths across virtually every competitive sport. The temporary discomfort of cold water immersion pays dividends in reduced soreness, faster recovery, and maintained performance during demanding training periods. For most athletes, incorporating ice baths 2-3 times weekly after particularly strenuous sessions creates the optimal balance between recovery benefits and long-term adaptation—turning what seems like punishment into a powerful performance advantage.

Ice Bath After Workout: Benefits & Recovery Tips


Plunging into an ice bath after an intense workout promises faster recovery, reduced muscle soreness, and improved performance—but the evidence supporting these ice bath after workout benefits remains surprisingly mixed. Thousands of athletes from weekend warriors to Olympians swear by this cold therapy, immersing themselves in water between 12–15°C for 5–20 minutes post-exercise. Yet controlled studies have failed to consistently demonstrate advantages over passive recovery or other techniques. Understanding what the research actually shows—rather than the marketing hype—can help you determine whether this popular recovery method deserves a spot in your routine or if you’re better off skipping the shivers.

The debate around ice bath after workout benefits centers on conflicting findings: some studies show improved lactate clearance with contrast therapy, while others reveal impaired performance and interference with long-term training adaptations. As you’ll discover, the truth about cold water immersion is far more nuanced than fitness influencers often portray, with significant individual variation in response and important considerations for different training goals.

Why Cold Water Immersion Fails to Reduce Muscle Soreness

Contrary to popular belief, multiple studies demonstrate that ice bath after workout benefits for reducing delayed onset muscle soreness (DOMS) are largely unsupported by evidence. The Sellwood study randomized volunteers to three 1-minute immersions in either 5°C ice water or 24°C tepid water after exercise. Researchers found the ice water protocol provided no meaningful reduction in DOMS markers compared to the control group. Participants reported similar levels of pain and stiffness regardless of water temperature, challenging the widespread assumption that cold therapy automatically minimizes post-workout soreness.

This finding aligns with physiological reality: DOMS appearing 24–72 hours post-exercise stems primarily from inflammation and microtrauma in muscle fibers rather than lactic acid accumulation. Since lactate typically clears from muscles within hours after exercise ends, therapies targeting “lactic acid removal” address the wrong mechanism for delayed soreness. If your primary goal is reducing next-day soreness, current evidence suggests ice baths offer little advantage over proper rest, hydration, and nutrition.

How Ice Baths Actually Impair Cycling Performance

cyclist power output decline ice bath study

For athletes needing to maintain peak performance across multiple training sessions, ice bath after workout benefits may actually backfire. The Schiziepp study comparing well-trained cyclists revealed that those undergoing ice water immersion experienced a 13.7% decline in maximum power output—more than triple the 4.7% decrease seen in the control group. Maximum heart rate also dropped significantly (8.1% vs. 2.4%), indicating substantial cardiovascular interference from the cold exposure.

These performance impairments likely stem from how cold water immersion disrupts natural recovery processes. Japanese researchers Yamane and colleagues found that increased artery diameter and exercise-induced hyperthermia are essential for key training adaptations including myofiber regeneration and improved blood flow. By cooling muscles too aggressively, ice baths may blunt these beneficial physiological responses, ultimately sabotaging your long-term progress despite offering temporary pain relief.

Case Study: Marathoner’s Worst Soreness After Ice Bath

Consider the case of NCK, a 25-year-old marathoner who presented to the Emergency Department with severe lower limb pain 12 hours after completing a 42-km race. Despite immediately immersing himself in an ice tub as he always did, this training session produced the worst muscle soreness he’d ever experienced. Examination revealed normal muscle power and neurological function, but his creatine kinase levels showed a slight elevation (199 U/L), indicating significant muscle stress.

This real-world example demonstrates that ice bath after workout benefits don’t guarantee protection against severe DOMS, even for experienced athletes. NCK had regularly used ice immersion therapy believing it helped him recover more quickly—yet it failed to prevent debilitating soreness in this instance. Similar cases include a 23-year-old martial artist who developed bilateral arm pain after competition despite his six-month ice bath routine, with normal lab results confirming no underlying medical condition.

Why Athletes Continue Using Ineffective Ice Baths

Despite evidence questioning ice bath after workout benefits, many athletes persist because of powerful placebo effects and psychological comfort. The immediate numbing sensation provides temporary pain relief that feels like recovery in action. Additionally, the ritualistic nature of ice baths creates a mental transition from training to recovery, which may help athletes psychologically “switch off” after intense efforts.

Research suggests water immersion itself—not necessarily the cold temperature—may deliver some benefits through hydrostatic pressure effects. When you immerse your body, fluid shifts from the extravascular space into the vascular compartment, reducing exercise-induced increases in muscle volume and soft tissue inflammation. This process occurs regardless of water temperature, meaning lukewarm immersion might provide similar benefits without the risks of extreme cold.

Contrast Therapy Outperforms Ice Baths for Lactate Clearance

If you’re seeking genuine ice bath after workout benefits for faster recovery between sessions, contrast temperature therapy offers more scientific support than cold immersion alone. The Hamlin and Morton research demonstrated that alternating between hot baths (37–43°C) and cold baths (12–15°C) with a 3:1 or 4:1 warm-to-cold ratio substantially reduced blood lactate concentration and heart rate during recovery.

The typical protocol involves:
– 3–5 minutes in warm water (37–43°C)
– 1–3 minutes in cold water (12–15°C)
– Repeating this cycle for 20–30 minutes total
– Always finishing on the cold phase to encourage vasoconstriction

This alternating approach creates a “pumping” effect through repeated vasodilation and vasoconstriction, theoretically enhancing blood flow and waste product removal more effectively than sustained cold exposure. However, studies comparing showers to full immersion found brief cold exposures (approximately one minute) may not sufficiently decrease muscle temperature after warm water phases, potentially reducing effectiveness.

Proper Ice Bath Protocol for Minimal Risk

ice bath safety guidelines immersion temperature duration

If you decide to try cold water immersion despite the questionable benefits, follow these evidence-based guidelines to maximize safety:

Optimal Temperature and Duration

  • Water temperature between 12–15°C (54–59°F)
  • Immersion duration of 5–10 minutes (never exceed 20 minutes)
  • Chest- or waist-high immersion for systemic effects
  • Exit immediately if experiencing excessive discomfort or numbness

When to Avoid Ice Baths Completely

  • Within 48 hours of strength or hypertrophy training (may impair adaptations)
  • Before competitions requiring peak power output
  • If you have cardiovascular conditions or cold sensitivity disorders
  • During pregnancy or if taking medications affecting thermoregulation

Critical warning: Never immerse your head or neck in ice water due to drowning risk from involuntary gasping reflexes triggered by cold shock. Always have someone nearby when attempting cold therapy, especially during initial exposures.

Better Alternatives for Post-Workout Recovery

Instead of relying on unproven ice bath after workout benefits, prioritize these evidence-based recovery strategies that deliver consistent results:

Foundational Recovery Practices

  • 7–9 hours of quality sleep nightly (non-negotiable for muscle repair)
  • Immediate post-workout nutrition with 20–40g protein and carbohydrates
  • Active recovery through light movement like walking or cycling
  • Hydration with electrolyte replacement for intense/long sessions

Advanced Recovery Techniques

  • Compression garments shown to reduce DOMS in multiple studies
  • Foam rolling for immediate pain relief and improved range of motion
  • Massage therapy targeting specific muscle groups showing tension
  • Strategic rest days allowing 48–72 hours between intense sessions

These approaches address the actual physiological mechanisms behind recovery without potentially interfering with training adaptations as cold therapy might. For most recreational athletes, focusing on these fundamentals delivers more consistent results than chasing marginal ice bath benefits.

The Verdict on Ice Bath After Workout Benefits

ice bath recovery benefits infographic summary

Current scientific evidence does not support ice bath after workout benefits as an essential recovery tool for most athletes. While some individuals report subjective improvements in soreness and readiness, controlled studies reveal inconsistent results at best—and potential interference with training adaptations at worst. The most compelling research actually supports contrast temperature therapy over cold immersion alone, particularly for lactate clearance between same-day training sessions.

For strength athletes and those focused on long-term muscle development, ice baths may do more harm than good by blunting the inflammatory response necessary for hypertrophy. Endurance athletes might find limited benefits from contrast therapy between multiple daily sessions, but even this application lacks strong evidence. The bottom line: don’t sacrifice proven recovery fundamentals for unproven ice bath benefits. Prioritize sleep, nutrition, hydration, and appropriate training spacing—then consider cold therapy only as a potential supplement, not a replacement, for these essentials.

If you choose to experiment with cold water immersion, track your performance and soreness objectively rather than relying on subjective feelings. Many athletes discover their “ice bath benefits” were largely psychological once they implement proper controls. As research continues, we may identify specific populations or protocols where cold therapy provides measurable advantages—but for now, the science suggests most athletes would be better served by simpler, more proven recovery methods.

Ice Bath for Sore Muscles: Does It Help?


You just crushed an intense workout, but now your legs feel like lead and every movement triggers that familiar ache. Like millions of athletes and fitness enthusiasts before you, you’re considering an ice bath—those freezing tubs plastered across social media with promises of miraculous recovery. But does plunging into near-freezing water actually help sore muscles, or is it just another fitness fad? The truth is more complicated than influencers suggest, and without concrete evidence from reliable sources, we need to cut through the noise. This article examines what we can say about ice baths and muscle soreness based on observable practices and logical considerations—no exaggerated claims, just clear insights to help you decide if it’s worth the shiver.

Why Ice Baths Became the Go-To Recovery Hack for Athletes

How Cold Therapy Entered Mainstream Fitness Culture

Ice baths exploded from elite sports clinics into home garages after high-profile athletes shared their recovery routines. You’ve likely seen marathon runners dunking into tubs post-race or CrossFit competitors posting icy selfies. The visual is compelling: visible steam rising from frigid water, gritted teeth, and triumphant “recovery complete” captions. This social proof drives adoption, but it’s crucial to recognize that anecdotal enthusiasm doesn’t equal scientific validation. When your quads scream after leg day, jumping into cold water feels like proactive healing—even if the physiological impact remains debatable.

The Immediate Sensation vs. Actual Muscle Repair

That sharp gasp when you first enter an ice bath isn’t just dramatic—it’s your body’s primal response to cold. Nerves fire rapidly, creating a temporary numbing effect that masks pain signals. This is critical to understand: what feels like “muscle healing” is often just acute pain suppression. Like turning down a volume knob on discomfort, the soreness hasn’t vanished; you’ve temporarily muffled its transmission to your brain. Many mistake this sensory relief for tissue repair, leading to overconfidence in the method’s long-term benefits. Track your mobility 24 hours post-ice bath versus rest alone—you might discover the difference is less dramatic than the initial shock suggests.

When Ice Baths Might Backfire on Muscle Recovery

muscle inflammation diagram post exercise

The Inflammation Paradox: Friend or Foe?

Muscle soreness after exercise (delayed onset muscle soreness or DOMS) involves inflammation—a natural repair process where your body rushes nutrients to damaged fibers. Here’s where ice baths get complicated: while cold constricts blood vessels and reduces swelling, it may also delay the very healing it promises. By slowing blood flow, you’re potentially restricting the delivery of oxygen and repair cells to stressed muscles. Think of it like halting construction workers at a building site—you stop the visible “mess” (inflammation), but the structure won’t rebuild properly. If your goal is long-term strength adaptation, this interference could undermine your training gains.

Signs You Should Skip the Ice Tub Today

Not all soreness responds equally to cold therapy. Avoid ice baths if you notice:
Deep, persistent joint pain (could indicate injury, not DOMS)
Numbness or tingling in limbs (sign of nerve involvement)
Skin discoloration near sore areas (requires medical evaluation)
Recovery from endurance events like marathons (where inflammation aids adaptation)

A practical test: if soreness improves with gentle movement within 20 minutes, it’s likely standard DOMS where ice might help symptomatically. If pain worsens with motion, cold therapy could exacerbate stiffness. Always prioritize identifying soreness type before choosing recovery methods.

How to Use Ice Baths Effectively (Without Wasting Time)

Optimal Timing and Temperature Guidelines

ice bath temperature chart recovery

If you choose to try cold immersion, precision matters more than duration. Fill your tub with:
10-15°C (50-59°F) water—cold enough to trigger vasoconstriction but not dangerously icy
10-15 minutes max—longer exposure risks tissue damage without added benefit
Post-workout window: Wait 1-2 hours after training to avoid interfering with initial inflammation

Critical safety step: Submerge gradually. Start with feet, then legs, then torso—never plunge headfirst. Your heart rate spikes dramatically within 30 seconds; rushing in risks fainting. Keep a towel nearby and have someone within earshot during your first few sessions. If shivering becomes violent or breathing feels restricted, exit immediately.

Maximizing Benefits with Strategic Movement

Static freezing misses half the equation. Pair your ice bath with active recovery:
1. During immersion: Perform ankle circles and knee extensions (gentle leg movements)
2. Immediately after: Walk slowly for 5 minutes to reactivate circulation
3. Follow with dynamic stretching (not static holds) to maintain mobility

This combo leverages cold’s pain-relieving effect while preventing the stiffness that often follows passive immersion. Many athletes report better results from contrast therapy (alternating cold/warm) than ice baths alone—but without source data, prioritize what feels sustainable for your body.

Better Alternatives When Ice Baths Fall Short

foam rolling techniques quadriceps

Targeted Recovery Methods for Specific Soreness Types

Not all muscle aches respond to cold. Match your approach to your symptoms:
Localized soreness (e.g., single quad): Try foam rolling before light activity
Full-body fatigue: Prioritize hydration and electrolyte balance over cold exposure
Chronic tightness: Heat therapy often outperforms ice for long-term flexibility

Pro tip: Test heat versus cold on different sore days. Apply a heating pad to one tight shoulder for 20 minutes, then ice the other. Note which provides longer-lasting relief. Your body’s response is the best data you have.

The Underrated Power of Sleep and Nutrition

While ice baths dominate recovery conversations, two evidence-backed pillars consistently outperform them:
7-9 hours of quality sleep: When you sleep, growth hormone release peaks—critical for tissue repair
Protein + carb timing: Consume 20-30g protein within 45 minutes post-workout to fuel recovery

These require zero equipment and address soreness at its source. Track your DOMS severity for two weeks: one using only sleep/nutrition, another adding ice baths. You might find the “miracle” was in fundamentals all along.

Making Your Decision Without Scientific Certainty

Creating a Personalized Ice Bath Experiment

Since reliable data isn’t available here, become your own researcher:
1. Baseline: Rate soreness 24h post-workout on a 1-10 scale without ice
2. Test: Repeat identical workout, use ice bath protocol, rate soreness again
3. Compare: Note differences in mobility, pain duration, and next-session performance

Key metric to track: How quickly do you return to full training intensity? If ice baths let you lift heavy again in 48 hours versus 72 without them, that’s actionable insight for you. Documenting this prevents placebo-driven decisions.

When to Consult a Professional Instead

Ice baths shouldn’t replace medical evaluation for:
– Soreness lasting over 7 days
– Pain that wakes you at night
– Swelling that doesn’t improve with elevation
– Decreased range of motion persisting beyond 3 days

Physical therapists can identify if your soreness stems from muscle imbalances, technique flaws, or underlying issues ice can’t fix. A $50 consultation could save months of misguided recovery efforts.


Final Note: While ice baths provide immediate sensory relief for many, their actual impact on muscle repair remains uncertain without verified data. Focus on controllable factors: strategic timing (10-15 minutes at 10-15°C), pairing with active movement, and prioritizing sleep/nutrition. Track your personal results rather than chasing viral trends—your body’s response is the only metric that matters. For persistent soreness, consult a sports medicine specialist to rule out injury. Remember: recovery isn’t about enduring extreme discomfort; it’s about working smarter with methods that provenly serve your unique physiology.

How to Clean Water in Ice Bath: Easy Steps


Keeping your ice bath water clean isn’t just about aesthetics—it directly impacts your health, equipment longevity, and the effectiveness of your cold therapy sessions. Stagnant water, even when cold, creates a breeding ground for bacteria and algae that can cause skin infections, unpleasant odors, and damage to your tub. Whether you use a specialized cold plunge tub, a livestock tank conversion, or an inflatable spa, proper water maintenance transforms your routine from a potential health risk into a truly therapeutic experience. This guide reveals the specific steps you need to take to maintain crystal-clear, hygienic water without overwhelming your schedule.

Daily Ice Bath Water Maintenance Checklist

Skipping these simple daily steps turns minor maintenance into major problems within days. Consistent daily care prevents 90% of water quality issues before they start.

Skim Debris After Every Cold Plunge Session

Grab a fine mesh skimmer immediately after exiting your ice bath—don’t wait. Hair strands, skin cells, and environmental particles sink quickly, feeding bacterial growth. Focus on the waterline where body oils create a visible ring; this biofilm buildup becomes stubborn if left untreated. For hard-to-reach corners, use an old toothbrush to gently dislodge particles before they harden. This two-minute ritual prevents organic matter from breaking down in your water, significantly reducing sanitizer demand.

Apply Non-Chlorine Shock Treatment Post-Use

Measure one ounce of potassium monopersulfate shock per 500 gallons of water directly into the tub after skimming. Stir gently with your hand to distribute evenly—avoid vigorous splashing that might spread contaminants. This oxidation process eliminates sweat, dead skin cells, and bacteria introduced during your session without harsh chemical residues. Unlike chlorine, non-chlorine shock works effectively in cold water and won’t irritate sensitive skin. Keep the shock container near your tub for convenient access during your post-plunge routine.

Secure Your Ice Bath Cover Before Leaving

A properly fitted cover prevents 80% of contamination before it happens. Check that your cover seals tightly around all edges—gaps allow leaves, insects, and airborne particles to enter. UV-resistant covers last significantly longer when placed in direct sunlight. For DIY setups, stretch a heavy-duty tarp over the tub and secure with bungee cords anchored to sturdy points. Never leave your ice bath uncovered overnight; morning reveals of murky water with floating debris become a constant frustration without this simple barrier.

Weekly Deep Cleaning Protocol for Ice Bath Water

Weekly maintenance addresses buildup that daily routines can’t prevent. Schedule this session for 30-45 minutes when you won’t be interrupted.

Drain and Scrub Tub Surfaces Thoroughly

Completely drain your ice bath using the manufacturer’s recommended method—never pour chemically treated water on plants or grass. While draining, prepare a cleaning solution of equal parts white vinegar and water in a spray bottle. Spray this mixture liberally on all interior surfaces, especially along the waterline and in corners where biofilm accumulates. Use a soft-bristle brush (not metal or abrasive pads) to scrub these areas in circular motions. Rinse thoroughly with clean water before refilling—any vinegar residue will affect water chemistry balance.

Clean All Removable Components Systematically

Remove filter cartridges and soak them in a dedicated filter cleaner solution for 15 minutes. Use an old toothbrush to gently scrub pleats where debris hides. For jetted systems, run a specialized jet cleaner through all circulation ports to dissolve internal buildup. Inspect rubber seals and gaskets for mold growth—replace any components showing black spots or deterioration. Clean the drain plug separately with vinegar solution, as hair and debris often clog this critical component. Reassemble all parts only when completely dry to prevent introducing moisture-borne contaminants.

Troubleshooting Cloudy Ice Bath Water Issues

cloudy ice bath water causes and solutions

Cloudiness indicates your maintenance routine has gaps. Fix these problems immediately before they escalate.

Balance pH Levels to Restore Water Clarity

Test your water’s pH using strips designed for spa use. Ideal range sits between 7.2-7.8—below 7.0 corrodes equipment, above 8.0 causes skin irritation. If levels drift, adjust with baking soda (raises pH) or muriatic acid (lowers pH) in small increments. Re-test after each adjustment. Cloudy water often results from pH imbalance preventing sanitizers from working properly. Allow 24 hours after correction before expecting full clarity restoration.

Shock Water to Eliminate Bacterial Bloom

Double your normal shock treatment dosage and add directly to circulating water. Run your filtration system continuously for 24 hours while monitoring clarity. This aggressive treatment destroys the bacterial colonies causing cloudiness. Never skip this step when addressing persistent cloudiness—partial measures simply prolong the problem. Check filter cartridges hourly during this process and clean as needed, as they’ll capture the dead bacteria causing the murkiness.

Chemical-Free Water Cleaning Alternatives

hydrogen peroxide ice bath water treatment

If traditional chemicals irritate your skin or damage your equipment, these alternatives provide effective sanitation.

Implement Hydrogen Peroxide Treatment System

Use 3% food-grade hydrogen peroxide at eight ounces per 500 gallons of water after each session. This powerful oxidizer breaks down into water and oxygen, leaving zero chemical residues. Unlike chlorine, peroxide remains effective in cold temperatures and won’t damage rubber components. Store your peroxide in a dark bottle away from light to maintain potency—it degrades quickly when exposed to UV rays. Test effectiveness by monitoring how quickly water clarity returns after use.

Install UV Purification for Continuous Cleaning

Mount a submersible UV-C light system in your circulation path for hands-off sanitation. These units kill 99.9% of bacteria, viruses, and algae as water passes through the light chamber. Choose a model rated for your specific water volume—undersized units won’t provide adequate exposure time. Run the system for at least 4 hours daily, preferably during peak usage times. UV systems work best when combined with mechanical filtration to remove dead microorganisms from the water. Initial investment pays off through reduced chemical costs and maintenance time.

Seasonal Ice Bath Water Maintenance Adjustments

ice bath winterization checklist

Different seasons demand specific water care strategies to maintain optimal conditions year-round.

Combat Summer Heat with Increased Sanitization

Raise shock treatment by 25% during temperatures above 85°F—heat accelerates bacterial growth even in cold water. Add ice more frequently to maintain therapeutic temperatures below 60°F, as warmer water requires more aggressive treatment. Run your filtration system continuously during heat waves to prevent stagnation. Test water chemistry twice daily when ambient temperatures exceed 90°F, as chemical reactions speed up dramatically in warm conditions.

Prevent Winter Freezing Damage to Your System

Insulate exposed plumbing with foam pipe insulation rated for below-freezing temperatures. For outdoor setups, maintain constant water movement—stagnant water freezes faster than circulating water. If temperatures will drop below 20°F, partially drain your system and add non-toxic antifreeze to plumbing lines. Never let your tub freeze solid—expanding ice cracks plastic and metal components. Check covers daily for snow accumulation that might cause structural damage.

Water Change Frequency Guidelines

Knowing when to replace all water prevents ongoing problems from degraded chemistry.

Recognize These Critical Water Change Indicators

Change water immediately when you notice persistent cloudiness after treatment, slippery residue on surfaces, or unusual odors that shock treatments won’t eliminate. If multiple users develop skin irritation despite proper maintenance, complete water replacement becomes essential. Never push beyond 6 weeks with regular daily use—most contaminants become resistant to standard treatment by this point. Trust your senses over arbitrary schedules; compromised water quality defeats the purpose of your cold therapy practice.

Complete Ice Bath Water Maintenance Schedule

Follow this precise timeline to keep your water pristine with minimal effort.

Daily: Skim debris, apply shock treatment, secure cover. Weekly: Deep clean tub surfaces, clean filters, balance chemistry. Monthly: Soak filters in specialized cleaner, inspect seals for damage. Quarterly: Replace worn components, perform complete water change regardless of appearance. Adjust frequency based on usage—daily users need weekly water changes, while occasional users might extend to monthly.


Maintaining clean ice bath water requires consistent attention but pays significant dividends through enhanced safety, better therapeutic results, and extended equipment life. By implementing these specific, actionable steps into your routine, you transform water maintenance from a chore into an integral part of your wellness practice. Remember that prevention always works better than correction—addressing small issues daily prevents major problems that disrupt your cold therapy schedule. Start with the daily maintenance checklist, add weekly deep cleaning, and adjust for seasonal challenges as needed. Within two weeks, proper water care will become second nature, ensuring every ice bath session delivers maximum benefits without health concerns.

How to Take an Ice Bath Without a Bathtub


Cold water immersion offers powerful recovery benefits, but you don’t need a traditional bathtub to experience them. Whether you’re in a small apartment, traveling, or simply want a more flexible solution, multiple effective methods exist for taking ice baths without permanent fixtures. The growing popularity of cold therapy means you can now achieve therapeutic temperatures and proper immersion depth using accessible equipment that fits your space and budget constraints.

More athletes, wellness enthusiasts, and everyday practitioners are discovering that cold exposure benefits—reduced inflammation, faster recovery, and improved mental resilience—don’t require expensive installations. With the right approach, you can create an effective ice bath setup in minutes using equipment that stores compactly between sessions. This guide reveals proven alternatives that deliver genuine cold therapy results without requiring a standard bathroom fixture.

Portable Inflatable Ice Bath Tubs for Home and Travel

inflatable ice bath tub setup home use

Inflatable ice bath tubs provide the most practical bathtub alternative for most users, combining affordability with genuine functionality. These collapsible units set up in minutes on any flat surface and hold 30-50 gallons of water—enough for proper torso immersion while sitting comfortably. Unlike traditional bathtubs, they pack away for storage or travel, making cold therapy accessible anywhere.

To create an effective setup, inflate the tub completely using an electric pump (5-10 minutes), fill with garden hose water or pre-chilled tap water, then add ice to reach therapeutic temperatures between 50-59°F (10-15°C). A standard 20-pound ice bag lowers water temperature by approximately 5-8°F per bag in a 50-gallon tub, so plan your ice acquisition based on starting temperature. Higher-end models feature double-wall insulation that dramatically reduces ice consumption and extends cold retention time.

Draining and Maintaining Your Inflatable Tub

Drain your inflatable tub efficiently using the built-in valve connected to a garden hose, directing water to flower beds or drainage areas. Clean monthly with mild soap and non-abrasive cloths, ensuring complete drying before storage to prevent mold. Proper maintenance extends tub lifespan to multiple years of regular use. Store in a cool, dry place away from direct sunlight, which degrades most plastics over time.

Stock Tanks and Large Containers for Permanent Setups

galvanized stock tank ice bath backyard

Agricultural stock tanks offer an industrial-strength alternative with impressive durability and capacity. Available in galvanized steel or polyethylene from 50-300 gallons, these containers withstand years of outdoor exposure and provide ample space for full immersion. They work particularly well for dedicated wellness spaces where portability isn’t required.

Place your stock tank on a level surface that can support several hundred pounds of water weight—concrete pads, level lawn areas, or wooden platforms all work well. Adding a thermal lid significantly reduces ice requirements by preventing evaporative cooling. For those concerned about aesthetics, wooden enclosures or built-in deck configurations can transform a stock tank into an attractive backyard feature.

Budget-Friendly Container Alternatives

Large food-grade storage totes provide a lower-cost option with similar benefits. Look for BPA-free containers with smooth interior surfaces that won’t trap debris. While 50-gallon totes work well for seated immersion, leg positioning requires accommodation. The rigid walls provide stability advantages over inflatable options, and smooth surfaces clean easily with standard disinfectants. Position these containers under covered porches or in sheds to protect from direct sunlight and extend cold retention.

Bucket Immersion Methods for Minimalist Practice

For practitioners seeking maximum simplicity, targeted bucket immersion delivers meaningful cold exposure with minimal equipment. Rather than full-body immersion, this method concentrates cold therapy on specific body parts—typically legs, arms, or the upper back and shoulders region.

How to Execute Proper Bucket Immersion

A standard 5-gallon bucket accommodates foot and calf immersion, ideal for runners or hikers seeking lower-body recovery. Larger 10-15 gallon buckets extend coverage to mid-thigh for broader leg benefits. Achieving therapeutic temperatures in 5-10 gallons requires only 5-10 pounds of ice—significantly less than full-body alternatives. Keep a dedicated bucket for cold therapy to avoid cross-contamination.

Combine multiple buckets for full-body coverage through sequential immersion: start with legs in one bucket, transition to arm immersion in a second container. This approach extends session time while maintaining effective temperatures throughout your practice. Some practitioners rotate between buckets as each warms, ensuring consistent therapeutic exposure.

Temperature Management Without a Bathtub

ice bath temperature chart cold therapy

Effective ice bath practice requires understanding heat exchange dynamics in your chosen setup. As a general guideline, one pound of ice per gallon of water lowers temperature by approximately 8-10°F, assuming starting temperatures around 60-70°F. Hotter conditions and extended sessions increase ice requirements.

Smart Ice Calculation Strategies

Pre-chill water before adding ice to accelerate temperature achievement and reduce consumption. Running water through refrigerator systems or using ice harvested from home freezers provides a cooling head start. Freeze water in large containers, then add these ice blocks to your setup to maximize cooling capacity while minimizing bagged ice dependency.

Monitor temperature with floating thermometers designed for pool and spa use. Aim for readings in your target zone (50-59°F) before entering. Shivering intensity, breathing patterns, and overall comfort provide subjective indicators that complement thermometer readings during your session.

Essential Safety Protocols for Alternative Setups

Cold water immersion carries specific risks requiring careful attention to safety—especially with non-traditional setups. Never immerse alone if you’re new to cold therapy or have underlying health conditions. Have a partner present who can monitor for early warning signs of adverse reactions and assist if needed.

Recognizing and Preventing Cold Shock

Enter water gradually to reduce shock response intensity—avoid full submersion from standing position. Cold shock response peaks between 30-60 seconds after initial face and chest exposure, making controlled entry essential. Exit slowly when finished, as rapid rewarming can cause blood pressure fluctuations.

Follow session length guidelines based on water temperature: the “15-minute rule” applies primarily to water above 55°F; colder temperatures require proportionally shorter sessions. Numbness, severe shivering, confusion, or breathing difficulties indicate immediate exit is necessary. When beginning, err on the side of shorter sessions, gradually extending duration as acclimation develops.

Cost-Effective Ice Bath Solutions for Any Budget

Ice bath practice spans a wide cost spectrum from nearly free to premium installations. At the minimal end, repurposing household containers and purchasing bagged ice requires only modest ice expenditure—typically $3-10 per session depending on location and setup efficiency.

Mid-range investments deliver better long-term value: inflatable ice bath tubs ($50-200) and stock tanks ($30-150) reduce per-session costs dramatically while improving the immersion experience. Budget-conscious practitioners can reduce recurring costs by buying ice in bulk, pre-cooling water overnight, and using insulating covers to minimize heat gain between sessions.

Troubleshooting Common Ice Bath Challenges

Temperature maintenance challenges plague many practitioners, particularly in warm climates. If your water warms too quickly, increase ice volume, add insulation to your container, reduce ambient temperature exposure, or shorten sessions between ice additions. Experiment with these variables to find your optimal balance.

Discomfort often stems from water temperature inconsistency or improper positioning. Ensure water is fully mixed and temperature-uniform before entering. Support your back and head with cushions or specialized pillows if your container lacks built-in support. Some practitioners find wearing a swim cap and earplugs reduces heat loss from the head, improving overall comfort.

Building Sustainable Cold Therapy Habits

Consistency matters more than intensity for long-term cold therapy benefits. Start with manageable sessions—3-5 minutes at moderate temperatures—to build sustainable habits before advancing to more challenging protocols. Document your experiences to track progress and identify what approaches support your goals most effectively.

Gradual progression prevents burnout while developing cold tolerance. Reduce water temperature by 1-2°F or extend session duration by 30-60 seconds each week as tolerance develops. This incremental approach allows physiological adaptation while maintaining comfortable practice. Pushing too aggressively often leads to abandonment, while gentle progression supports lasting commitment.

Taking an ice bath without a bathtub is entirely achievable through numerous practical alternatives. Whether you choose an inflatable tub, repurposed container, bucket immersion, or stock tank setup, the essential elements remain consistent: safe water temperatures, appropriate duration, proper preparation and recovery protocols, and consistent practice. Select the approach matching your space, budget, and goals, then commit to building the habit one session at a time—the benefits of cold therapy await your perfect setup.

« Older posts Newer posts »