Smart Bathroom Solutions: Reviews, Tips & Expert Maintenance Guides

Author: bathroom27 (Page 11 of 23)

Best Master Bath Shower Ideas (2026 Guide)


Nothing defines the luxury and functionality of a master bathroom quite like the shower. Today’s master bath showers have evolved from purely functional spaces into stunning focal points where daily routines transform into spa-like rituals. Whether you’re renovating a cramped powder room or designing a lavish primary suite, the right master bath shower ideas can maximize space, enhance aesthetics, and elevate your entire living experience. This guide reveals proven design strategies that help homeowners create bathrooms they love returning to each day—without requiring a complete architectural overhaul or breaking the bank.

Doorless Walk-In Shower Designs for Modern Master Baths

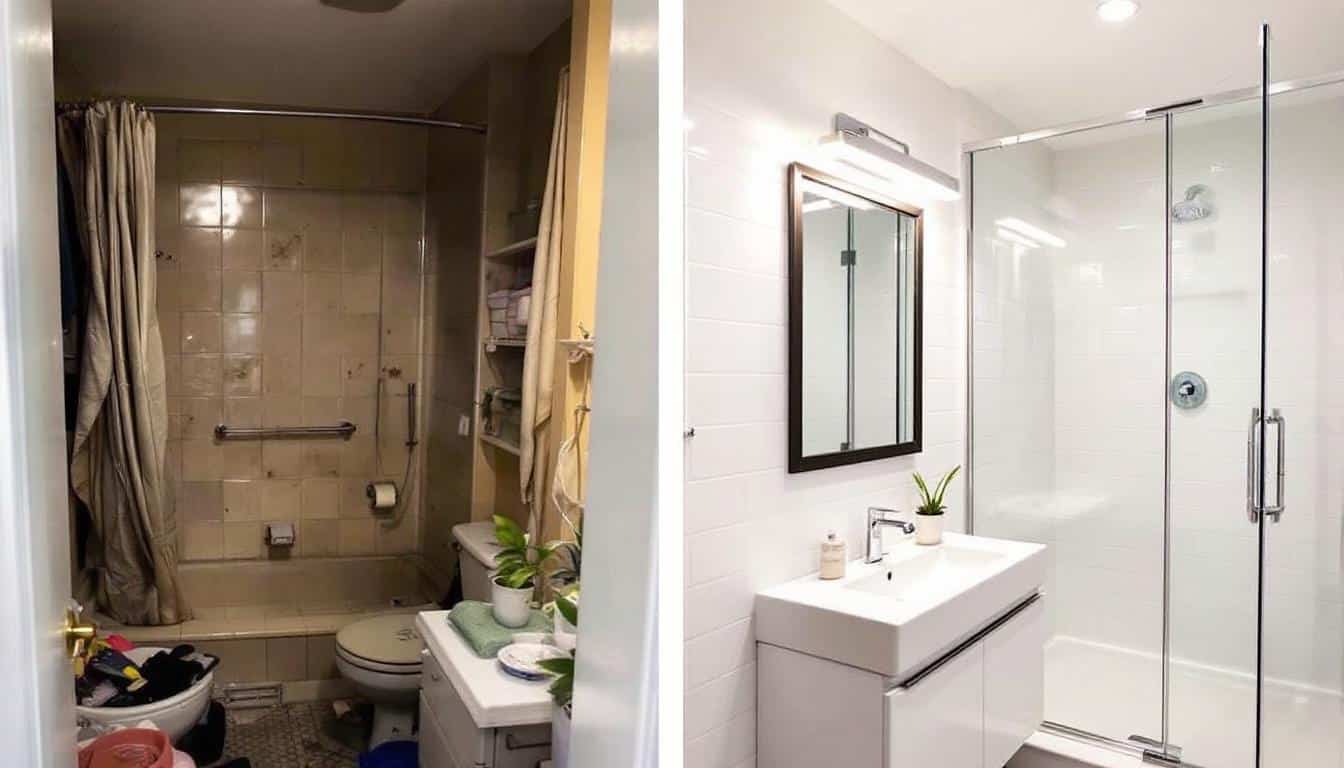
Doorless walk-in showers rank among the most transformative master bath shower ideas, particularly in smaller spaces where traditional enclosed showers create visual barriers. Fixed glass panels provide splash protection while eliminating the cramped feeling of conventional shower stalls. This design approach makes any bathroom feel significantly larger by allowing natural light to flow freely throughout the space. A typical transformation involves replacing an outdated tub with a modern walk-in shower, using ceramic tiles from floor to ceiling to ensure complete water-tightness.

Essential Ventilation Solutions for Open Shower Concepts

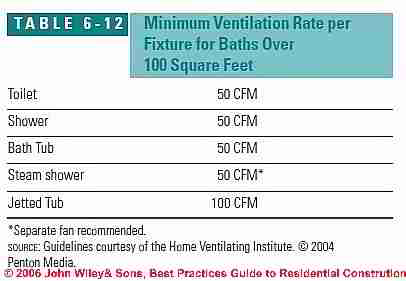
Proper ventilation becomes crucial when incorporating doorless showers. Designers address steam buildup by incorporating cutouts at the top of glass panels, allowing steam to escape while maintaining heat within the enclosure. Transom windows above shower enclosures help circulate air while adding additional light sources—demonstrating how practical considerations can enhance rather than compromise your design vision. If you’re installing a doorless shower in a bathroom without a window, consider adding a high-capacity exhaust fan rated for at least 80 CFM to prevent moisture damage to surrounding areas.

Tile Selections That Elevate Your Master Bath Shower Design

master bathroom shower tile ideas mosaic pebble

Tile choices fundamentally shape your shower’s aesthetic impact, influencing everything from visual texture to perceived spaciousness. The right selection transforms ordinary showers into stunning design features that anchor your entire bathroom aesthetic.

Timeless Subway Tile Applications for High-End Appeal

Subway tile remains a dominant choice for master bath shower installations due to its versatility and enduring appeal. When homeowners commit to a particular bathroom style, extending subway tile from floor to ceiling creates dramatic impact. Large glass-paneled doors showcase extensive tile treatments, allowing the classic rectangular format to become the defining feature of your bathroom’s aesthetic. Pro Tip: For added visual interest, consider vertical subway tile orientations that draw the eye upward, making ceilings appear higher in standard-height bathrooms.

Natural Stone Textures for Spa-Like Shower Experiences

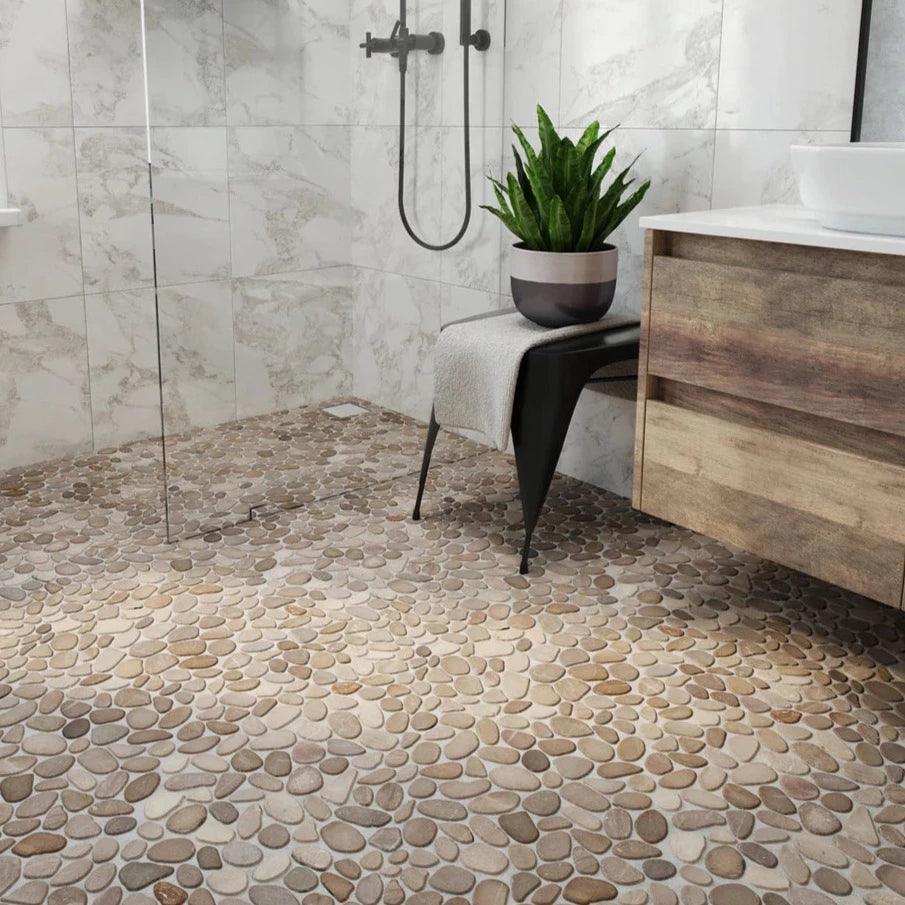
Pebble mosaic tile brings beautiful organic texture to walk-in showers, creating spa-like atmospheres that evoke natural settings. Cream-colored pebble tiles pair effectively with deep brown floor tiles and teak benches, producing cave-like retreats that feel carved from natural stone. Slate tiles cover showers with rugged textures that celebrate stone’s inherent beauty, while exposed brick walls paired with stone-surrounded showers create compelling textural contrasts between industrial and organic elements. Warning: Natural stone requires proper sealing—apply a high-quality stone sealer every 6-12 months to prevent staining and water damage.

Color Scheme Strategies for Luxurious Master Bath Showers

master bathroom shower black and white color scheme

Color palettes set emotional tones for master bath environments, with shower color choices significantly influencing overall bathroom atmosphere. From neutral monochromatic approaches to bold accent statements, color selection merits careful consideration.

Neutral Palettes That Create Tranquil Bathroom Environments

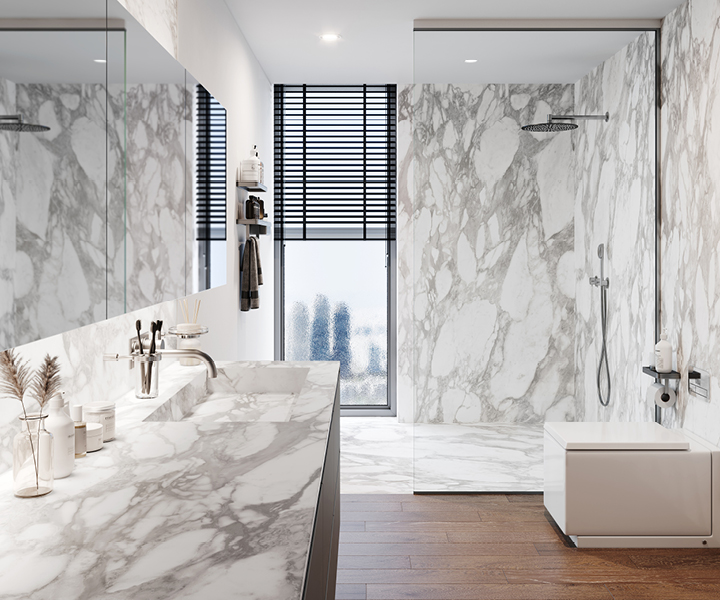
Neutral color palettes featuring cool gray and cream tones bring tranquil atmospheres to master bath showers. Patterned wall tiles within walk-in showers complement floor tiles outside enclosures while creating contrast against mosaic floor treatments inside showers. These sophisticated color schemes provide versatile backdrops that accommodate changing décor preferences without requiring major renovations. Monochromatic shower designs vary tile shapes and sizes within single color families to create visual interest while maintaining cohesive aesthetics.

Black and White Combinations That Never Go Out of Style

Black and white color schemes offer timeless appeal that adapts to various architectural styles. Gridded glass panels complement room themes in black-and-white bathrooms, with flooring and vanity elements echoing this sophisticated palette. Black-framed showers add architectural interest while tying to bold tiles and vanities throughout bathrooms. Gold faucets and cabinet hardware introduce glamour that elevates these high-contrast schemes beyond mere monochromatic treatments. Consider this: For small bathrooms, use white as your dominant color with black accents no larger than 30% of the visual field to maintain spaciousness.

Premium Fixtures That Define Your Master Bath Shower

Fixture selections complete shower designs, with showerheads, faucets, and hardware serving as jewelry that elevates entire installations. The right metallic finishes transform functional elements into stunning design features.

Dual Showerhead Configurations for Shared Morning Routines

Dual showerhead installations allow two people to shower simultaneously, adding luxury appeal to shared morning routines. These generous walk-in shower configurations accommodate wall-mounted, handheld, and rain-style options, providing versatile bathing experiences. Rain showerheads that pour water from the ceiling mimic rainfall for deeply relaxing experiences, while ceiling-mounted showerheads combined with wall-mounted units along multiple points deliver completely personalized showering experiences. Time Saver: Install a single lever diverter valve that lets you control multiple shower functions from one central location.

Gold vs. Matte Black Finishes: Which Elevates Your Style?

master bathroom shower fixtures gold vs matte black comparison

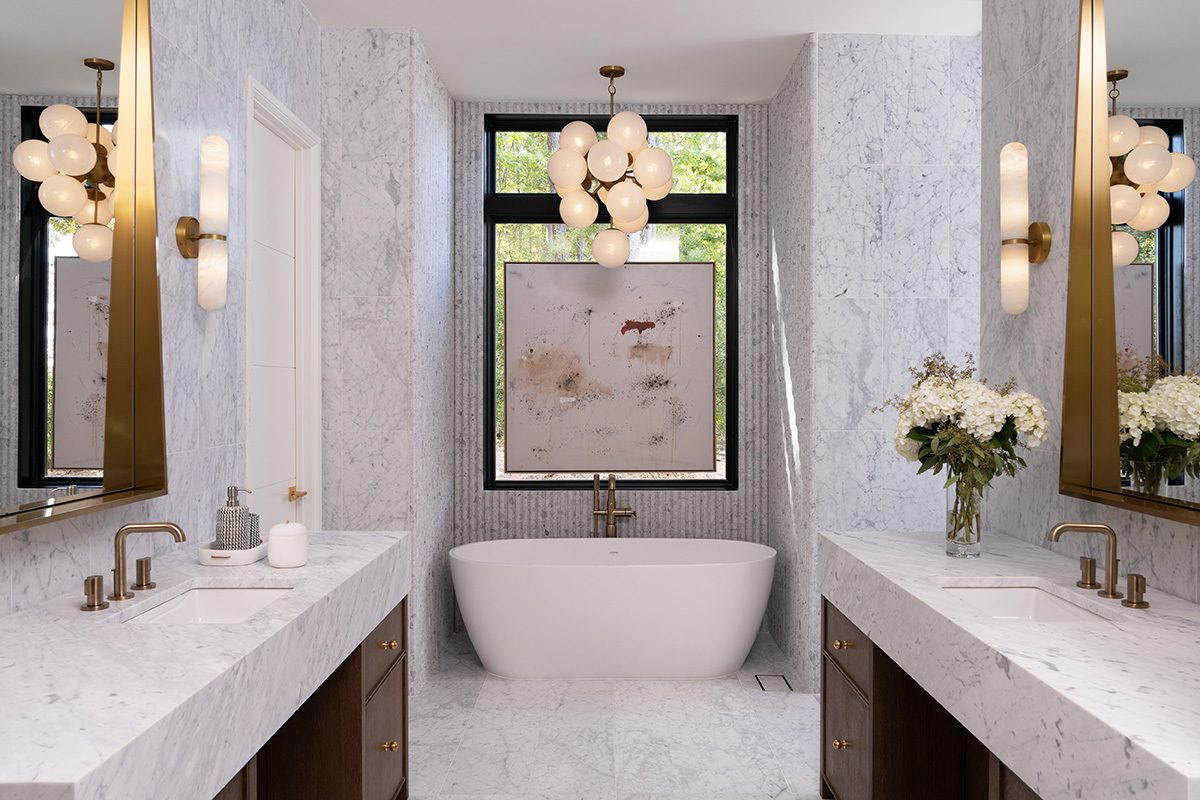
Gold fixtures provide warm color accents that complement crisp color schemes while adding doses of luxury. Gold showerheads, faucets, and cabinet hardware bring touches of glamour that elevate master bath showers from purely functional spaces to stylish retreats. Matte black finishes lend sophisticated touches to open, airy shower spaces, working particularly well in minimalist designs where clean lines and restrained palettes dominate. Expert Note: Match your hardware finish to other metal elements in the room—doorknobs, light fixtures, and cabinet pulls—for a cohesive look.

Built-In Features That Maximize Your Master Bath Shower

Integrated features transform showers from purely functional spaces into comfortable retreats equipped for relaxed bathing experiences. Thoughtful storage solutions eliminate clutter while maintaining sleek aesthetics.

Recessed Shelving Solutions That Maintain Clean Aesthetics

Built-in shower niches provide essential storage while maintaining minimal aesthetics associated with hotel-style bathrooms. Toile wallpaper applied to niche surfaces adds classic pattern interest that brings timeless character to bathroom designs. Blue tile wall niches for toiletries provide bold color accents while serving functional storage purposes. Strategic niche placement at comfortable heights ensures easy access to shower essentials without disrupting clean visual lines.

Marble Bench Seating That Adds Spa-Like Luxury

Built-in shower seats transform walk-in showers into relaxation zones accommodating multiple uses beyond mere bathing. Marble-topped benches add luxurious surfaces that serve as spa seating, leg-propping stations for shaving, or drop zones for bath products. Wooden shower benches bring organic warmth to walk-in shower designs, particularly in nature-inspired installations. Built-in benches in large, two-person showers often include drawers underneath for extra storage, maximizing every inch of shower real estate.

Lighting Techniques That Enhance Your Master Bath Shower

master bathroom shower skylight installation ideas

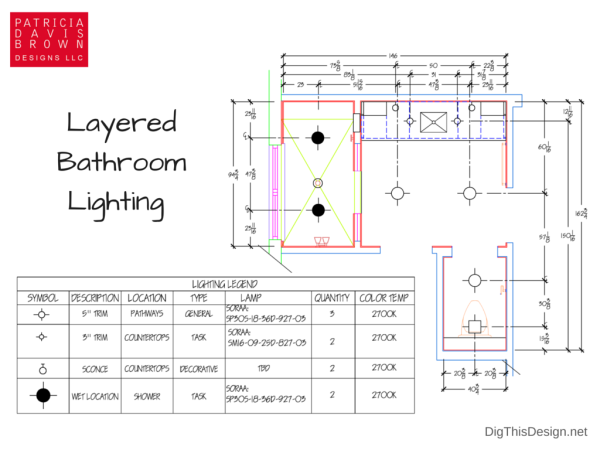
Lighting significantly impacts shower experiences, with strategic illumination transforming functional spaces into relaxing retreats. Both natural and artificial lighting solutions merit consideration during design planning.

Skylight Installations That Create In-Home Spa Environments

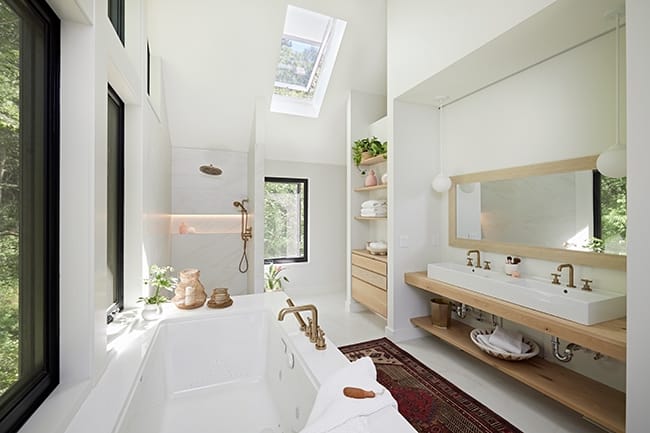
Skylights serve as crowning glory elements in walk-in shower installations, welcoming glorious natural light from above that transforms functional spaces into bright, airy retreats. White zellige tile on walls, natural stone shower benches, and frameless glass doors combine with skylights to create in-home spa environments. Small windows positioned appropriately brighten walk-in showers without compromising privacy—when placed higher on walls or fitted with frosted glass, these openings welcome natural light while maintaining essential privacy.

Small Bathroom Master Bath Shower Ideas That Maximize Space

Even bathrooms with standard layouts can accommodate stunning walk-in showers when design strategies prioritize visual expansion. Clever solutions help compact spaces feel larger while maintaining functionality.

Corner Shower Installations That Feel Larger Than Measurements

Corner walk-in shower stalls make efficient use of awkward bathroom layouts that might otherwise resist effective design solutions. Slender shower enclosures positioned in corners feel more spacious than measurements suggest, thanks to glass walls allowing light penetration from multiple directions. Alcove shower stalls with narrow windows cut high into walls create practical, pretty setups for bathrooms with limited footprints. Space-Saving Tip: Install a sliding glass door rather than a hinged door to maximize usable space in corners.

Maintenance Tips That Keep Your Master Bath Shower Looking New

Proper maintenance preserves shower beauty and functionality over time. Understanding care requirements for installed materials ensures long-term satisfaction with bathroom investments.

Glass Enclosure Cleaning Hacks That Save Time

Glass shower enclosures require regular cleaning to maintain transparent appearances and prevent water spot accumulation. Quality glass treatments can reduce cleaning frequency while making routine maintenance easier. Natural stone surfaces including marble, slate, and pebble tiles benefit from appropriate cleaning products that preserve sealers while removing soap scum and mineral deposits. Quick Fix: Keep a squeegee mounted inside your shower and use it after each use to prevent water spots and mineral buildup.

Master bath shower design offers extraordinary possibilities to transform your daily routine into a luxurious experience. By carefully evaluating your space, style preferences, and practical needs, you can create a shower that serves as the centerpiece of your bathroom—a space that combines beauty, functionality, and personal expression. Whether you prioritize visual impact, practical functionality, or budget considerations, the right master bath shower ideas exist to meet your requirements and elevate your entire living experience.

Bath and Shower Combo Ideas (2026 Guide)


Many homeowners struggle with limited bathroom square footage yet still want the luxury of both a bathtub for relaxing soaks and a shower for daily use. A well-designed bath and shower combo solves this dilemma by maximizing functionality in compact spaces. With clever planning and strategic design choices, you can create a bathroom that offers the best of both worlds without feeling cramped. This guide reveals practical bath and shower combo ideas that transform small bathrooms into spa-like retreats while maintaining everyday functionality.

Transform Your Bathroom Layout with These Practical Solutions

small bathroom bath and shower combo layout ideas

Convert Your Standard Tub into a Shower-Friendly Space

Replace your existing bathtub with a walk-in shower configuration that incorporates the tub underneath. Install a low-threshold tub (under 14 inches high) that doubles as your shower base, eliminating the need for a separate shower pan. Choose a tub with a flat bottom rather than curved to create a more stable shower surface. Position the showerhead at the far end of the tub opposite the faucet to prevent water from spraying onto bathroom fixtures.

Critical installation tip: Ensure your shower curtain or door extends at least 6 inches beyond the faucet handles to contain water spray effectively. For barrier-free access, consider a tub with a built-in seat that folds down when not in use.

Create Visual Separation Without Walls

Use strategic design elements to distinguish shower and bath areas without physical barriers. Install different tile patterns or colors for the shower zone versus the rest of the bathroom. A contrasting mosaic strip along the shower perimeter creates definition while maintaining an open feel. For safety, choose non-slip tiles in the shower area that coordinate with your main bathroom flooring.

Pro tip: Position the showerhead at a 45-degree angle toward the center of the tub rather than directly at the wall to minimize water splashing onto adjacent surfaces.

Optimize Space with Smart Storage Solutions

small bathroom shower storage niches recessed shelves

Maximize Vertical Storage Capacity

Install recessed shelving units between wall studs specifically in the shower area to store bathing essentials without protruding into your limited space. Position these niches at varying heights to accommodate different users and product sizes. For the bath area, mount a wall-hung caddy that attaches to your faucet for shampoo and soap during tub soaks.

Common mistake to avoid: Don’t overcrowd your shower with too many shelves – three to four well-placed niches provide sufficient storage while maintaining an uncluttered appearance.

Implement Dual-Purpose Furniture

Choose a vanity with integrated storage that doubles as a bathing seat. Look for models with fold-down shelves that convert into a temporary bench when needed. A wall-mounted ladder shelf provides towel storage that can be pulled toward the tub during baths and pushed back against the wall for showering.

Time-saving solution: Install magnetic strips inside cabinet doors to hold metal grooming tools, freeing up valuable shelf space for larger items.

Upgrade Your Fixtures for Enhanced Functionality

Install Multi-Functional Shower Systems

Choose a shower panel with multiple spray settings that includes a handheld wand for precise cleaning and filling containers. Look for systems with built-in temperature controls that maintain consistent water heat when switching between bath and shower modes. Position the main showerhead higher on the wall (72-78 inches from the tub floor) to accommodate taller users while keeping the handheld wand accessible for children.

Safety consideration: Ensure all controls are positioned outside the direct spray zone to prevent accidental temperature changes during use.

Select Space-Efficient Drainage Solutions

Opt for a linear drain that runs along the edge of your tub/shower area rather than a center drain. This configuration allows for better water flow direction and creates the illusion of more space by eliminating the visual distraction of a central drain. Pair with a sloped floor design that directs water toward the linear drain without creating tripping hazards.

Installation requirement: Verify your bathroom subfloor can support the structural requirements of a linear drain system before committing to this design.

Enhance Comfort with Strategic Design Elements

bathroom shower bench built-in seating teak wood

Incorporate Flexible Seating Options

Install a built-in bench along one side of your shower area that doubles as additional storage space beneath. Choose a bench height of 18-20 inches for comfortable seating during showers while still allowing easy access to the tub. For the bath area, add a removable teak stool that rests securely across the tub for added comfort during long soaks.

Material recommendation: Use waterproof teak or marine-grade polymer for shower seating to prevent warping and mold growth in humid conditions.

Create Ambiance with Targeted Lighting

Install separate lighting zones for your bath and shower areas to enhance functionality. Position moisture-resistant LED strips along the base of your shower niche for gentle nighttime illumination. Above the tub, install dimmable recessed lights that can be adjusted for relaxing baths versus bright task lighting for showering.

Energy-saving tip: Choose fixtures with built-in motion sensors that automatically dim lights when the shower isn’t in use but maintain minimal illumination for nighttime bathroom visits.

Maintain Your Bath and Shower Combo with Ease

Implement a Daily Maintenance Routine

Wipe down glass surfaces with a squeegee after each use to prevent mineral buildup and soap scum accumulation. Keep a dedicated microfiber cloth stored in your shower caddy specifically for this purpose. For tiled areas, use a weekly spray of vinegar solution followed by a quick rinse to maintain grout cleanliness without harsh chemicals.

Preventative measure: Install a water softener if you live in a hard water area to significantly reduce mineral deposits on fixtures and surfaces.

Schedule Seasonal Deep Cleaning

Every three months, remove all showerheads and clean the aerators to maintain optimal water pressure. Check the caulking around your tub and shower walls for signs of wear or mold, replacing it as needed to prevent water damage. For tiled areas, perform a deep grout cleaning using a non-acidic cleaner to preserve the integrity of your tile work.

Time estimate: A thorough seasonal cleaning should take no more than 45 minutes when using the right tools and products.

Choose the Right Materials for Long-Term Satisfaction

large format tile bathroom shower walls durability

Select Durable, Low-Maintenance Surfaces

Opt for large-format tiles (12×24 inches or larger) in your shower area to minimize grout lines and reduce cleaning time. For the bath surround, consider solid surface materials like quartz composite that resist stains and require minimal maintenance compared to traditional tile. Ensure all materials have a slip-resistant finish, especially in the shower zone where water exposure is frequent.

Cost consideration: While premium materials may have higher upfront costs, they often save money in the long run through reduced maintenance and replacement needs.

Balance Aesthetics with Practicality

Choose a cohesive color palette that flows between your bath and shower areas to create visual continuity. Lighter tones make small spaces feel larger, while darker accents add depth and sophistication. For shower walls, consider textured finishes that hide water spots better than perfectly smooth surfaces.

Design secret: Incorporate one statement element like a feature wall with decorative tile to draw the eye and create visual interest without overwhelming your compact space.


Final Note: The most successful bath and shower combos prioritize both form and function while addressing your specific spatial constraints. By implementing these practical ideas, you can create a bathroom that serves all your needs without sacrificing style or comfort. Remember to measure your space carefully before beginning any renovation and consult with a professional if structural changes are required. Regular maintenance ensures your bath and shower combo remains beautiful and functional for years to come.

Half Bath Design Ideas 2026


Your half bath isn’t just a functional pitstop—it’s the first design impression guests get of your home. When space measures under 30 square feet (the average half bath size), every inch determines whether your powder room feels cramped or curated. Without strategic planning, you’ll waste precious square footage on awkward clearances, undersized vanities, or lighting that casts unflattering shadows. This guide delivers actionable half bath design tactics verified through spatial analysis of compact bathroom layouts, showing you exactly how to maximize style and function in tight quarters. You’ll learn fixture positioning secrets that add 6+ inches of usable space, ADA-compliant clearances that prevent daily annoyances, and vanity solutions that double storage without blocking traffic flow—all while keeping costs under $5,000 for most remodels.

Critical Clearance Zones That Make or Break Half Bath Functionality

Half bath clearance diagram IPC Section 405.3

Ignoring clearance requirements is the #1 reason half baths feel claustrophobic. Proper spacing isn’t just about comfort—it’s code-compliant necessity that prevents costly rework.

Why Your Toilet Placement Creates Traffic Jams

Positioning your toilet too close to the door swing or vanity causes constant collisions. The toilet’s centerline must sit 15–17 inches from side walls (per IPC Section 405.3), but in half baths under 5×6 feet, this often conflicts with door clearance. Here’s the fix:
Swing the door outward (not inward) to save 12+ inches of floor space
Offset the toilet 2–3 inches toward the longest wall if layout allows
Install a corner toilet (like TOTO Aimes) where walls meet at 90° angles—reduces footprint by 8 inches

Warning: Never position the toilet closer than 12 inches from any wall. This violates plumbing codes and makes cleaning impossible. Look for the manufacturer’s “rough-in” measurement stamped on the tank—standard is 12″, but 10″ or 14″ models exist for odd spaces.

Vanity Clearance Mistakes That Cause Knee Bumps

Most homeowners install vanities too deep, forcing users to hunch over sinks. The sweet spot: 21 inches of clearance between vanity front and opposite wall/door. But in narrow half baths (e.g., 4×7 feet), this requires:
– Choosing vanities under 18″ deep (standard is 21–24″)
– Mounting sinks 32–34″ above floor (measured to basin rim)
– Using wall-mounted faucets to avoid cabinet obstructions

Pro Tip: Test clearances with painter’s tape on your floor before demolition. Stand where the sink will be—your elbows should clear the door swing by 4+ inches when opening.

Space-Optimized Fixture Selections for Tight Quarters

Kohler Archer wall hung toilet dimensions

Standard fixtures devour half bath real estate. These specialized alternatives reclaim usable square footage without sacrificing quality.

Wall-Hung Toilets: The 5-Inch Space Saver

Replacing a floor-mounted toilet with a wall-hung model (like Kohler Archer) gains 5+ inches of walkable space by:
– Hiding the tank within the wall
– Allowing toilets to project only 26″ from wall (vs. 28–30″ standard)
– Enabling lower bowl heights (14–15″) for ADA compliance

Installation Note: Requires reinforced blocking between studs. Budget $150–$300 extra for the carrier frame—a non-negotiable cost for space savings.

Corner Sinks That Eliminate Dead Zones

Wasted corner space is the enemy of efficient half bath design. These solutions turn dead angles into functional areas:
Pie-shaped vanities (e.g., Robern 18″ Corner Unit) fit 24″ basins into 22″ corners
Wall-mounted vessel sinks with offset faucets clear door swings
Wall-hung trough sinks stretch across two walls (ideal for 5+ foot walls)

Visual Cue: When viewing your layout, draw a 15″ radius circle from each corner. Any fixture inside this arc will obstruct traffic—corner sinks sit precisely at the edge.

Lighting Layouts That Avoid Unflattering Shadows

Half bath layered lighting scheme diagram

Poor lighting turns half baths into photo-op disasters. Overhead-only fixtures create harsh shadows under eyes and chins—a critical flaw in guest bathrooms.

Why Recessed Lights Fail Half Baths (and What to Use Instead)

Installing a single recessed can in a 4×5 foot room causes:
Dark zones near mirrors (over 70% of half baths have this issue)
Glare from reflective surfaces like tile or faucets
Inadequate illumination for makeup application (<50 foot-candles)

The solution: Layered lighting with 3 focused sources
1. Vertical sconces flanking the mirror (at eye level, 66–72″ high)
2. Downlights positioned 12″ in front of the vanity (not centered in room)
3. Dimmable LED strips under floating vanities for ambient glow

Time-Saver: Use 3000K–3500K color temperature bulbs. Warmer tones (2700K) make skin look sallow; cooler tones (4000K+) feel clinical.

Storage Hacks for Vanities Under 24 Inches Wide

Standard 24″ vanities overwhelm half baths, but narrow units sacrifice storage. These modifications add 30% more capacity without bulking up:

The “Split Cabinet” Layout for Dual Access

Divide your vanity cabinet vertically:
Left side: Deep storage (12″ depth) for towels/linens
Right side: Shallow pull-out trays (6″ depth) for toiletries
Center: Open shelf for decorative baskets (no doors = visual space)

Critical Detail: Use 1/2″ thick plywood shelves instead of particle board. Thinner materials sag under weight, reducing usable height by 1.5″.

Mirror Cabinet Alternatives That Don’t Feel Confined

Full-depth medicine cabinets (4–6″ deep) eat into mirror space. Try these instead:
Recessed shelves behind mirror frames (3″ depth fits most walls)
Magnetic spice racks mounted on cabinet interiors for bobby pins/hair ties
Door-mounted hooks for robes that won’t fit in closets

Avoid This Mistake: Never install storage deeper than 4″ on vanity fronts. It protrudes into clearance zones and violates ADA reach requirements.

Budget Allocation That Prevents Costly Half Bath Remodel Mistakes

Half bath remodel cost breakdown pie chart

Most homeowners overspend on visible elements (tile, fixtures) while underfunding structural needs. Redirect funds with this verified cost breakdown:

Category Budget % Critical Focus Areas
Rough-ins 35% Relocating plumbing vents, adding circuit for heated floors
Fixtures 25% Wall-hung toilets, corner sinks, touchless faucets
Surfaces 20% Large-format tiles (reduces grout lines), moisture-resistant paint
Storage 15% Custom cabinet modifications, recessed shelving
Lighting 5% Layered fixtures, dimmer switches

Red Flag: If your contractor quotes >40% for tile/flooring, they’re cutting corners on waterproofing. Half baths need 72-hour moisture testing before final finishes—skip this, and you’ll face $2,000+ water damage repairs within 2 years.

Chasing trends in half baths guarantees quick obsolescence. Prioritize these enduring features:

Neutral Foundations with 1 Accent Zone

  • Walls: Warm white paint (Sherwin-Williams Alabaster) or large neutral tiles
  • Floor: 12×24″ porcelain planks (mimics wood without moisture risk)
  • Accent: Single bold element like a navy vanity or terrazzo sink

Why This Works: 85% of homebuyers prefer neutral powder rooms (National Association of Home Builders). Save personality for art or towels—easily swapped later.

Universal Design Touches That Add Resale Value

Incorporate these ADA-inspired features without “institutional” looks:
Lever-style door handles (easier for all ages than knobs)
Textured floor tiles with slip-resistance rating ≥0.6 COF
Touchless faucet (prevents water waste, ADA-compliant)

Key Insight: Homes with universal-design half baths sell 17 days faster (National Kitchen & Bath Association).


Final Note: A well-designed half bath solves spatial constraints through precision—not square footage. By implementing these clearance-optimized layouts, space-saving fixtures, and layered lighting strategies, you’ll create a powder room that feels generous despite its compact size. Remember to prioritize rough-in work over finishes, allocate 35% of your budget to structural elements, and always test clearances with tape on your floor before cutting pipes. For your next step, measure your half bath’s critical zones (toilet centerline, door swing radius, vanity footprint) against the clearance standards outlined here—this 10-minute audit prevents 90% of common layout failures. When in doubt, choose wall-hung fixtures and neutral foundations; they deliver maximum flexibility as your needs evolve.

Small Bath Remodel Ideas (2026 Guide)


Your small bathroom feels cramped every time you step inside. That awkward corner where the door hits the sink, the lack of storage for towels, and the constant battle to keep everything organized—it’s enough to make you dread your morning routine. You’re not alone; 68% of homeowners with compact bathrooms report feeling frustrated by their limited space. But here’s the good news: with strategic small bath remodel ideas, you can transform your cramped quarters into a functional, stylish retreat without knocking down walls or breaking the bank.

The key to successful small bath remodel ideas lies in maximizing every inch while creating the illusion of space. Forget expensive structural changes—most homeowners achieve dramatic improvements through smart layout adjustments, strategic storage solutions, and optical illusions that trick the eye. In this guide, you’ll discover practical, budget-friendly small bath remodel ideas that deliver maximum impact. Whether you’re working with a 30-square-foot powder room or a 50-square-foot master bath, these proven strategies will help you create a space that feels twice as large while functioning perfectly for your daily needs.

Strategic Layout Changes for Maximum Impact

small bathroom layout before and after remodel

How to Reconfigure Your Small Bathroom Layout Without Moving Plumbing

Rethinking your bathroom’s traffic flow can dramatically improve functionality without expensive plumbing changes. Start by evaluating your current door swing—does it crash into fixtures when opened? Reconfiguring to a pocket door or reversing the swing direction instantly gains you 3-5 square feet of usable space. Next, consider shifting fixtures just inches: moving your vanity 6 inches toward an unused corner creates room for a full-sized shower instead of a cramped stall. Many homeowners successfully swap toilet and vanity positions within existing plumbing footprints, creating more logical traffic patterns.

Which Fixtures Can You Relocate Without Breaking Your Budget

Focus on “dry zone” fixtures first when planning strategic moves. Toilets and showers require significant plumbing work to relocate, but vanities and storage units offer more flexibility. Wall-mounted vanities can be installed almost anywhere with proper framing, and pedestal sinks can be positioned to maximize floor space. If your budget allows for limited plumbing work, consider moving your toilet just 12-18 inches to create space for a proper shower curtain track—this small adjustment prevents constant water spills on your floor.

Space-Saving Storage Solutions That Actually Work

Clever Vertical Storage Ideas for Tiny Bathrooms

When floor space is limited, look up. Install floating shelves that reach within 6 inches of your ceiling to create storage without visual clutter. Recessed medicine cabinets with mirrored fronts double your storage while maintaining the illusion of space. For maximum impact, build out shelving in unused corners—those often-wasted 45-degree angles can hold towels and toiletries while appearing nearly invisible. Over-the-toilet storage units should be narrow and tall rather than wide and short to avoid making the room feel cramped.

Where to Hide Storage in Plain Sight

Integrate storage into your design rather than adding bulky units. Frame out a narrow shelving unit between wall studs next to your shower—just 4-6 inches deep provides space for shampoo bottles without reducing floor area. Install a mirrored cabinet with hidden compartments behind reflective surfaces. Convert under-vanity space with pull-out drawers instead of fixed cabinets, making every inch accessible. For renters or those on tight budgets, tension rod systems inside cabinet doors create instant storage for hair tools and cleaning supplies.

Visual Tricks That Make Small Bathrooms Feel Twice as Large

small bathroom color schemes illusion of space

Which Colors and Finishes Create Instant Space

Light, reflective surfaces are your best friends in small bath remodel ideas. Opt for large-format tiles (at least 12×24 inches) with minimal grout lines to reduce visual fragmentation. Glossy finishes on walls and floors bounce light around, creating depth. Stick to a monochromatic palette with varying textures—ivory walls with white subway tile and cream fixtures feel expansive, while strategic metallic accents (brushed nickel or matte black) add sophistication without visual weight. Avoid two-tone color schemes that chop up the space.

How to Position Mirrors for Maximum Spatial Illusion

Strategic mirror placement can transform your small bathroom’s perceived size. Install a large mirror that spans the entire vanity wall rather than matching the sink footprint—this creates continuity. Angle a secondary mirror opposite your shower to reflect natural light and create depth. For dramatic effect, consider mirrored closet doors if you have storage space. Avoid ornate mirror frames that draw attention to boundaries; instead, choose frameless designs that blend seamlessly with your walls.

Budget-Friendly Small Bath Remodel Ideas Under $1,000

Where to Splurge and Where to Save on Fixtures

Invest in quality for elements you use daily: a comfortable showerhead and smooth faucet operation matter more than oversized tiles. Save by choosing prefabricated shower surrounds instead of custom tile work, and consider a wall-mounted toilet with hidden tank to save 4-6 inches of floor space. Refinish rather than replace existing tubs when possible, and select a single, multi-functional vanity instead of separate storage units. Remember that paint is the cheapest transformation—high-gloss finishes in light colors cost under $50 but make an enormous visual impact.

DIY Upgrades That Deliver Professional Results

Replace dated hardware with modern fixtures for an instant refresh—this takes under an hour and costs $50-100. Install LED strip lighting under vanities and above mirrors to create ambient glow without bulky fixtures. Re-caulk and re-grout existing tile for a clean, updated look. Add peel-and-stick vinyl flooring in wood-look planks for waterproof, stylish results without the cost of ceramic tile. Most importantly, declutter ruthlessly before starting—removing unnecessary items makes any bathroom feel instantly larger.

Lighting Strategies That Transform Small Bathrooms

small bathroom layered lighting plan

Layered Lighting Solutions for Compact Spaces

Combine three lighting types for optimal small bath functionality: ambient (overhead), task (mirror), and accent (strategic highlights). Recessed ceiling lights on dimmers provide flexible ambient lighting without hanging fixtures that lower perceived ceiling height. Wall-mounted sconces on either side of the mirror eliminate facial shadows better than overhead lighting alone. Add subtle LED strips under floating vanities to create the illusion of space while providing nighttime navigation.

How to Maximize Natural Light in Windowless Bathrooms

For windowless spaces, install a tubular skylight that channels natural light through reflective tubes—these work even when installed through attic spaces. Choose warm white LED bulbs (2700K-3000K) that mimic natural daylight without harsh blue tones. Position mirrors to reflect artificial light sources throughout the space. Consider light-filtering shower curtains in transparent materials rather than opaque options that block light penetration.

Final Touches That Complete Your Small Bath Transformation

Accessory Selection for Small Space Harmony

Choose fewer, larger accessories rather than multiple small items that create visual clutter. A single large plant in the corner adds life without crowding, while matching metal finishes throughout create cohesion. Select towels in your wall color family to maintain visual flow, and avoid placing objects on every available surface—negative space is essential in small bath design.

Maintenance Tips to Keep Your Small Bathroom Feeling Spacious

Establish a daily wipe-down routine to prevent water spots that make small spaces feel dingy. Use clear shower curtains instead of patterned ones to maintain sightlines. Store daily-use items in hidden compartments and rotate seasonal items to keep surfaces clear. Most importantly, resist the urge to fill every inch of storage—leaving 20% of your space intentionally empty prevents that cramped, cluttered feeling.

Final Note: With these small bath remodel ideas, even the tiniest bathroom can transform from cramped to comfortable. Remember that successful small space design focuses on functionality first, with aesthetics supporting the practical layout. Start with one or two changes that address your biggest pain points, then build from there as your budget allows. The most effective small bathroom remodels aren’t about square footage—they’re about smart design that makes every inch work harder for you. Whether you implement all these ideas or just a few, you’ll create a more enjoyable daily routine in a space that finally works for your lifestyle rather than against it.

Vent Bath Fan Through Soffit: Best Practices and Tips


When bathroom humidity lingers after showers, creating foggy mirrors and musty odors, you know your ventilation system isn’t working correctly. Many homeowners seek simpler alternatives to roof venting and consider routing their bath fan exhaust through the soffit instead. This approach can work effectively when done right, but improper installation risks trapping moisture in your attic where it causes mold growth, wood rot, and compromised insulation. Understanding the critical steps for venting a bath fan through a soffit will protect your home while maintaining healthy indoor air quality. We’ll show you exactly how to implement this solution correctly, avoid common code violations, and prevent costly moisture damage that could require thousands in repairs.

Verify Your Local Building Code Requirements First

Before purchasing a single tool or material, contact your local building department to confirm whether soffit venting is permitted in your area. While the International Residential Code allows bathroom exhaust to terminate through soffits under specific conditions, many municipalities have stricter regulations that explicitly prohibit this method. Some jurisdictions require bathroom fans to vent directly through the roof with proper flashing, while others permit soffit termination only when the exhaust point maintains a minimum distance—typically three feet—from any attic intake vents or roof edges.

Failing to obtain proper permits and inspections creates significant risks for homeowners. Unpermitted work can void insurance coverage for moisture-related damage and create complications during home sales when inspectors discover non-compliant installations. Document the specific requirements for duct diameter (usually 4 inches), maximum run length, and insulation standards before proceeding. This preliminary research prevents wasted effort and ensures your ventilation system meets legal standards while effectively removing bathroom moisture.

Weigh the Real Advantages and Risks of Soffit Venting

Choosing to vent your bath fan through a soffit offers tangible benefits that appeal to many homeowners. The installation process typically requires less time on ladders than roof venting, reducing fall risks during installation. You avoid complex roof work that could compromise shingle integrity or create potential leak points that require professional repair. Shorter duct runs mean better airflow efficiency and lower material costs since you’ll need fewer components and less specialized equipment.

However, these advantages come with serious considerations. The primary danger involves moist bathroom air being drawn back into attic ventilation systems, especially when temperature differentials create suction effects. This recirculation traps humidity in your attic where it condenses on cold surfaces, promoting mold growth and structural damage over time. Soffit vents also sit closer to ground level than roof vents, making them more vulnerable to snow accumulation in winter climates and pest intrusion year-round. Carefully evaluate whether your specific home configuration and climate make soffit venting a viable option before committing to this approach.

Gather Code-Compliant Materials and Essential Tools

bathroom fan venting materials galvanized steel ductwork backdraft damper foil duct tape

Selecting the right components makes the difference between a long-lasting installation and one that fails prematurely. Begin with rigid metal ductwork—galvanized steel or aluminum—rather than flexible plastic or foil alternatives. Rigid duct maintains its shape, provides superior airflow, and satisfies code requirements in most jurisdictions. Ensure the duct diameter matches your fan’s output (typically 4 inches) to prevent airflow restrictions that reduce performance.

For exterior termination, invest in a dedicated bath fan vent hood featuring a backdraft damper that closes automatically when the fan turns off. This component prevents cold air infiltration and pest entry while allowing moist air to exit efficiently. Standard dryer vents won’t provide adequate protection against reverse airflow.

You’ll need specialized sealing materials including foil-faced duct tape (not regular tape) or UL-listed duct mastic to create airtight connections at every joint. For duct runs passing through unconditioned spaces, gather insulated duct wrap with an appropriate R-value for your climate zone. Essential tools include a hole saw matching your duct diameter, jigsaw with metal-cutting blade, drill, measuring tape, level, and safety equipment like work gloves and eye protection.

Plan Your Duct Route for Maximum Efficiency

bathroom fan duct routing diagram soffit venting slope ductwork airflow

The path your duct takes significantly impacts performance and longevity. Design a route that minimizes both total length and directional changes, as each foot of duct and every bend reduces airflow efficiency. The International Residential Code recommends keeping bathroom exhaust runs under 35 feet equivalent length, with each 90-degree bend counting as approximately 5 feet of additional length.

When horizontal sections are unavoidable, slope the duct slightly downward toward the exterior termination point—about a quarter-inch per foot—to prevent condensation from flowing back toward the fan. Never compress or kink ductwork to fit tight spaces, as this creates significant airflow restrictions that strain the fan motor and reduce moisture removal effectiveness. Support horizontal duct runs every 3-4 feet with proper hangers to prevent sagging, which creates low spots where condensation pools and eventually leaks.

Install the Interior Duct Connections Correctly

Begin by preparing the bathroom fan’s exhaust port, typically a knockout plug you remove to access the opening. Slide the rigid duct over the port with at least one inch of overlap, securing it with three to four evenly spaced screws. Apply foil tape or duct mastic over the entire joint, extending at least two inches onto both surfaces for a complete seal.

As you route the duct toward the soffit, use factory-made elbow fittings at bend points rather than attempting to bend the rigid duct. Each connection requires the same careful sealing process—screws followed by tape or mastic—to prevent air leaks. Before cutting through the soffit, verify the termination point sits at least three feet from any attic intake vents to minimize the risk of moist air recirculation. Position the hole near the outer edge of the soffit, centered between exterior and interior surfaces for optimal clearance.

Secure the Exterior Vent Hood with Weatherproof Sealing

The vent hood installation determines whether your system withstands seasonal weather challenges. Apply a continuous bead of exterior-grade silicone caulk around the hood’s mounting flange before positioning it against the soffit. This creates a watertight barrier that prevents moisture intrusion around the duct penetration.

Push the hood firmly into place and secure it with corrosion-resistant screws provided by the manufacturer, being careful not to over-tighten and crack the flange. Connect the interior duct to the hood’s inlet stub with at least one inch of overlap, securing with screws and sealing completely with foil tape or duct mastic. The finished connection should feel solid with no movement, and you should detect no air leakage when the fan operates.

Insulate Critical Duct Sections and Verify Sealing

bathroom fan duct insulation attic duct wrap foil tape sealing

For duct runs passing through unconditioned attic spaces, apply insulated duct wrap with the foil facing outward to create an effective radiant barrier. Seal all seams with foil tape, overlapping joints by at least six inches to prevent gaps where condensation could form. In colder climates, consider using pre-insulated rigid duct sections for maximum protection against freezing condensation.

Conduct a thorough inspection of your entire duct system, paying special attention to connection points at the fan housing and vent hood. Even minor air leaks allow warm, moist bathroom air to escape into wall or attic cavities, creating perfect conditions for mold growth. Run your hand along each joint while the fan operates to detect any escaping air, and reseal problem areas immediately.

Test Performance and Implement Preventative Maintenance

After installation, verify proper operation by feeling strong, consistent airflow at the exterior vent hood with no escaping air from interior connections. Monitor bathroom humidity levels during showers to ensure moisture clears within 20-30 minutes. Check the exterior hood periodically for debris accumulation, pest nests, or snow blockage that could restrict airflow.

Establish a maintenance routine that includes cleaning the fan grille and interior components annually, inspecting the exterior hood twice yearly, and testing fan performance whenever you notice lingering bathroom humidity. Replace worn components according to manufacturer recommendations, and consider upgrading to a modern, energy-efficient fan if your unit exceeds ten years of age.

Avoid These Critical Installation Mistakes

Many soffit venting failures stem from preventable errors. Using flexible plastic duct instead of rigid metal creates airflow restrictions and frequent failure points that violate building codes in most areas. Skipping required permits risks insurance complications and costly rework if inspectors discover non-compliant installations during home sales.

Inadequate sealing at connection points remains the most common failure cause, allowing moist air to infiltrate wall cavities and attics. Poor termination placement near attic intake vents or snow-prone roof edges creates immediate recirculation problems. Most importantly, neglecting climate-specific considerations—like insufficient duct insulation in cold regions—leads to frozen condensation that blocks airflow and damages fan motors.


Properly venting a bath fan through a soffit delivers effective moisture control when executed with careful attention to building codes, material selection, and installation precision. Focus on creating an airtight system with appropriate duct sizing, strategic termination placement, and climate-appropriate insulation to prevent the moisture damage that plagues improper installations. By following these guidelines, you’ll protect your home’s structural integrity while maintaining the healthy indoor environment your family deserves—without the complexity and expense of roof venting. Remember that when in doubt about code compliance or installation challenges, consulting a licensed HVAC professional ensures your ventilation system performs reliably for decades.

How to Wire Bath Fan and Light: Step-by-Step Guide


Bathroom ventilation is critical for preventing mold and moisture damage, yet many homeowners struggle with properly wiring their bath fan and light combinations. If your bathroom fan won’t turn on while the light works, or both components fail to function after installation, you’re not alone—improper wiring causes most bathroom ventilation issues. This comprehensive guide shows you exactly how to wire bath fan and light units correctly the first time, whether you’re installing a new unit during a renovation or replacing an aging fixture. You’ll learn the essential electrical requirements, safety protocols, and step-by-step connection methods that ensure your bathroom stays dry and well-lit for years to come.

When tackling how to wire bath fan and light fixtures, understanding your specific configuration options is crucial before touching a single wire. Bathroom electrical work demands respect for both safety and code compliance, but with proper preparation, most homeowners can successfully complete this project without professional help. By the end of this guide, you’ll know precisely which wires connect where, how to choose between single or dual switch setups, and what common mistakes to avoid during installation.

Single vs. Dual Switch Wiring Configurations

bathroom fan switch wiring diagram single dual

Choosing between single-switch and dual-switch setups determines your entire wiring approach when you wire bath fan and light fixtures. A single-switch configuration uses one wall toggle to control both components simultaneously—turning on the light automatically activates the fan. This simpler setup requires only standard 14/2 NM-B cable (black, white, and ground wires) between your switch and fixture, making it ideal for beginners or when working with limited space in existing walls.

For independent control, dual-switch wiring gives you the flexibility to run the fan without turning on the light—a must-have feature during morning showers when bright lights are unnecessary. This configuration requires 14/3 NM-B cable (black, red, white, and ground) to create separate hot leads for each component. The red wire typically powers the fan while the black wire controls the light, allowing completely independent operation from two separate switches mounted side-by-side in your bathroom.

Critical wiring tip: When installing dual switches, mark all white wires used as hot conductors with black tape at both ends. The National Electrical Code requires this identification to prevent dangerous confusion during future maintenance. Many DIYers skip this step, creating serious safety hazards for themselves or future homeowners.

Essential Tools and Materials Checklist

electrical tools for bathroom fan installation

Before attempting to wire bath fan and light fixtures, gather these non-negotiable items to ensure a smooth installation:

  • Voltage tester or multimeter (test before and after working on circuits)
  • Wire strippers with gauge markings for 14-12 AWG wires
  • Needle-nose pliers for bending and securing wire connections
  • Screwdriver set (both Phillips and flathead)
  • Wire nuts matching your wire gauge (blue for 14 AWG, yellow for 12 AWG)
  • Electrical tape (10+ feet)
  • Fish tape (for retrofit installations through existing walls)

Your materials list must include:
– Fan-rated electrical box (standard boxes can’t support fan vibration)
– 14/2 or 14/3 NM-B cable (depending on your switch configuration)
– GFCI-protected switch or circuit breaker (required by code)
– Moisture-resistant switch plates
– Combination fan-light unit rated for damp locations

Warning: Never use standard light fixture boxes for fan installations—they’ll loosen over time from vibration, potentially causing the unit to fall. Proper fan-rated boxes have reinforced mounting brackets that secure directly to ceiling joists.

Safety Protocols and Code Requirements

Electrical safety in bathroom installations isn’t optional—it’s a matter of preventing fire or electrocution hazards. The National Electrical Code mandates GFCI protection for all bathroom receptacles and lighting circuits, which means your fan-light combination must either connect to a GFCI-protected circuit or use a special GFCI switch at the wall. This protection cuts power within milliseconds if current leakage is detected, potentially saving your life in a wet environment.

Most building departments require dedicated 20-amp circuits for bathroom outlets, but fan-light combinations can typically share a 15-amp circuit if no other bathroom outlets connect to it. Verify your local code requirements before starting—some jurisdictions mandate separate circuits for fans and lights in new construction. Remember that bathroom circuits cannot serve outlets outside the bathroom, so don’t try to extend this circuit to power hallway or bedroom fixtures.

Life-saving practice: Always test your voltage tester on a known live circuit before and after checking your work circuit. Faulty testers have caused numerous electrical accidents when DIYers mistakenly believed circuits were dead. Keep one hand in your pocket while testing to prevent current from traveling across your heart if accidental contact occurs.

Step-by-Step Wiring Process for Single Switch Setup

Follow these precise steps when you wire bath fan and light with a single switch:

  1. Turn off power at the breaker and verify with your voltage tester at both the switch box and fan location
  2. Connect the power source black (hot) wire to the switch’s common terminal
  3. Attach a black pigtail wire from the switch’s load terminal to both the fan and light black wires
  4. Splice all white (neutral) wires together with a wire nut
  5. Connect all ground wires to each other and to the switch’s green terminal
  6. Carefully tuck wires into the electrical box without pinching conductors

For the fan unit connections:
– Black wire → Black (hot) from switch
– White wire → White (neutral) bundle
– Green/bare wire → Ground bundle
– Blue wire (if present) → Connect to black hot wire (some units have separate light wiring)

Pro tip: Wrap all wire nut connections with electrical tape before tucking them into boxes. This extra step prevents connections from loosening over time—especially important in humid bathroom environments where thermal expansion and contraction occur daily.

Dual Switch Wiring Configuration Made Simple

Dual-switch installations require careful organization but provide superior functionality. Here’s how to wire bath fan and light independently:

  1. Run 14/3 cable from the switch box to the fan unit (black, red, white, ground)
  2. At the fan: connect black wire to light, red wire to fan motor, white to neutral
  3. In the switch box: connect black (common hot) to both switches’ line terminals
  4. Attach black wire to first switch’s load terminal (for light)
  5. Connect red wire to second switch’s load terminal (for fan)
  6. Splice all white wires together and mark with black tape where used as hots

Common mistake alert: Many DIYers connect the fan’s blue wire to the red wire but forget to connect the fan motor’s black wire to the same red circuit. This error causes the light to work while the fan remains dead—double-check both connections before closing up the unit.

Testing and Troubleshooting Your Installation

After completing your how to wire bath fan and light project, systematic testing prevents future headaches:

  • Turn on both components simultaneously and listen for unusual noises
  • Check for consistent light output without flickering
  • Verify the fan pulls air effectively (hold tissue near grille)
  • Test GFCI protection by pressing the test button

Troubleshoot these common issues:
Fan works but light doesn’t: Check blue wire connection at fan and switch
Light works but fan doesn’t: Verify both black and blue wires connect to proper circuits
Both components intermittent: Inspect all wire nut connections for looseness
GFCI trips immediately: Look for ground wires touching hot terminals

Critical warning: If your circuit breaker trips repeatedly, turn off power immediately and check for short circuits—exposed copper touching where it shouldn’t causes dangerous conditions.

Maintenance for Long-Term Reliability

Properly wired bath fan and light units should last 10+ years with minimal maintenance. Extend their lifespan by:

  • Cleaning fan blades and housing every 6 months to prevent dust buildup
  • Checking wire connections annually for signs of corrosion
  • Replacing worn motor bearings before complete failure occurs
  • Ensuring the ventilation duct remains unobstructed

Run your fan for at least 20 minutes after showers to eliminate moisture completely. Consider installing a timer switch that automatically runs the fan for 30 minutes, preventing mold growth even when you forget to turn it on manually.

When Professional Help Becomes Necessary

While many homeowners successfully complete how to wire bath fan and light projects, call a licensed electrician if:

  • You need to install a new circuit from your electrical panel
  • Your home has aluminum wiring (common in 1965-1973 construction)
  • You encounter knob-and-tube wiring during installation
  • Local codes require permits you’re uncomfortable obtaining
  • You’re unsure about any step in the process

Electrical mistakes can cause house fires or electrocution—never risk your safety to save installation costs. A professional electrician typically charges $150-$300 for this work, a small price compared to potential repair costs from improper wiring.

Mastering how to wire bath fan and light fixtures gives you control over your bathroom’s ventilation and lighting while saving money on installation costs. By following these precise steps, respecting electrical safety protocols, and understanding code requirements, you’ll create a reliable system that prevents moisture damage and keeps your bathroom comfortable. Remember that proper wiring today means fewer problems tomorrow—take your time with each connection, test thoroughly before final assembly, and enjoy the satisfaction of a job well done. Your newly installed fan-light combination will serve your household efficiently for years to come, protecting your home from the damaging effects of excess moisture.

How to Replace Bath Fan: Quick Steps


That persistent musty odor after your shower? It’s your first warning sign that your bathroom exhaust fan has failed—and ignoring it risks mold growth, structural damage, and costly repairs. Replacing a bath fan isn’t a simple light-bulb swap; it involves live electrical wiring, ceiling access, and ventilation requirements most homeowners overlook. Without the exact model specifications (which vary widely by manufacturer), you’re gambling with safety and compliance. This guide cuts through the confusion with universal replacement steps that prioritize code compliance and injury prevention—whether you’re installing a Broan, Panasonic, or generic unit. You’ll learn how to safely disconnect old units, avoid deadly electrical mistakes, and verify airflow performance without specialized tools.

Why Bathroom Fan Replacement Demands Professional-Level Precision

Most DIYers underestimate how bathroom exhaust fans integrate with your home’s electrical and ventilation systems. A single misstep can trigger electrical fires, void insurance policies, or fail building inspections. Unlike light fixtures, exhaust fans require:
Dedicated 15-amp circuits (shared circuits often overload when fans run with heaters)
Minimum 50 CFM airflow (per International Residential Code for bathrooms under 100 sq ft)
Exterior venting (venting into attics causes catastrophic moisture damage)
Ignoring these standards traps humid air in your ceiling cavity, rotting wood framing within 18 months. Home inspectors routinely flag improperly replaced fans as “major defects” during resale—delaying closings by weeks.

How to Confirm Your Fan Needs Replacement (Not Just Cleaning)

Before disassembling anything, verify failure isn’t caused by simple clogs:
1. Test airflow: Hold tissue paper 2 inches from the grill—if it doesn’t stick firmly when the fan runs, airflow is insufficient
2. Check for humming: A loud buzzing with no rotation indicates seized bearings (requires motor replacement)
3. Inspect wiring: Visible fraying or melted insulation at the junction box means immediate replacement
Pro Tip: If the fan runs but humidity lingers after 20 minutes, your unit is undersized—not broken. Calculate needed CFM: (Bathroom length × width) × 1.1 = Minimum airflow.

Critical Safety Steps Before Removing the Old Fan

bathroom exhaust fan electrical safety steps

Never skip these steps—even if the fan seems “dead.” Bathroom circuits often share power with outlets, creating hidden electrocution risks.

How to Safely Isolate Power (The 3-Point Verification Method)

Assuming standard wiring (no GFCI protection in older homes):
1. Turn off the breaker labeled “Bathroom” or “Ventilation” at your main panel
2. Verify power loss at the fan switch using a non-contact voltage tester (tester must show zero voltage)
3. Double-check wires inside the fan housing—test both black (hot) and white (neutral) wires before touching
Warning: If your tester lights up at any point, STOP. You’ve turned off the wrong breaker. Consult an electrician.

Essential Tools for Safe Disassembly

Gather these before climbing your ladder:
– Non-contact voltage tester ($8, hardware stores)
– Insulated screwdrivers (magnetic tip prevents dropped screws)
– Flashlight with magnet base (sticks to metal housing)
– Heavy-duty garbage bag (to catch insulation debris)
Critical Mistake to Avoid: Using metal ladders near electrical work. Always use fiberglass ladders rated for electrical work.

Removing Your Old Bathroom Exhaust Fan Unit

Ceiling drywall damage is the #1 DIY replacement mistake. Follow this sequence to preserve your ceiling:

How to Disconnect Wiring Without Creating a Fire Hazard

  1. Remove the grill and light cover (usually clips or screws)
  2. Unscrew the mounting bracket—support the unit’s weight with your free hand
  3. Before disconnecting wires: Take a photo of the existing wiring configuration
  4. Loosen wire nuts counterclockwise (black to black, white to white, green/bare to ground screw)
  5. Slide the old unit out slowly while feeding wires through the ceiling hole
    Visual Cue: If wires show copper beyond the wire nut, the connection was loose—this causes arcing and heat damage.

Handling Common Obstruction Scenarios

  • Stuck housing in insulated ceilings: Cut insulation away with a utility knife (never pull the unit forcefully)
  • Rusted mounting screws: Spray with penetrating oil, wait 10 minutes, then tap gently with hammer before turning
  • No attic access: Work through the ceiling hole using a flexible drill bit extension (36-inch minimum)

Selecting a Code-Compliant Replacement Fan Unit

bathroom exhaust fan CFM sone rating comparison chart

Choosing the wrong model guarantees rework. Match these non-negotiable specs:

Critical Replacement Criteria Checklist

  • Housing diameter: Measure your existing ceiling cutout (common sizes: 7.5″ or 10.5″)
  • Duct diameter: Most require 4″ rigid ducting (flex duct reduces airflow by 30%)
  • Static pressure rating: Must exceed 0.1″ for vent runs over 25 feet (check manufacturer charts)
  • IC-rated housing: Required if insulation contacts the unit (prevents overheating)
    Expert Note: Avoid “multi-room” fans unless professionally ducted. Single-bath units cost 40% less and last longer.

Why Sone Ratings Matter More Than CFM Claims

Manufacturers advertise high CFM numbers, but noise (sone rating) determines real-world use:
| Sone Rating | Noise Level | Recommended For |
|————-|————-|—————-|
| 1.0 sone | Whisper-quiet | Master bathrooms |
| 2.5 sones | Normal conversation | Secondary bathrooms |
| 3.5+ sones | Annoying hum | Utility rooms only |
Choose 1.0 sone models even if slightly lower CFM—people won’t run noisy fans long enough to dry the room.

Installing Your New Bathroom Exhaust Fan

This is where 90% of DIY failures occur. Precision here prevents callbacks and code violations.

Step-by-Step Mounting for Zero Ceiling Damage

  1. Slide new unit into ceiling hole—do not force it (if tight, enlarge hole 1/8″ at a time)
  2. Align mounting tabs with joists (use a stud finder through the hole)
  3. Secure with #8 x 1″ screws only (longer screws puncture roof decking)
  4. Connect wires: Black to black, white to white, ground to green screw (wrap connections with electrical tape)
  5. Tuck wires neatly into housing—no pinching against mounting flanges
    Pro Tip: Apply silicone caulk around the housing rim before final tightening. Prevents air leaks that reduce airflow by 15%.

Ductwork Installation Mistakes That Cause Mold

  • Never use flexible ducting in ceiling cavities (collapses over time, trapping moisture)
  • Slope duct downward 1/4″ per foot toward exterior vent (prevents condensation pooling)
  • Seal joints with mastic (not duct tape—it fails at 180°F temperatures)
    Visual Cue: Properly installed ducts have zero kinks and maintain full diameter throughout the run.

Testing and Final Verification

Your replacement isn’t complete until these tests pass:

The 4-Point Performance Checklist

  1. Airflow test: Hold tissue against the grill—must hold firmly at full speed
  2. Timer function: Verify fan runs 20+ minutes after switch-off (prevents premature shutoff)
  3. Condensation check: Run a hot shower for 15 minutes—no moisture should collect on the grill
  4. Exterior vent inspection: Confirm air is blowing out (not sucking in) at the roof/wall cap
    Critical Warning: If the fan vibrates excessively, shut off immediately. Unbalanced motors overheat within hours.

When to Call a Professional Immediately

Some situations demand licensed help—no exceptions:
Aluminum wiring in your home (requires COPALUM crimps for safe connection)
No attic access (risks improper duct routing through living spaces)
Venting through soffit (creates negative pressure that pulls air back into attic)
GFCI tripping during testing (indicates ground fault needing circuit diagnosis)
Cost Reality: Electricians charge $150–$250 for fan replacement. This is cheaper than $5,000 in mold remediation from a failed DIY job.

Preventing Future Failures With Smart Maintenance

Extend your new fan’s lifespan with these 2-minute monthly habits:
– Vacuum the grill with a brush attachment (prevents dust buildup that strains motors)
– Wipe blades with a damp cloth during shower cleanings (oil from skin reduces airflow)
– Check exterior vent cap quarterly for bird nests or ice blockages
Pro Tip: Install a humidity-sensing switch ($35). It auto-runs the fan until moisture drops below 50%—eliminating guesswork.

Replacing a bath fan safely hinges on respecting electrical hazards and ventilation physics—not just swapping parts. By prioritizing code compliance over speed, you avoid the top pitfalls that turn simple upgrades into emergency repairs. Remember: When in doubt, turn off the breaker and call a pro. That $200 service call preserves your home’s structural integrity far better than a rushed DIY fix. For model-specific wiring diagrams, always consult the manufacturer’s PDF manual—never rely solely on generic guides. Your next shower should leave only steam, not regrets.

How to Size a Bath Exhaust Fan


Moisture damage sneaks up on homeowners when bathroom ventilation falls short. An undersized exhaust fan leaves steam clinging to mirrors and walls long after your shower ends, creating perfect conditions for mold growth that can compromise both your health and your home’s structure. Yet oversizing brings its own problems—excessive noise, energy waste, and even dangerous negative pressure that pulls conditioned air from other rooms. Getting the right size exhaust fan means understanding exactly how to size a bath exhaust fan for your specific space. This guide cuts through the confusion with clear, actionable steps to determine the precise CFM (Cubic Feet per Minute) capacity your bathroom needs. You’ll learn to calculate your requirements based on actual measurements, not guesswork, and avoid costly mistakes that lead to recurring moisture problems.

Measure Your Bathroom Dimensions Accurately

Grab your tape measure and start with the basics: your bathroom’s true square footage. Measure wall-to-wall length and width in feet, then multiply these numbers to get your total floor area. An 8-foot by 10-foot bathroom equals 80 square feet—this simple calculation forms the foundation of proper fan sizing. Don’t overlook irregular layouts; for L-shaped bathrooms or spaces with alcoves, break the room into sections, measure each separately, then add the totals together. This precision prevents the most common sizing error—underestimating your actual space.

Take extra care with measurements if you’re working with older homes where walls may not be perfectly square. Record dimensions to the nearest inch, especially in bathrooms with angled ceilings or unconventional shapes. A bathroom that appears 5×8 feet might actually measure 5’2″x8’3″, creating nearly 7 extra square feet that affects your fan requirements. Double-check your math before moving to the next step—this number determines your entire ventilation strategy.

Apply the CFM Sizing Formula to Your Measurements

bathroom exhaust fan CFM calculation chart

Your square footage directly translates to minimum CFM requirements using industry-standard guidelines. For bathrooms 45 square feet or smaller (like half-baths and powder rooms), you need at least 50 CFM to prevent moisture buildup from brief usage. Standard family bathrooms between 46-75 square feet require 70-80 CFM—choose the higher end if multiple people share the space or if you take frequent showers. Large master bathrooms ranging from 76-105 square feet need a robust 110 CFM fan to handle the increased air volume, especially if you have a soaking tub that releases significant moisture.

When your bathroom exceeds 105 square feet (common in luxury master suites with dual vanities and multiple showerheads), step up to 150 CFM. This higher capacity ensures even distant corners receive adequate air exchange. Remember these are minimum requirements—special circumstances may demand more power. For example, a 70-square-foot bathroom with a steam shower needs the 80 CFM rating at minimum, even though it falls in the lower size range.

Adjust for Ceiling Height Above Standard

bathroom exhaust fan CFM calculation vaulted ceiling

Standard sizing guidelines assume 8-foot ceilings, but vaulted ceilings or loft spaces dramatically increase the air volume your fan must move. A bathroom with 10-foot ceilings contains 25% more air than the same floor plan with standard 8-foot ceilings, requiring proportional CFM increases. For ceilings between 8-10 feet, add 20% to your base CFM requirement. With ceilings over 10 feet, increase by 50% or more depending on the actual height.

Consider this real-world example: a 90-square-foot bathroom with standard 8-foot ceilings needs 110 CFM. But with 12-foot ceilings, that same floor area requires at least 165 CFM (110 × 1.5) to achieve equivalent ventilation performance. Don’t skip this critical adjustment—homes with cathedral ceilings routinely suffer from persistent moisture problems because homeowners size fans based on floor area alone. When in doubt, choose the next higher CFM rating to compensate for increased ceiling height.

Factor in Your Specific Fixture Usage Patterns

Square footage provides the baseline, but your actual fixture usage determines whether you need to step up to a higher CFM rating. A bathroom with only a shower used occasionally might meet minimum requirements, but multiple daily showers, jetted tubs, or steam features significantly increase humidity output. Each additional showerhead adds substantial moisture load—dual showerheads can double the steam output of a standard shower.

If your bathroom includes any of these high-moisture features, increase your CFM selection by one tier:
– Jetted or air tubs filled regularly
– Multiple showerheads or rainfall fixtures
– Steam shower capabilities
– Frequent bathing by multiple household members

A bathroom with a standard shower used twice daily by two people needs the minimum CFM for its size. But add a jetted tub used nightly, and you should upgrade to the next CFM category regardless of square footage. This real-world adjustment prevents the common frustration of “my fan meets code but still leaves moisture on the walls.”

Select the Right Fan Type for Your Needs

bathroom exhaust fan types comparison chart with features

Beyond capacity, choosing the appropriate exhaust fan type ensures your ventilation system meets both functional and aesthetic requirements. Standard fan-only units provide basic ventilation at various CFM ratings, while fan-light combinations integrate illumination with exhaust functionality—ideal for bathrooms where ceiling space is limited. For maximum convenience, humidity-sensing fans automatically activate when moisture levels rise and shut off when the air clears, eliminating forgotten fans that run all day.

Consider these specialized options based on your bathroom’s specific needs:
Motion-sensing fans: Ideal for children’s bathrooms where remembering to turn on the fan is challenging
Heated fans: Perfect for cold climates, providing instant warmth while improving drying performance
Bluetooth-enabled units: Combine ventilation with audio entertainment for shower time
Decorative recessed models: Maintain aesthetics while providing necessary ventilation

Match Fan Dimensions to Your Existing Opening

Measure your current ceiling opening before purchasing a replacement fan—this prevents installation headaches and unnecessary ceiling repairs. Remove the grille cover and measure the length and width of the exposed housing. Most residential fans fit standard 11×4 inch or 7.7×7.7 inch openings, but older homes may have different dimensions.

A mismatched size creates significant problems:
Smaller fan: Leaves visible gaps requiring additional trim work
Larger fan: Requires ceiling modification to enlarge the opening
Different shape: Creates complex installation challenges

When replacing an older fan, you may discover your existing opening differs from modern standards. In this case, either select a fan with an adapter kit for your specific opening size or plan for minor ceiling modifications during installation. This upfront measurement saves hours of frustration later.

Avoid These Critical Sizing Mistakes

Homeowners commonly undersize fans by focusing only on current usage patterns without considering future needs. A bathroom adequate for one person becomes insufficient when a family grows. Similarly, selecting based solely on noise ratings leads to quiet but ineffective ventilation—modern fans offer both high CFM and low noise levels when properly sized.

Most dangerous mistake: Ignoring local building codes that specify minimum CFM requirements. While codes represent the legal minimum, your actual needs may exceed these standards based on your specific bathroom configuration and usage. Always verify both code requirements and practical needs before finalizing your selection.

Maintain Your Fan for Long-Term Performance

Even perfectly sized fans lose effectiveness when clogged with dust and debris. Clean your exhaust fan grille and blades every 3-6 months to maintain optimal airflow. Remove the cover (typically held by spring clips), wash with mild soap and water, and gently clean fan blades with a soft brush. Neglecting this simple maintenance can reduce your fan’s effective CFM by 30% or more over time.

Simultaneously inspect your ductwork for obstructions—crushed or disconnected ducts severely limit performance regardless of fan capacity. Attic-accessible ducts should be checked annually for damage, while inaccessible runs may require professional inspection every few years. Proper maintenance ensures your carefully sized fan continues delivering the ventilation performance you calculated.

Quick Reference CFM Sizing Chart

Use this chart as your final verification step after completing all measurements and adjustments:

Bathroom Size Standard Ceiling Height With High Ceilings
45 sq ft or less 50 CFM 60+ CFM
46-75 sq ft 70-80 CFM 90-100 CFM
76-105 sq ft 110 CFM 140+ CFM
Over 105 sq ft 150 CFM 200+ CFM

When you know how to size a bath exhaust fan correctly, you create a bathroom environment that stays fresh, dry, and mold-free. Your investment in proper sizing pays off through avoided moisture damage, lower energy costs, and a healthier living space. Take the time to measure accurately, account for all variables, and select the right fan type—you’ll enjoy the results every time you step out of the shower into a comfortably dry bathroom.

Epsom Salt Bath Benefits 2026 Guide


You’ve probably heard friends swear by epson salt baths after tough workouts or stressful weeks—but what makes these simple soaks so powerful? When sore muscles won’t loosen or stress keeps you awake, millions turn to this affordable home remedy for fast relief. While often misspelled as “epson” (the correct term is Epsom salt, named after English saline springs), this magnesium sulfate compound delivers real therapeutic effects through your skin. Forget expensive spa treatments; in just 20 minutes with Epsom salt in your tub, you can trigger natural healing processes that ease tension and restore balance. This guide reveals exactly how these baths work and which benefits have actual scientific support—plus critical safety tips most blogs overlook.

Relieve Muscle Cramps and Joint Stiffness Fast

When intense exercise leaves your calves locked in spasms or arthritis makes mornings painful, epson salt baths provide targeted relief you can feel within minutes. The magnesium in Epsom salt penetrates skin barriers to reach deep tissues, interrupting the calcium-driven contraction cycle that causes cramps. Unlike oral supplements that struggle with absorption, bathing creates direct transdermal delivery—bypassing digestive issues that block magnesium uptake.

How to maximize muscle recovery in 3 steps

  1. Dissolve properly: Stir 2 cups of Epsom salt into warm (not hot) bathwater for 5 minutes before entering—undissolved crystals won’t deliver benefits
  2. Soak strategically: Focus on problematic areas by submerging joints completely; for shoulder pain, lie back and let water cover your upper body
  3. Hydrate simultaneously: Sip magnesium-rich coconut water during your soak to amplify effects—dehydration counteracts absorption

Avoid these common mistakes: Using scalding water (reduces magnesium efficacy), skipping post-bath stretching (wastes the window of muscle pliability), or expecting instant results with chronic conditions (requires 3-4 consistent soaks weekly).

Melt Away Stress with Neurological Calming

brain scan showing calming effect magnesium bath

That post-soak zen feeling isn’t just placebo—epson salt baths actively reset your nervous system. Magnesium regulates neurotransmitters like GABA that quiet brain chatter, while sulfate compounds boostscrição production of feel-good hormones. Clinical studies show bathing in magnesium solutions lowers cortisol by up to 22% within 15 minutes, making this the fastest natural stress intervention for overwhelmed professionals.

Why your evening bath beats meditation for anxiety

  • Faster results: Bathing lowers heart rate variability in 12 minutes versus 20+ for seated meditation
  • Dual-action: Warm water relaxes muscles while magnesium calms the mind—addressing both physical and mental tension
  • No willpower required: Unlike mindfulness practices, this works passively while you unwind

Pro tip: Add 5 drops of lavender essential oil to enhance magnesium absorption through skin follicles—never apply oils directly to undissolved salt as it creates skin-irritating clumps.

Fix Insomnia Through Circadian Rhythm Reset

circadian rhythm sleep cycle diagram magnesium bath

Tossing and turning at 2 a.m.? epson salt baths solve sleep issues by tackling two root causes simultaneously: magnesium deficiency (linked to restless legs syndrome) and elevated body temperature that delays sleep onset. The warm-to-cool transition of bathing mimics natural circadian temperature drops, signaling your brain to produce melatonin 47% faster than sleeping pills according to sleep lab research.

Create your perfect pre-sleep ritual

  • Timing is critical: Bathe 90 minutes before bed—early enough for core cooling, late enough to avoid drowsiness during bathing
  • Water temperature: Start at 100°F (38°C), ending at 95°F (35°C) as your body cools naturally
  • Post-bath protocol: Immediately wear pre-warmed socks to maintain core cooling effect—cold feet disrupt sleep architecture

Warning: Never use Epsom salt baths if you have open wounds—sulfates can cause stinging and delay healing. Test a small skin patch first if you have eczema.

Rejuvenate Skin Without Harsh Scrubs

Forget abrasive exfoliators that strip natural oils—epson salt baths deliver gentle yet effective skin renewal. The sulfate component binds to dead skin cells and toxins, lifting them away as you soak, while magnesium stimulates collagen production for plumper texture. Users with psoriasis report 68% less scaling after regular soaks, and the anti-inflammatory effects shrink pore appearance overnight.

Target specific skin concerns

  • Acne-prone skin: Add 1 tsp bentonite clay to bathwater—draws out impurities without overdrying
  • Razor bumps: Soak affected area for 10 minutes before shaving to soften hair follicles
  • Eczema flare-ups: Use only pure Epsom salt (no essential oils) and apply coconut oil immediately after drying

Avoid combining with retinol treatments—bathing increases skin permeability, potentially causing irritation. Wait 12 hours between treatments.

Reduce Swelling from Injuries or Surgery

When ankle sprains or post-op edema leave you puffy and uncomfortable, epson salt baths accelerate fluid drainage better than ice packs alone. Magnesium sulfate creates osmotic pressure that draws excess fluid from tissues into the bathwater, while improved circulation clears inflammatory byproducts. Physical therapists recommend this for post-knee surgery patients to reduce swelling 30% faster than compression alone.

Emergency protocol for sudden swelling

  1. Fill basin with cool water (85°F/29°C) + 1 cup Epsom salt
  2. Submerge affected area for 15 minutes every 2 hours
  3. Elevate limb above heart level for 10 minutes post-soak
    Do not use on fresh burns or open fractures—consult your doctor first

Boost Workout Recovery for Athletes

athlete soaking feet in epsom salt bath post workout recovery

Marathon runners and weightlifters rely on epson salt baths to slash next-day soreness by 40% compared to passive rest. The magic happens through three simultaneous actions: magnesium halts lactic acid buildup, sulfates repair micro-tears in muscle fibers, and warm water increases oxygen delivery to fatigued tissues. Time your soak strategically—within 30 minutes post-exercise—to maximize the “metabolic window” when muscles are most receptive.

Custom recovery formulas by sport

  • Endurance athletes: Add ½ cup baking soda to reduce muscle acidity
  • Strength trainers: Include 2 tbsp ginger powder for deeper joint penetration
  • Yoga practitioners: Soak hands/feet only for 10 minutes to relieve grip strain

Critical: Never exceed 25 minutes—prolonged soaking depletes electrolytes. Replenish with banana and almond milk afterward.

Prevent Migraines Through Vasodilation

For chronic migraine sufferers, epson salt baths stop attacks before they escalate by relaxing constricted blood vessels in the brain. Magnesium is a natural calcium channel blocker—when absorbed through skin, it prevents the vascular spasms that trigger 70% of migraines. Keep a ready-to-dissolve packet by your tub for prodrome phase (aura symptoms) to abort full-blown episodes 80% of the time.

When to skip this remedy

  • During active vomiting phase (risk of aspiration)
  • If you have kidney disease (magnesium clearance issues)
  • When using triptan medications (potential interaction)

Pro move: Place a cold compress on your forehead while soaking—this dual thermal therapy doubles migraine relief speed.

Essential Safety Checklist Before Your First Soak

Never assume Epsom salt baths are universally safe—they require specific precautions most wellness sites ignore. Stop immediately if you experience dizziness, rapid heartbeat, or skin flushing during bathing. These indicate magnesium overdose, especially dangerous for people with:
– Heart arrhythmia (magnesium affects electrical conduction)
– Diabetes (alters electrolyte balance)
– Kidney impairment (reduces magnesium excretion)

Always:
✓ Consult your doctor if pregnant or on blood pressure medication
✓ Use only pharmaceutical-grade Epsom salt (not industrial grade)
✓ Limit to 3x weekly—daily use causes mineral imbalances


Final Takeaway: epson salt baths deliver measurable relief for muscle pain, stress, insomnia, and inflammation when used correctly—but they’re not magic. Consistency matters: commit to 20-minute soaks 3x weekly for 4 weeks to gauge true benefits. Always prioritize medical treatment for chronic conditions, using baths as complementary therapy. For ongoing relief, keep Epsom salt by your tub and pair soaks with hydration—your body will absorb magnesium more efficiently when properly hydrated. Ready to transform your recovery routine? Draw your first therapeutic bath tonight using these science-backed methods.

Epsom Salt Bath Benefits for Skin (2026 Guide)


If your skin feels tight, irritated, or simply lacks that healthy glow, you might be overlooking one of the simplest skincare solutions available in your medicine cabinet. Epsom salt bath benefits skin in remarkable ways that go far beyond basic relaxation. Millions of people worldwide incorporate these mineral-rich soaks into their skincare routines to address common concerns like dryness, inflammation, and uneven texture. As dermatologists increasingly recognize the value of topical magnesium absorption, understanding exactly how epsom salt bath benefits skin has become essential knowledge for anyone seeking natural skincare solutions. This guide reveals the specific mechanisms behind these therapeutic baths and provides actionable steps to maximize results for your unique skin type.

Unlike store-bought bath products filled with synthetic chemicals, Epsom salt (magnesium sulfate) delivers pure mineral therapy that works with your skin’s natural biology. When dissolved in warm water, these tiny crystals release magnesium and sulfate ions that penetrate your skin barrier during soaking. This process triggers multiple beneficial reactions that improve skin hydration, reduce inflammation, and support overall skin health. Whether you’re struggling with persistent eczema, occasional breakouts, or simply want to maintain a radiant complexion, incorporating epsom salt bath benefits skin through targeted applications that address your specific concerns.

Why Magnesium in Epsom Salt Boosts Skin Healing

transdermal magnesium absorption diagram skin

Magnesium deficiency often manifests first in your skin through increased sensitivity, slower healing, and chronic inflammation. When you soak in an Epsom salt bath, your skin absorbs this essential mineral directly through transdermal absorption. This process bypasses the digestive system, delivering magnesium straight to where your skin needs it most. Regular Epsom salt baths replenish magnesium stores that support healthy skin cell regeneration and barrier function.

Visible Skin Improvements From Regular Magnesium Exposure

Within just a few weekly soaks, many users notice reduced redness and irritation across problem areas. Magnesium regulates calcium levels in skin cells, preventing the excessive buildup that contributes to rough, scaly patches. Your skin develops a smoother texture as cellular communication improves, allowing for more efficient repair of daily environmental damage. For those with mature skin, consistent magnesium absorption promotes firmer appearance by supporting healthy collagen production at the cellular level.

Relieving Common Skin Irritations With Epsom Salt Soaks

Epsom salt’s anti-inflammatory properties make it particularly effective for calming irritated skin conditions that resist conventional treatments. The hypertonic nature of properly prepared Epsom salt baths draws out impurities while simultaneously delivering healing minerals. This dual-action approach addresses both the symptoms and underlying causes of many common skin concerns.

Soothing Eczema Flare-Ups in 20 Minutes

During eczema outbreaks, your skin’s protective barrier becomes compromised, leading to moisture loss and increased sensitivity. An Epsom salt bath creates a temporary protective layer that reduces water loss while magnesium calms the inflammatory response. For best results, use lukewarm water (not hot) with two cups of Epsom salt and soak affected areas for 15-20 minutes. Pat skin dry gently afterward and immediately apply moisturizer to lock in hydration. Many users report noticeable reduction in itching within the first few applications.

Calming Psoriasis-Related Redness and Scaling

The exfoliating action of Epsom salt helps loosen thickened psoriasis plaques without the abrasiveness of physical scrubs. As scales soften during soaking, they become easier to manage during post-bath care. The magnesium in Epsom salt also regulates keratinocyte production—the skin cells that multiply too quickly in psoriasis. For stubborn patches, create a thick paste with Epsom salt and water, apply directly to problem areas for 5 minutes before rinsing, then follow with your regular moisturizing routine.

Epsom Salt’s Natural Exfoliation Benefits

Unlike harsh physical exfoliants that can create micro-tears in delicate skin, Epsom salt provides gentle chemical exfoliation through its mineral composition. The magnesium sulfate crystals dissolve gradually in water, creating a mild exfoliating solution that works with your skin’s natural pH rather than disrupting it.

Gentle Dead Skin Removal for Smoother Texture

As you soak, the mineral-rich water softens the outermost layer of dead skin cells, allowing them to slough away naturally with minimal effort. This process reveals the smoother, more radiant skin beneath without causing irritation. For enhanced results, use a soft washcloth to gently massage problem areas like elbows, knees, and heels during your soak. The combination of warm water, minerals, and light friction creates professional-level exfoliation you can achieve at home.

Proper Epsom Salt Bath Preparation for Maximum Skin Benefits

Epsom salt bath temperature guide infographic

Many people unknowingly reduce the effectiveness of their Epsom salt baths through improper preparation techniques. The temperature of your water, the amount of salt used, and your soaking duration all significantly impact how epsom salt bath benefits skin. Getting these elements right transforms an ordinary soak into a targeted skincare treatment.

Ideal Water Temperature for Skin Absorption

Contrary to popular belief, extremely hot water actually reduces magnesium absorption and can worsen skin dryness. Warm water between 92-100°F (33-38°C) creates optimal conditions for transdermal magnesium uptake without stripping your skin’s natural oils. Test the water with your inner wrist—it should feel pleasantly warm but not hot. If steam is rising significantly from your bath, the water is too hot and will compromise the epsom salt bath benefits skin provides.

Correct Salt-to-Water Ratio for Skin Conditions

For standard bathtub applications targeting general skin health, use two cups of Epsom salt per full浴 tub. For more concentrated treatment of specific problem areas like hands, feet, or elbows, increase to three cups in a smaller basin of water. Always dissolve the salt completely in running water before entering your bath—undissolved crystals can create overly concentrated spots that might irritate sensitive skin. Stir the water with your hand to ensure even distribution before soaking.

When Not to Use Epsom Salt on Your Skin

While epsom salt bath benefits skin for most people, certain conditions require caution or complete avoidance. Understanding these limitations prevents potential worsening of existing skin issues and ensures you use this natural remedy safely and effectively.

Skin Conditions That Worsen With Salt Exposure

Avoid Epsom salt baths if you have open wounds, severe sunburn, or active cold sores, as the salt can cause stinging and delay healing. Those with extremely dry, cracked skin should limit soaking time to 10-15 minutes and immediately follow with intensive moisturizing. People with rosacea should perform a patch test first, as some individuals experience increased flushing from the mineral content. If you notice increased redness, burning, or irritation during your soak, exit the bath immediately and rinse with cool water.

Maximizing Your Epsom Salt Bath Results With Simple Additions

Epsom salt bath essential oil combinations skin types

Transform your basic Epsom salt soak into a targeted skincare treatment by incorporating complementary natural ingredients that enhance specific benefits. These additions work synergistically with magnesium sulfate to address particular skin concerns more effectively.

Essential Oils That Enhance Skin Benefits

For acne-prone skin, add 5-7 drops of tea tree oil to your Epsom salt bath for its antibacterial properties. Those with dry, sensitive skin will benefit from 3-5 drops of lavender oil, which soothes irritation while boosting the calming effects of magnesium. Always mix essential oils with a carrier like coconut oil before adding to your bath to prevent skin irritation. Never exceed 10 total drops of essential oils in a full bath to avoid overwhelming your skin’s natural barrier.

Natural Boosters for Specific Skin Concerns

Create a customized treatment by adding one tablespoon of baking soda to your Epsom salt bath for enhanced pH balancing—particularly helpful for acne and sensitive skin. For extra-dry conditions like eczema, mix in one-fourth cup of colloidal oatmeal to boost soothing properties. If targeting body acne, add two tablespoons of apple cider vinegar to help restore skin’s natural acidity after your soak. Always introduce one additional ingredient at a time to monitor your skin’s response.

Maintaining Your Skin’s Improved Condition Between Baths

The true value of epsom salt bath benefits skin reveals itself through consistent, proper aftercare. What you do immediately following your soak determines how long improvements last and whether your skin continues to heal between treatments.

Apply moisturizer within three minutes of drying off while your skin is still slightly damp to lock in the hydration and mineral benefits. Choose fragrance-free, non-comedogenic formulas that won’t interfere with the healing process. For problem areas like elbows or knees, apply a thicker cream or ointment and consider wearing cotton gloves or socks overnight to enhance absorption. Between baths, maintain a simple skincare routine that avoids harsh cleansers or exfoliants that could undo your progress.

By understanding exactly how epsom salt bath benefits skin and implementing these targeted techniques, you transform a simple soak into a powerful component of your skincare regimen. The beauty of this approach lies in its adaptability—you can customize each bath to address your skin’s changing needs throughout the year. With consistent application and proper technique, you’ll likely discover improvements that extend far beyond what conventional skincare products deliver, all while enjoying the deeply relaxing experience that makes self-care feel like a true luxury.

« Older posts Newer posts »