Your bath spout has started leaking, or perhaps you’re renovating your bathroom and need to update that outdated fixture. Whatever the reason, changing a bath spout ranks among the most accessible plumbing projects you can tackle yourself—requiring only basic tools and typically taking under an hour to complete. Unlike complex faucet repairs that involve intricate internal mechanisms, most bath spout replacements connect through simple slip-on or threaded connections that even novice DIYers can handle successfully. The water supply usually shuts off at the fixture level, eliminating the need to drain your entire plumbing system. By following this guide, you’ll gain the confidence to replace your bath spout without calling a plumber, saving both time and money while improving your bathroom’s functionality and appearance.
Before grabbing your tools, understand that approximately 70% of residential bath spouts use slip-on connections, making them the most beginner-friendly option for replacement. Threaded connections account for most remaining installations, with diverter spouts (which redirect water to your shower) representing a specialized subset. The key to success lies in correctly identifying your spout type before purchasing a replacement, as mismatched fixtures lead to frustrating installation failures. This guide walks you through every critical step—from identification and preparation to installation and troubleshooting common problems—ensuring your bath spout replacement project succeeds on the first attempt.
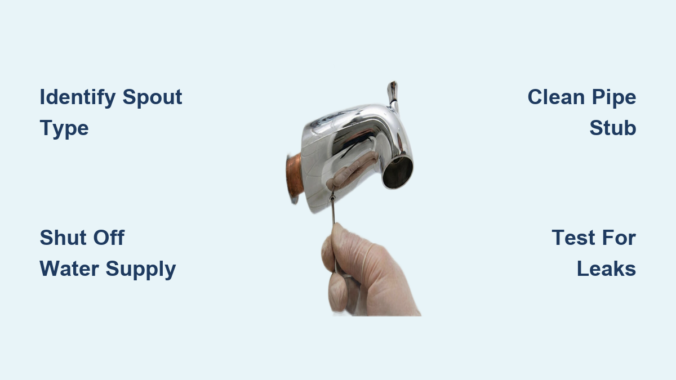
Identify Your Exact Bath Spout Type Before Buying Replacement

Selecting the wrong replacement spout creates immediate installation problems, so take five minutes to determine your specific connection type before heading to the store. Your spout’s attachment method dictates everything from tool requirements to installation technique, and confusing slip-on with threaded connections is the most common DIY mistake in bath spout replacement.
Spot Slip-On Spouts by Finding the Hidden Set Screw
Slip-on spouts dominate modern bathrooms with their simple design: a hollow tube that slides onto a copper pipe stubbing from your wall, secured by a set screw underneath the spout body. To confirm you have this type, look for a small screw hole on the spout’s underside where it meets the wall—often requiring a mirror for visibility. When you find it, that tiny set screw is your key to removal; loosen it counterclockwise and the spout should slide right off. Most slip-on spouts require at least one inch of exposed copper pipe for proper installation, so measure your pipe stub before purchasing a replacement.
Recognize Threaded Spouts by Their Hexagonal Grip Points
Threaded spouts attach directly to male-threaded nipples in your plumbing system, featuring female threads inside the spout inlet that screw onto matching pipe threads. Identify this type by the hex-shaped section near the spout base—designed specifically for wrench grip—or by observing if the spout unscrews rather than slides off. Threaded connections commonly appear in homes with galvanized steel or brass plumbing, particularly in older constructions. When replacing threaded spouts, always apply fresh PTFE tape to the threads to prevent leaks, wrapping clockwise with three to five complete layers before installation.
Verify If You Have a Diverter Spout Before Removal
Diverter spouts contain an internal valve that redirects water from your tub to shower when activated, featuring a distinctive operating lever or knob on the spout body. If your bathtub includes a shower function controlled by a lever directly on the spout itself, you’re working with a diverter model that requires special attention during replacement. Before removing the spout body, always detach the operating lever first—typically secured by a small screw or clip—to avoid losing internal components like washers or springs. When purchasing a replacement, ensure the new diverter spout matches your existing model’s internal mechanism, as incompatibilities prevent proper water redirection.
Gather These 6 Essential Tools Before Starting Your Project
Having the right tools ready prevents mid-project frustration and ensures you complete your bath spout replacement efficiently. Most households already own several of these items, and the remaining tools cost less than $20 at any hardware store while serving countless future household projects.
Must-have tools for bath spout replacement:
– 10-inch adjustable wrench (for threaded connections)
– Screwdriver set (Phillips and flathead for set screws)
– Hex key set (for Allen-type set screws)
– Plumber’s putty (for sealing slip-on spout bases)
– PTFE tape (for threaded connections)
– Sandpaper (150-220 grit for pipe cleaning)
Pro tip: Keep a small bucket and towels nearby to catch water that may spill during removal—most pipes retain residual water even after shutoff. A flashlight or headlamp also proves invaluable for seeing connection points clearly, especially in poorly lit bathrooms.
Shut Off Water Supply Correctly to Prevent Floods
Improper water shutoff causes 80% of DIY plumbing disasters, so take time to verify your water is completely off before removing the old spout. Most bathrooms feature shutoff valves under the adjacent sink, in a nearby closet, or behind an access panel near the tub.
Locate and Test All Relevant Shutoff Valves
Begin by closing the main bathroom shutoff valves completely, then open both hot and cold faucet handles to release pressure and drain remaining water from the pipes. For bathtub-only replacements, check for dedicated shutoff valves behind an access panel—often hidden behind the fixture or within a neighboring vanity. After closing all valves, test by turning on the tub faucet; no water should flow. If you detect dripping, locate and close the main house shutoff valve before proceeding.
Critical warning: Never assume shutoff valves work properly—always verify water is off before removing plumbing fixtures. A single missed valve can release gallons of water into your walls within minutes.
Remove Your Old Bath Spout Without Damaging Pipes
With water confirmed off and tools ready, begin removal using the technique specific to your spout type. Rushing this step often damages pipes or walls, creating problems far worse than your original leak.
Remove Slip-On Spouts by Loosening the Set Screw First
Locate the set screw on your slip-on spout’s underside using a mirror if necessary. Apply penetrating oil if the screw resists turning, waiting 15 minutes before attempting again. Once loose, gently twist and pull the spout outward—never force it, as excessive pressure can crack pipes. After removal, clean the copper pipe stub with sandpaper until bright metal appears, ensuring optimal contact with your new spout.
Unscrew Threaded Spouts While Protecting Internal Pipes
Threaded spout removal requires special care: always secure the threaded nipple with a second wrench while turning the spout counterclockwise. Failing to brace the nipple can twist pipes inside your walls, causing catastrophic leaks. Apply steady, even pressure rather than jerking motions, and wrap old towels around the connection point to catch debris during removal.
Install Your New Bath Spout in 4 Critical Steps

Proper installation prevents future leaks and ensures years of reliable service. Rushing this phase creates problems that often require complete reinstallation.
Prepare the Pipe Stub for Optimal Seal Formation
Whether installing slip-on or threaded spouts, begin with a clean, smooth pipe surface. For slip-on connections, sand the copper stub until shiny and free of burrs, then wipe clean with a dry cloth. For threaded connections, remove all old PTFE tape and inspect threads for damage—replace the nipple if threads appear stripped or corroded.
Apply Sealant Correctly Based on Connection Type
Slip-on spouts: Roll plumber’s putty into a thin rope and apply around the spout base where it meets the wall. Slide the spout fully onto the pipe before tightening the set screw.
Threaded spouts: Wrap PTFE tape clockwise around nipple threads (3-5 layers), then hand-tighten the spout before applying final 1/2 turn with a wrench. Never overtighten—this cracks spout bodies and strips threads.
Verify Proper Alignment Before Final Tightening
With the spout partially secured, check its orientation: the outlet should point downward at a slight angle for optimal water flow into the tub. Adjust positioning before final tightening, as correcting alignment after full installation often requires complete disassembly.
Test for Leaks Before Calling the Job Complete
Turn water supply back on slowly while watching the connection point. Check for drips at both the pipe connection and wall interface. For diverter spouts, operate the lever multiple times to confirm proper water redirection between tub and shower. Address any leaks immediately by tightening connections incrementally—never force connections beyond snug tightness.
Fix These 3 Common Installation Problems Immediately
Even careful installations sometimes develop issues—knowing how to address them prevents water damage and avoids starting over.
Spout Won’t Seat Fully Against the Wall
This usually means your pipe stub isn’t long enough (minimum 1 inch required) or contains debris. Clean the pipe thoroughly with sandpaper, and if still too short, install a pipe sleeve extender before proceeding with installation.
Set Screw Won’t Tighten or Keeps Loosening
Stripped threads cause most set screw problems. Replace the screw first; if that fails, install a helicoil insert to restore thread integrity. For recurring loosening, apply thread-locking compound to the screw before installation.
Diverter Mechanism Fails to Redirect Water
Mineral deposits often prevent proper diverter function. Remove the mechanism and soak components in white vinegar for 30 minutes to dissolve buildup. Replace any cracked or hardened rubber seals before reassembly.
Choose the Right Replacement Spout for Your Tub Configuration
Selecting inappropriate length or finish creates functional and aesthetic problems down the road. Measure your tub depth and existing pipe projection before purchasing.
Spout length guide:
– 3-4 inches: Deep recessed tubs (water surface close to wall)
– 5-6 inches: Standard alcove tubs (most common)
– 7-8 inches: Deep soaking or clawfoot tubs
– 9+ inches: Oversized tubs with distant edges
Finish considerations: Chrome shows water spots but cleans easily; brushed nickel hides spots better; matte black offers modern appeal but shows scratches; oil-rubbed bronze provides traditional warmth but requires special cleaners.
Maintain Your New Bath Spout for Long-Term Reliability
Proper maintenance extends spout life and prevents premature replacement. Clean weekly with mild soap and water, avoiding abrasive cleaners that damage finishes. Annually inspect seals and connections for wear, replacing rubber components at first sign of cracking. For hard water areas, soak mineral deposits with vinegar weekly to prevent buildup that affects performance.
When changing bath spout fixtures, remember that most installations succeed with proper preparation and patience. If you encounter persistent leaks after multiple attempts or need to modify plumbing pipes, consult a professional plumber—some situations exceed DIY capabilities. But for the vast majority of homeowners, this guide provides everything needed to complete a successful bath spout replacement that enhances both function and appearance of your bathroom.
Leave a Reply