Your bird bath has become a favorite gathering spot for neighborhood songbirds, but you’ve noticed cracks forming in the concrete and water seeping through the base. Without proper sealing, your bird bath won’t survive another winter—freeze-thaw cycles will only worsen these cracks until the structure fails completely. Learning how to seal bird bath properly isn’t just about preserving your garden decor; it’s essential for maintaining a safe, clean water source that won’t contaminate with crumbling materials. This guide delivers the exact sealing process professionals use to protect bird baths from water damage, UV deterioration, and seasonal extremes.
Choose the Right Bird Bath Sealant for Your Material Type

Selecting the appropriate sealant makes or breaks your entire project. Using the wrong product leads to premature failure, wasted money, and potentially harmful chemicals leaching into water where birds drink and bathe. Your bird bath’s material determines which sealant will provide lasting protection.
Concrete and Stone Bird Bath Sealing Solutions
Porous materials like concrete, natural stone, and terracotta require penetrating sealants that soak deep into the material rather than forming a surface coating. These sealants—typically containing silanes, siloxanes, or fluoropolymers—create an invisible hydrophobic barrier within the pores while allowing the material to breathe. This prevents trapped moisture from causing spalling and cracking during freeze-thaw cycles.
Critical selection tip: Always choose sealants specifically labeled safe for wildlife and aquatic environments. Standard masonry sealers often contain biocides that kill algae but will also harm birds. Look for products with EPA approval for potable water contact or explicit “safe for bird baths” labeling. Expect to pay $15-$40 for quality penetrating sealants covering 100-200 square feet.
Resin and Fiberglass Bird Bath Protection
Non-porous resin and fiberglass baths need surface sealants that adhere to smooth materials. Marine-grade polyurethane or two-part epoxy coatings provide the best protection against UV damage and constant water exposure. Before application, lightly sand the surface with 120-150 grit sandpaper to create microscopic texture for better adhesion.
Pro tip: For existing resin baths with peeling finish, completely remove old coating before sealing. Resin sealants won’t bond properly to compromised surfaces, guaranteeing premature failure. Budget $25-$60 for professional-grade marine sealants that withstand years of outdoor exposure.
Metal Bird Bath Preservation Techniques
Cast iron, copper, and galvanized steel require rust-inhibiting sealants designed for constant water contact. Clear marine coatings formulated for boat hardware work exceptionally well, providing UV protection without trapping moisture against the metal surface.
Important consideration: Copper bird baths present a special case. If you want to preserve the bright copper finish, apply multiple thin coats of marine-grade clear coat. For the natural green patina look, skip sealing entirely—copper oxide is harmless to birds and creates beautiful aging.
Prepare Your Bird Bath Surface for Perfect Sealant Adhesion
Surface preparation accounts for 80% of sealing success. Many DIYers rush this step, only to watch their sealant peel off within months. Proper preparation ensures your sealant bonds permanently to the substrate.
Deep Cleaning Process Before Sealing
Begin with a thorough cleaning to remove all contaminants that prevent proper adhesion:
- Empty the bath completely and remove loose debris
- Scrub with white vinegar and water (1:1 ratio) to dissolve mineral deposits
- For stubborn algae, use a soft-bristled brush with mild dish soap
- Rinse thoroughly with clean water—no soap residue should remain
- Allow to dry completely for 24-48 hours in direct sunlight
Warning: Never apply sealant to a damp surface. Test dryness by placing plastic wrap on the surface; condensation forming underneath indicates trapped moisture that will cause sealant failure.
Repair Existing Damage Before Sealing
Inspect your bird bath for cracks, chips, and other damage. Small cracks in concrete can be repaired with hydraulic cement, while stone baths benefit from stone-colored epoxy fillers. Allow all repairs to cure for at least 48 hours before proceeding.
Critical step: Sand repair areas smooth after curing so they blend with surrounding material. Uneven repairs create weak points where water can penetrate beneath the sealant.
Apply Bird Bath Sealant with Professional Results
Now that your surface is properly prepared, it’s time for the actual sealing process. Follow these techniques to achieve even coverage and maximum protection.
Optimal Application Tools and Methods
Match your tools to your sealant type and bird bath material:
- Penetrating sealants: Use low-nap rollers for flat surfaces, soft brushes for textured areas
- Surface sealants: Foam brushes create the smoothest finish on non-porous materials
- Spray sealants: Ideal for detailed ornamentation but require careful masking
Pro technique: Apply sealant in thin, even coats rather than one thick application. For concrete baths, apply until the surface stops absorbing the sealant—this indicates full penetration. On non-porous surfaces, avoid pooling that leads to drips and uneven curing.
Multi-Coat Application Process
Most bird baths require at least two coats for adequate protection:
- Apply first coat in one direction, working from top to bottom
- Allow proper drying time (check product instructions—typically 2-4 hours)
- Apply second coat perpendicular to first coat for complete coverage
- For maximum durability, apply a third coat on high-wear areas
Expert tip: On concrete baths, the second coat should be applied when the first coat has dried to the touch but hasn’t fully cured—this creates a chemical bond between layers for superior protection.
Ensure Complete Curing Before Bird Bath Use
Rushing this stage is the #1 cause of sealant failure. Incomplete curing results in soft, easily damaged coatings that peel prematurely.
Curing Time Requirements by Sealant Type
| Sealant Type | Surface Dry Time | Full Cure Time | Water Test Ready |
|---|---|---|---|
| Penetrating Concrete Sealers | 2-4 hours | 48-72 hours | 72 hours |
| Marine Polyurethane | 4-6 hours | 72-96 hours | 96 hours |
| Two-Part Epoxy | 6-8 hours | 5-7 days | 7 days |
Critical warning: Never fill your bird bath before the full cure time has elapsed. Water exposure during curing compromises the chemical bonding process, resulting in poor adhesion and premature failure.
Weather Considerations for Optimal Curing
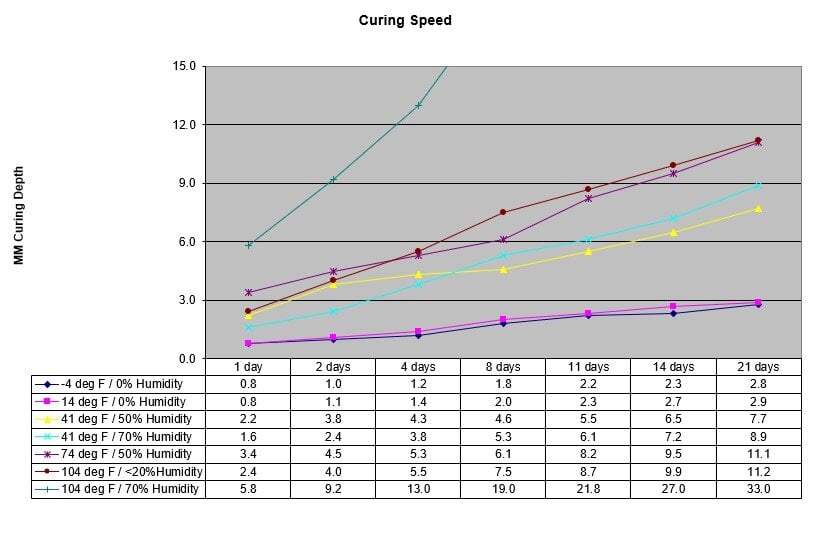
Temperature and humidity dramatically affect curing:
- Ideal conditions: 60-80°F with humidity below 60%
- Avoid sealing when temperatures will drop below 50°F within 48 hours
- High humidity (>75%) significantly extends drying times
- Never seal if rain is forecast within 72 hours
Pro tip: Morning applications allow maximum daytime curing before nighttime temperature drops. In cooler climates, aim for late spring through early fall for best results.
Maintain Your Sealed Bird Bath for Long-Term Protection
Even the best sealant eventually wears, especially with constant water exposure and seasonal extremes. Proper maintenance extends protection and prevents costly repairs.
Annual Maintenance Checklist
- Inspect monthly for cracked, peeling, or thinning sealant—especially at water line
- Clean gently with vinegar solution (never harsh chemicals or abrasive tools)
- Touch up problem areas immediately with matching sealant
- Plan resealing every 1-3 years based on climate and usage
Expert insight: Document your sealing dates and note performance issues. This helps establish the optimal resealing schedule for your specific climate and bird bath location.
Resealing Process for Existing Coatings
When it’s time for a full reseal:
- Clean thoroughly with vinegar solution
- Lightly sand existing coating with 220-grit sandpaper
- Remove all dust with tack cloth
- Apply new sealant following original application process
Warning: Never apply new sealant over peeling or compromised existing coating. Complete removal is necessary for proper adhesion of the new layer.
Avoid These 4 Costly Bird Bath Sealing Mistakes

Learning how to seal bird bath properly means understanding common pitfalls that lead to premature failure:
- Skipping surface prep – Dust, moisture, and contaminants prevent proper adhesion
- Using wrong sealant – Standard sealers often contain harmful chemicals
- Rushing curing time – Incomplete curing causes soft, easily damaged coatings
- Applying too thick – Thin coats cure properly; thick coats peel and bubble
Pro tip: When in doubt about sealant safety, contact the manufacturer directly and ask: “Is this product safe for constant contact with water that birds will drink and bathe in?”
Sealing your bird bath properly protects your investment and provides a safe, attractive water source for backyard birds for years to come. By choosing the right sealant for your material, preparing the surface thoroughly, applying correctly, and allowing complete curing, you’ll enjoy a bird bath that withstands seasons of use without deterioration. Take the time to seal your bird bath correctly today—your feathered friends will thank you with their joyful splashing all season long.
Leave a Reply