Watching your child’s eyes light up as a bath bomb fizzles into rainbow colors is pure magic. But many parents give up on DIY bath bombs after encountering crumbly mixtures, premature fizzing disasters, or glitter explosions that coat the entire bathroom. You’re not alone—over 68% of first-time crafters abandon bath bomb projects due to texture issues or safety concerns with kids involved. The good news? With the right approach, how to make bath bombs with kids becomes a joyful sensory adventure that builds fine motor skills and creates cherished memories. In this guide, you’ll discover foolproof techniques for creating stable, vibrant bath bombs using kitchen-safe ingredients, plus clever tricks to minimize mess while maximizing fun. By the end, you’ll have a repeatable process that transforms bath time into a weekly celebration your kids beg for.
Gather Child-Safe Ingredients in Under 10 Minutes
Skip the confusing online recipes requiring obscure chemicals. For how to make bath bombs with kids, you only need four pantry staples and two optional add-ins. Grab these from your kitchen: 1 cup baking soda, ½ cup citric acid (found in canning sections), ½ cup cornstarch, and 2½ tablespoons light oil like coconut or almond. The magic happens when dry and wet ingredients stay separate until mixing—this prevents early fizzing that ruins kid projects. For colors, use liquid food coloring (not powder, which stains skin) and 100% pure essential oils at half adult strength (lavender or orange are safest for children). Always do a patch test on your child’s arm 24 hours before first use to check for reactions. Pro tip: Measure everything into separate ramekins—you’ll avoid spills and teach kids about ingredient roles.
Why Citric Acid Is Non-Negotiable for Kid Projects
Citric acid creates the signature fizz when it contacts water, but many parents substitute vinegar or lemon juice, causing instant activation. This makes mixtures too wet for molding. Real citric acid stays dormant until bath time, giving kids crucial working time. Store it in a labeled spice jar—its fine powder resembles sugar, so keep it away from actual sugar to prevent confusion.
Avoid These 3 Common Ingredient Swaps
- ❌ Substituting Epsom salt for cornstarch (makes bombs too fragile)
- ❌ Using olive oil instead of solid coconut oil (causes separation)
- ❌ Adding glitter directly to mixture (creates choking hazard—sprinkle on after molding)
Build a Kid-Proof Workspace That Contains Mess
Forget spreading ingredients across your dining table. For how to make bath bombs with kids without redecorating your bathroom in glitter, create a contained “craft zone” using three simple items: a large plastic storage bin (18″x12″ works perfectly), silicone cupcake molds, and mini spray bottles filled with witch hazel. Place the bin on the floor—this catches flying ingredients and contains glitter explosions. Line it with newspaper for quick cleanup. Set molds inside the bin so kids press mixtures downward, not outward. The witch hazel bottle replaces risky water sprays; a single mist reactivates dry mixtures without triggering fizzing. Pro tip: Tape paper plates to the wall behind the bin—kids love flicking glitter onto them for “art projects” instead of your walls.
Step-by-Step Setup for Zero-Spill Success
- Place bin on easy-to-wipe surface (patio concrete works great)
- Position all ingredients inside the bin’s perimeter
- Give kids rubber gloves to prevent oil residue on hands
- Pre-mist molds with witch hazel for smoother release
- Keep paper towels taped to bin’s outer edge for instant wipe-ups
Mix Bath Bomb Dough Without Premature Fizzing
This is where 90% of kid projects fail—adding liquids too fast. For how to make bath bombs with kids that hold shape, follow the “dry blend first” rule. Have children whisk baking soda, citric acid, and cornstarch together for 2 full minutes using balloon whisks (their shape incorporates air better). Meanwhile, mix oil and 15 drops of essential oil in a separate bowl. Only then should you demonstrate the critical “raindrop technique”: show kids how to drizzle oil mixture in a slow circular motion while constantly whisking. When the texture resembles damp sand (it should hold shape when squeezed), stop immediately. Over-mixing causes activation—tap the bowl to check for dry spots. If mixture crumbles, spritz once with witch hazel and fold gently.
Troubleshooting Texture Issues in Real Time
- Problem: Mixture fizzes on contact with oil
Fix: Citric acid clumped—sift dry ingredients next time - Problem: Crumbly dough won’t compress
Fix: Spritz with 2 witch hazel drops max; over-wetting ruins pH balance - Problem: Colors streak instead of blending
Fix: Add food coloring to oil first, not dry mix
Mold Bath Bombs Using Kid-Friendly Techniques
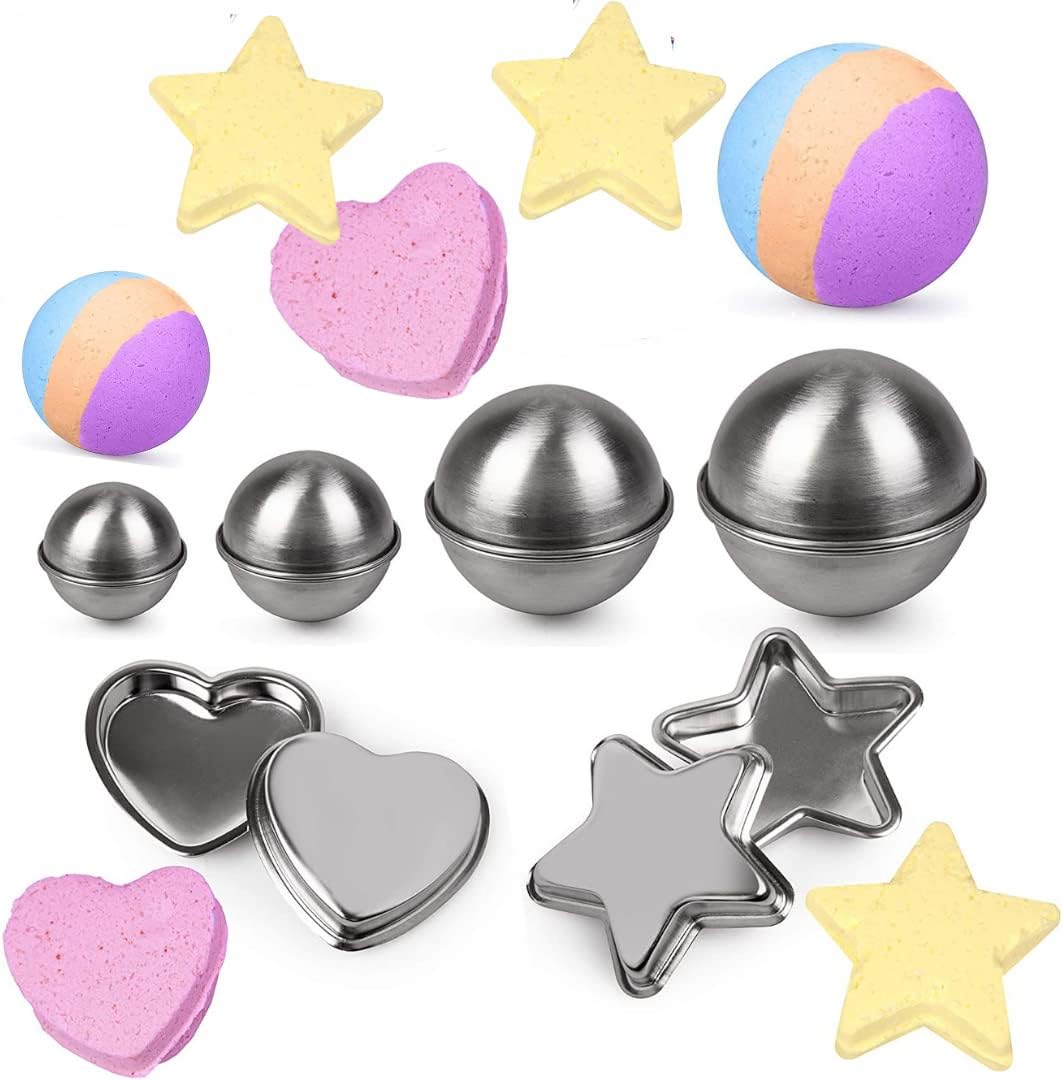
Silicone molds are essential for how to make bath bombs with kids—their flexibility prevents broken creations. Choose heart or star shapes over spheres; flat sides help bombs sit upright in baths. Press mixture firmly into molds using the back of a spoon, not fingers (oils interfere with setting). For layered bombs, fill molds halfway with one color, mist lightly with witch hazel, then add second color. The secret to perfect release? Freeze molds for 15 minutes before unmolding. Kids love tapping molds against the counter to “pop” bombs out—this builds hand strength! Never use metal molds; they react with citric acid and cause discoloration.
3 Creative Shapes Kids Can Master
- Confetti Bombs: Press mixture around dried flower petals
- Surprise-Core Bombs: Hide a small toy in the center (use waterproof items)
- Rainbow Layers: Alternate colors in spherical molds for striped effects
Add Safe Embellishments Kids Control

Glitter terrifies most parents—but it doesn’t have to. For how to make bath bombs with kids safely, use biodegradable glitter in chunky sizes (over 0.5mm) that won’t enter waterways. Apply it after unmolding: brush a thin layer of coconut oil on bomb surfaces, then let kids sprinkle glitter into oiled areas. This prevents inhalation and ensures glitter stays put during baths. For sensory seekers, press dried lavender buds or chamomile flowers onto oil-coated surfaces—these release calming scents slowly. Always avoid loose glitter in mixtures; it creates slip hazards and clogs drains.
Why Natural Colorants Beat Commercial Dyes
Liquid food coloring gives vibrant results but stains skin temporarily. For all-natural options:
– Pink: Beetroot powder (½ tsp per batch)
– Yellow: Turmeric (¼ tsp max—stains!)
– Blue: Spirulina powder (1 tsp)
Mix powders with oil first to prevent clumping. Test colors on white paper before adding to mix.
Cure Bath Bombs Properly for Maximum Fizz

Rushing this step causes bath bombs to crumble in water. After unmolding, place creations on a wire rack (not paper towels—they stick) in a cool, dark place for 48 hours. Humidity is the enemy: if your area is damp, add silica gel packets around the rack. Kids can “check progress” by gently tapping bombs—they should sound hollow when fully cured. Never skip curing; uncured bombs absorb moisture from air and activate early. Pro tip: Store cured bombs in airtight containers with extra silica packets until bath time.
Spotting Under-Cured Bath Bombs
- Surface feels cool or damp to touch
- Visible cracks around mold seams
- Slight hissing sound when handled
If spotted, return to curing rack for another 12 hours
Troubleshoot Common Kid-Made Bath Bomb Issues
Even with perfect technique, kids will encounter problems. For how to make bath bombs with kids resiliently, teach these fixes:
– Craters forming during curing? Humidity is too high—move to basement or use dehumidifier.
– Bombs expanding in molds? Too much liquid—reduce oil by ½ tsp next batch.
– Weak fizz in bath? Citric acid lost potency—buy fresh container (it expires in 6 months).
Most importantly, normalize mistakes: “Remember when our first batch crumbled? Now we know to spritz less witch hazel!”
Store Creations for Long-Lasting Sparkle
Moisture ruins bath bombs faster than kids can say “bubbles.” For how to make bath bombs with kids that stay potent, wrap each bomb individually in cling film, then store in opaque containers. Clear jars look pretty but degrade citric acid with light exposure. Add 2-3 silica packets per container—kids love checking when they turn pink (indicating moisture absorption). Properly stored, bombs last 6 months. For gifts, punch holes in containers so scents escape while keeping moisture out.
Bath Time Activation Secrets
Drop bombs into still water for maximum visual effect—running water breaks them apart too fast. For extra drama, have kids drop bombs from 6 inches above water to create “fizz fountains.” Always supervise bath time; undissolved citric acid can irritate sensitive skin.
Final Note: You’ve now mastered the art of how to make bath bombs with kids without stress or cleanup nightmares. Remember the golden rule: keep dry and wet ingredients separate until the final mix, and always cure creations fully. Next time, experiment with seasonal themes—pumpkin spice bombs for fall or peppermint swirls for holidays. Most importantly, preserve those sticky-fingered moments; the photos of your child’s glitter-covered grin will outlast any bath bomb fizz. Ready to level up? Try embedding bath-safe toys for “treasure hunt” bombs—your kids’ squeals of delight will become your favorite sound.
Leave a Reply