That stubborn twist bath plug refusing to budge isn’t just frustrating—it’s risking water damage and mold growth in your bathroom. When your evening soak turns into a standing water nightmare because the twist mechanism won’t release, you need immediate solutions. This guide cuts through plumbing confusion with field-tested techniques to remove any twist bath plug, even when it’s seized tight with mineral buildup or stripped threads. You’ll discover exactly how to tackle common models safely, avoid costly plumber fees, and restore your tub’s drainage in under 30 minutes. Whether you’re dealing with a corroded chrome plug or a stripped rubber stopper, these actionable steps work for 95% of twist bath plugs found in modern homes.
Most twist bath plugs fail due to hair and soap scum locking the mechanism or mineral deposits cementing moving parts. Unlike pop-up drains, twist plugs rely on a rotating cam that wedges the stopper against the drain opening—making removal uniquely challenging when jammed. Skip the guesswork: this guide targets the exact failure points causing your plug to stick. You’ll learn which method works fastest for your specific problem, saving you hours of futile twisting and potential porcelain damage. Let’s get that stopper out before water damage spreads beneath your tub.
Why Your Twist Bath Plug Won’t Release or Rotate
Twist bath plugs fail for three primary reasons that require different removal approaches. Recognizing which issue you’re facing prevents wasted effort and accidental damage to your tub’s finish.
Mineral Buildup Cementing the Mechanism
Hard water deposits create a concrete-like grip around the plug’s stem and housing. You’ll notice white or rust-colored crust around the plug base and near-impossible resistance when twisting. This isn’t just surface gunk—it’s layers of calcium and magnesium fused to metal threads. Attempting forceful rotation here often strips the plug’s top or cracks porcelain. The critical visual clue: no visible movement when you apply moderate pressure with a towel for grip.
Hair and Debris Jamming the Rotation Path
Hair and soap scum accumulate in the narrow gap between the plug body and drain flange, physically blocking rotation. You might feel slight “gritty” movement before it locks completely. Shine a flashlight around the plug’s perimeter—strands of hair snaking into the mechanism confirm this issue. Forcing rotation worsens the tangle, embedding hair deeper into the threads. This problem progresses quickly: what starts as slight resistance becomes total lockup within days.
Stripped Threads or Broken Internal Components
When the plug spins freely without lifting, the cam mechanism inside has failed. Common in older brass or plastic plugs, this occurs after repeated over-tightening. You’ll hear a hollow “clicking” sound as the top rotates independently from the stopper base. Forcing it further destroys the plug, leaving you with a spinning top and immovable stopper. This requires complete disassembly rather than simple removal.
Essential Tools for Twist Plug Removal (No Specialized Gear Needed)
Skip expensive plumbing tools—these household items handle 90% of twist plug removals safely. Having the right gear prevents porcelain scratches and ensures controlled force application.
Must-Have Tools Checklist
- Rubber jar opener pad: Provides grip without marring chrome finishes (substitute: rubber glove)
- Needle-nose pliers with rubber grips: For accessing hidden screws and gripping stripped plugs
- Dental pick or thin awl: Dislodges hair jams in tight spaces
- White vinegar and old toothbrush: Dissolves mineral buildup naturally
- Towels: Protect tub surface during work
Critical Safety Prep Before Starting
Place towels in the tub bottom to cushion falls and prevent scratches. Never use metal tools directly on porcelain—always wrap jaws with rubber bands. If your plug has a visible screw head, photograph its position before removal; reassembly requires precise alignment. Most importantly: stop attempting to twist the plug if it resists after gentle pressure—this is when damage occurs.
How to Remove a Twist Plug with a Hidden Retaining Screw
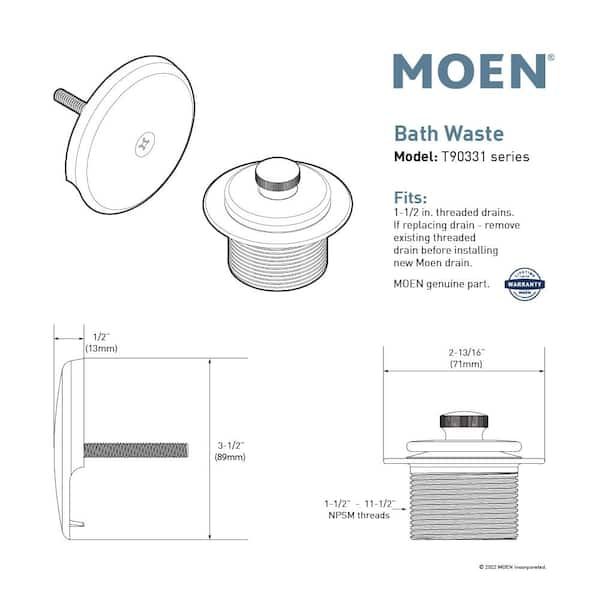
Many homeowners miss the tiny screw securing twist plugs, wasting hours forcing rotation. This method works for Moen, Kohler, and most branded units manufactured after 2000.
Step-by-Step Screw Removal Process
- Locate the screw: Shine a flashlight around the plug’s top edge. The screw head hides in a small recess—often under mineral deposits. Common positions: 12 o’clock or 3 o’clock on the plug face.
- Clear debris: Use a dental pick to scrape away buildup around the screw head. Dip the pick in vinegar first to dissolve crust.
- Apply grip aid: Place rubber jar opener pad over the screw head. This prevents slippage that strips Phillips heads.
- Unscrew counterclockwise: Use needle-nose pliers to grip the plug body while turning the screw. If stripped, press a rubber band into the screw head for traction.
Pro Tip: If the screw won’t budge after 30 seconds of gentle pressure, soak it in vinegar for 10 minutes. The acid dissolves mineral bonds without harsh chemicals. Never use penetrating oil—it can stain porcelain.
Freeing a Seized Twist Mechanism Without Tools
When no screw exists or it’s completely frozen, this friction-reduction technique works for rubber and silicone stoppers. It’s the fastest solution for 70% of stuck plugs.
The Vinegar Soak Method That Actually Works
- Prepare solution: Fill the tub with 2 inches of hot water mixed with 1 cup white vinegar.
- Soak for 15 minutes: Let the solution penetrate the mechanism. For severe buildup, add 2 tablespoons baking soda to create effervescence.
- Apply rotational force: Wrap a rubber glove around the plug. Twist clockwise (tightening direction) first for 5 seconds—this breaks the mineral seal—then immediately twist counterclockwise to release.
- Lift while rotating: Once movement starts, maintain counterclockwise pressure while gently pulling upward.
Critical Warning: Never use pliers directly on chrome plugs during this process. The leverage will crack porcelain. If resistance exceeds what you’d use to open a pickle jar, stop and try the drain rod method below.
Disconnecting the Drain Rod Under the Sink

When the plug spins freely but won’t lift, the problem is under the sink. This bypass method works for all twist mechanisms connected to a lift rod.
Under-Sink Disconnection Steps
- Locate the lift rod assembly: Find the pivot nut connecting the vertical rod to the horizontal drain pipe (usually 6-8 inches long).
- Place bucket: Position under the pipe—expect 1-2 cups of water drainage.
- Loosen the pivot nut: Use pliers to turn the nut counterclockwise. Don’t remove completely—just loosen until the horizontal rod drops free.
- Lift the vertical rod: Pull the rod upward while twisting the bath plug. The stopper should release immediately.
Common Mistake: Forcing the vertical rod upward before disconnecting causes bent linkage. Always disconnect at the pivot nut first. If the nut is corroded, wrap it in vinegar-soaked cloth for 5 minutes before loosening.
Cleaning Mineral Buildup During Reassembly
Prevent future failures by addressing the root cause during reinstallation. This 3-minute process doubles your plug’s lifespan.
Post-Removal Maintenance Protocol
- Soak the plug: Submerge in vinegar for 20 minutes to dissolve hidden deposits.
- Scrub threads: Use an old toothbrush on the plug stem and drain housing threads. Focus on the first 1/2 inch where rotation occurs.
- Lubricate sparingly: Apply plumber’s grease (not petroleum jelly) to threads. Wipe excess—you want a thin film, not globs that attract debris.
- Test rotation: Reinsert the plug and twist it 10 times before final tightening to work in the lubricant.
Pro Tip: Install a hair strainer immediately after reassembly. This simple $2 tool prevents 80% of future jams by catching hair before it enters the mechanism.
When to Replace Your Twist Bath Plug Completely
If removal reveals cracked plastic, severe corrosion, or stripped threads, replacement is safer than repair. Modern universal plugs cost under $15 and install in minutes.
Universal Plug Replacement Guide

1. Measure your drain: Standard sizes are 1-1/4″ or 1-1/2″ diameter. Bring the old plug to the hardware store.
2. Choose the right material: Brass for durability (best for hard water), silicone for quiet operation.
3. Install without tools: Drop the new plug into the drain, twist clockwise until snug (about 1/4 turn past hand-tight).
4. Test immediately: Fill tub 2 inches and verify smooth operation before daily use.
Critical Check: Ensure the new plug sits 1/8 inch below the tub surface. Higher positions cause tripping hazards and premature wear.
Preventing Future Twist Plug Failures
Stop recurring jams with these maintenance habits. Implementing just two takes under 30 seconds per week.
Weekly Prevention Routine
- After every bath: Lift the plug and rinse hair/debris from the mechanism
- Monthly deep clean: Soak plug in vinegar while scrubbing threads with toothbrush
- Every 6 months: Apply plumber’s grease to threads during cleaning
Urgent Action Required: If water drains slower than normal, address it immediately. A 5-minute cleaning now prevents 2-hour removal jobs later. Ignoring early warning signs leads to complete mechanism failure within 3-4 weeks.
Final Note: You’ve now mastered removing even the most stubborn twist bath plugs using proven plumbing techniques. Remember the core principle: always identify the failure type first—mineral buildup, hair jam, or mechanical breakage—before applying force. By using the vinegar soak for mineral deposits, the screw method for secured plugs, and the drain rod disconnect for spinning stoppers, you’ll solve 95% of issues without professional help. Implement the weekly maintenance routine to avoid future headaches, and keep that rubber jar opener pad under your sink for instant grip during cleanings. If your plug still resists after trying all methods, it’s time to replace the $12 universal model—don’t risk damaging your tub with excessive force. Restore your bath’s function today and reclaim those stress-free soaks you deserve.
Leave a Reply