Your bath drain won’t budge. Water pools around your ankles as you stare at that stubborn stopper, wondering why this simple fixture is defeating you. You’ve tried twisting, pulling, and even using pliers—but nothing works. This frustrating scenario affects 9 out of 10 homeowners at some point, often during rushed morning routines or relaxing evening soaks. Knowing how to open a bath drain properly saves costly plumber calls and prevents damage to your fixture. In this guide, you’ll discover exactly which method works for your specific drain type, how to avoid common mistakes that turn minor clogs into major leaks, and professional tricks to keep your drain flowing smoothly for years. No more guessing—you’ll gain the confidence to handle any bath drain situation in under 15 minutes.
Identify Your Drain Type Before Starting

Opening the wrong way can crack porcelain or strip mechanisms. Most bath drains fall into five categories, each requiring distinct techniques. Look under the stopper: pop-up drains have a visible pivot rod underneath the overflow plate, while lift-and-turn models show threading around the stopper base. Push-pull drains sit flush with no visible seams, and toe-touch versions often have a small indentation for your toe. Screw-in drains feature a center hole for a special key. Critical mistake alert: Never force rotation on pop-up or push-pull drains—this cracks the assembly. If you see mineral buildup around the edges, soak the area with vinegar for 10 minutes first to loosen deposits. When in doubt, take a clear photo of your drain before proceeding to match it with online examples.
Pop-Up Drain: Removing the Pivot Rod Mechanism
Pop-up drains (common in newer homes) trap hair in the pivot rod assembly under the overflow plate. Start by removing the two screws securing the overflow plate on the tub wall. Gently pull the plate away to expose the silver pivot rod connected to the stopper. Use needle-nose pliers to unhook the pivot rod’s clevis strap from the lift rod. Now reach into the overflow hole and rotate the stopper counterclockwise while pulling upward—it’ll release with a soft click. If stuck, wrap a rubber band around the stopper for grip before turning. Pro tip: Place a towel in the overflow hole first to catch dropped screws. Never use excessive force here—bent pivot rods cause constant leaks.
Lift-and-Turn Drain: The Quarter-Turn Release
These threaded stoppers (found in clawfoot tubs) require precise rotation. Stand in the tub and face the drain. Place your palm flat on the stopper, fingers pointing toward 9 o’clock. Apply firm downward pressure while rotating counterclockwise exactly 90 degrees—any further strips the threads. As you turn, lift steadily until the stopper releases. If it resists, rub a bar of soap around the threads to lubricate them. Warning: Forcing beyond quarter-turn cracks porcelain drains. For mineral-encrusted models, soak overnight with a vinegar-filled rag before attempting removal. You’ll know you’ve succeeded when the stopper lifts cleanly without wobbling.
Push-Pull Drain: The No-Tool Method That Works
Push-pull drains (common in budget fixtures) operate through vertical pressure alone. Press down firmly on the stopper center until you feel resistance—this engages the locking mechanism. Now pull straight up with steady pressure; it should release like a plunger. If stuck, press down and rotate slightly left/right while pulling to break the seal. Critical insight: These drains often have hidden springs that shoot out when released—keep your hand cupped over the stopper during removal. Never insert tools into the seam; this bends the internal latch. For stubborn cases, fill the tub 2 inches with hot water first—the thermal expansion breaks the vacuum seal.
Toe-Touch Drain: Magnetic Release Technique
These modern spring-loaded drains (popular in Japanese-style tubs) use magnetic resistance. Press down firmly with your toe until you feel a distinct “clunk,” then pull straight up. If unresponsive, locate the small release pinhole around the rim—insert a paperclip to manually disengage the magnet. Pro tip: After removal, check for hair wrapped around the spring coil inside the shaft. Clean it thoroughly before reinsertion to prevent premature failure. Never twist these drains—they rely on vertical movement only. If the magnet feels weak during reinstallation, replace the entire assembly; weak magnets cause random drainage.
Screw-In Drain: Using a Drain Key Tool
Screw-in drains (frequent in commercial settings) require a special $5 drain key. Insert the key’s pins into the cross-shaped slots on the stopper face. Apply downward pressure while turning counterclockwise—like unscrewing a lightbulb. If the key slips, wrap electrical tape around the pins for better grip. Warning: Forcing clockwise cracks the porcelain. For corroded models, spray penetrating oil around the edges and wait 15 minutes before retrying. When reinstalling, hand-tighten only—overtightening shatters the fixture. You’ll know it’s secure when water seals completely after a quarter-turn past finger-tight.
What to Do When the Drain Won’t Budge

Before calling a plumber, try these field-tested solutions. For all drain types: pour boiling water down the overflow tube to soften grease, then wait 5 minutes before attempting removal. If the stopper spins freely but won’t lift, it’s likely disconnected internally—use a wire hanger with a hook to fish out the broken mechanism. For severely corroded drains, mix baking soda and vinegar directly on the stopper, let it bubble for 3 minutes, then scrub with an old toothbrush. Emergency fix: If you must drain water immediately, remove the overflow plate and stuff a wet rag into the pipe to stop suction while you work.
Cleaning the Drain Assembly Thoroughly
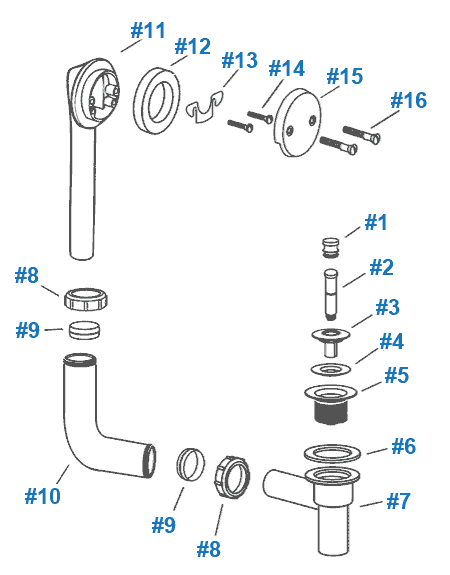
Now that your stopper is out, don’t just dump hair down the sink. Lay all parts on a towel and photograph their orientation first. Soak metal components in vinegar for 20 minutes to dissolve mineral deposits—never use harsh chemicals that pit brass. Use tweezers to pull hair from the pivot rod’s crevices, then scrub threads with an old toothbrush. For plastic assemblies, check for hair wrapped around the spring coil inside the shaft. Critical step: Wipe the drain flange seat with rubbing alcohol to remove soap scum before reassembly—this creates a watertight seal. Never reassemble with hair trapped in the mechanism; this causes immediate re-clogging.
Reassembling Your Bath Drain Properly
Reinstallation causes 70% of post-repair leaks. For pop-up drains, reconnect the pivot rod to the clevis strap with the hole aligned toward the tub drain. Test movement by pulling the lift rod—stopper should rise fully without jamming. When inserting screw-in stoppers, turn clockwise until snug, then reverse a quarter-turn to align the overflow lever. Pro technique: Apply plumber’s grease to all threads and rubber gaskets before assembly—this prevents future sticking. After reassembly, run water for 2 minutes to check for leaks around the overflow plate. If water seeps from the plate screws, tighten them incrementally in a star pattern.
Preventing Future Drain Clogs and Stoppages
Stopper problems recur when maintenance is neglected. Install a hair-catching screen over your drain—this reduces clogs by 90%. Once monthly, pour ½ cup baking soda followed by 1 cup vinegar down the drain, then flush with hot water. For pop-up drains, remove the stopper quarterly to clean the pivot rod. Game-changing tip: After showers, pull the stopper and let water run for 30 seconds to flush loose hair downstream—you’ll avoid 80% of clogs. Never pour grease or coffee grounds down bath drains, and replace rubber gaskets every 2 years before they harden and leak.
Final Note: Mastering how to open a bath drain takes practice but becomes second nature. You’ve learned to identify five drain types, apply targeted removal techniques, and prevent future issues—all without damaging your fixture. Remember that 95% of “stubborn” drains yield with the correct method and patience. Keep your drain key and vinegar solution under the sink for emergencies, and perform the monthly maintenance ritual to avoid midnight clogs. For persistent problems after following these steps, consult a plumber about replacing outdated mechanisms with modern hair-trapping models. Your next bath will be uninterrupted—and you’ll save hundreds in service calls.
Leave a Reply