Waterlogged bath squeeze toys might seem harmless, but they’re actually notorious breeding grounds for mold, mildew, and bacteria that can make your child sick. When your toddler squeezes that smiling duck during bath time, they’re potentially inhaling microscopic contaminants trapped inside the toy’s hidden chambers. The warm, moist environment combined with residual soap and organic matter creates the perfect storm for microbial growth that standard rinsing can’t eliminate. This comprehensive cleaning guide delivers proven methods to sanitize bath squeeze toys effectively—methods that pediatricians recommend to protect your child’s respiratory health while extending toy longevity.
Most parents don’t realize that the squeeze mechanism designed for fun actually works against hygiene. Each time your child squeezes the toy, they’re forcing contaminated bathwater deep into crevices where it becomes trapped, creating a hidden ecosystem for harmful microorganisms. Visible mold on the exterior is just the tip of the iceberg—what you can’t see inside poses the real danger. By implementing the right cleaning routine, you’ll transform these potential health hazards into safe bath companions that provide clean entertainment for months.
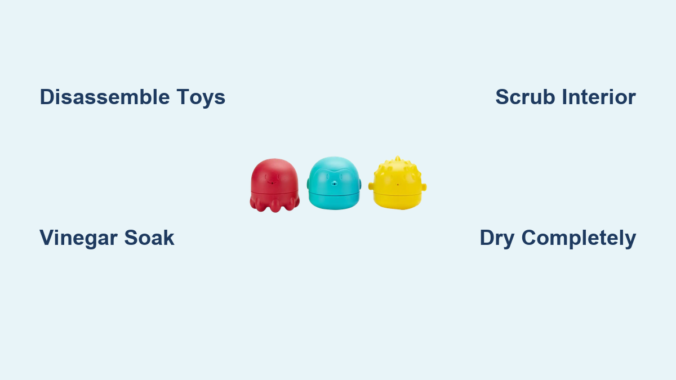
Gather Supplies Before Cleaning
Before tackling those moldy bath toys, assemble your cleaning arsenal to ensure a thorough sanitization process. Having everything within arm’s reach prevents interrupted cleaning sessions and guarantees you complete each critical step without cutting corners. The vinegar-based cleaning system we recommend uses household items that effectively eliminate mold without exposing your child to harsh chemicals.
Your essential cleaning kit should include:
- White distilled vinegar (5% acidity for optimal cleaning power)
- Baking soda for gentle abrasion and odor neutralization
- Unscented dish soap (free from dyes and artificial fragrances)
- Soft-bristled toothbrush for reaching tight spaces
- Microfiber towels for streak-free drying
- Large container for soaking (glass or food-grade plastic)
- Rubber gloves to protect your hands from mold exposure
Vinegar serves as your primary weapon against mold because its acetic acid content penetrates deep into toy crevices to destroy microbial colonies at their source. Unlike bleach, vinegar won’t leave toxic residues that could transfer to your child’s skin during bath time. The combination of vinegar’s acidity and baking soda’s mild abrasiveness creates a powerful cleaning duo that safely handles even stubborn mold growth without damaging toy materials.
Disassemble and Inspect Each Toy Thoroughly

Complete disassembly is the non-negotiable first step in effective bath toy cleaning—most squeeze toys feature snap-on or screw-off components that hide problem areas where mold thrives. Twist or pull apart each component carefully, keeping track of how pieces fit together for reassembly. This separation allows you to access interior surfaces that standard cleaning misses.
Examine each piece under bright light, paying special attention to the squeeze bulb interior, connection points, and any textured surfaces where moisture collects. Look for telltale signs of mold growth: black, green, or pinkish spots that indicate microbial colonies have established themselves. If you spot mold inside the squeeze mechanism that you can’t physically reach, consider replacing the toy immediately—no cleaning method can eliminate deeply embedded mold from inaccessible areas.
Check for physical damage that compromises the toy’s integrity. Hairline cracks, worn seals, or deteriorating plastic create perfect hiding spots for bacteria that cleaning solutions can’t penetrate. Toys showing these signs should be retired immediately, as they’ll continue harboring contaminants even after thorough cleaning. Document which toys pass inspection to establish your replacement schedule—most pediatricians recommend replacing bath squeeze toys every 3-6 months regardless of visible condition.
Vinegar Soaking Method for Deep Sanitization
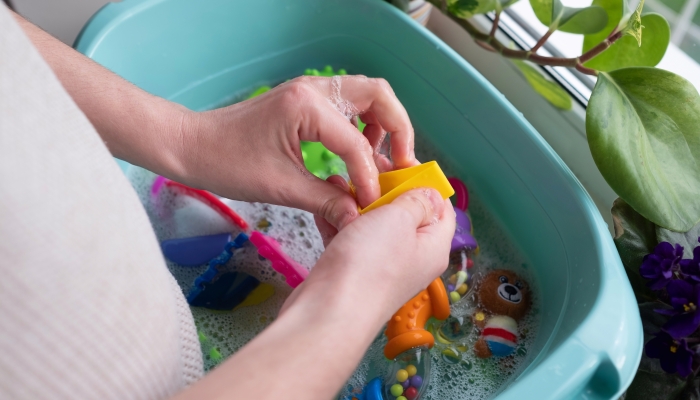
The vinegar soak provides the most effective deep cleaning for bath squeeze toys by reaching interior surfaces that scrubbing alone cannot access. Fill a large container with equal parts white vinegar and warm water (not hot, which could warp plastic components). Submerge all disassembled toy parts completely, ensuring liquid penetrates inside each squeeze bulb. For toys with narrow openings, use a turkey baster to force the solution inside.
Allow components to soak for 30-60 minutes—the acetic acid needs sufficient contact time to break down biofilm and kill mold spores at their source. During soaking, periodically squeeze the bulbs underwater to circulate the solution through internal chambers. Don’t be alarmed if the water turns cloudy; this indicates the vinegar is successfully dissolving organic buildup.
After soaking, remove pieces and rinse thoroughly under running water. The vinegar smell dissipates completely once dry, but proper rinsing ensures no residual acidity remains. For heavily contaminated toys, repeat the soaking process rather than extending soak time, as prolonged exposure won’t increase effectiveness and might damage certain plastics.
Scrub Interior and Exterior Surfaces Effectively
Post-soak scrubbing removes loosened residue and ensures complete sanitization of all surfaces. The interior squeeze mechanism requires special attention—this hidden area traps the most moisture and accumulates the most contaminants. Dip your soft-bristled brush into fresh vinegar solution and carefully insert it into each toy opening. Rotate the brush while applying gentle pressure to contact all interior surfaces.
For toys with particularly narrow openings, create a cleaning solution of baking soda and vinegar in the bulb itself: add one teaspoon baking soda, then squeeze in white vinegar until the bulb is half full. The resulting fizzing action creates mechanical agitation that dislodges stubborn buildup. Let the reaction work for 5 minutes before scrubbing with your brush.
Exterior surfaces need equal attention—scrub textured areas, ridges, and decorative elements where dirt accumulates. Pay special attention to the squeeze mechanism’s moving parts, which often harbor hidden mold colonies. Rinse each component thoroughly under running water, squeezing bulbs repeatedly to flush out any remaining debris from internal chambers. Proper rinsing prevents vinegar residue from irritating your child’s skin during future bath time.
Baking Soda Paste for Stubborn Stains and Odors

When standard cleaning fails to remove persistent stains or musty odors, baking soda paste provides targeted treatment without damaging toy materials. Mix baking soda with just enough water to form a thick paste—similar to toothpaste consistency. Apply this paste directly to stained areas using your fingertip or soft brush, working it into textured surfaces with circular motions.
Allow the paste to sit for 10-15 minutes while the mild alkalinity neutralizes acidic buildup and lifts stains. For particularly stubborn discoloration, wrap the treated area in plastic wrap to prevent drying and extend contact time. After the waiting period, scrub again with your brush using gentle pressure, then rinse thoroughly. The dual-action cleaning—chemical neutralization from the baking soda combined with mechanical scrubbing—effectively removes most stubborn stains without harsh chemicals.
This method works especially well for “pink slime” buildup (Serratia marcescens bacteria) that sometimes appears in bathroom fixtures. If the paste treatment doesn’t eliminate persistent odors or discoloration after two applications, consider replacing the toy—deeply embedded contamination likely remains.
Proper Drying Techniques to Prevent Mold Regrowth
Inadequate drying after cleaning guarantees rapid mold regrowth—many parents unknowingly undo their cleaning efforts by skipping this critical step. After rinsing, squeeze each component multiple times to expel trapped water, then shake vigorously to dislodge interior droplets. Position toys with openings facing downward to allow complete drainage—hanging them on a drying rack works perfectly.
Place components in a well-ventilated area with direct airflow, ideally near a fan or in sunlight if possible. Sunlight’s UV rays provide additional sanitizing benefits. Never reassemble or store toys until they’re completely dry to the touch inside and out—this typically requires 24 hours in average humidity. In damp climates, extend drying time or use a cool-setting hair dryer to accelerate the process.
Consider investing in a mesh bath toy bag that hangs in your shower—these allow toys to air-dry completely between uses while keeping them organized. Proper drying extends time between deep cleanings and significantly reduces mold risk.
Weekly Maintenance Between Deep Cleans
Implement these quick maintenance habits after every bath to dramatically reduce mold buildup between deep cleanings. Immediately after bath time, squeeze each toy repeatedly while still wet to flush out soapy water and debris. Then squeeze them completely dry—get out every last drop of water with firm pressure.
Store toys in an open container or mesh bag rather than a closed cabinet where moisture gets trapped. Some parents find success designating a specific shower caddy that hangs in the shower, allowing toys to air-dry continuously between uses. Wipe down exterior surfaces with a vinegar-dampened cloth once weekly to prevent surface mold.
This simple routine takes less than 30 seconds per toy but extends the time between deep cleanings from weekly to bi-weekly. Consistent maintenance prevents the heavy buildup that makes deep cleaning more difficult over time.
When to Replace Rather Than Clean Bath Toys
Know these critical warning signs that indicate it’s time to discard bath squeeze toys regardless of sentimental value. Persistent mold growth that returns within days of cleaning signals deeply embedded contamination that no surface treatment can eliminate. Visible mold inside the squeeze mechanism—especially black or pink varieties—means replacement is non-negotiable for your child’s safety.
Discard toys showing physical deterioration: cracks that trap water, warped shapes that prevent complete drying, or degraded plastic that feels sticky or brittle. These structural issues create perfect breeding grounds for bacteria that cleaning can’t address. Toys that develop persistent musty odors despite thorough cleaning should also be retired immediately.
Follow pediatricians’ recommendations to replace all bath squeeze toys every 3-6 months as a proactive health measure. Mark purchase dates on your calendar to stay on schedule—your child’s respiratory health is worth the small investment in new toys.
Prevent Mold Growth Long-Term with Smart Habits
Implement these prevention strategies to keep bath toys cleaner between cleanings and extend their usable lifespan. Always squeeze toys completely dry after each bath and store them in a well-ventilated area—never in a closed container where moisture gets trapped. Choose toys with simple designs and fewer crevices when purchasing replacements, as intricate shapes harbor more moisture.
Consider toys made with antimicrobial materials or featuring drainage holes that prevent water trapping. Some modern bath toys incorporate silicone construction that resists mold better than traditional rubber. Reduce soap residue buildup by rinsing toys with clean water before storing them after bath time—this simple step removes the organic matter mold feeds on.
Establish a cleaning schedule that works for your family: weekly deep cleaning for daily-use toys, bi-weekly for occasional use. Combine this with daily squeeze-and-dry habits, and you’ll dramatically reduce mold risks while keeping bath time fun and safe for your child.
Leave a Reply